Scanning documents is a process that involves digitizing physical media. Most often we are talking about ordinary paper sheets and documents (passport, birth certificate, ID and others). Simply put, we convert the original document into a digital file.
It is called a scan (scanned copy, image of a document). Opens on any electronic device that supports the file format. For example, a regular graphic file in .jpeg format can be opened both on a computer and on a mobile phone or tablet. Files can be sent by email.
What do you want to scan?
You can scan a document using a separate scanner designed only for this task. But most often you scan from a printer to a computer. In the latter case, we are not talking specifically about the printer. We are talking about a multifunctional device (MFP), which also includes a printer. This is a so-called 3 in 1 printer. Includes a printer, scanner and copier.
What can you scan?
You will be able to scan everything that fits on the glass of the scanning equipment (if we are talking about the familiar flatbed scanner with a lid). But it will not be possible to scan a very voluminous object.
The most common objects to scan:
- any ordinary sheets of A4 paper (abstracts, reports, contracts, statements, photographs, invitations, etc.);
- personal identification documents (passport, work pass, identity card, certificates, certificates, etc.);
- books, but not too thick so that you can successfully lean against the working surface of the scanner and cover them with a lid.
There are also larger scanners, which allows you to scan a document whose format is, for example, A3.
At home, in almost 100% of cases, conventional A4 format flatbed scanners are used.
Description of the scanning process
To read and convert information into digital format, the scanner contains a set of elements and parts. So, there is a working surface - glass, where the storage medium is placed. And under the glass there is a carriage that moves a lamp, photocells, a set of mirrors and glasses involved in creating the image.
The more photocells, the higher the resolution, which means the better the final quality.
How the scanner works:
- After starting, the carriage is driven by a motor and moves along the glass.
- While scanning, light from the lamp enters through the glass onto the carrier, is reflected and enters the matrix, or rather, into a system of many mirrors and pieces of glass.
- From the latter, light enters the photosensitive elements and an analog signal is created, which is determined by the strength of the light flux. That is, each photocell takes a specific voltage value for one line of the image.
- The signal is sent to a converter, the output of which is not an analog value, but a digital value.
- The last stage is the decoding of the signal by a computer and the creation of a scanned copy.
The finished scan is the result of combining many scanned lines, and not a solid image.
What you need for scanning
To use the scanner, you definitely need a computer (or laptop). You will also need a separate scanner or a full-fledged MFP. A regular printer will not work; it is intended for printing only.
Before scanning documents from the printer to your computer, both devices must be connected to each other. For this purpose, a USB connecting cable is almost always included with office equipment.
In short, the procedure for connecting the scanner to the computer is as follows:
- Connect both devices with a USB cable.
- Plug the scanner into a power outlet using a network cable. It can be either built-in or removable. In the latter case, you need to insert the cable into the printer (scanner) and into the outlet yourself.
- Press the power button on the case. If the MFP turns on, the mechanisms will immediately be heard.
- A running computer should detect the connected equipment and notify you about it. It may even start an automatic installation. If so, then you just need to wait until the installation is complete and you can try scanning or printing something.
- If automatic installation does not start, then you need to install the software (driver) manually. Inspect the equipment, find the disk. It is likely that the disk contains drivers that will allow the device to operate correctly and use all functions. Insert the disc into your computer's drive and start the installation. Complete the process by following the step-by-step instructions of the standard software installation wizard.
If there is no disk with the equipment, then you need to download the drivers yourself. In Yandex or Google search, enter the search query “driver [printer model].” Go to the official website of your device manufacturer.
The page should have a button or link to download the software called “Upload” or “Download”.
To ensure proper operation of your equipment, always download the full driver package. This is especially true if you own an MFP. Often for each node (printing, scanning and copying) you need to install its own driver. This is exactly one of the reasons why the printer does not scan. Many people install only the printer driver and forget about the scanner.
Connecting via a USB interface is the easiest and most common. But many modern devices support wireless communication.
If your equipment contains a Wi-Fi module, you can connect without cables. In this case, you will need to connect the computer and the scanning device to the same Wi-Fi network, which requires a router and an active Internet connection. More capable devices can create an access point themselves. This is the so-called direct connection (Wi-Fi Direct). Afterwards, run the driver on your computer and finish adding the device to Windows.
After the installation steps, you need to make sure that the MFP or scanning equipment works without problems.
- On your keyboard, press “Windows+R” at the same time.
- In the window that opens, enter “control printers” in the empty field and click “OK.”
- The Devices and Printers window appears. Using the model name of your equipment, find it among other devices.
In normal mode, the icon should not be translucent and contain warnings next to it. The latter are expressed in the form of bright marks (for example, exclamation marks).
If the device is not in the list of equipment, it means that the installation either was not performed or was unsuccessful. Repeat the procedure again until the icon appears.
Afterwards, you can start scanning, using the step-by-step instructions below.
Equipment
Currently, standalone scanners are giving way to multifunction devices. They print and scan sheets at the same time. There are different models on the market, and each of them has its own unique features.
Epson L3110
The device prints using inkjet technology. Its speed in black and white mode is 33 ppm, and in color – 15 ppm. Scanning speed is only 11 seconds. for one page. Supports sizes smaller and equal to A4. You can fit 100 sheets in the paper input tray and 30 in the output tray.
Price – approx. 17,000 rub.
Canon TS7440
Budget solution for home use. Printing using thermal inkjet technology - black 15 ppm. and color 10 ppm. Automatic two-sided printing helps a lot because you don't have to turn the pages yourself. It can scan sheets up to A4 size and print photos. Thanks to its small size, the equipment fits perfectly into any home office.
Price – approx. 11,000 rub.
HP Neverstop Laser 1200w
This model is a more extensive laser machine designed for a small office. It prints high-quality black and white documents at a guaranteed speed of 20ppm. and scans at 5.5 ppm. The paper input tray capacity is 150 sheets, and the output tray capacity is 100 sheets. The paper size is A4, and the toner supply is enough to print about 5000 pages. The equipment has a convenient display, but can also be controlled using a mobile application on your phone. Plus, AirPrint lets you print from your Mac or iPhone without the need to install special software.
Price – approx. 20,000 rub.
Epson L6190
This high-quality inkjet delivers consistent black and white and color printing at 33 ppm. and 20 ppm. The spacious paper feeder holds up to 250 sheets, and the output tray holds 30. The maximum print and scan size is A4. Convenient two-sided printing is a great additional option. The device has a built-in fax with a phone book for 60 entries. The printer is easy to use with an easy-to-read display and Wi-Fi connectivity.
Price – approx. 37,000 rub.
What else you need to know about MFPs
It is a set of three devices assembled into one unit - printing, scanning and copying (copier). The printer and copier work with ink, that is, they apply dye to paper. This means that as soon as the ink is used up, the printing will be blocked and it will be impossible to use these units. You can resume operation only after refilling or replacing the cartridge with a new one.
The situation with a scanner is different. This is an independent module that has nothing to do with ink.
Therefore, even when printing and photocopying is impossible due to lack of ink, you can start scanning.
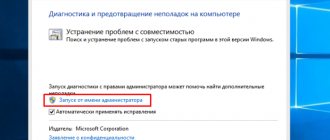
What to do if the device does not scan?
- "Start"
- "Control Panel"
- "Administration
- "Device Manager"
- Find scanner name
- "Image Processing Devices"
- Click on + - this is how you will find the model name
- download the driver for scanning.
- If everything is in working order, but scanning does not work, then download or upload the program for your MFP.
You also need to check the operating condition of the device, namely:
- Power supply unit (wire)
- Visible damage
- Mains voltage
- Grounding electrical wiring
- Restore and check settings
How to make a scan on a printer (MFP)
It makes no difference whether you want to scan on Canon or HP, Epson, Brother, Xerox, Kyocera or other brand printers. The algorithm of actions is the same everywhere. You need to place the media required for scanning, start creating a scanned copy on your computer and wait until the digital copy is ready.
Scanning instructions:
- Turn on the equipment and wait for the mechanisms to fully start. You can start when the device stops making sounds.
- Lift the top cover that covers the scanner glass. First, put down a regular, non-blank piece of paper. When positioning the sheet, follow the guide. The arrow indicates where the sheet should be placed. The arrow also corresponds to the top left part on the sheet.
- Close the lid back.
- Open “Devices and Printers” using the “Win+R” key combination and entering the “control printers” command.
- Right-click on the device icon and select “Start Scan”.
- The standard scanning tool in Windows “Scanner Wizard” will open. You need to set the necessary characteristics with which the output will be a scanned document. The parameters are described below.
- You can preview the scan. This may take a lot of time. Therefore, it is easier to immediately click on “Scan”.
- The progress bar will start.
- After scanning is completed, the system will prompt you to give a name to the scanned copy.
- After clicking on the “Import” button, the document will be placed in a new created folder, which will be named with the current date and the specified name. The directory is located in “My Computer” - “Images”.
Scan Options
You can obtain scans that meet the conditions necessary in each specific case. To do this, you need to set specific parameters and configure values. In accordance with them, the printer will provide a scan file at the output.
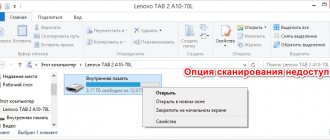
Some options in the screenshot and description below are unavailable or severely limited. Depending on the functionality of the device, the settings options will expand or narrow.
- Scanner. Click the “Change” button to select the device that will scan.
- Profile. You can add different sets of settings here so that you don’t have to set new parameters each time in different situations. We configured the settings once, for example, for scanning a passport. Next, save the profile, and in the future, when you need to scan your passport, select the appropriate profile. This way you can create any number of profiles.
- Innings. Determines how and where sheets of paper will be placed. There are different types of scanners. The most popular are tablets. The working area is located on top of the device under the lid. But there are also lingering scanners. The principle of paper feeding in them is similar to a conventional printer. The sheet is grabbed on one side and comes out on the other. Choose the feed format that suits your technique. Almost always the parameter is set as it should, since the system itself determines the characteristics of the equipment. Therefore, nothing needs to be changed.
- Paper size. The option is only available for very capable scanners in terms of media size. For regular A4 scanners, the line is inactive.
- Color format. Decide whether you need a color copy or black and white.
Color scanning is slower, and the finished file weighs much more than black and white.
- File type. Select scan extension. For general purposes, the regular .jpg image format is sufficient. Ideal for photographs and color images. If you need to scan diagrams and small elements, then select the “.png” format. The latest extension also allows you to make a transparent background. The ".bmp" format in most cases makes no sense to use. The file can be very large in weight on the computer. The ".pdf" extension is usually used for files that need to be sent via E-mail.
- Resolution (DPI). If the future scanned documents are drawings and diagrams, set it to the highest value. High resolution allows you to zoom in many times without losing quality. It can be useful if you then need to print the scan on a large format. The higher the DPI, the better the quality, but the size of the scan on the computer increases significantly. Also affects scanning speed.
- Brightness and contrast. If necessary, you can perform basic light correction on the scan.
A scanner is needed for scanning
Different levels of reflection allow the scanner to form a digital copy of the object being scanned. Simply put, the result of scanning is a file (or digital copy) containing a picture (more precisely, a photo), an exact copy of what is on the paper. There are scanners that can scan not only images on paper, but even three-dimensional objects.
There are several types of scanners. However, the most popular devices are those that allow you to work with text and graphic documents.
Most budget, inexpensive models are tablet-type devices. Here scanning (or photocopying) occurs as follows.
A sheet of paper with the information on it is placed on a special transparent window (glass) of the scanner and pressed on top with a tight lid. A stream of light rays are then directed onto the sheet, which are reflected from the scanned image and are captured, recognized and converted into a digital copy.
About the scanner device
The main element of the scanner is the matrix, which captures and recognizes the image. It comes in two types:
- CCD and
- CIS.
The first type of CCD is Charge Coupled Device - scanning an image using sensitive elements called CCD (charge coupled device) sensors.
The first type model has a matrix with a carriage with a built-in backlight. A system of focusing systems (lenses) collects the reflected light. To obtain a color image, it is divided into components of the color spectrum and captured by photocells.
This allows for rich and vibrant output images. Moreover, tightly pressing the sheet of paper with the scanned image to the scanner window is not required. Since the luminous flux is sufficiently intense to cover short distances. And this circumstance is very important for simple devices for widespread use.
Information in such scanners is processed at a fairly high speed. Disadvantages include the short lamp life and the need to use an external power supply.
The second type of CIS - capital letters for Contact Image Sensor - translates as "contact image sensor".
The CIS type matrix has a built-in carriage with photocells and LEDs. During the scanning process, it slowly moves along the copied object, turning on alternately LEDs of different colors (red, blue, green), which allows you to form a color image.
Such models are highly reliable. In addition, their cost is relatively low. The main disadvantages of the device include the need to press the paper tightly against the scanner window and the low scanning speed.
The main characteristic of these devices is the so-called color depth (24, 32, 42 bits) and resolution or simply resolution. The more bits in the device's resolution, the better the quality of the resulting image. Resolution is expressed as XXX (dot resolution):YYY (carriage pitches), for example 600:300 dpi (bits per inch).
Video 1 “How to prepare a scanner and document for the HP Laser Jet M1005 MFP”
The following video shows the operation of the scanner using the example of the HP Laser Jet 1005 MFP multifunctional device, which includes a b/w (black and white) printer, b/w copier and color scanner.
In the first video you can see how to prepare a scanner and how to position a document for subsequent scanning.
Start a scan
Before you start working with the scanner, you must
- connect the scanner to 220V,
- and also connect the scanner to a computer, usually via a USB port.
- It is also important to press the power button on the scanner, if there is one.
Then you need to place the document to be scanned correctly on the scanner window (text or picture down on the window, pressing it to the corner shown in the diagram printed right next to the scanner window).
So, the hardware was assembled and connected. Let's move on to its software control on the computer. To do this, click the “Start” button.
In the Start menu, click on “Devices and Printers”. A window opens as shown in Fig. 1:
Rice. 1. Where to find an MFP (printer, copier, scanner in one bottle) in Windows 7 if it is connected to a PC.
In Fig. 1 The number 1 indicates a printer (+scanner, +copier) that is connected and ready for use. Green checkmark in Fig. 1 shows the status of the printer (+scanner), that this particular printer is the “Default Printer”. This means that it will be used currently.
Right-click on the printer (+scanner). A context menu will appear, as in Fig. 2:
Rice. 2. How to start scanning?
In this menu we find the option “Start scanning” (number 1 in Fig. 2). The “New Scan” window will open (Fig. 3):
Rice. 3. New Scan window in Windows 7.
Scanning to a printer using Paint
The standard graphic editor of the Windows operating system also allows you to scan various documents onto your computer via a printer.
- Open Paint. In Win XP, 7-10, open the “Start” menu and look for the program in the “Accessories” folder.
- Place the document on the scanner glass.
- In Paint, at the very top left, click on “File” and select the “From Scanner or Camera” menu item.
- Select color. If necessary, click on the “Adjust scanned image quality” link. Next, set the necessary parameters.
- Click "Scan" and wait until scanning is completed. As a result, the image will appear in the working field of the Paint editor.
- Open the File menu again and select the destination file format from the Save As submenu. Select a save location on your computer.
Five scan settings
1) Before scanning, you can make settings if necessary. Let's start with the “ Color Format ” parameter (number 1 in Fig. 3). By clicking on the small triangle (number 1 in Fig. 3), you can select one of the formats:
- Colored
- Shades of Gray
- Black and white
I chose the Color format because I needed to scan a color postcard.
2) The next parameter is “ File type ” (number 2 in Fig. 3). This refers to the type of file that we will receive as a result of scanning. If desired, you can choose formats:
- BMP (Bitmap)
- JPG (JPEG Picture)
- PNG (Picture PNG)
- TIF (TIFF Picture)
I have selected the “JPG (JPEG Picture)” type, since this type allows you to store the file in a more compressed form and saves space on your hard drive.
3) The “ Resolution (DPI) ” parameter is indicated by number 3 in Fig. 3.
The lower the resolution is selected, the worse the scan quality. The minimum resolution is 75. The maximum for this device is 1200.
The higher the resolution, the better the quality of the resulting scan. But scanning will take longer and the resulting file (scan) will have a larger volume, that is, it will take up more space on the hard drive.
For my device, the recommended resolution is 300 dpi.
4) The “ Brightness ” parameter is highlighted with number 4 in Fig. 3. You can adjust the scanning brightness using the slider. I have the brightness set to 25, slightly to the right of the middle of the scale.
5) The scanning parameter “ Contrast ” is marked with number 5 in Fig. 3, adjustable by slider. In my case, the contrast is set to 0, that is, exactly in the middle of the scale. Brightness and contrast are selected experimentally. It is impossible to give precise recommendations here.
More standard scanning tools
Depending on the version of OS Windows, there are different tools for working with scans.
- Windows 7 has a Fax and Scan tool.
After starting the program, you need to click “New Scan” at the top, set the parameters and scan. - Windows 10 includes a separate dedicated scanning application. In the Start menu, in the list of all applications, or through search, find “Scanner.”
Launch the program, adjust the output quality and scan the required document.
The utility may not be available immediately after installing Windows on your computer. Then you will need to download “Scanner” from the official Microsoft Store (located in “Start”). The program is completely free.
How does the photocopying process work on a printer?
Photocopying is the exact reproduction of information (copying) and the production of duplicates on paper.
How to make a photocopy of documents?
- You will need an MFP
- Paper
- Refilling the multifunction printer
- Load paper into the input tray
- Clean the glass if necessary
- Place the document face down
- Align with the border of the guides (lines around the glass)
- Close the copier/printer cover
- Select print color from the control panel
- If you need many copies of the same document, click the Start button several times.
- (At one time, depending on the device, you can make from 1 to 20 copies at a time.)
- To change the paper format, press the “paper” button
Programs from office equipment manufacturers
To perform basic actions, you can use standard Windows tools. But in order to manage the printer (MFP) fully and expand the functionality to the maximum possible, manufacturers are developing their own utilities.
The program interface and set of features may be slightly different. But the general principle of obtaining an electronic copy of a document from a physical one is the same.
List of software:
- HP Scan;
- Epson Scan;
- Xerox Easy Printer Manager;
- Canon MF ToolBox.
Manufacturers Samsung and Kyocera also have their own developments. Programs are available for download from official sources.
Why are scans needed?
Previously, scans were used only for digitizing old, worn-out documents, books, and photographs. This way you can save valuable materials in electronic form, which will no longer be subject to aging.
Now computer scans are being used for more tangible operations.
For example, copies have become widespread in the legal, medical, and especially accounting industries. In many cases, there is no need to make physical photocopies and take them to offices. All you need to do is scan the document and send the file by email.
The scan you have made can be easily edited at your discretion, as you will be able to scan in a very large size of good quality. Afterwards, it is possible to examine even small elements by zooming in on the image on a computer. For example, these include drawings, electronic circuits, various design work, etc.
Internet entrepreneurs use scans very often, since many accounting, confirmation and payment acceptance services require you to provide personal data. And confirmation of the data is just a personal photo of the passport or a scanned copy.
By providing a scan, you can even take out a small loan on the Internet.
Therefore, sharing information with third parties is strictly not recommended.
Other programs for creating scanned copies of documents
There is no need to turn to third-party software. The above scanning methods fully satisfy the needs of the average user. Moreover, they are completely safe and free.
But, if there are any problems or you need to get additional functions, you can use the services of other developers. The list of functions for receiving electronic versions of documents on a computer is almost identical.
- FineReader. The software costs money, but for testing you can install the free version or use it online. In addition to standard scanning, it can read text from a document and save it to a file with the possibility of subsequent editing.
- ScanLite. A lightweight utility for simple and fast scanning. You just need to launch the software from a shortcut on the desktop, set the save path and name of the copy.
- RiDoc. Has a wide range of choice of final formats for computer documents. If there is such a need, you can use the software. Otherwise, it is better to resort to the previously discussed options.
- WinScan2PDF (free). The purpose of the program is scanning to a PDF file.
- VueScan. In terms of functionality, it bypasses standard tools with the ability to recognize text. Otherwise the functionality is standard.
What is the difference between scanning and copying?
The initial stages of scanning and copying are the same. First, the document is read, the only difference is the result obtained.
- When scanning to a computer, the user receives an electronic file in a convenient format (JPG, PNG, PDF, BMP, TIF). And the task itself cannot be completed without a personal PC. To work, you will need an MFP or a separate scanner.
- When a photocopy is created, the output is a printed black and white or color copy on a regular landscape sheet. When transferring information, liquid ink is used if the device is inkjet, or powder toner if the printing technology is laser. The cartridge where ink or toner is stored needs to be refilled regularly. You don’t need a computer to use it; copying is started with a button on the body of the copier or MFP.
Choosing the best option from both is incorrect, since each situation requires a different action.
If you need to store information for a long time on your computer hard drive, flash drive or phone, choose scanning. And when you need to quickly get an identical copy of an existing document to solve a quick problem, make a photocopy. For example, you need to give someone a sample of a printed application.
Scan is…..
A scan is a digital version of a real paper document.
Digital “images” are created by carrying out the scanning process with a special device - a scanner. The result is saved on computer disks or flash drives in the form of images as pdf, jpg, png and other files, and over time they lose their quality. In the digital era, document management is increasingly being saved in scans. This saves space in archives, where large areas for storing paper are no longer needed. Thousands of files can be stored on one hard drive of a PC or server. The use of this storage format has found its popularity in various sectors of human life. And most often in accounting, medicine, law. At the same time, paper versions of important documentation are also saved. But working with digital ones is much more convenient and easier.
When scanned in good quality, the company's seals and person's signatures will be clearly visible on the image. This makes it possible to fully use a scan of a document instead of the original. Already, a digital copy of a passport allows you to get a small cash loan or use many government services. Together with a digital signature, they can completely replace the originals.
How to use the scanner?
2 options for scanning a document to a computer:
- Editable
- Not editable
Editable document - a scan of the document is loaded through a recognizer (special software)
A non-editable document is a scan of a document that turns any text document into a non-editable image.
How to scan documents to your computer using a printer
Scanning documents – transferring information from physical media into electronic form (for more details, see the article: what is scanning). You can make a scan with a separate device (scanner) or use an MFP (multifunction device). The latter technology includes several devices and is often called a 3-in-1 printer. It includes a printer, scanner and copier (copier). In both cases, scanning any document is very easy.
Below are step-by-step instructions on how to scan documents from your printer to your computer. This article is also relevant for individual scanners. It’s easy to make sure that you can make scanned copies through the printer - look at the documentation for the equipment or lift the top cover of the device. If there is clear glass underneath the latter, then you can both scan and make photocopies of documents. So, you are the owner of all-in-one equipment.
To avoid damage to equipment, it is important to follow the correct procedure when working with connection cords. First, connect the USB cable to the printer, then to your desktop computer or laptop. Then plug the power cord into the outlet. Only after this can you press the power button located on the case.
In most cases, after connecting the printer to the computer via a USB cable or an air connection (Wi-Fi), Windows will automatically detect the device, search for and install drivers. After installation is complete, the device will appear in the list of all equipment in the “Devices and Printers” item. The printer icon should not be “light” or contain any icons near it (for example, exclamation marks).
If the indicators on the printer body are blinking, indicating that there is no ink in the cartridges, scanning will still be possible, since ink is not used in this case. Only the scanner starts up. There are often cases when a printer is no longer used due to the high cost of purchasing new cartridges. There is no need to throw away your equipment, because you will always be able to use the scanner.
The installation situation is different when nothing is done automatically. Then you need to use the disk, which often comes with the equipment, and contains the driver necessary for the operation of all components of the device.
You can scan any media that does not interfere with the top cover closing. Of course, ordinary sheets of paper are always scanned, and small paper media (brochures, money, passports, photographs, etc.), plastic elements, and books can be digitized.
How to make a scan on a printer
Let's look at the process of creating a scan on an HP Deskjet 2130 MFP printer. The model is very old, but the scanning principle will be similar to other printers. You just need to turn on the printer, put the media under the cover, and start scanning on your computer in any convenient way.
The driver for the HP 2130 printer includes a program, inside of which there is also a scanning option, for which a separate item is responsible. The software is installed by default along with the Drov installation.
Launch the program and once opened, select “Scan” from the “Print & Scan” menu. The HP Scan utility will launch.
Select the required scanning option. Set the appropriate parameters for the document and click on “Scan”.
The printer will scan the media and offer to save the document to any location, having previously specified the desired file name.
You can open a scan with any graphic editor, but the easiest way is to use the standard “Image Viewer” tool.
How to scan to a computer through the Windows Printer Wizard - MFP.
- Lift the lid
- If there are foreign bodies, wipe the scanner glass
- Place the sheet of text or photo face down
- Close the scanner cover
- Open the tab in the “Start” system and sequentially open: “Control Panel” - “Hardware and Sound” - “Devices and Printers”
- Right-click on the shortcut with the name of your MFP
- "Start Scan"
- Options: “Preview” - “Scan”
- The scanned document will appear in a pop-up window
- “Save”, or, if necessary, send the file for printing.
Scan to Windows using manufacturer's software
Equipment manufacturing giants such as HP, Samsung, Xerox, Canon, Epson or Brothers (and many others) offer to install a proprietary software package with device drivers.
While ordinary users rarely encounter problems when printing documents, scanning is a completely different matter. Using software from the manufacturer greatly facilitates and expands the user's capabilities.
Branded programs are intuitively simple. If the device is paired with a computer and the drivers are installed correctly, the user just needs to open the program, select the desired button (“Scan”), receive images and save it in the desired format. Often you don't even need to change the default settings.
Using software from the printer manufacturer makes bulk scanning of documents much easier. Typically, programs save scanned images in order, for example, IMG-0001, IMG-0002, etc. The user can set the desired name and starting point independently. Thus, each page of the document is in a separate file, and the necessary pictures are easy to find.
Scan to Windows using Paint
Not all users know about the advanced capabilities of the OS and specific software. But even children are familiar with the standard Paint program. This utility can help with scanning documents for those users who are not too eager to dive deeply into the system settings.
To get a scan it is enough:
- turn on the device,
- open Paint,
- place the document on the scanner,
- close the printer cover,
- select “From a scanner or camera” in the “File” tab.
In the window that opens, the user just has to select an available MFP and click the “Scan” button.
We save the resulting image in a convenient resolution (PNG, JPEG, GIF), under the desired name in the specified folder.
Scanning via Paint
Launch the graphic editor Paint. You can open the program using search in Windows 8-10. On Windows XP, open the Start menu, find the Accessories folder, inside which Paint will be.
Next, open the editor’s main menu and select “From a scanner or camera.”
A scanning window will open, where you can select the color of the image, perform a preview, scan immediately and even adjust the quality (resolution, brightness and contrast).
Click “Scan” and wait for the operation to complete. The digitized image will appear in the editor's working field.
Saving the file is done in the main menu through the “Save As” item, where there are several formats to choose from (bmp, png, jpeg, gif and others).
This option allows you to scan to your computer from a printer as quickly as possible. If necessary, you can immediately format the scan using Paint, which is offered on the top panel of the editor.
Scanning to Mac OS: instructions
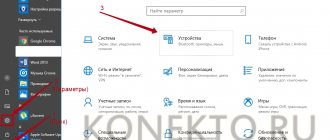
To see the list of available devices on the Mac operating system, the user needs to enter the main menu of the computer, select “System Preferences” and find the “Printers & Scanners” tab.
In the window that opens, select a multifunction printer from the list of available ones. You can add a new device using the “+” button. Go to the Scan tab, then Open Scanner.
The scanner settings window opens with the ability to view an electronic version of the resulting image. To get started, just select “Scan”.
You can save a scanned version of the document in a convenient folder and with the desired extension (by default, pictures are saved in the “Images” folder in JPEG format).
Scan to Mac OS using the product software
For Apple equipment, MFP manufacturers also supply proprietary programs that allow you to work with the multifunctional device as quickly as possible. The program interfaces for Windows and Mac OS differ little.
If, when installing the “firewood”, the user chose to install all the utilities, to start working, just find the required software in the list of programs. Manufacturers name programs with their name mentioned. For example:
- EPSON Scan
- Xerox Easy Printer Manager,
- HP Easy Scan
- Samsung Easy Document Creator,
- Brother iPrint&Scan,
- Canon MF Toolbox.
So it’s difficult to make a mistake when choosing the right application. To obtain a scan of a document, the user can follow the instructions and prompts of the utility.
Scanning to Mac OS using Image Capture
Standard tools of the Mac operating system will also come to the rescue if you need to convert a document into electronic format. The image capture application is located in the Applications menu on your Apple computer.
The list of connected devices is displayed on the left side of the program screen. The resulting image and parameters are on the right.
Set the necessary parameters. You can choose:
- document type (black and white, text or color);
- size;
- pixel density;
- angle of rotation;
- automatic selection of an edge or a separate scanning area;
- folder for saving images;
- scanned copy format.
Digitization starts by pressing the Scan button.
The advantages of using the utility are:
- ease of use,
- wide range of settings options,
- selection of scanning area,
- editing the received document,
- saving the scan in the required format.
The application allows you to combine several pictures into one file and save them in PDF format without the need to use additional programs.
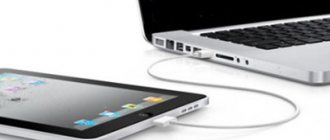
Educational article: How to transfer movies, photos and videos from iPad to computer and vice versa: 7 ways
Scanning with Paint
The easiest way to transfer files from a printer to a PC is to learn how to use this program. Paint is included in the standard set of options for the Windows operating base. Step-by-step instructions are given below:
- You can launch the Paint program through “Start” or in another convenient way. A blank window with icons appears on the display. You need to select the white rectangle located in the top left corner. In Windows 7, this window is called “File”.
- Click the item “From camera and scanner”. This makes it possible to transfer material to the program’s working database with a single click.
- Another window will pop up, offering several options for copying the document. The fastest and easiest way is to choose color or black and white without additional settings.
- Included in the “Scanning” or “Viewing” sections. If the presented version is satisfactory in all respects, activate the “Scan” button.
- The resulting result will be loaded into the Paint working window, which will make it possible to quickly assess the quality of the work performed. To save the selected material, you must click on the button in the upper left corner again and select the “Save as” option.
This algorithm.
How to properly share scans
Scan documents in high resolution, in color, if possible. Make sure that the signatures are clearly visible.
Do not send a “naked” file in an email or message. Write at least a couple of lines as an explanation.
Invite your counterparty to include a clause in the contract regarding the validity of scans and determine the email addresses from which you will send documents.
The item might look something like this:
1.1. The parties agreed that this agreement can be concluded by exchanging documents using electronic mail (email) or other electronic means of communication.
Emails are sent from the following addresses:
1.2. The documents transferred must be signed by the parties (their authorized representatives) and sealed, and the method of communication used must allow one to reliably establish that the document comes from a party to the agreement.
1.3. Subject to the specified conditions, scanned copies of this agreement have the legal force of the original.
If the other party does not dispute that the contract exists and is concluded under certain conditions, there should be no problems in the future.