Hello.
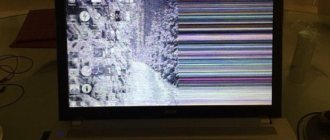
While many errors and problems on the computer can be tolerated, defects on the screen (the same stripes as in the picture on the left) cannot be tolerated! Not only do they interfere with your view, but they can also damage your eyesight if you work on such an image on the screen for a long time.
Stripes on the screen can appear for various reasons, but most often they are associated with problems with the video card (many people say that artifacts have appeared on the video card...).
Artifacts mean any distortion of the image on a PC monitor. Most often, they appear as ripples, color distortion, stripes with squares across the entire area of the monitor. So what to do with them?
Right away I want to make a small disclaimer. Many people confuse artifacts on the video card with dead pixels on the monitor (a clear difference is demonstrated in Fig. 1).
A dead pixel is a white dot on the screen that does not change color when the image on the screen changes. Therefore, it is quite easy to detect by filling the screen with different colors one by one.
Artifacts are distortions on the monitor screen that are not related to problems with the monitor itself. It’s just that the video card sends such a distorted signal to it (this happens for many reasons).
Rice. 1. Artifacts on the video card (left), dead pixel (right).
There are software artifacts (related to drivers, for example) and hardware artifacts (related to the hardware itself).
Software artifacts
As a rule, they appear when launching some 3D games or applications. If you see artifacts when loading Windows (also in the BIOS), most likely you are dealing with hardware artifacts (more about them later in the article).
Rice. 2. Example of artifacts in the game.
There are a lot of reasons for the appearance of artifacts in the game, but I will analyze the most popular ones.
1) Firstly, I recommend checking the temperature of the video card during operation. The thing is that if the temperature has reached critical values, then everything is possible, from distortion of the picture on the screen to failure of the device.
You can read about how to find out the temperature of a video card in my previous article: https://pcpro100.info/kak-uznat-temperaturu-videokartyi/
If the temperature of the video card exceeds the norm, I recommend cleaning the computer from dust (and paying special attention to the video card when cleaning). Also pay attention to the operation of the coolers; perhaps one of them is not working (or is clogged with dust and does not spin).
Overheating most often occurs in hot summer months. To reduce the temperature of the system unit components, it is even recommended to open the unit cover and place a regular fan opposite it. This primitive method will help to significantly reduce the temperature inside the system unit.
2) The second reason (and quite common) is video card drivers. I would like to note that neither new nor old drivers provide a guarantee of good performance. Therefore, I recommend updating the driver first, and then (if the picture is just as bad) rolling back the driver or installing an even older one.
Sometimes using “old” drivers is more justified, and for example, they more than once helped me enjoy a game that refused to work normally with new versions of drivers.
How to update drivers with just 1 click: https://pcpro100.info/obnovleniya-drayverov/
3) Update DirectX and .NetFrameWork. There is nothing special to comment here, I will give a couple of links to my previous articles:
4) The lack of support for shaders will almost certainly result in artifacts on the screen (shaders are a kind of scripts for a video card that allow you to implement various special effects in games: dust, ripples on the water, particles of dirt, etc., everything that makes the game so realistic).
Usually, if you try to run a new game on an old video card, you get an error saying that it is not supported. But sometimes this does not happen, and the game runs on a video card that does not support the required shaders (there are also special shader emulators that help run new games on old PCs).
In this case, you just need to carefully study the system requirements of the game, and if your video card is too old (and weak), then, as a rule, you won’t be able to do anything (except overclocking...).
5) When overclocking a video card, artifacts may appear. In this case, reset the frequencies and return everything to its original state. In general, overclocking is a rather complicated topic, and if handled inappropriately, you can easily damage the device.
6) A glitchy game can also cause image distortion on the screen. You can usually find out about this by looking at various player communities (forums, blogs, etc.). If there is such a problem, then you are not the only one who will encounter it. Surely, they will also suggest a solution to this problem (if there is one...).
Stripes and ripples on the screen (artifacts on the video card). What to do?
Hello.
While many errors and problems on the computer can be tolerated, defects on the screen (the same stripes as in the picture on the left) cannot be tolerated! Not only do they interfere with your view, but they can also damage your eyesight if you work on such an image on the screen for a long time.
Stripes on the screen can appear for various reasons, but most often they are associated with problems with the video card (many people say that artifacts have appeared on the video card...).
Artifacts mean any distortion of the image on a PC monitor. Most often, they appear as ripples, color distortion, stripes with squares across the entire area of the monitor. So what to do with them?
Right away I want to make a small disclaimer. Many people confuse artifacts on the video card with dead pixels on the monitor (a clear difference is demonstrated in Fig. 1).
A dead pixel is a white dot on the screen that does not change color when the image on the screen changes. Therefore, it is quite easy to detect by filling the screen with different colors one by one.
Artifacts are distortions on the monitor screen that are not related to problems with the monitor itself. It’s just that the video card sends such a distorted signal to it (this happens for many reasons).
Rice. 1. Artifacts on the video card (left), dead pixel (right).
There are software artifacts (related to drivers, for example) and hardware artifacts (related to the hardware itself).
Software artifacts
As a rule, they appear when launching some 3D games or applications. If you see artifacts when loading Windows (also in the BIOS), most likely you are dealing with hardware artifacts (more about them later in the article).
Rice. 2. Example of artifacts in the game.
There are a lot of reasons for the appearance of artifacts in the game, but I will analyze the most popular ones.
1) Firstly, I recommend checking the temperature of the video card during operation. The thing is that if the temperature has reached critical values, then everything is possible, from distortion of the picture on the screen to failure of the device.
You can read about how to find out the temperature of a video card in my previous article: https://pcpro100.info/kak-uznat-temperaturu-videokartyi/
If the temperature of the video card exceeds the norm, I recommend cleaning the computer from dust (and paying special attention to the video card when cleaning). Also pay attention to the operation of the coolers; perhaps one of them is not working (or is clogged with dust and does not spin).
Overheating most often occurs in hot summer months. To reduce the temperature of the system unit components, it is even recommended to open the unit cover and place a regular fan opposite it. This primitive method will help to significantly reduce the temperature inside the system unit.
How to clean your computer from dust: https://pcpro100.info/kak-pochistit-kompyuter-ot-pyili/
2) The second reason (and quite common) is the drivers for the video card. I would like to note that neither new nor old drivers provide a guarantee of good performance. Therefore, I recommend updating the driver first, and then (if the picture is just as bad) rolling back the driver or installing an even older one.
Sometimes using “old” drivers is more justified, and for example, they more than once helped me enjoy a game that refused to work normally with new versions of drivers.
How to update drivers with just 1 click: https://pcpro100.info/obnovleniya-drayverov/
3) Update DirectX and .NetFrameWork. There is nothing special to comment here, I will give a couple of links to my previous articles:
— popular questions about DirectX: https://pcpro100.info/directx/;
- .NetFrameWork update: https://pcpro100.info/microsoft-net-framework/.
4) Lack of support for shaders - will almost certainly result in artifacts on the screen (shaders are a kind of scripts for a video card that allow you to implement various special effects in games: dust, ripples on the water, particles of dirt, etc., everything that makes the game so realistic).
Usually, if you try to run a new game on an old video card, you get an error saying that it is not supported. But sometimes this does not happen, and the game runs on a video card that does not support the required shaders (there are also special shader emulators that help run new games on old PCs).
In this case, you just need to carefully study the system requirements of the game, and if your video card is too old (and weak), then, as a rule, you won’t be able to do anything (except overclocking...).
5) When overclocking a video card, artifacts may appear. In this case, reset the frequencies and return everything to its original state. In general, overclocking is a rather complicated topic, and if you do it inappropriately, you can easily damage the device.
6) A glitchy game can also cause image distortion on the screen. You can usually find out about this by looking at various player communities (forums, blogs, etc.). If there is such a problem, then you are not the only one who will encounter it. Surely, they will also suggest a solution to this problem (if there is one...).
Hardware artifacts
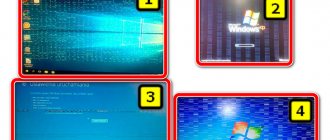
In addition to software artifacts, there may also be hardware artifacts, the cause of which is poorly functioning hardware. As a rule, you will have to observe them absolutely everywhere you are: in the BIOS, on the desktop, when loading Windows, in games, any 2D and 3D applications, etc. The reason for this, most often, is the detachment of the graphics chip; less often, there are problems with overheating of the memory chips.
Rice. 3. Artifacts on the desktop (Windows XP).
For hardware artifacts, you can do the following:
1) Replace the chip on the video card. Expensive (relative to the cost of the video card), it’s tedious to look for an office that will carry out repairs, it takes a long time to search for the right chip, and other problems. It is still unknown how this repair will be carried out for you...
2) Trying to warm up the video card yourself. This topic is quite extensive. But I will say right away that such a repair, even if it helps, will not help for long: the video card will work from a week to six months (sometimes up to a year). You can read about warming up the video card from this author: https://my-mods.net/archives/1387
3) Replacing the video card with a new one. The fastest and simplest option, which sooner or later everyone comes to when artifacts appear...
Software
This is due to the fact that it is very high and it cannot correctly process or transmit to the screen a complex and quickly updated image.
Correction
The second step is to reset the settings and frequencies of the problematic game to the “default” setting. Often the problem disappears at this stage.
But in order to play comfortably enough, do the following:
Artifacts when loading Windows and BIOS appear when the video card is faulty or overheated.
Image distortion when using a computer or laptop
Image distortions during operation (ripples, stripes, various defects) can be caused by hardware or software problems and indicate a loss of performance of the monitor or video card. Determination of the damaged component can be carried out after functional diagnostics.
If the image is distorted exclusively while the operating system is running, that is, when the computer starts, information from the BIOS is displayed on the screen and the boot animation of Windows (well, or another OS), ripples, stripes or other defects are not observed, the problem is most likely in the video card or its software provision. On the contrary, if distortion is visible even on the basic I/O system setup screen, then this most likely indicates problems with the monitor matrix.
It is also advisable to determine whether these problems are temporary or permanent. If distortion does not appear immediately after starting the PC, but after a few minutes or even hours of operation, the problem is caused by the video card or other graphics accelerator installed in the system. Otherwise (defects are visible immediately after startup), damage to the matrix is observed during operation.
Definition
They can appear quickly and disappear quickly, or be present for quite a long time.
There are many types:
Most often, this phenomenon occurs when using programs and games that place a fairly significant load on this device.
Such distortion can appear either exclusively during the game or for some time after it is turned off.
They appear for the following reason: the video card cannot correctly and fully process the image.
As a result, she conveys to the screen a distorted version of it, filled with such problems. The picture changes and floats.
Possible causes of image distortion
There are several reasons why there is distortion in the image on the monitor. It can be:
- malfunction of the monitor matrix itself. Solved only by replacement;
- video card malfunction. Here we are talking about a complete irreversible loss of functionality, and the solution is to replace this component;
- violation of the integrity of the contacts of the graphics accelerator. The problem occurs exclusively on laptops and is relatively easily fixed by laptop service center specialists;
- corrosion on the motherboard, video card, graphics accelerator or in some other unexpected place;
- overheating of the video card. If defects appear only a few minutes or hours after the start, most likely this is the problem;
- video memory malfunction;
- degradation of the computing core of the video card. The problem is checked using special software and solved by replacing the damaged component;
- inappropriate video card driver. It needs to be reinstalled or rolled back to an older one;
- inappropriate AGP controller driver, if available. This software also needs to be reinstalled.
Damage to the matrix cable. Often found on laptops and almost never on desktop systems. In some cases, contacts can be restored;
Problems caused by damaged cable or cable
Some problems arise due to damage to the matrix cable in laptops or the cable from the PC to the monitor in desktop systems. In the first case, you need to take the computer to a service center to restore or resolder the contacts, in the second, you just need to replace the wire.
The problems that can be solved by this simple technique are:
- "northern lights". The screen is suddenly covered with a huge number of multi-colored vertical stripes, changing shades in a random order. If you move or reconnect the cable (in desktop systems) or tilt the display (in laptops), horizontal stripes appear, and the overall color scheme tends to white;
- "color flashes" Part of the screen or the entire screen suddenly becomes covered with large color spots of complex geometric shapes. They can change shades or maintain them. When you tilt the screen or move the cable, the spots become deformed or disappear completely.
In addition, in desktop systems, such damage indicates possible oxidation or destruction of the connector on the monitor or video card.
Problems indicating matrix damage
Matrix damage is a problem that cannot be solved on your own. And service centers will most likely offer a display replacement - because this is the cheapest and most effective type of repair.
If the matrix is damaged, the following problems may occur:
- vertical multi-colored stripes that appear immediately after the computer starts and are visible even in the BIOS or boot animation;
- partial absence of image. For example, on half of the screen there is a “picture”, and on the second there is simply whiteness or multi-colored wide or narrow stripes;
- wide vertical stripe with static ripples;
- the appearance of blurry images 5-10 seconds after operation;
- negative, chromatic aberration and other color defects, including on the boot screen and in the BIOS setup menu;
- a wide white stripe that appears immediately after switching on and is located in the same place;
- periodic partial or complete loss of an image with or without its return.
Problems with the matrix or display can only be solved by replacing the matrix or display.
An example of replacing the north bridge of a laptop after overheating
The fact is that in order to resolder video card chips, or replace them (and this is how artifacts on a laptop display are solved), you need serious soldering equipment (an ordinary soldering iron will not do here) and plus good soldering skills of the technician who will be repairing the laptop.
The worst thing you can do is try to warm up the video card chip yourself with a hair dryer, or put the video card in the oven. You can look through a lot of methods on the Internet, but they all give short-term results, plus the chances of burning the chip are very high. And even if successful, the problem may arise again, and in a very short time. After such “warming up”, the “repairability”:) of your laptop drops sharply, and even in serious service centers you may not be able to fix it.
You can try to clean the laptop from dust, but if squares appear on the screen immediately after turning on the laptop, then this is of little use. Another thing is if stripes appear on the screen after the laptop has been running for a short time, then there is a chance that cleaning the cooling system can solve the problem.
Ways to prevent artifacts on the screen:
Ways to solve existing “squares on the screen”:
It may or may not have a positive effect, if the video card works, it won’t last long.
Almost always a positive effect (there may be exceptions if you took the first path :))), there is always a guarantee for replacing the chip (the video card lasts a long time. Well, just a very long time :)). subject to prevention (see above).
There are probably other people besides me who have heard that you can repair a video card by warming it up, or heating it, but they probably don’t know how to actually do it. This is what I will talk about in this article.
In order to completely solve the problem of video card problems, you need to use special equipment, which you, of course, do not have. How then can such repairs be made without resorting to special equipment or to a specialist for money?
First you need to remove the video card, having previously removed all the connectors, of course, with the computer turned off. Once you have the video card in your hands, you will need to remove the cooler from it. Unscrew the screws that hold the cooler. Under the cooler you will see a paste that transfers temperature from the processor to the cooler, thereby cooling it. Under no circumstances do not touch this paste if you do not have a spare tube; after the repair you will need to put the cooler back in the same place. And so, the cooler was removed.
After warming up, when the tin has become shiny, we can finish our repairs and let the board cool for 10 minutes. To test the video card, you need to assemble it. You need to tighten the screws carefully and without fanaticism; warming up does not return to factory settings. We put our video card back on the computer, connecting all the connectors. If the artifacts have disappeared and no others have appeared, then we have successfully completed our task.
Source
Problems with the video card
All other defects, including partial multi-colored ripples or inverted colors, that appear some time after the computer is running, indicate damage to the video card. Also, signals indicating that the graphics accelerator has stopped functioning are:
- Windows unexpectedly switches to “Simplified mode”, spontaneous extension change and other signs of switching from a discrete video card to an integrated graphics accelerator;
- a variety of vertical stripes of the same color located at equal intervals. This defect may appear already when the computer starts;
- colored ripples, most often red or blue, appearing already when the computer starts.
Since problems with the video card can be caused by a variety of reasons, functional diagnostics of this component is required. At home it is carried out as follows:
- The release date of the video card drivers is checked (it can be viewed in the “Device Manager”). If they are suspiciously new, then they need to be rolled back. If they are too old, update them.
- If the problem persists, check the temperature of the video card. You can measure it with special programs like AIDA64, SpeedFan or RivaTuner. It is recommended to select the latter, as it will be required for further diagnostics. The normal operating temperature of a discrete video card is 40-60 degrees, periodic increases to 70 are dangerous, but not critical. If the graphics accelerator overheats, you need to check and, if necessary, clean the cooling system. It is clear that it is better to measure the temperature when defects appear.
- If the problem persists, it is recommended to test the video memory. To do this, you can use the special VMT utility. Actually, it is impossible to fix video memory damage at home, just like any other physical problems with hardware, but it is better to know what you will have to contact a service center for.
- After this, it is recommended to check the functionality of the GPU. To do this, you can use the previously installed RivaTuner program. With its help, you need to reduce the clock frequency of the graphics processor of the video card by 100 MHz from the current one. If the problems disappear, it means that the components are deteriorating. It is recommended to replace the video card, and the current one can be used at lower frequencies before purchasing a new one.
- Also, regardless of the result in the previous two steps, it is recommended to test the video memory at a clock speed reduced by 100 MHz. If no errors are observed in its operation, this also signals degradation.
These are the basic steps of functional diagnostics of a video card, which you can do yourself at home. Laboratory tests will be required to determine further damage.
In addition, images may be distorted for other reasons not related to hardware. For example, a conflict between low-level and high-level software, incorrect setting of the combined recording mode in the BIOS or Windows Control Panel, and other problems. There may also simply be incompatibility between the video card and the motherboard - but the graphics accelerator will work normally when installed in another computer.
At the same time, by contacting a service center, you can save yourself from lengthy computer diagnostics, find out the true cause of image defects and eliminate them, and all this in a very short period.
Repair
Attention! The user carries out any actions described below at his own peril and risk. Self-repair does not guarantee restoration of performance, and in some cases can lead to permanent failure of the video card! If the user does not have experience in such actions, it is better to contact a specialist!
What to do if the chip falls off
If the chip still falls off, you can try to solve the problem yourself. Required: syringe, flux, screwdriver, soldering iron and hair dryer. Let's start repairing the video card with our own hands:
- It is necessary all plastic plugs and stickers from the top side of the board At the place where the chip is located under the board, all this can melt. This usually doesn't happen, but it's better not to risk it.
- The second thing to do is remove the cooler using a screwdriver. Unscrew the bolts that hold the cooler in place and remove the metal gasket.
- Remove the graphics video chip cooling radiator. Sometimes it is difficult to remove due to dried thermal conductive paste. It will glue the chip and the heatsink together so that it will be almost impossible to tear them apart. You cannot try to separate them by force . You need to take a hairdryer and heat the dried thermal paste with hot air until it begins to soften (this will take no more than 10 seconds). And after that, you should loosen the radiator to the right and left (continuing to warm up the mounting location with a hairdryer) until it moves away. Don’t forget to clean the surfaces of the heatsink and video chip from old thermal paste with a rag or cotton swab.
- Next, you need to start repairing the chip itself. It is important to note that between video chip crystal and substrate There are the same BGA balls as between the chip and the board.
repair the video chip yourself only if the contact between the chip and the card is broken. If the problem is inside the video chip, that is, the crystal has fallen off the substrate, then you cannot solve this problem yourself. - Place a cube of flux into a syringe. Place a needle at the junction of the substrate and the card and gradually squeeze it out, tilting the card so that the substance spreads evenly. Don't forget to wash the syringe, otherwise the flux will dry out.
- Take a soldering iron and start heating the substrate . It is important not to touch the crystal itself.
- Clean any remaining rosin from the card and reassemble all components.
How to clean a video card
To clean and restore the functionality of the video card, you will first need a soft brush:
- First you need to unscrew the screws on the side of the system unit.
- the side housing cover back . If it has a fan, turn off the power.
- Next, you need to disconnect all wires from the card (if any).
- Unscrew the bolts that hold the video adapter.
- Unscrew the card lock latch.
- Carefully remove the graphics adapter .
- Take a soft brush and clean the video card. It is better not to remove the cooler, although if there is serious contamination, this will have to be done. In this case it is necessary clean carefully cooler blades so as not to break them. When disassembling the cooler you will need thermal paste.
- After cleaning, you need to make sure that the integrity of the video adapter is not damaged, all screws are in place and the cooler wire is connected to the board. Insert the card back into the system unit.
Replacing thermal paste
First you need to buy thermal paste. It costs about 300-400 rubles. You will also need a screwdriver, a napkin and a syringe, as well as a plastic card for evenly applying the paste. It is also advisable to have a vacuum cleaner to clear away all the dust. Let's get started:
- First you need to remove the card from the system unit. Repeat steps 1-6 from the instructions above.
- Remove the radiator by unscrewing all screws.
- Take a napkin with alcohol and wipe off any remaining dried paste from the surface of the video chip. A regular eraser may also work.
- Take a syringe and squeeze out a small a drop of paste.
- Spread evenly over the surface of the crystal.
- After replacing the thermal conductive paste, reinstall the radiator and tighten all screws tightly.
- Insert the video card back into the system unit.
Repair methods
In case the problem cannot be identified, there are universal ways to repair a video card.
Warming up the chip
To warm up the video card chip, a soldering station is required . You need to warm up the video card at a temperature of about 450 degrees:
- First you need to remove the video card from the unit.
- Remove the radiator and cooler .
- Start warming up. Five minutes is usually enough.
- Replace thermal paste.
- Reassemble the card and return it to the system unit.
We accelerate the video card for maximum performance in games
In principle, you can warm up the video card and chip with an ordinary hairdryer, but in this case there is no guarantee that this will help.
Chip replacement
To replace a video adapter chip, you will need serious equipment, such as a soldering station and the video chip itself. If you cannot restore the functionality of the video chip, and the only option left is its complete replacement , it is better to contact a workshop.
As you can see, in most cases you can fix your video card at home. Most breakdowns occur precisely due to overheating of the video adapter chip. So to prevent subsequent repairs, it is better to avoid this.
Settings of the monitor you are using
Another common reason for a laptop screen to ripple is due to incorrect Windows OS settings.
The user can independently adjust the color rendition of the display and its overall flicker frequency. If this setting is incorrect, the monitor may not function properly.
To set the correct parameters, you need to:
- Right-click on the desktop.
- Select the tab called Screen Resolution in the context menu.
- Open the section called Advanced Settings and go to the Monitor section.
- Select the most possible screen refresh rate under the line.
- Press the List of all modes button on the Adapter item.
- Select the highest frequency of the display and its color rendition.
- Save all changes.
Recommended reading: What to do if the laptop screen does not light up when turned on
Check and result
Now we need to put our video card back in, connect all the cables to it and check what we got. By the way, do not forget to connect additional power to the video camera. The initial BIOS boot screen already looks as it should, which makes me happy. Just for fun, look at the first screenshot of this article.
The system also booted quickly without any glitches, errors or interference. As you can see, there is nothing complicated in the procedure itself, you just need a little patience. The video card also performs similarly in games – no problems were noticed.
A couple more lines about warming up “in general.” You need to understand that this method is not a panacea, and artifacts may appear again, as oxidation will continue to occur. No one will tell you how long this will happen: in a month, two, three or a year. True, you can warm it up in this way several more times. So the video camera can still serve you for some time.
Sources
- https://infotechnica.ru/pro-kompyuteryi/o-videokartah/artefakty-kak-vyglyadyat/
- https://zen.yandex.ru/media/id/5b71da7827b4f300a96b5e88/borba-s-nazoilivymi-artefaktami-prochtite-etu-statiu-ne-povtoriaite-moih-oshibok—5b7711f0766a5a00a94505ac
- https://onoutbukax.ru/kak-ustranit-artefakty-videokarty-11-sposobov/
- https://entercomputers.ru/interesting/artefakty.html
- https://pomogaemkompu.temaretik.com/1184703700996983567/kak-ustranit-artefakty-videokarty-prichiny-nepoladok-i-metody-ih-ustraneniya/
- https://composs.ru/remont-videokarty-svoimi-rukami/
- https://lumpics.ru/warm-up-the-video-card-in-the-home/
- https://mirdostupa.ru/10-glavnyx-sovetov-dlya-progreva-chipa-videokarty-stroitelnym-fenom/
- https://WiFiGid.ru/blog/borodach/progrev-videokarty-utyugom