Do you have an inoperative USB flash drive or other storage device and are you wondering what program to choose for recovery?
We reviewed the most popular utilities. Which of the above programs is suitable for you and will restore a flash drive with a 100% guarantee?
The only program of its kind, Hetman Partition Recovery, will help you extract all the data.
It is loved by both beginners and professionals for its convenience, speed and advanced information recovery algorithm. Your files will be found and copied even when the media’s FS is no longer accessible or is damaged.
JetFlash Recovery Tool is a proprietary utility that has the simplest possible interface and supports working with Transcend, JetFlash and A-DATA drives. Controlled by just two buttons, you will definitely like it. Do not forget that cleared data cannot be restored, so pre-saving information from a flash drive will not be superfluous.
If you have a need to always have a universal program with you that is convenient to use both on your home computer and outside it, we recommend D-Soft Flash Doctor; its platform does not require pre-installation; it launches instantly on any PC. The software is suitable for repairing, unlocking, restoring the volume of a flash drive and its performance.
If you need to recover SD cards, we recommend downloading F-Recovery SD, which has an effective set of simple options for working with damaged flash drives from digital cameras and other portable devices. From the point of view of a professional approach to Flash drives, it will be interesting to use the Flash Memory Toolkit; the application contains a whole range of additional functionality that can test flash drives; in addition, the program works with any version of the Microsoft OS.
The formatting and recovery utility USB Disk Storage Format Tool, which has a very clear and user-friendly interface, can recognize the maximum number of different types of Flash Drives among the above utilities, as well as quickly restore the drives’ functionality. The USB Disk Storage flash drive repair program will be able to quickly recover data from damaged hard drive partitions, even if problems with the flash drive firmware are detected.
If no flash drive recovery program has helped, we recommend checking the status of the memory controller using the ChipGenius utility. The program works with USB, micro SD, SD, SDHC and USB-MP players from Kingston, Silicon Power, Transcend, Adata, PQI. Further actions to correct errors and recover lost data are only advisable if the flash drive is detected in Chip Genius.
Flash drive recovery is possible in almost all cases. The recovery methods listed below are intended to eliminate software failures; if the flash drive is sunk, broken, or melted, then software data recovery methods will not help. Therefore, at the very beginning it is necessary to determine the type of failure. To do this, insert the drive into the USB connector and look at the indicator or at the list of connected devices in the “My Computer” section:
- If the device is displayed
, but the files are not visible or inaccessible, then there is a malfunction, which is often corrected using special programs and you can proceed to selection; - The light goes out and does not start (or the device is not displayed
) - there is a physical breakdown; - The flash drive appears as a 0 MB disk
. Not the most popular type of malfunction, but if this is what you have, then feel free to skip the main part - a quick solution to this problem is described at the end of the article.
Selection of a special program
There are a number of free programs through which you can bring a flash drive back to life. To select the right program, you must first determine the VIP and PID.
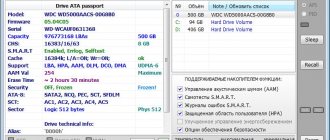
Determining VID and PID
VID and PID are identifiers that determine the type of controller installed in the flash drive. Using these identifiers, software for working with the device is selected. Programs are developed for different types of controllers.
To determine VID and PID you need to:
Program selection
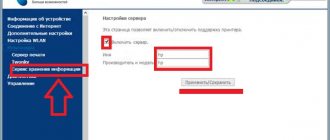
You should use the obtained information about controller identifiers to find the best compatible program. For this:
The service will automatically find compatible software for working with the flash drive. You need to select an entry with the same manufacturer as your flash drive and click on the link. If the link does not work, you can enter the name of the program in the search bar of your browser and download it through the developer’s website.
In some cases, searching by VID and PID does not bring results. The website does not display software compatible with the controller. Then you need to select a program to work with the flash drive manually. Some of them are universal, suitable for restoring most cards. Such programs will be discussed below.
The meaning of checking a USB drive
Contrary to popular belief, a failure of a flash drive cannot always be associated with technical problems or a breakdown of the device at the physical level. Often problems can occur in the cycle of writing and reading information. Without going into long and tedious details, it must be said that this algorithm can go astray in its operation in the same way as the process of performing tasks in any other program. The cause of the failure may be:
- Frequently removing the flash drive while ignoring the “Safely Remove” option;
- Flash drive exposure to electromagnetic radiation;
- Long service life (flash drives have their own lifespan and after prolonged use they begin to fail);
- Virus activity;
- Failures while working with files (for example, the device was removed before the data was copied), etc.
Of course, there are a number of ways to check that these cycles are running correctly. With their help, you can most often find out whether it will be possible to return the flash drive to service without repair.
Method 1: Check Flash
Check Flash (aka ChkFlsh) is a program created by Ukrainian independent programmer Mikhail Cherkes. It is quite popular due to its small size, high speed and free distribution model.
The main disadvantage of the program is that it completely clears the flash drive during operation. It is suitable for assessing the state of a device in conditions where there is no important data on it. In other cases, it is better to resort to the following method.
Method 2: Through the command line
The most promising method in terms of saving information on media is to use the Windows console (command line).
All that remains is to close the window. This method is faster and safer than using the program described above, but there is an opinion that the check is not as thorough.
Method 3: Standard Windows diagnostic program
The latter option is suitable for cases where using the console or other tools causes difficulties. You can use Windows built-in software to diagnose problems.
This method is the simplest, but is not highly accurate in performing the test. The main advantage is also that after a certain period of using the flash drive, the system itself will begin to require a check.
If none of the above methods produced any errors, then the problem is not in the memory usage algorithms. This could be either technical damage to the device or a problem with the socket into which it is inserted. You should try inserting it into a different USB port. If this does not solve the problem, then you should take the media to a repair service, or simply replace it.
Recovery using built-in Windows utilities
CHKDSK utility
The utility is suitable for the simplest cases when file system data fails without disrupting the cluster layout. When trying to display existing files when there are bad sectors, the computer will often simply hang, so there is no need to try to open the device. Instead, let's use the command line by doing the following:
- Look at what letter the system identifies the drive under (in our case, G).
- Launch Command Prompt. To do this, press the Win and R keys or use the “Start” button to open the “Run” window, write the line cmd in the input field, and click Ok.
- In the command prompt window, enter G: /f (under the letter G, in our case, the system identifies the flash drive).
This will launch the CHKDSK program to check for file system errors, the /f key will give it the command to automatically correct the problems found. Upon completion of the utility, you will most likely successfully restore the flash drive without losing data.
Windows DiskPart utility
The Diskpart utility is launched via the command line. You can launch the command line by searching in the Start menu. To restore the flash drive you will need the following commands:
To work with the utility, you will need administrator rights on your computer. It should also be run as an administrator. Otherwise, some commands may not work.
Error 0x8007045d when installing Windows 7, 8
indicates, again, physical problems with the HDD, and partitions for installation are created without problems and the disks are formatted normally, and then during shutdown everything is interrupted by an error. To correct the error, boot from the installation disk or flash drive with Windows 7 or 8 and click instead of install the inconspicuous inscription at the bottom of the “System Restore” window, in the next window select “Command Prompt”:
In the command line, you can immediately type the command to check the disk, in 99% of cases it will be disk C, just in case it is better to clarify which disks are there and whether the installer sees them at all, to do this we type and after each command press Enter:
diskpart list volume It should look like this something like:
Type Exit, press Enter, and in the command line write:
chkdsk X: /F /R where X is the drive letter that you want to check, in 99% of cases it will be C. If the file system is NTFS, then you can add another key - /B for a more thorough check.
Other recovery programs
Fortunately for owners, restoring data and performance of flash drives is much easier than for hard drives or microSD drives. Below are several effective programs that will make a “dead” flash drive work.
SDformatter
What it can do:
- Format devices if the system fails;
- Restoring functionality due to software, virus damage or improper cleaning in the past;
- Flexible settings for working with a flash drive.
Suitable for Windows and MacOS. Disadvantage: there is only an English interface. Not compatible with all types of removable storage devices.
PC Inspector Smart Recovery
The program is suitable for working with any storage media, including hard drives and removable cards. PC Inspector Smart Recovery is distributed free of charge, you can download it. There is a Russian interface.
PC Inspector Smart Recovery can recover files of most existing extensions, including rare ones. The program itself has a convenient hint system, which is aimed at helping users during recovery. The software even recovers data for which header lines have been deleted. The program can clean and format data on storage media in various ways. The user is offered flexible parameter settings and extensive functionality.
RecoverRx
The program was developed by the removable storage manufacturer Transcend. It is free, there is a Russian language. You can download it. Designed specifically for working with removable devices, including players, phones, microcards, SD and flash drives.
RecoverRx can:
- Recovers data. Helps to return deleted files of most formats: text, audio, video, applications.
- Formats. Safely clears the disk of all data without affecting its performance.
- Protects. With RecoveRx you can set a password for the device memory. Deleting data will only work if you enter this combination. The function is only compatible with Windows OS.
The program is simple and easy to use. The main window offers a list of all connected devices. The user needs to select a flash drive and the function he wants to use.
Features of working with the program
If there are some signs that something is wrong with the media: errors, formatting suggestions, speed, etc. Choose to check the flash drive with the access type - use a temporary dump, often this test is enough.
In all other cases, copy the contents by creating a disk image, as shown in the gif
, or in a way convenient for you.
It is better to perform more complex reading and writing tests on an empty flash drive or memory card, so as not to lose information. But the picture of these tests is more accurate and detailed.
The entire set of procedures is available in one window, actions and parameters are divided into blocks, everything is clear and understandable. The utility does not require installation, unpack and run ChkFlsh.exe
be careful and patient. Some tests are quite lengthy, depending on the media, its speed and condition.
I recorded a short video that shows the capabilities of the program and where the various items are located.
The system detects a USB drive as a disk size of 0 bytes
If the system detects a flash drive with a size of 0 bytes, the file system fails with a violation of the cluster layout. If you want to restore data, then it is better to use the instructions above, but if you need to return the flash drive to functionality, then there is a much simpler and faster way without using additional programs - formatting.
For this:
What is a RAW disk and where did it come from?
CHKDSK on Windows
In Windows, RAW disks are drives that do not have any file system. For example, if you delete a partition of your hard drive through one of the utilities, it will take on the RAW state. If the file system of a partition is critically damaged, it can also become RAW, since the OS will not be able to load and read the file system table.
Thus, if the disk worked normally, files were written to it freely, but now it does not open, and the CHKDSK utility does not want to correct errors on it, then there is a rather serious problem, which, in most cases, can be corrected only in one way - formatting . Next, we will fix the error CHKDSK is not valid for RAW disks.
Why do crashes occur?
Problems with flash cards arise for various reasons:
- The wrong file system was selected when formatting;
- The flash drive was cleaned incorrectly, the operation was interrupted before formatting was completed;
- The device was repeatedly forcibly disconnected from the computer while it was working, without software removal;
- The device memory is infected with a virus;
- The memory has been overwritten many times without formatting, and the sectors are damaged.
Serious memory problems with flash drives are rare. Common problems include incorrect formatting and virus infections. If you overwrite information in the card's memory, it is recommended to format it.
Careless, careless handling can lead to damage to even the most durable device. Cards do not have moving elements, like HDD drives, but they are also susceptible to malfunctions. You can avoid many problems with flash drives if you store them in dark, dry places, carefully remove them from the computer, and continue formatting and processing files so as not to cause a critical error.
Report content
- Copyright infringement Spam Incorrect content Broken links
Send
Micro SD memory cards are quite popular due to their portability: you can use it in your phone, and if you insert it into an adapter, you can easily place it in your computer, digital camera and any other devices. Such memory cards are inexpensive, but they often break down. Micro SD suddenly stops responding and shows no data. In this case, do not rush to throw away the flash drive and buy another one, as you can restore it using basic Windows tools or third-party programs. Bring your Micro SD flash drive back to life with the help of this article.
Diagnosis of the problem
The main signs that a flash drive requires repair are:
Sometimes the problem may be a USB connector or a lack of drivers on a particular computer. But when problems occur on every device, most likely the problem is with the drive. And you can try to restore it.
How to recover a Micro SD flash drive without third-party programs
The surest way and the first one that you should immediately take is to format the flash drive in Windows using an external USB adapter. The thing is that built-in adapters for Micro SD do not always cope with their task; it is best to buy a USB adapter for memory cards and use it or ask friends for a while.
- Insert the USB flash drive into the adapter and then connect it to the computer. Wait until the device is detected by the system. It's okay if the type of flash drive is displayed incorrectly, because it is broken.
- Right-click on it and select “Format”.
Select formatting options:
- The file system must be Fat32.
- The cluster size is 32 KB.
- Check the box next to “Quick Format”.
Click “Ok” and wait until the procedure is completed. Remove the device when finished and insert again. Of course, after formatting, all files from the flash drive will be deleted, but, nevertheless, its performance may return to normal.
Blog about modems, routers and gpon ont terminals.
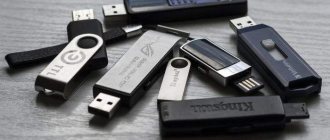
Removable USB drives and memory cards, which are popularly known as flash drives, are probably the most popular storage media in the world. We carry documents, important files, photographs and even just music, films and pictures on them. In parallel with their popularity, the problems that arise with them are growing. Someone unsuccessfully disconnected the disk during recording, someone's controller malfunctioned, and someone was unlucky and their flash drive died - this also happens. In the latter case, the problem is hardware and it is easier to throw away the device. But if the failure is software, then you can try to fix the situation yourself. In this article I will give several ways to restore a flash drive , or rather its functionality, which I myself have used. If you have your own solutions to the problem, write in the comments, it’s very interesting to know who helped. So, let's go!
The flash drive won't open!
Windows sees the removable drive, but when you try to log in, it displays the error “No access” or “Access denied.” The most common reason is malware distributed through removable media.
The virus creates a file in the root of the disk: “autorun.inf” with instructions for launching the necessary executable files. Moreover, it often happens that the antivirus has already destroyed the infection itself, but the autorun file remains. Check the flash drive with an antivirus program with the latest databases. After this, you need to go to “My Computer”, right-click on the disk and select “Open”. The content will open in a separate window and you will need to delete the autorun.inf file manually.
The disk is not formatted!
The cause may be a memory controller failure. First, try formatting the flash drive in the usual way, through “My Computer”. Did not help? Try doing this through Disk Manager. To get into it in Windows 7 or Windows 8, press the key combination “Win + R” and in the “Run” window type the command diskmgmt.msc. In the manager window that opens, find your flash drive, right-click on it and select the “Format” menu item.
If this does not bring results, try using specialized utilities. For more details, see the article How to format a flash drive.
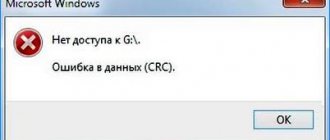
3. The flash drive is not detected (USB device is not recognized)
At the same time, the following error appears.
If it is a USB flash drive, then to begin with, simply disconnect the drive and plug it into another USB port. Ideally, it should be plugged directly into the connector on the motherboard. This will eliminate the possibility of a malfunctioning extension cord or connector. Did not help? Then test it on another computer or laptop. If you have an SD, Micro SD or other memory card, then try disconnecting the card reader and connecting it to another USB port. The same? Then you need to check the card reader, it may be faulty. If a removable disk is detected on another computer without problems, try removing the driver on your own. This is done as follows. Go to Windows Device Manager and find the “USB Controllers” section:
Now we need the line “USB storage device”. Right-click on it and select Delete. Disconnect the flash drive from the PC and reboot. Checking the operation of the drive.
Reinstalling the driver didn't work? Let's try to clean the registry branches in which information about the device is stored. First, you need to collect information about it, or more precisely, two parameters: VID - manufacturer identifier PID - device identifier To do this, go back to Device Manager, find “Storage device” there, right-click on it and select the menu item “ Properties". In the window that opens, we are interested in the “Details” tab. In the “Property” list, look for the line “Device ID” or “Device Instance Code”.
The “Value” field should display lines containing the following code:
These are the parameters we are looking for. Now press the Win+R key combination and enter the regedit command. This will launch the Windows Registry Editor. Here we need to find two branches:
Each of them will have subfolders. We find those that contain the found identifiers in their names and completely clear the contents. Attention! You are working with the Windows registry, so be extremely careful. After you clear the folders, restart your computer and check the operation of the flash drive.
Another way is to try to give the system a driver from another computer. The main thing is that the versions of Windows on both PCs are completely identical. Here are these two files:
We simply copy them to any working medium (disk, another flash drive, etc.), bring them to us and place them exactly along the same path. Let's reboot and check if we were able to restore the flash drive.
How to recover a Micro SD flash drive using the program
This option is suitable not only for restoring the functionality of a flash drive, but also for recovering files from it. Try this procedure after formatting to recover all photos and files.
- Download the Card Recovery program on the official website at https://www.cardrecovery.com. There are several options for one program available here to recover different files and memory cards.
- Please note that the program is distributed only in a trial version. You will have to pay for the full one.
- Installation is quite simple and straightforward: agree to the license agreement and select the program installation directory.
- Immediately open the program via Start or a desktop shortcut. First of all, insert your memory card into your computer.
- Click “Next” and you will see the next step. Here you need to select the drive letter on which the flash drive is currently located. Expand the first list and select it.
- Once you set the device letter, in the bottom line set the path to save the recovered files. It is in this folder that all photographs and other documents will appear.
- Click “Next” again to begin. If the program itself was unable to indicate the amount of memory on the device, write it down manually.
- Confirm the restoration and click “Yes”.
- Wait while the scan completes. During the process, all lost files will be found, as well as problems with the flash drive. As soon as the line is completely filled with green, the scanning was successful. In the lower window you will see everything that was recovered.
- The program will tell you how many files were found.
- Click “Next” to view them.
- Check the boxes next to those that need to be restored. Click “Next” again. The recovery will take several minutes, depending on the capabilities of your computer.
- Now you can again use the Micro SD flash drive and files recovered from it.
No computer owner can imagine life without removable storage media. There is a lot of information, why overload your computer with all sorts of data if you can save everything on a flash drive? All the more unpleasant is the moment when very necessary information suddenly appears on the media.
Bad sectors are sectors of the storage medium that, due to damage or system failures, the computer cannot read.
There are two types of bad sectors:
- logical. Data replay error occurs as a result of system failures. Such incidents can be corrected and after correction the computer will read everything;
- physical. The readable area of the card is so damaged that it is impossible to read information from it.
It is important to understand what led or could lead to such an incident.
Switch to USB 3.0
USB 3.0 is the third generation interface, which (unlike the second) represents an extremely powerful and improved data transfer speed. If you compare the performance of 3.0 and 2.0, you will see that the third generation has increased it by more than 95%.
New generation USB 3.0 flash drive
Before buying such a flash drive, make sure that your PC/laptop has at least one port that supports it, since older devices are equipped with 2.0 type connectors, and they are not suitable for third-generation drives. The new SuperSpeed transfer mode is capable of copying files at speeds of up to 625 MB/s.
Where do they come from?
The reasons that the computer does not like certain areas on the flash card lie in:
- system failures;
- viral infection;
- physical damage (crack, scratches);
- incorrect completion of work with the media (roughly pulling it out of the port as soon as the card is no longer needed);
- the initial presence of defects on the machine heads.
All these incidents lead to the operating system receiving an adjustment error code instead of the sector contents. From this moment on, the volume is closed to her; she ceases to perceive it as a potential repository of information.
Checking the disk if the OS does not boot
If, after a sudden failure, the OS refuses to start, you can check it using a boot disk. To begin, insert the CD into the drive and start the computer. A message will appear on the screen telling you to start from a bootable CD. Usually it looks like this:
Next, you will see a blue screen on the Windows console. You need to run OS recovery from the console. If you set an administrator password, you will need to enter it. If not, you will not be prompted for a password. Press R on the keyboard and press Enter. A black command prompt window should appear. You can already enter commands there. Before running CHKDSK, it is advisable to enter the HELP command. In the list of commands that appear, find the name of the utility. All movements in the command line are carried out using the keyboard (in this case, using the up and down arrows). Or, immediately enter on the command line: CHKDSK/? or CHKDSK HELP.
We already talked about command line switches above, but it’s still worth reading the detailed information. The command is entered specifying the hard disk volume label, if there is more than one, and the R key. It looks like this:
To run the program from the console, you need the AUTOCH.EXE file. if it does not find it on the disk, it will start from the CD, but if it is not there, then a message will be displayed asking you to indicate the path to this file. This method is effective for all Windows operating systems, including Windows 7. It is quite possible that you will be lucky and the utility will correct errors resulting from a system failure. After the check is completed, the program will display a report. Now you can try to start from the hard drive. Reboot using the CTRL+ALT+DEL keys. Remove the boot CD from the drive. You may need to change the boot method in the BIOS. The errors have been corrected, which means the system should start!
Is it always possible to restore them?
Logical broken areas can be corrected. If the failure is caused by physical wear and tear or serious damage to the media, then even repairing the flash card is often useless.
In any case, you should still try to restore the bad sector. For this there are internal and external applications of the system, for example:
- conductor;
- Check Disk;
- Hetman Partition Recovery;
- Jet Flash Recovery Tool;
- Storage Format Tool;
- PartitionGuru.
All external utilities can be downloaded from the Internet for free. They are easy to use, which is facilitated by the Russian interface. Hetman Partition Recovery is the most popular - according to user reviews, this utility revives data on an almost completely “dead” drive. Each program is accompanied by instructions. After launching, the utility scans and evaluates the condition of the media, then eliminates damage - of course, only those that are possible.
After this, all that remains is to restart the computer. The drive operates in satisfactory mode.
Execution from the command line
To run CHKDSK, administrator rights are required. Let's look at how to perform the check from the command line. The syntax for specifying the path to the hard drive looks like this:
Where:
- Volume – Just the letter of the disk being analyzed;
- file_name – Check a single file. Specified only if the file system is FAT/FAT32. The parameter must contain the entire file name;
- /F - Enables error correction. Example:
- /R We are looking for bad sectors. Works with /F enabled:
- /V Specifies that the utility should display the file path in the report. For NTFS, additional cleaning messages are displayed;
- /X disables the volume before analysis, valid when /F is enabled. Looks like that:
- /L Specifies the size of the log file in kilobytes. Example, for a 55 MB file:
- /I Makes the analysis less deep, but faster;
- /C The program will not check for loops inside directories;
- /B does not affect previously detected bad sectors. View:
If chkdsk cannot start immediately, the command prompt will display the following message:
You need to press Y on your keyboard and then Enter. It should be noted that the most useful parameter is R, as it allows you to fix bad sectors. The utility itself, of course, does not repair mechanical faults. The team looks for bad sectors and restores lost information. Launching from the console works on all Windows operating systems.
Remedies
Windows Explorer
Usually, the system, having noticed a “guest”, offers to check and restore it. This also happens in Windows (starting with Windows 7). It is enough to insert the removable drive into the port, then a notification will appear that the operating system has noticed the device and for some reason it no longer likes it.
However, the PC does not always offer such a service right away. For many reasons (outdated version, data overload), it may not respond immediately. In this case you can:
If after this the work of the removable media becomes satisfactory, you can simply return to it. As a last resort, you should restart the computer. However, this service is only good for minor damage.
Check Disk
The built-in Check Disk application will detect damage on the flash card and, if possible, fix it. Of course, not everything either, but in many cases it turns out to be a good help.
It's also very easy to use:
On a note!
“E:” - indicates the identifier of the flash drive; you can insert another identifier instead of it
.
Next, the system itself will assess the condition of the removable drive and revive the damaged areas. True, only logical ones. And that's not all. After completion of the work, the system will provide a report on what broken areas were detected and whether they were able to be revived.
After rebooting the machine, the removable drive should start working in the same mode as before the damage. In other cases, it is better to use other utilities, such as Hetman Partition or Partition Guru.
Hetman Partition Recovery
Hetman Partition Recovery utility can find and recover damaged or deleted files regardless of the method. For this:
- Go to the official website of the utility developers, select the file download option and click “Download file”.
- The Google Chrome browser will prompt you to select a folder to download the file on your computer, we recommend selecting the “Downloads” or “Desktop” folder, click “Save”. Sometimes the file is downloaded automatically.
- Run the program installation file from the "Downloads" folder or from the bottom bar of the download browser by double-left clicking the mouse.
- The usual “Setup Wizard” will open, read the information and click “Next”.
- Click the “I Accept” button and read the terms of the license agreement if you wish.
- Click Next.
- Check the required boxes and click “Install”. Wait for the installation process to complete and the program to start automatically.
- After starting the program, the “File Recovery Wizard” window will appear, read the text, click “Next”.
- Select with the left mouse click. The utility will provide two scanning options, we recommend selecting “Full analysis”, checking the appropriate box, click “Next”.
- After completing the scanning process, click on the “Finish” button.
- Drag the necessary files into the recovery field, click on the “Recover” option.
- Check the box to save files and click Next.
- Wait for the process to complete and go to the selected drive to view the recovered data.
Running Check Flash
Insert the USB flash drive into your computer and, if necessary, create copies of all files stored on it. Then open mikelab.kiev.ua, then select “Programs | ChkFlash" and download the provided ZIP archive. Unpack the archive and run the program.
Calculating the actual capacity of a flash drive
In the program window, in the “Disk” section, select the desired drive and in the “Access Type” section, activate the “As a physical device (only for NT systems)” option. In the Action section, select the Write and Read function and activate Full Set. Under Duration, select the Single Pass option.
Then click on the “Start!” button. and by clicking on the “Yes” button, confirm the action in the notification that all files stored on the flash drive will be deleted. If the flash drive capacity is less than specified, memory errors will appear during the test.
Flash drive speed measurement
In the main Check Flash window, select the desired flash drive and in the “Access Type” section o. Under Duration, select the Single Pass option, then click Start! The graph above the button shows the verification process.
In the “Information” area, the utility displays the received data. Opposite the “Read” item the reading speed is displayed, opposite “Write” the measured write speed.
Detection of memory cells containing errors
In the Check Flash program, select the desired flash drive and in the “Access Type” section, select the “As a logical drive (NT systems only)” option. In the "Action" section, activate the "Write and Read" function and then "Small Set". Click on the “Start!” button and by clicking on the “Yes” button in the notification that all files stored on the flash drive will be deleted, confirm the action.
Then open the “Log” tab, and if the utility displays a long list of errors there, then in the future you should not save important files on the flash drive.
Formatting a USB flash drive
Since Check Flash writes data to the flash drive in different places, the next step is to format it. Open Windows Explorer, right-click on the flash drive icon, select “Format” and follow the instructions.
The host is infected with a virus
Sometimes the reason lies in the fact that the removable disk was damaged by “saboteurs” who arrived from the Internet. Such a threat lurks, for example, on photo hosting sites.
An inexperienced user can also cope with this. Free antivirus cleaners will come to the rescue, for example:
- Dr. Web Cureit;
- Malwarebytes Anti-Malware.
It’s easier to use Doctor Web, which can also be downloaded from the Internet. This service is good because the virus database is constantly updated and the defender program keeps up with viruses in its development faster than many other analogues.
If the reason for the appearance of broken areas was related to viruses, this will become clear from the report.
Thus, it turns out that bad sectors on a removable drive are not a fatal problem; in most cases it is possible to fix it. In some cases, you will have to contact a service center to restore the flash card.
Video - How to check a flash drive for errors and fix them?
How to recover an SD card or USB flash drive if the computer does not see it, does not read or write data? Problems with flash drives are rarely caused by natural wear and tear. More often, problems with them are caused by users ignoring the rules for safely removing the device, experiments with various software in which these flash drives are involved, as well as their initially lousy quality. Below we will consider a list of possible actions carried out in the Windows environment that can solve the problem, unless, of course, the cause lies in a mechanical failure. And we, friends, will go from simple to complex.
Checking a flash drive for bad sectors: effective methods
by
Elvin (Admin) 02/13/2019, 06:00
Let's find out how to most effectively and quickly check for bad sectors on a flash drive. It is possible to fix bad sectors on a removable disk - you can also use third-party software for this...
In the event that problems arise in the operation of a portable storage device (hereinafter referred to as a flash drive), most users choose to replace this device. This article offers an alternative solution. Checking a flash drive for bad sectors is a fairly easy procedure and does not require any deep technical knowledge. Below are three main options for detecting bad sectors of physical memory, two of which do not require the use of third-party software.
Checking a flash drive without using the cmd operator
The first thing you need to do is double-click on the “My Computer” shortcut - having opened this folder, you need to find the flash drive icon, after which you need to right-click to bring up the context menu. Next you need to select the marker called “Properties”. Then there is also nothing complicated - in the window that appears you need to open the “Service” tab. The task will be completed after checking the flash drive for bad sectors starts - to do this, just click on the “Run check” button.
Launching Check Disk using the console
To call the above-mentioned console, you must use a hotkey combination. These are the “R” key and the “Win” key. After a window called “Run” appears on the screen, in the “Open” field: you need to enter the command chkdsk E: / F / R
Let's look at all the notations in detail:
E: - letter designating a flash drive; /F - is responsible for fixing errors in the FS of the flash drive; /R - fixes sectors that are damaged.
This operation will not only check the bad sectors, but also restore them as much as possible.
In-depth analysis using third-party Check Flash software
Check Flash is third-party software that was designed specifically to carefully work with physical memory drives. The functionality of this software is not limited to checking and correcting errors. It also gives the user the opportunity to change the writing/reading speed of the device being checked, save images of partitions/disks with their subsequent restoration, and completely delete the contents of the media.
It is worth noting that checking a flash drive for bad sectors using Check Flash is the highest quality among those previously listed. Before starting use, it is recommended to copy the necessary documents and files from the flash drive, since they will be deleted during the scanning process.
Before you click Start, you must configure certain scan options. Everything is not as complicated as it might seem at first glance. To configure the scan, select the following parameters:
After setting the above parameters, you should select the name of the flash drive - this is done in the “Device” field and click “Start”. All is ready! Now all you have to do is wait for the scan to finish - the presence of all found bad sectors and other errors will be visualized in the log.
It should also be noted that in the “legend” section there is an annotation for all colors used in the scanning results
Recovering SD cards and USB flash drives in Windows
- Note: below we will only talk about restoring the functionality of flash drives, but not about saving the data stored on them. This is a separate topic, and there is something about this on the website; you can also use this program for. Most of the methods proposed below for recovering SD cards and flash drives will lead to the loss of their data.
Hardware lock
SD cards, MicroSD adapters and flash drives can be hardware protected from writing data or completely blocked even for reading. On such devices there is a lock switch, which must, accordingly, be set to the “Unlocked” position.
Problems not related to the drives themselves
The cause of problems with SD cards and flash drives may be Windows security policy. You need to find out whether access to removable drives is blocked (in whole or in part of writing data to them) by the computer administrator. You also need to check the card reader or USB ports of your computer. If everything is fine with the latter - the card reader reads other SD cards, but problems still arise with the flash drive, no matter how you connect it to other USB ports, move on.
Windows Explorer
Standard formatting using Windows Explorer can help in simple cases such as unsuccessful writing of data to a flash drive. Or when for some reason a smartphone, tablet, camera or other device cannot cope with this operation regarding SD cards. In any current version of Windows, in the Explorer window on the drive, call up the context menu and click “Format”.
We leave the original file system and first try a quick format.
If it fails, repeat the operation, but with full formatting (uncheck the fast box).
Windows Disk Management
You can try to perform the formatting procedure in disk management. To launch this tool, enter in the system search field:
diskmgmt.msc
In the disk management window, focusing on the size of the drive, we look for it among the disks connected to the computer. And in the context menu called on it, we launch formatting.
You can immediately select full formatting.
If the flash drive has a partition structure like a hard drive, you must delete each of those partitions. This is done using the “Delete Volume” option in the context menu.
And then, in place of the resulting unallocated space, you need to create a single partition. To do this, in the context menu on this very unallocated space, launch the “Create a new volume” operation and follow the instructions of the step-by-step wizard.
Programs for low-level formatting
Standard formatting tools may not help in complex cases, for example, when flash drives are displayed (in the same Explorer or Disk Management) as unrecognized devices with the RAW file system. The latter means that either the Windows environment does not understand the file system of the drive, or there is no file system as such in principle. Actually, this is what causes problems with a flash drive or SD card when it works on other devices, with other operating systems. In such cases, third-party Windows programs designed for so-called low-level formatting will help restore the flash drive.
In fact, low-level formatting is a procedure that is carried out either in the production conditions of flash device manufacturers, or in serious specialized services. Various types of Windows software that claim to perform this kind of operation actually perform a regular full format, but using mechanisms that differ from those used by the operating system. Such programs cope well with flash drive problems if these problems arise at the file system level. Let's look at two of these programs.
HDD Low Level Format Tool
https://hddguru.com/software/HDD-LLF-Low-Level-Format-Tool/
The shareware portable program HDD Low Level Format Tool can format various types of storage media, in particular SD cards and USB flash drives. After unpacking the archive with the program, run it and agree to the license terms.
We choose free use.
Directly in the program window we indicate the problematic drive and click “Continue”.
We confirm the decision.
We wait for the operation to complete and check the operation of the media.
SDFormatter
https://flashboot.ru/files/file/355
A completely free small program called SDFormatter is another tool for so-called low-level formatting. Works with both SD cards and USB flash drives. Install SDFormatter into the system, launch it, and indicate the problematic flash drive in the “Drive” column. Click “Format”.
The program wants to make sure that our intentions are serious, click “Ok.
He asks not to touch the drive while the operation is being performed.
Upon completion, test the flash drive or SD card. If this does not help, repeat the operation with the settings for complete overwriting of sectors (nothing more than full formatting). Press “Option”, select “Full (OverWrite)”. And also click “Format” at the bottom.
If using the above methods it was not possible to revive the flash drive, and it is still under warranty, you need to stop at this stage. And do not take any further action except contact the seller with a request to replace the device. All the actions described below should be resorted to only when, in fact, there is nothing to lose. The instructions below apply to USB flash drives, SD and MicroSD cards. However, in the case of the latter, the likelihood of recovery is extremely low.
D-Soft Flash Doctor
D-Soft Flash Doctor performs so-called low-level formatting, and at the same time also detects damaged sectors (cells). Well, and, accordingly, knows how to block them and replace them with backup ones. The program can help when flash drives or SD cards have difficulty reading individual files located on damaged sectors. The program is free and portable. I did not find the official website, but it can be freely downloaded on the Internet.
In the D-Soft Flash Doctor window, the first thing you need to do is run a scan to detect errors.
In my case, there were no damaged (broken) sectors.
But if in your case, friends, the scan results are different and bad sectors are detected, we start the recovery process.
The window for performing this operation promises that the process will not last longer than 10 minutes, but in fact, reassigning bad sectors on a drive with a capacity larger than 4 GB can take quite a long time. So it is better to run the recovery operation at night.
Flashing the memory controller
Programs for so-called low-level formatting or their analogues, which in any other form claim to be able to resuscitate all types of SD cards and/or USB flash drives, turn out to be powerless in the event of a software failure of the controller, when it requires flashing. This problem can have different symptoms, but more often it is either the computer does not see the drive completely, or it sees it and can even read the data, but cannot format it by any means. In particular, due to write protection even though the drive is not locked by hardware.
How to restore functionality to a RAW disk
Formatting disks in Windows
If the partition of the hard drive you are interested in is missing important files, then getting it back into operation will not be a problem. To do this you will need to do the following:
- Open “Control Panel”;
- Go to the “System and Security” section;
- Select “Create and format hard disk partitions”;
- In the window that opens, select the desired section;
- Right-click on it and click on “Format” in the drop-down menu;
- A window will open in which you need to select NTFS in the “File system” item;
- Click “Ok” and wait for the process to complete.
- After this, you can restart your computer (although this is not necessary).
However, if there is important information on the partition that has now become RAW, then it will need to be restored. Therefore, you will have to wait with formatting and perform a number of actions:
- Download the TestDisk program (it’s free) from the developer’s official website and unpack it anywhere;
- Go to the program folder and find the TestDisk.exe file;
- In the window that opens, select the “No Log” option;
- Select the damaged disk and click on Proceed;
- After this, you will need to specify the disk type, in our case – Intel/PC;
- Having done this, you will need to select Quick search and press P;
- After some time, a list of folders and files that the program found on the partition will be displayed;
- Select the ones you need and copy to your working partition.
Once the necessary files are in a safe place, you can begin formatting.
Be aware that after formatting (especially full formatting), it will be impossible to restore the files that were on the damaged disk. Therefore, be sure to make sure that you save all the important data that you found using the TestDisk program.
If you do not know how to fix the RAW error on your hard drive, USB or SD card, if the CHKDSK utility does not cope with the task of fixing the PC file system problem, then this article will help you solve this issue.
The content of the article:
An example of disk analysis without Chkdsk error correction
You can check the integrity of the drive by entering the command name and the drive letter followed by a colon. For example, to check the integrity of drive C, enter:
If the index check finds lost files, Check Disk will restore them as they are. Typically, recovered files are stored with a .chk extension in the root directory of the corresponding drive. Finally, Check Disk displays a report telling you whether the free space was incorrectly marked as in use, and if so, recommends that you correct the error by running Check Disk with the /F switch
.
CHKDSK Command Options
CHKDSK [volume[[path]filename]] ] , where
- Volume
—Specifies the mount point, volume name, or drive letter of the drive being tested, followed by a colon. - filename
- Files to check for fragmentation (FAT/FAT32 only). - /F
- Correct disk errors. - /V
- For FAT/FAT32: displays the full path and name of each file on the disk. For NTFS: display cleanup messages (if any). - /R
- Search for bad sectors and restore surviving contents (requires /F). - /L:size
- For NTFS only: Set the size of the log file (in KB). If a size is not specified, the current size value is displayed. - /X
- Preliminarily disable the volume (if necessary). All open handles to this volume will be invalidated (requires /F) - /I
- NTFS only: less strict checking of index entries. - /C
- NTFS only: skips checking for loops within the folder structure. - /B
- NTFS only: Re-evaluate bad clusters on the disk (requires /R) - The /I or /C options reduce Chkdsk execution time by skipping some volume checks.