Monitor flickering is a phenomenon that PC users encounter quite often. This problem can be solved in several ways - it all depends on the reasons for which this phenomenon arose. If you carefully read the troubleshooting methods, you can return the monitor to its former clarity and use the computer comfortably again.
Monitor screen flickers
Ripples on the monitor: what kind of ripples happen and how to get rid of them
Image artifacts are an extremely serious problem that can lead to numerous eye problems. This is why it is so important to get rid of any faults as soon as possible.
Most often, users are bothered by ripples.
What to do with the ripples? What measures will allow you to get rid of this defect as soon as possible? Are there any universal measures that can be taken to correct the situation and fix the monitor?
What defect is commonly called ripples?
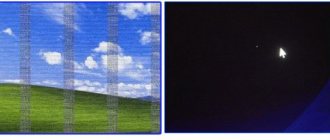
Ripples are a defect on a monitor screen (or television screen), such as the complete absence of an image and hissing (in the case of a TV).
Instead, noise appears on the screen that will prevent you from using your PC or TV monitor.
This interference usually appears as horizontal stripes that flicker on the screen.
Rippling was a fairly common problem in the past, however, it still occurs today.
If earlier ripples were widespread specifically in the case of televisions, then with the widespread use of computer technology this defect has reached monitor screens.
Now this problem worries more and more people, because PC monitors tend to fail.
The ripples always look roughly the same, although there are some differences. They consist in the fact that some screens show simply gray-black stripes during ripples, while others show gray-black stripes diluted with colored stripes.
It's important to note that there is no difference in exactly what the ripples look like. It is a defect that requires elimination as soon as possible. Only in this case can you be sure that everything will go well and the defects will disappear.
Why does the screen ripple?
Problems with video card drivers are one of the most common reasons why ripples appear. It is not surprising that in many cases it is extremely difficult to fix this problem on your own.
The fact is that the best option is to install a new version of drivers, however, this is not always possible.
Moreover, in some cases, installing new software can lead to numerous technical problems, and in some cases it is completely impossible. When turned on, the ripples will remain.
So, if we are talking about a relatively new video card, then you should install the new version of drivers as soon as possible.
In this case, you can forget about any problems for a very long time.
If we are talking about an old PC with very little memory, then you will have to delete unnecessary files and make room for installing drivers.
If you need to install new software for a video card that is already more than 10 years old, then everything will be much more complicated. You will need to spend as much effort and time as possible to find working drivers, which may no longer be on the manufacturer’s website.
REFERENCE! As an alternative, we recommend paying attention to forums where it may be possible to find software for even the oldest equipment.
Another common problem is overclocking a video card. Overclocking is an extremely serious problem that can be extremely difficult to solve even for a specialist. The consequences of improper overclocking are the failure of the video card.
This seems like a small problem, but in reality it is not at all.
After incorrect overclocking, the video card will have to be taken to a technician or service center, since in most cases it is absolutely impossible to repair it on your own.
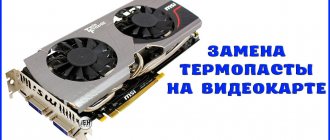
Video adapter malfunction due to overheating is another popular problem. In this case, you will have to start testing the video card. This can be done using specialized software.
We can recommend the Everest program as such software. It is free and easy to find on the Internet. In order for the test to be as successful as possible, you need to know the normal temperature for the video card.
Usually it's about 50-65 degrees.
REFERENCE ! If the temperature is significantly higher, this means that the video card is overheating. Overheating can cause a wide variety of problems, so it's not surprising that ripples often appear after a device is out of temperature.
https://www.youtube.com/watch?v=oH9wkQkgMcI
If the program detects a high temperature, but no overheating is observed (according to personal feelings), then the problem may lie in poor contacts.
Then you need to check all the cables, however, this is the most extreme method.
The thing is that opening a PC or laptop is not recommended, because it is very easy to break it or do something wrong.
Most often problems arise with the monitor. The most common problem is in the monitor itself. This is not surprising, because the monitor is a complex technical device that is very easy to malfunction.
To prevent this from happening, you must comply with at least the most basic requirements for using the screen. If suspicions fall on the monitor, then they need to be checked. To do this, you need to connect the monitor to another PC.
If the problem still does not disappear, then the problem is clearly that there is some kind of malfunction in the monitor.
It is possible that there are problems with the matrix. The matrix is a complex technical component, which can be extremely difficult to replace on your own. Sometimes it's all about the backlight or inverter.
Rubbing the cable can also cause ripples. Usually the reason for the cable chafing is that the laptop is constantly being opened and closed.
In this case, you can expect the problem to appear after a couple of months of intensive use.
How to get rid of ripples on the screen
As mentioned earlier, you can get rid of ripples in different ways depending on the type of malfunction. Among the universal ways to solve the problem are the following:
Replacing the chip directly on the video adapter itself. This is a rather complicated method. The thing is that finding a company that can repair a device with a chip replacement can be difficult even in a relatively large city.
Moreover, some technicians do not have sufficient qualifications to cope with the problem. Then they will have to spend a lot of effort learning the basic repair methods and then finding the right chip.
All this affects the cost, which is why it is so important to prepare in advance for the fact that this method will not be implemented.
REFERENCE! Warming up a video card is also a relatively complex method. It can only be used when no other method helps.
The fact is that this method can correct the situation only for a very limited time. Then the device will become unusable again and will have to be repaired.
In what case can you fix the problem yourself?
It all depends on how well a person understands technology. If we are talking about a housewife, then it is recommended to take the equipment to a specialized service center. They will help you sort out all the problems and make sure that the user does not even have the thought of doing the repairs himself.
The only case where you can try to fix the problem yourself concerns drivers. If you reinstall them, then you can forget about the problems for a very long time. However, the problem is not always the software. Most often, we are talking about some kind of hardware malfunction. Then you can’t do it not only without knowledge, but also without special tools.
Ripples and stripes on the computer/laptop screen (artifacts)
User question
Hello!
Recently, stripes and ripples began to appear on my computer screen; the picture can sometimes twitch when passing a horizontal stripe.
This happens only in games. I tried reinstalling Windows, changing video drivers - no effect. These are artifacts on the video card (I was told so at the service center), and it needs to be changed. Or are there other options?
Good day!
In general, the presence of any distortion on the screen is a very alarming sign. Stripes and ripples can appear on the screen both due to problems with software and problems with hardware. In this article I will try to analyze the most basic things that you have to deal with, what can be done and taken to diagnose and find the cause (well, knowing the essence of the problem, you can often eliminate it on your own
Source: https://ocomp.info/ryab-i-polosyi-na-ekrane.html
Flickering horizontal or vertical stripes
The presence of horizontal or vertical stripes on the monitor, as well as so-called artifacts - geometric color or black and white figures of different sizes, short monochromatic stripes and pronounced noise from small but clearly visible objects - deserves special comment. Artifacts most often indicate problems with the video card caused by overheating or hardware faults. Also, the presence of artifacts may indicate a problem with the cable.
If flickering horizontal or vertical stripes appear on the monitor, especially those consisting of thinner colored stripes, this is more likely to indicate a malfunction of the connectors on the video card or monitor, as well as damage to the cable or cable (in a laptop) and the display matrix itself. Both cannot be treated programmatically; here you will need the help of a specialist. At the very least, you will need to establish the exact cause of the problem. The exception is cable replacement, since this operation can be performed by every user.
Why does the computer monitor screen flicker?
Monitor flickering is a fairly common problem that was common among users of older monitors.
But with the transition to modern devices, it may still bother some people, and certain software and hardware factors may be responsible for this phenomenon.
In this article we will analyze the main points related to the situation in question and tell you how to get rid of them.
Eliminate PC monitor flickering
There are several sources that negatively affect the quality of the monitor. Fortunately, defects are not always hardware in nature and require repairs and financial investments. Sometimes they can be corrected by operating system settings.
Method 1: Windows Settings
Sometimes it is enough to turn to the Windows settings to fix the problem. Below we will discuss the main problems that cause the monitor to not work correctly.
Low screen refresh rate
Comfortable use of the display in most cases is important when the screen refresh rate is high. Low values can cause an unpleasant flickering sensation.
The optimal choice is 60 Hz or 75 Hz.
Many monitors in the mid-price category and above support setting the parameter to 120 Hz and even 144 Hz - your video card should also be able to set a higher frequency. Mainly, high values are used for games and working with 3D, and for normal everyday use of a PC, 60-75 Hz is enough.
To change this setting, follow these steps:
- Right-click on an empty space on your desktop and select “Display Settings.”
- In the Windows settings that launch, click on the “Advanced display settings” link.
- Click on "Display Video Adapter Properties".
- A window with properties will open, switch to the “Monitor” tab, and in the “Screen refresh rate” field from the drop-down menu, select the highest value. Save changes to "OK".
If the flickering is not resolved or there are no other values available, continue to the next tips.
Incorrect driver operation
A driver for a video card can both reveal the performance of this component and ruin its operation at the software level.
Problems can arise not only after OS/driver version updates, but also for no apparent reason.
In this case, the advice to “update the driver” does not look like an excuse or a panacea for solving any difficulties, but a real chance to solve the problem.
Please note that sometimes it may be necessary not to update, but to roll back to the previous version of the driver. For the installation process to be successful, the first step is to completely remove the software, and only then do a clean installation. For information on how to do this correctly, read our article at the link below.
Read more: Reinstalling video card drivers
Problems with programs
Some installed applications may be incompatible with the PC configuration at a level that causes the monitor to flicker. Let's look at the main situations:
- Remember if you have recently installed/updated any software, and if so, try quitting this program or uninstalling it.
- You can also identify the problematic application through the Event Viewer system log. You can open it like this:
- Press Win + R on your keyboard and enter the command eventvwr.msc, confirm with Enter or “OK”.
- On the left side of the window, expand the Windows Logs tab and go to Applications.
- Browse the list. Pay attention to the “Date and Time” column - they should correspond to when the flickering appears. Naturally, time needs to be compared approximately, and not to the nearest second.
- If you see an “Error” event in the “Level” column, click on it and view the details of the problem below, perhaps they will help you figure out whether the program is involved in the malfunction of the monitor.
- If necessary, do the same in the “System” tab.
- You can also start your PC in safe mode, where no unnecessary software is loaded other than those important for the functioning of the operating system. How to enter safe mode on Windows XP, Windows 7, Windows 8, Windows 10 How to enter “Safe Mode” via BIOS
- Run a system scanning utility that repairs errors in Windows. This is written in Method 1 of the article at the link below. Read more: Restoring system files in Windows Similarly, use the damaged component recovery utility. Read more: Restoring damaged components in Windows using DISM It is worth noting that these commands work not only in Windows 7, but also in its newer versions.
Method 2: Diagnose hardware problems
When the operating system settings do not help, you should check for technical problems and breakdowns.
Cable problems
The monitor cable that is plugged into the outlet and supplying electricity may have poor contact. Try simply moving it, checking that the plug is firmly inserted, unplugging it from the outlet, and then turning it on. Repeat these steps with the cable connecting the monitor to the system unit.
It would be a good idea to connect the monitor to the network in an isolated manner. To do this, remove all other cables so that they do not come into contact with the one coming from the monitor (or even with the extension cord if the display is connected through it).
When restoring functionality, try to route the network cable to the outlet so that it does not come into contact with the rest.
A few more reasons
The above malfunctions are the most common problems. However, it happens that the monitor flickers only in games. This is where you should check your graphics settings. Sometimes a weak video card is simply not capable of drawing an image, which is why this effect occurs.
Another point is that a powerful video card and a high-quality graphics type must be connected with high-quality wires with high bandwidth. We are talking about an HDMI cable. There is no point in using VGA, because it is not designed for a digital signal and itself causes interference in the picture.
If the system unit does not display a picture on the display, then you should check how the monitor is configured. Perhaps someone recently connected a second monitor and instead of duplicating or splitting the picture, they showed it on the second screen. In this case, you need to connect the monitor through a different connector and check the screen settings.
Let's figure out why the monitor screen blinks when the computer is running.
The most common cause of computer monitor flickering is an incorrectly determined refresh rate. This parameter can be changed manually.
To go to screen settings, call the context menu on the desktop. To do this, right-click on any empty space on the screen.
In the menu that appears, select the last item - “Personalization”.
This will open your Windows theme settings. In the lower left part of the window, find the “Screen” link and click on it.
Here you can change the size of screen elements. To access additional configuration items, click “Customize Screen Settings.”
Note! You can also use the "Adjust screen resolution" link. Both of these items lead to the same menu.
This section sets the resolution - the number of horizontal and vertical pixels that make up the image on the screen.
To do this, select the desired value from the drop-down list. Opposite the optimal value for the connected monitor, “recommended” will be indicated in parentheses.
You can save these settings without closing the window by clicking the “Apply” button.
After that, click on the “Advanced options” link, which is located on the right. A new window will open in which you can change the basic settings of the video card and monitor.
The screen refresh rate is set on the “Monitor” tab in the window that opens. Select the maximum refresh rate available from the list.
This parameter determines how many times per second the image on the monitor will be updated.
If the selected frequency is too low or the value is not supported by the output device, the screen will flicker.
It is better not to check the box responsible for access to additional modes. If it is checked, uncheck it. The list of available frequencies will be updated, and you will be able to select the maximum of them.
Note! It is not recommended to set a refresh rate that is not supported by the monitor itself. You can find out the recommended frequency in the instructions for the device or in its characteristics on the manufacturer’s website.
Outdated video card drivers
Your computer monitor screen may flicker when you install incorrect or outdated graphics adapter drivers. You can update this software from the Adapter tab. To do this, click the “Properties” button.
In the section that opens, go to the “Driver” tab and click “Update”. Then use the built-in search wizard. If after installation the system notifies you that you need to restart your computer, do so. A reboot may be required for the software changes you made to take effect.
Problems with monitor drivers
In addition to the video card, an outdated program can be installed for the output device itself. The update is performed in a similar way.
Close the graphics adapter properties window and return to the Monitor menu. After that, click “Properties” in this section and select the “Driver” tab.
Click on the “Update” item.
The system will prompt you to choose one of two software search modes.
When you select the first option (automatic search), the computer folders will be scanned, and if the monitor driver is not found, Windows will try to find the necessary software on the Internet.
If you select the second option, the search will be performed only on the user's computer, without access to the network. It is recommended to select the first option.
If your monitor came with a driver disc, insert it into your computer's optical drive. Wait until the search process is completed. It takes from a few seconds to 1-2 minutes.
Damaged cables or unstable connection
The cause of problems with the screen may be a faulty VGA, DVI or HDMI cable with which the monitor is connected to the computer. To diagnose this problem, check the cord for damage.
It should not be crushed or torn. Also check the network cable through which the device is plugged into the outlet. Unstable contact with the electrical network causes the image to flicker.
If possible, connect your computer using a different cable and check if the screen is flickering. If there are no problems when using the replacement cable, the problem was with the cord. Replace it for proper operation of the device.
In addition, it is worth checking whether the cable connector is tightly inserted into the ports of the monitor and computer.
Most VGA and DVI cables have screws with which the massive connector is screwed to special mounts on the device outputs.
A cable secured in this way will not fall out, and the contact will not come off even if you frequently move the monitor.
Monitor technical problems
Another reason why the screen may flicker when the computer is running is a breakdown of the monitor itself. The best solution in this case would be to take it to a service center.
Flickering of the image can be caused by the burnout of one or more CCFL or LED lamps that illuminate the matrix.
The built-in power supply may also become unusable.
But you can fix common minor faults at home, using a soldering iron. The most common cause of hardware failure, due to which the image on the screen may flicker, is the failure of capacitors.
A capacitor malfunction is easily determined by its appearance. Normally, this part looks like a cylinder with a flat top edge.
If it is convex, the capacitor could have lost its original properties, which is why the screen flickers.
If the capacitor ruptures and electrolyte leaks from it, the part will not work normally and needs to be replaced. The most common causes of such a breakdown are power surges and overheating. Because of them, the electrolyte inside the device boils, expands and breaks through the top cover.
Important! Do not repair the monitor yourself if its warranty period has not yet expired. Most devices have seals that, if broken, will void the warranty.
Such parts are attached to the board with two metal legs. To disconnect them, heat the connection with a soldering iron and pull it towards you. The parameters of the capacitor are always indicated on the case, according to which you can purchase a similar part on the radio market or in a specialized store.
Solder the purchased capacitor in place of the removed one, observing the original polarity. A contrasting stripe on the side of the part will help you identify “-”.
It consists of broken lines and resembles road markings in appearance. Replacing capacitors at home will cost you several times less than the same repair at a service center.
Therefore, if you have a soldering iron and minimal experience, it makes sense to try to produce it.
The game image is flashing
If the screen only flickers in certain games or graphics programs, check the application settings. They are usually located in the "" or "Graphics" section.
Set the settings to the minimum values, disable anti-aliasing and anisotropic filtering. Then launch the game and check if the screen is flickering.
If the problem is resolved, gradually increase the settings to achieve a balance between performance and realistic graphics.
Particular attention should be paid to the “Vertical Sync” parameter. Disabling it improves game performance, but the image may flicker. It is recommended to enable this setting to avoid flashing horizontal bars during gameplay.
Important! When setting up some games, you encounter the “Automatic configuration detection” option. When selected, the optimal graphics settings for your system will be installed.
Training video: How to remove flicker from your monitor screen
Source: https://WiNetwork.ru/kompyuternaya-pomosch/migaet-ekran-monitora-kompjutera.html
Outdated video card drivers
Your computer monitor screen may flicker when you install incorrect or outdated graphics adapter drivers. You can update this software from the Adapter tab. To do this, click the “Properties” button.
In the section that opens, go to the “Driver” tab and click “Update”. Then use the built-in search wizard. If after installation the system notifies you that you need to restart your computer, do so. A reboot may be required for the software changes you made to take effect.
The screen on the laptop flickers: reasons, what to do to fix the problem
When interacting with a computer, the user receives most of the information through the monitor, and in a situation with a laptop, through the screen.
Screen matrices differ quite significantly from each other: in resolution, picture refresh rate, color rendering quality and other parameters.
But they all have one task - to display information to the user so that he can perceive it comfortably. A serious problem that can hinder your information consumption is screen flickering.
It is practically impossible to work on a laptop whose display flickers or the colors on it are distorted. In this article, we will look at what to do if the screen flickers, and how the problem can be fixed without contacting a service center.
Why does my laptop screen flicker?
The peculiarity of laptops is their portability. You can always take your computer with you, which increases the risk of damage at the hardware level. But problems with a flickering screen can also arise for software reasons.
Most often the screen flickers due to the following problems:
- Incorrect screen frequency settings in the system;
- Software glitch;
- Video card drivers that are incompatible with the current version of the operating system are installed;
- There are problems with the screen output device (video card). Most often, the malfunction is associated with burnout of video card elements or overheating;
- Faulty operation of the screen matrix backlight;
- Failures in contact between the laptop matrix and computer elements, which is most often caused by damage to the cable.
Only some of the problems described above can be eliminated at home. If, for example, the video card is faulty, you will have to contact a service center to have it repaired or replaced.
What to do if your laptop screen is flickering
Before you start searching and trying to fix the problem, you need to try turning off the power to the laptop. To do this, unplug the computer from the outlet and remove the battery.
Wait 3-4 minutes and reconnect the battery, then start the laptop.
If this simple procedure does not help get rid of the problem, proceed to other ways to correct the situation described below.
Solving software problems
The easiest way is to solve possible software problems yourself, so when searching for the reason why the laptop screen is flickering, it is recommended to start by checking the settings and drivers. First, make sure that the screen refresh rate settings in your operating system are correct. You can check this as follows:
- Go to the screen settings; to do this, right-click on an empty space on the desktop and select “Display Settings”;
- Next, a settings window will open, in which you need to click “Advanced screen settings”;
- A new window will open in which you need to select “Graphics adapter properties” from the list of related parameters;
- Next, a settings window will open, in which you need to go to the “Monitor” tab and configure the screen refresh rate setting. The optimal frequency may differ on different laptop models, so we recommend that you try setting all available frequency options in turn, each time checking whether the problem with screen flickering has been resolved.
Please note: Also, sometimes a problem with screen flickering may occur due to an incorrectly selected screen resolution. Make sure that the settings are set to the optimal resolution for the matrix used in the laptop.
If you cannot solve the problem by changing the frequency and resolution of the screen, it is recommended to make sure that the video card drivers installed on your computer are up to date.
Go to the official website of the developers of the GPU used on the laptop and download the latest drivers for the operating system installed on the computer.
After that, go to “Device Manager” and remove the current drivers for the video card, and then install new ones and restart the computer.
Updating Windows
If the screen blinks after all the options we've tried, update Windows:
- Launch the “Task Manager” line (to do this, press the combination Ctrl + Shift + Esc).
- Find "Update Center".
- Go to “Options”.
- Click the “Update and Security” box.
- In the first tab we find “Check now” (this means that the system will automatically evaluate the problem, why the computer monitor is blinking, and identify the reasons in Windows 10).
- After checking for updates, click “Install Now”.
- We are waiting for the Windows update to finish.
- We restart the computer.