Ways to enable the mixer for Windows 7
First you need to go to the Start menu, then go to Control Panel. In the window that appears, you need to select the “Hardware and Sound” line, and then open the “Sound” tab. When you get to the menu, you need to right-click on the empty space and select the line “Show disabled devices”. In the same menu there is a “Record” attachment. In the list of devices that appears, you need to identify the one you need and right-click on it and click the “Enable” button. Now the mixer for Windows 7 is ready to work, you can configure it, and it will also appear in recording programs as a sound source.
To open the mixer, you need to find the speaker icon on the taskbar and right-click on it. In the window that appears, click on the “Open volume mixer” button. Now you can adjust the volume levels of system notifications, games, music from the player or browser.
The volume mixer can be opened using the console. To do this, you need to open a command prompt and enter SndVol.exe into it.
What to do if the mixer is not visible
Sometimes it happens that even after selecting the “Show disabled” line, nothing appears there. The presence of such a problem may indicate that the device is faulty or there are no drivers for it. To install, you need to go to the official website of your device and download the appropriate software for it. Even if this doesn’t help you, try updating your computer’s drivers; this almost always solves the problem. Remember, downloaded software from third-party resources can harm your computer, infect it with viruses, or simply not work, causing even more problems. After installing the drivers, you must restart your computer for the changes to take effect.
Checking your microphone settings
The problem often occurs if the microphone is not available. In this case, use of the mixer is automatically disabled.
Click on the gear icon in the Start menu to enter Settings and go to the Privacy section.
In the left pane, open Microphone. First of all, check if microphone access is enabled for this device. If not, click the Change button and set the switch to Enabled.
Then turn on the “Allow apps to access your microphone” option and scroll down the list of installed apps. Toggle the switch next to the apps you want to grant access to.
Restart your computer and see if the problem is resolved.
Manipulating screen settings
You can also assume that the icon seems to be active, but it is still not in the tray, as a result of which the Windows 10 volume mixer is inaccessible. Very often, this problem can be related to screen settings.
In order to fix the problem, you need to use RMB on the “Desktop” to go to the screen settings item, set the scale of text and application elements to 125%, close the settings window, enter the same section again, set the initial value for the scale to 100%, exit settings and completely reboot your computer or laptop.
Show disabled devices
It's possible that Windows 10 has automatically disabled the stereo mixer as a virtual audio device. He considered it unnecessary and may be disabled by third-party applications.
Right-click on the volume icon in the system tray and select the “Sounds” option. Go to the "Recording" tab.
Right-click anywhere in the middle of the window and check the “Show disabled/disconnected devices” options. The mixer should now appear.
Right-click on it and select Enable.
How to remove the volume icon from the Windows 10 tray
By the way, if you decide to use this program, you will most likely want to remove the extra standard volume icon from the tray.
This is easily done through PC Settings...
You can immediately enable this icon if for some reason it “fell off” from the taskbar.
Sound Driver Update
The problem can be solved by reinstalling the sound card drivers.
In the system search bar, type “Device Manager”, click the “Open” link under the result found.
Expand the "Sound, Game and Video Devices" section. Right-click on High Definition Audio, select "Update".
On the next screen, select the option to automatically search for updated drivers.
Check if the mixer appears in the playback devices.
Enabling the Conexant HD Audio Sound Card Feature
If you have a Conexant HD Audio sound card installed, the following steps will enable the stereo mixer.
Open File Explorer and navigate to the following folder containing the file you need to edit to enable Stereo Mixer on Windows 10:
Right-click on the specified file, select "Properties" and go to the "Security" tab. Click "Advanced". The Advanced Security Settings window appears. Here you need to change the owner.
Click on the “Edit” link next to “Owner” and a window will appear to select a user or group.
Enter your user account in the “Enter the names of the objects to select” field, check the name and click on “OK”. Add the Everyone account.
Under Basic Permissions, make sure you select Full Control before applying the changes.
After you have successfully changed the owner and granted permissions for CALCC2WA.inf, you need to edit it.
Right-click on it to expand the menu and select open with notepad. Use Ctrl + F to bring up the Find window and type "stereo". You need to find 3 lines:
;HKR, %EPattributePath%EpSettingsStereoMixEnable, Enable,1,01 ;HKR, %EPattributePath%EpSettingsStereoMixEnable, MixAssocSeq,1,E0,E0 ;HKR, %EPattributePath%EpSettingsStereoMixEnable, MuteGainSettings,1,00,00
Remove semicolons before each line. Then press Ctrl + S to save the file and close Notepad.
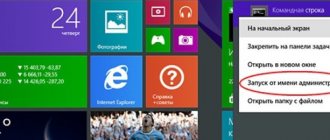
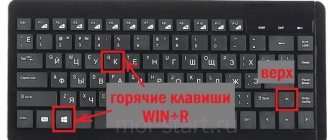
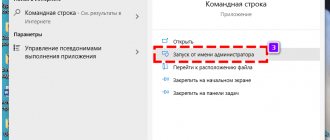
Now let's reinstall the driver. Open the Run window using the Win + R key combination, type the command devmgmt.msc and click OK.
Since we are reinstalling the sound card driver, expand the “Sound, game and video devices” tab. Right-click on Conexant HD Audio, select "Uninstall..." from the context menu.
Confirm any dialog boxes that appear asking you to confirm the deletion. Do not select the "Remove the driver for this device" checkbox because you want the file to be reinstalled.
Restart your computer. Check if the stereo mixer function has been enabled.
Turn on the mixer in Windows 10
In order to enable quick access from the system tray to the mixer, you must enable the display of the volume icon. There are many ways to do this, let's start with the most basic:
Method 1: By restarting Explorer
The stable operation of Explorer is directly related to the correct display of many elements, which include both the desktop and the taskbar. If problems arise with its operation, the volume icon may simply disappear. The solution is to restart the Explorer process, how to do this:
Step 1. Open the “Task Manager” by simultaneously holding down the “Cntrl”, “Shift” and “Escape” keys.
Open the “Task Manager” by simultaneously holding down the “Cntrl”, “Shift” and “Escape” keys
Step 2. After this, you will need to go to the “Processes” tab. Find the column with the text “Explorer”, right-click on it and then click on the text “Restart”.
Find the column with the text “Explorer”, right-click on it and then click on the text “Restart”
Note! You can also restart Explorer using a regular system restart.
Method 2: Enable system icons in Settings
The volume icon may also not appear because it is disabled in the notification area or system tray icon settings. How to check this, and if necessary, enable the display of the volume icon:
Step 1. You need to launch the Settings application, located in the well-known Start, located at the bottom left edge of the screen.
Open "Options"
Step 2: In Settings, go to the System tile section.
In “Settings” go to the “System” tile section
Step 3: Here, pay attention to the tabs on the left, we need a tab called “Notifications and Actions”. Then find and click on the text “Turn system icons on or off” highlighted in color.
In “Notifications and actions” click on the text “Turn system icons on and off”
Step 4. In the menu that opens, look at the “Volume” parameter; the slider located opposite it should be on.
In the menu that opens, check the “Volume” parameter; the slider located opposite it should be on
Method 3: Using the Group Policy Editor
Also, the volume icon may be hidden in the Group Policy Editor. Check if it is hidden by doing the following:
Step 1. Launch the “Run” window by holding down the “Win” and “R” keys at the same time. In the “Open:” field, enter the command gpedit.msc.
Launch the “Run” window by holding down the “Win” and “R” keys at the same time and enter the command gpedit.msc
Step 2. In the options menu that opens, find and expand the “User Configuration” item. After that, in “Administrative Templates”, click on the sub-item “Start Menu and Taskbar”
In the “User Configuration” item, select “Administrative Templates” and click on the sub-item “Start Menu and Taskbar”
Step 3. Click on the option called “Remove Volume Control Icon.” If it is enabled, you need to change its value to "off".
Important! This method does not work for the Windows 10 Home version.
NirCmd Command Line Options for Volume Control
In order to turn off/on all sounds , use the following command: At the first start, the sound is turned off, the next time it is turned on.
In order to increase or decrease the sound volume, Nircmd supports an option of the form: Here X is a negative or positive number from zero to 65535. A positive number increases the volume by X points, and -X decreases it, respectively. Everyone can choose the X value according to their taste, I settled on 2000.
Thus, to control the volume level I used commands like:
- increase volume
- turn down the volume
We know everything we need to know, now we’ll assign global hotkeys to these commands.
Hotkeys for volume control
Windows operating systems use keyboard shortcuts assigned to shortcuts in the Start menu as global ones. We will take advantage of this wonderful opportunity.
- Open the Start in Explorer. The easiest way to do this is by right-clicking on the “All Programs” button and selecting “Open”
- You will see the main menu folders where all of its shortcuts are located. You can create shortcuts for sound control in any of these folders, I prefer to create them in the “Standard” folder.
- Create three shortcuts with commands. It will look like this:
- For each created shortcut, change the icon and set the keyboard shortcut:
I have assigned and used the following keyboard shortcuts:
- CTRL+ALT+Num+ – increase volume
- CTRL+ALT+Num- - decrease volume
- CTRL+ALT+Num/ - mute or unmute sound
As I said at the beginning of the article, the advantages of this approach are that there are no unnecessary applications hanging in memory, Nircmd processes and closes without wasting system resources.
Controlling the volume of sounds from the keyboard is quite convenient. Are you using this opportunity? Tell us in the comments how and what utilities you use - perhaps your option is much more practical than mine. Sharing experiences is a great thing, you know.
Reverting the Mixer Using the Registry Editor
If the method described earlier did not bring the desired result, try the method associated with the registry editor: using this algorithm, you will have to erase two keys in the Windows 10 registry and then restart the PC.
Now take a closer look to see if the icon has returned to the system tray. In theory, it should already be there.
Another technique related to manipulations in the registry editor:
- Open the registry subcategory HKEY_CURENT_USER/Control Penel/Dasktop
- Generate two string values in this category (using the menu called up by right-clicking in a free position on the right side of the registry editor). Call one of them WaitToKillAppTimeout
and the other
HungAppTimeout
. - For both of these keys, set the values to 20000, and after that you can close the editor. When everything is ready, it is also worth rebooting the PC to make sure whether our actions have an effect.
If you need to return a missing mixer, one of the described procedures should definitely help you, after which you will be able to configure the system sound settings and the overall volume of the operating system.
Yes, such a phenomenon as the disappearance of the volume control happens on Windows 10. And there are several reasons for this, from a banal “glitch”, it is currently not established what causes it, to problems with the drivers installed for the sound device. As well as the reasons, there are several solutions. Try it, one of the options should help you - and the question of how to return the volume control to Windows 10 will no longer bother you.