Not every user is satisfied with the mouse pointer available by default in Windows. For some it is too small, others don’t like the design to be too simple, they don’t want to breathe a lot of life into it. Even if you are not such a user, you may be wondering: is it possible to change the mouse pointer in Windows 10? This article is a visual guide on how to change the size and color of the mouse cursor in Windows 10.
Replacing the mouse cursor on Windows 10
Sometimes we want something new on our computer: change the interface or use a new background on the Desktop. In addition to these changes that are good for the eyes, you can adjust the pointer of your computer mouse, with which we perform the vast majority of actions on the PC. You can make changes to the appearance of the device either using Windows or through third-party utilities.
Using system tools
Using built-in tools, each Windows 10 client can change the appearance of their mouse pointer. As you know, it can change its shape while working at the computer, depending on the situation. For example, a blue circle or hourglass icon appears when the system is waiting for a window to load. In a special window, you can configure not only the main pointer, but also icons for all its states separately.
So how do you open this special window? How can I customize the pointer for myself? Take into account the following detailed instructions:
- Using the Start menu, launch the system partition for user settings called Control Panel. It will be in the list under the letter “P” or in the “Frequently Used” block if you have opened it often.
Find the "Control Panel" section in the Start menu - When the panel window opens, you will see a field in the upper right corner for entering search queries. Type the query “Mouse” there, and in the search results that immediately appear, select the “Change the appearance of the mouse pointer” link.
In the "Mouse" section, click on the link "Change the appearance of the mouse pointer" - Another window will open, but smaller in size. It will be called "Properties: Mouse".
After clicking on the “Change mouse pointer appearance” link, the “Properties: Mouse” window will appear. - Left-click on the Outline drop-down menu to see a list of topics currently available. Select the theme you like for the mouse cursor from the “Scheme” menu
- Decide which design you like best, for example, let’s give preference to the scheme called “Black (large) (systemic)”.
The “Black (large) (system)” scheme will install a large dark-colored cursor - The name of the cursor will immediately indicate its size and color. If you want a large cursor, select items with the words “huge” or “large”. To choose a pointer that suits you, we advise you to look through all available schemes. This way you won't miss anything.
- If you wish, you can enable a shadow effect on the cursor. To do this, check the box next to the corresponding item below the list.
- The cursor can also be selected using the Browse button. Left click on it. In open Windows Explorer, select any one you like. You can preview it in the lower left corner of the explorer. Select the cursor type you like in the Browse window
- For example, select aero_link.cur. It will be in the shape of a palm. Click on “Open”.
Select, for example, the cursor aero_link.cur. palm shaped - If you don't like the selected icon, you can return it to the previous standard one using the "Default" button, which is located next to the "Browse" key.
- In the “Properties” window, now click first on “Apply”, and then on the adjacent OK button to close the window.
Video: how to replace the cursor using Windows
Using special programs
For people who want to quickly install a beautiful new mouse cursor, special utilities have been developed. In just a couple of clicks, they install various cursors available in their database. For example, the CursorFX program was created for such purposes. Today we will look at installing a pointer using its example.
The advantage of this software is that its interface is in Russian. Even a beginner can easily understand it. In addition, it has a large database of original signs and various effects for them, including sound ones. Where can I download the utility from and how to use it?
- In any browser, go to the official website of the developer of the Stardock utility.
Click on the Try it Free button - Click on the blue Try it Free button to download only the free version of the program.
- Enter a valid email address for which you know the password. You will receive an email with a download link. Now click on the green Download button and follow the link that came to the specified mailbox.
- Download the installer and open it. Install the program. The procedure will not take much time.
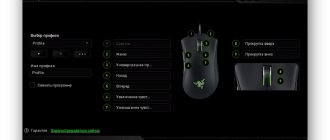
- Launch the software and get to the main CursorFX “Control Panel” window. There are several tabs available here.
The CursorFX window is divided into several convenient tabs - In the first block, “My Cursors,” you choose a theme for your cursor. There are quite a lot of them here. Plus they are very unusual. For example, let's choose Drop Plus - an icon in the form of a large drop of water. We immediately click on the “Apply” button, which is located in the lower right corner of the window. In the first tab “My Cursors” select the pointer icon itself
- In the second "Effects" block, add visual effects for certain actions performed by the mouse: pressing and releasing buttons, double clicking, etc. For example, click on "Left Double Click" in the left column and select any effect in the right column. After all the steps, click on “Apply”.
Apply visual effects to every mouse action - In the “Trace” block, decide on the type of trace that the cursor will leave behind. For example, let's put on Smoke Trail. To apply, double-click on it.
In the third section, optionally set any trace you like, which will be left by the cursor - The Sounds block reveals other cursor capabilities: sound. Again, for each action you can select a specific sound. The selection procedure is the same as in the “Effects” tab.
In the Sounds tab, apply individual available sounds to each mouse action - In the “More cursors” section, you can go to a page on the Internet where there are a lot of other index topics that are freely available. Using the “More cursors” tab, you can open a database of additional topics for the index
- In the Options section, the Windows client can adjust settings for brightness, transparency, contrast, size, etc.
In the Options tab, you can change many settings, including brightness, contrast, transparency, pointer size, and more.
Video: how to use CursorFX program
Using third party programs
The above methods allow you to select and position the cursor manually. But this will be inconvenient if the icon has to be changed frequently, so there are special programs that speed up this process.
CursorFX
With this program you can select a new cursor, set its size, select the desired shade and change the color. An interesting feature is that the application allows you to add an effect that will be displayed when a certain event occurs. For example, clicking the left mouse button can cause a small “explosion”. The list of visual additions is quite extensive.
With CursorFX you can change the cursor and set effects for it
Video: how to use CursorFX
RealWorld Cursor Editor
A program designed primarily for those who want to draw icons professionally. It provides an extensive set of tools that are quite enough to create a truly beautiful icon. The resulting file can be immediately saved in a suitable format. With this program you can create animated cursors.
RealWorld Cursor Editor allows you to draw high-quality cursors
Daanav Mouse Cursor Changer
A program that allows you to specify the path to several cursors at once and switch between them as needed. It is suitable for those who often have to change one type of pointer to another.
In Daanav Mouse Cursor Changer you can select multiple cursors and switch between them
How to change cursor size and color on Windows 10
If you wish, you can increase or decrease the size of your cursor in another way: in the Windows Settings window. There you can also choose a different cursor color. However, there will only be three options: black, white or black and white. Windows, unfortunately, does not offer color or bright versions of pointers. How to open the required window for configuration?
- First click on the “Start” button to open the menu of the same name. In Windows 10, the “Windows Settings” window is called up very simply: for this purpose, a gear-shaped icon was placed above the device shutdown button. If you hover your mouse over it, the name of the “Options” section will appear. Click on this icon just once. Click on the gear icon to open Windows Settings
- In the large window that opens with a list of several sections arranged in the form of cells, select the “Special Features” block.
Select Accessibility in Windows Settings - You will be taken directly to the first tab, Narrator.
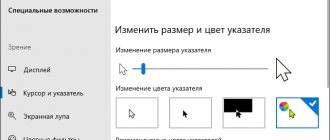
After opening the Accessibility section, the Narrator tab launches. - We immediately move on to the penultimate block called “Mouse”.
Set the color and size options to your liking - Here you will see two parameters that you want to change: color and size. Mark the tiles you need. You will notice that the changes take effect immediately without any saving. Now you can close the window.
Video instruction
We also recommend that you watch video instructions on this topic.
Some users are not satisfied with the default mouse cursor available in Windows 10.
Some say that it is too small, others that it is too simple and gets lost in the landscape, others want it animated or in a different color.
If you want to change the mouse cursor in Windows 10, read this guide.
Then you will learn how you can change the size and color of the cursor using the standard options offered by the operating system.
How to create your own cursor
If your imagination goes far beyond the standard Windows icons and you want a truly original mouse cursor that will be a pleasure to work with, create your own pointer. Here you can either download icons that have already been created before you, or draw your own using editors. Let's consider all two scenarios.
Download a new icon from the Internet
Before downloading a particular file on the Internet, you need to know its format. For static images, a file with the extension cur is used. If you download a whole set of icons to set it as a scheme (see the “Using system tools” section of this article), that is, set for each situation (for example, waiting for loading) an icon similar in theme to the main index, then the icons will be loaded in inf format.
- Download the archive you like with icons on the Internet. To quickly find a site to download, use the Yandex or Google search engine. Be careful: do not download files from suspicious resources.
- Open the archive you downloaded. For example, we downloaded a set of cursors called UltimateVi. It contains a list of files, each of which is responsible for a separate cursor. Now let's look at how to install the downloaded cursor.
The UltimateVi archive will contain files for each cursor icon - Extract the folder with the new pointers. To do this, right-click on it and select “Extract without confirmation” in the large context menu. The folder will appear in the same download section that was installed in the browser.
Select "Extract without confirmation" from the context menu - Now we need to launch the folder in Windows Explorer where you extracted the archive. There will be one different file called install.inf. He is the one who will help us include the UltimateVi theme in the list of schemes. Right-click on it and select the second item “Install” from the large list of options.
Select "Install" from the context menu of the install.inf file - Click on “Open” in a small window with a security warning.
Click on "Open" to force the file to run - Now click on “Yes,” thus allowing the file to make changes on the device. Click “Yes” to allow the file to make changes on the device
- Wait while the system installs the theme.
- Open the “Properties: Mouse” window again using the instructions from the “Using system tools” section of this article.
Select Ultimate Vi from the Scheme drop-down menu - Click on the “Scheme” drop-down menu. In this list, the Ultimate Vi theme will practically be in first place. We click on it.
- All that remains is to click “Apply” and then OK to close the window. Now you can enjoy the new design of your pointer.
Apply the Ultimate Vi theme using the appropriate button
Video: how to download a new pointer from the Internet and install it
Create your own icon in Paint
You don't have to be an artist to draw your own mouse cursor in this built-in Windows image editor. His tools allow you to make straight lines and use any colors. This method is suitable for you if you don't like the black and white colors of the classic mouse cursor, or if you just find them boring.
The method is not easy, as it consists of several stages, but it will help you create an original icon, without first installing programs on your computer (to edit the image we will use services that work online, that is, you must have an Internet connection).
- Using the Start menu, launch the graphic editor Paint. It will be in the list under the Latin letter P or in the “Frequently used” section if you called it often.
Find Paint in the Start menu - Set the background size to 128 x 128 pixels. Use the arrows along the edges of the page to zoom out. If you want a big, beautiful cursor, make the format larger than this: there are no size restrictions. However, do not forget that if you make a drawing on the entire sheet, the arrow will be on the entire screen. Draw on a white sheet of paper the cursor that you want to use in the future, for example, a straight red arrow without a filled space inside.
Reduce the sheet size and draw the future cursor using any Paint tool - Click on “File” and in the menu, hover over the fourth item “Save As”. Now we choose the first option with the png extension. Select png format to save
- We print the desired cursor name so as not to lose the file among other images on the PC. We save it in a folder to which you have quick access. Can be placed directly on the “Desktop”.
Name the file and select a folder to save - Now we need to solve the problem with the white background. If you do not delete it, the mouse cursor will appear as an arrow on a white square. Naturally, this cannot suit you, so we make a transparent background, but using another service, since Paint does not have a similar function. Go to the image editor website. It is very easy and convenient to work with and, in addition, it has wide functionality.
- Click on “Upload photo from computer”. In Windows Explorer, select the file that we just created using Paint.
Click on “Upload photo from computer” - On the Layers tile located on the right side of the screen, there will be one “Background” item. In its right corner there will be a lock icon. Click on it twice quickly to remove the lock. Double click on the padlock icon
- In the “Tool” panel, select “Magic Wand”. Click on the white background in the image and press the Delete button on the keyboard. Repeat the procedure for the white background inside the arrow.
Select Magic Wand as your tool - As a result, instead of a white background, a background with a checkerboard pattern will appear. This will mean that it is transparent.
The checkerboard in the background means it is transparent - Click on “File” and then on the fifth option “Save”. Click on "Save" in the "File" menu
- The “Format” parameter will already contain the png extension we need. Click on “Yes”. The file will be saved in the Downloads folder on your PC. Click on "Save" to save the cursor drawing on a transparent background
- The next step is to convert the file. We need to install another extension for it to set it as a cursor in the result. How to do it? You must use any online conversion service. For example, let's take this site called Convertio. It is reliable and quickly converts almost all types of files. Click on the red “From Computer” button.
Click on the red "From Computer" button on the Convertio home page - In Windows Explorer, select the image you just edited. Click on the “Open” button. Select the previously edited picture in the Windows Explorer window
- Click on the “B” drop-down menu.
Open the "B" dropdown menu - First, hover the mouse over the “Image” item, and then over the cur file type.
Select the Image section and then cur from the list - Now click on the “Convert” button. Please wait while the file you downloaded is processed.
Click on the "Convert" button to start the conversion process - After the procedure is completed, a green “Download” button will appear in the line. Let's click on it.
Click on the “Download” button to download the file with the desired extension - The file with the cur format is already on your computer. Most of the procedure has been completed. All that remains is one small thing: set the cursor using the “Properties: Mouse” window. Instructions for launching this small block to configure the cursor are in the “Using system tools” section of this article.
- Click on the already familiar “Browse” button. Switch to the folder into which the converted file was downloaded. We are looking for him on the list. Open the Red Cursor file using the browse button in the Mouse Properties window.
- The final action is the “Apply” button. You will see that the cursor has changed appearance: now instead of the usual one there is your own drawing.
Click on the “Apply” button so that the pointer you drew appears instead of the usual cursor
Create a cursor using ArtCursors
You can draw your own mouse pointer not only using Paint, but also using third-party utilities from various developers. The advantage of using special programs is that you will not need to separately convert the png image file. The utility will create a drawing in the required cur format.
For example, let's take ArtCursors. Despite the fact that its interface is in English, it is easy to understand. Its disadvantage is that it is paid. However, a trial period of one month is offered at the beginning of use. So, how and where to download it, and then work in it?
- We download the installer for this cursor editor only from the official source. Click on the green Download button.
Click on the Download button to download the installer - Open the archive we just downloaded and double-click the latest setup.exe file in it.
Double-click setup.exe - We follow simple step-by-step instructions for installing the program in a special window. The procedure itself will not take much time.
- As a result, the editor window itself will open. First, you will be given two options to choose from: use the program for free for a month or register and pay the cost of the paid version. Click on OK to select the first option.
Click on OK to start using the program during the trial period - In the next window, decide on the icon size and left-click OK. Select the desired cursor size from the available options
- Draw the required cursor in the editor, for example, a purple arrow. In this case, we used the Line tool to make the drawing even. At the same time, we had the transparent background mode enabled (icon in the form of a green cube).
Draw your future cursor in the editor window - When the drawing is completed, click on the section in the top “File” panel, and then click on Save as.
From the File menu, select Save as - Give the image a name and click on the “Save” button. You can use any folder on your PC to store the file. We saved it to “Desktop”.
Select a name and location for the drawing - Now set the cursor in the “Properties: Mouse” window, using the instructions from the “Downloading an icon from the Internet” section of this article.
Apply your changes
Video: how to make your own cursor in the ArtCursors program
Creating an Animated Cursor
What is meant by "animated cursor"? This is a mouse pointer icon that constantly changes its appearance every second, that is, one picture is immediately replaced by another and so on in a circle. An animation can be either short or long depending on the number of images in it. You can easily create an animated mouse pointer yourself. For these purposes, the program that we used in the previous section of the article to create a regular static cursor is suitable. Let's take a closer look at the steps to create original animation:
- Launch the ArtCursors utility using its icon on the “Desktop”. Click OK to continue with your free trial.
- In the program window, click on the icon in the form of a blue sheet of paper with a yellow circle drawn inside. It will be called New animated cursor. Click on the icon that looks like a piece of paper with a yellow circle drawn on it
- Select the cursor size you need. If you want a large index, check 128 x 128 or larger. Click OK.
Select the desired size for your future animated mouse pointer - Draw the cursor you need, in particular, its first picture in the animation. For example, we made a green frame in the form of an arrow and did not fill the inside.
Draw the animation image first - Now in the upper right corner, look for an icon in the form of a piece of paper with a picture of a pink videotape. Click on it to create the next image for future animation.
To create a second drawing, click on the pink videotape icon - In a small window we indicate that we are creating only one frame (Frame) and select the value Insert after current frame. This will mean that the next image we create will come after the first one in the animation, rather than before it. If you want to use the first picture as a basis for the second, leave a checkmark next to the Use current frame option. We left it because it was necessary for the implementation of our idea.
Select Insert after current frame and click on OK - Our idea for the animation was to first have a void inside the animated cursor, and then have a background of the same color appear. We filled the inside of the arrow with green paint. You can watch the animation right during the creation process. To do this, simply click on the button with a green arrow (like the Play button in a regular player) located on the toolbar at the top. The animation will be shown in the lower right corner of the window. Make a second drawing for animation
- If you are finished working with the animation, click on the File option and then Save as. Click on Save as to save the animation on your PC
- Name your animation. The “File Type” menu will already have the required resolution. Select a storage location, for example, “Desktop” and click on “Save”. Select a location to store the file and click on “Save”
- In the “Properties: Mouse” window, using the “Browse” button, set the animated pointer that we just created.
Select the file you just saved in the Mouse Properties window using the Browse button
Microangelo: creating Windows icons and animated mouse cursors
You can draw an animated mouse pointer not only in ArtCursors, but also in other applications, for example, Mircoangelo from the developer of the same name. It allows you to create not only new cursors, but also various types of icons for the Windows operating system. The user of this software has several modes at his disposal. Using Animator, for example, animated icons are created, including for the mouse pointer.
What features does this program have?
- changes drawings according to each parameter: color, size, shade, effects, etc.;
- offers special templates for editing;
- allows you to rotate images, as well as load third-party images.
In Micrangelo you can edit existing templates.
The application is available for download on the official website of the developer.
IconLover: turning ready-made pictures into an animated cursor
The IconLover utility is suitable for creating icons (directories, programs, etc.) and cursors, including animated ones. Its advantage is that it can turn ready-made pictures into an icon and pointer.
What else is this utility capable of?
- import and export files in various formats, including gif, png, bmp and many others;
- make checkerboard and gradient fills in animation layers;
- create icons of small and large sizes;
- draw translucent icons for icons and cursors;
- use various effects: tinting, shadow, smoothing, transparency and more;
- rotate, shift and flip the picture.
In IconLover you can create both icons for catalogs and animated cursors.
You can download this useful utility for creative people from the official website.
Enabling pointer shift settings
If it is not possible to change the cursor on Windows 7, 8 and the “pointers” tab is not available in the mouse settings, it means that it has been disabled by the administrator. There are 2 ways to return it.
1. Download the archive, unpack it. Double click the mouse, run the reg file, click “yes”, “yes”, OK. So, you activate the missing tab.
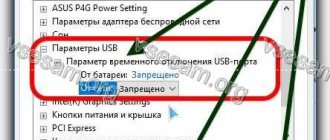
2. Open the Group Policy Editor. Type in gpedit.msc, then click Enter. Select the “personalization” section (see screenshot below). In the right pane, double-click the option responsible for disabling changes to the mouse cursor.
In the open window, set either “not set” or “disable”. Next, click OK.
Now you know how to change the mouse cursor on Windows 7, 8 and install new pointers. Many aspects of transforming the OS have been taken into account here, in addition to them you can read in order to transform the OS.
Method 3: Registry Editor
Before you continue, you need to know that you are going to be processing a sensitive database. If you make any mistakes while setting up the registry, you can cause serious damage to your system. Thus, we recommend this method only for advanced PC users. On the other hand, if you are not confident in your technical skills, it is best to stick to methods 1 and 2.
- Press the Windows key + R
on your keyboard to launch the Run dialog box. - In the Run dialog box, type "regedit" (without the quotes), and then click OK.
- Click Yes in the User Account Control window.
- Once Registry Editor is enabled, navigate to this path: HKEY_CURRENT_USER\Control Panel\Cursors
- Go to the right pane, then look for the word ContactVisualization DWORD
. - Right-click the entry and select Edit from the context menu.
- Click the Value Data field and then change it to 1.
- Save your change by clicking OK.
- Now search for the word GestureVisualization DWORD and then right click on it.
- Select the item: “Change” and change the Value Data value to 31.
- Click OK to continue.