Today, the Windows XP operating system is considered obsolete. It has been replaced by more modern systems with much greater capabilities. But at a time when Windows XP was one of the most common, most users respected it for its high reliability and stability, ease of configuration and compatibility with most existing equipment.
At the moment, the XP system is used on computers that were once designed specifically for it and do not meet the requirements for installing more modern programs.
Most users note that a system that has a limited number of programs installed that meet operating system compatibility requirements can work indefinitely without reinstallation. At the same time, a computer on which many programs, sometimes of dubious origin, are often installed and uninstalled, may at any time refuse to work due to an OS failure.
The problems are caused by the fact that as a result of installing programs, various “garbage” accumulates in the system catalog and registry of the operating system, which at some point can be recognized by the system as working files and, naturally, lead to the “crash” of the system and the appearance of the “Blue Screen of Death” "
So, we can name the main reasons for the need to reinstall the operating system:
- “garbage” in the registry and system directory;
- hard drive failure;
- changes in computer hardware configuration;
- virus attack.
“Treatment” or reinstallation
There are many special programs or utilities for cleaning and restoring operating systems, but, as experience shows, their use by inexperienced users does not bring tangible results. This is due to the fact that the effect of these software tools is superficial, and more complete cleaning requires a lot of experience and time. In most cases, loading a new system takes less time and does not require special skills, since most actions occur automatically.
The only exceptions are computers with installed programs for which there are no installation images or media, since the newly installed system contains only the minimum programs necessary for the computer to operate.
How to back up OS
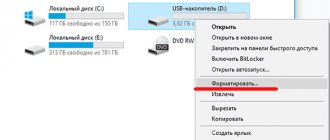
To do this, you need to insert a USB flash drive and go to the folder with the installed operating system. After this, you will need to right-click on the folder and indicate that you want to create a boot disk (flash drive). Let us remind you that this method is not recommended, as it contains system errors that were later encountered. It is also designed for using the system on a specific hardware. On another computer, additional difficulties may arise.
Acronis program for creating images in tif format
Some also use the Acronis program to create images in tif format. This is quite a useful utility, but the problem remains the same, so it is best to use the special programs mentioned above to create a “clean” boot image.
Why not DVD and what is the difference between a regular flash drive and a bootable and multiboot one?
Almost all installation files for installing programs, including operating systems, are supplied on CDs or DVDs. Their volume is sufficient for any purpose. But modern computers allow initial startup, before the operating system starts, from other devices, including flash drives. What advantages does this provide:
- Firstly, reliability. A flash drive is much more reliable than a fragile disk made of thin plastic, the working surface of which is very easy to scratch. A small crack on the disk leads to its rupture in the drive with all the ensuing consequences.
- Secondly, the dimensions. Flash memory, which is smaller in size than a key fob or car alarm remote control, cannot be compared to a disk with a diameter of 12 cm.
- Thirdly, the speed of work. Installing programs from a flash drive is several times faster than from any other media.
A bootable USB flash drive with Windows XP allows you to install a new operating system and the necessary set of application software on your computer in a few tens of minutes, without changing the media.
An increasing number of users prefer to use bootable flash drives. Why they are called bootable, the fact is that you cannot simply take and write the operating system files to a flash drive. In order for the computer BIOS to start booting from an external drive, its structure must be designed accordingly. This applies to the structure of the drive as a whole and, in particular, its boot sector. The boot is based on the master boot record - MBR, which contains data about the boot order, the location of the loaded data and other service information. The MBR structure is inaccessible to the average user, so its formation requires special programs and utilities.
In addition to simple bootable flash drives, there are multiboot flash drives that allow you to select the necessary actions before installing the operating system. Such flash drives may contain:
- several OS boot options;
- several different operating systems;
- utilities for testing hardware;
- utilities for working with hard drives;
- a lightweight version of the operating system that does not require installation.
For these purposes, you need a specialized program or utility that would create the necessary partition structure of the external drive and copy installation data into it, placing them in a certain order.
What needs to be done before recording?
Since I want to describe the whole process to you in detail, with all possible software, here is a list of software. which needs to be downloaded.
UltaISO - download here. The main tool for creating bootable flash drives. The most popular among ordinary users without special skills.
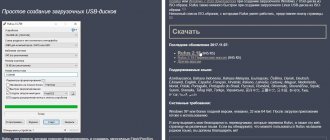
Rufus – take it here. A very useful thing. The software writes bootloaders very quickly. There are more settings here than in the previous software, but the software is also more professional. Download, install.
Winsetupfromusb 1.7 and another product that works on more modern systems. For example, with some versions of the programs described above, problems may arise in Windows 10. And this software works great on new operating systems.
Next we need Windows itself. But before you download it, you need a torrent client. Let's take it here. Download and install as follows.
Follow the link here.
Scroll the page to the very bottom.
You open the downloaded file in the browser directly through it.
poke this rectangle on the right
Then you click it again.
Text will appear in English, which you don’t really need, just move on.
Again text about licenses and other things. Let's move forward.
An offer will appear that we do not need. Click here.
Check the boxes everywhere if they are not there (although usually they are immediately by default).
Again, we poke the squares once and move on...
There will be unpacking, then the installation of the software itself. This will scan your laptop. You may be able to install several useful programs for free.
Click on the finish button.
The client window will appear, which means the installation is complete.
With the help of this software we pull from here - the XP 64 bit version.
The main difficulties when reinstalling the Windows XP operating system
Currently, MicroSoft Corporation has stopped supporting outdated operating systems, which, unfortunately, includes Windows XP. The biggest problem with this attitude is that when reinstalling outdated programs, sometimes a situation may arise when some hardware requires a driver. Sometimes finding the required driver takes longer than reinstalling the entire system.
Since the release and support of the Windows XP operating system has been discontinued, for recording it is necessary to use existing DVDs or download ISO images of the operating system from the Internet. Similar images are available in sufficient quantities on available file hosting services or torrent trackers. It should be especially noted that by downloading files from the Internet, users violate copyright laws, since the posted files are pirated, and do so at their own peril and risk. You also need to be aware that there is no guarantee that the installation images are correct and that they are identical to the original ones.
How to burn Windows XP to a flash drive?
Maintaining an operating system is not an easy task: the user not only has to look for the best antivirus for Windows 7, 8 or 10, but also from time to time faces the incompatibility of old programs and games with the latest generations of the OS. And if there is no desire to emulate Windows XP, there is only one thing left: write it to a flash drive and install it as a second OS. How to do this quickly and correctly will be described below.
Ultra ISO
A convenient and fast program, one of the best for creating disk images from scratch or based on existing media, and for burning information to a CD, DVD or flash card. It is distributed in shareware mode, but the user can easily find and download the full version - it’s as simple as finding the best program for optimizing your PC.
Important: before burning Windows XP to a flash drive, you must download an image of the operating system from the Internet - or, if the user has a licensed disk, insert it into the drive and copy the files to any folder on the computer.
To burn Windows XP to a flash drive using UltraISO, you will need:
- Download and run the program.
- If the operating system is being recorded from an image, click on the “File” drop-down menu and select “Open”.
- Then find the desired file in Explorer, select it by pressing the left mouse button and click on the “Open” button again.
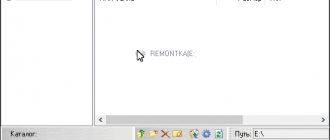
- If you plan to record from a folder with files, find the desired directory in the bottom panel of the program.
- Open it by double-clicking the left mouse button on the title.
- Select all files and drag them into the top main window.
- At this stage, regardless of whether a Windows XP image or a directory with files is used, the user needs to pay close attention to the presence of the BOOT folder in the “contents” - without it, the installation program will not be able to run. If the specified directory is missing, you should check again that all data has been downloaded and unpacked correctly - and, if no errors are found, find and download another, “correct” image.
- Insert a flash drive for recording into the USB connector of a computer or laptop and remove all other removable media while working - this will minimize the likelihood of accidentally deleting important data. If the user wants to write a “bare” OS (without any add-ons) to a memory card, it will be enough to use a medium with a capacity of 1–4 GB; if you prefer all kinds of assemblies with supporting programs - 4–32 GB, depending on the “weight” of the source image or directory.
- Call the “Boot” drop-down menu in UltraISO and select “Burn disk image” from it.
- In the new dialog box, select removable media from the list - as already mentioned, it will be better if, apart from one flash drive, there is nothing left in the PC connectors during recording.
- Indicate by checking or unchecking the adjacent checkbox whether the correctness of data recording is needed - without sparing a few minutes, the user will receive a guaranteed working flash drive with Windows XP.
- Select a recording method in the next drop-down list - for Windows XP, any of the first three will do.
- And the next step is to determine whether boot files should be hidden from the user. If the flash card is prepared for your own needs, there is little point in this; if it is transferred to an inexperienced user, it is better to choose the second or third option.
- Click on the “Format” button located in the lower left corner of the same window.
- Select the file system format for the removable media; To write to a Windows XP flash drive, it would be optimal to use FAT32 - then starting the installation process on any computer will be easier than clearing drive C of unnecessary files.
- Specify the cluster size. For modern machines, you can leave the value automatically set by the system, and for older and less powerful machines, select the “Standard size” item.
- Or use the "Restore default settings" button.
- Optionally, specify a name for the flash drive to be written in the editable field. It can be anything and does not affect the quality of the process at all.
- Select the formatting method: if the removable media is in good condition and does not contain files, just check the “Quick format” checkbox; if one of the conditions is not met, it is better to remove it and wait a few minutes longer for the end of recording.
- Click on the “Start” button and agree to delete all files on the flash card. If something important is recorded on the media, this is the last chance for the user to prevent data loss - in the future it will be almost impossible to restore it.
- Wait for formatting to complete and click the “OK” button in the dialog box that appears.
- And close the window.
- Now the user can safely click on the “Record” button.
- And once again confirm your desire to give away the flash drive for the Windows XP image.
- Typically the recording process takes no more than five to ten minutes; it all depends on the size of the source file or directory and the speed of data exchange with the hard drive and removable media.
- Upon completion, the program will notify the user that the data has been successfully transferred to the flash drive.
- You can start the installation process directly in a running OS by opening the memory card.
- And running the Setup.exe file.
Tip: for a “clean” installation, it is highly recommended to turn off your computer or laptop and start it with the flash drive inserted - this will help avoid unwanted errors that occur on Windows 8 and 10.
WinSetupFromUSB
A simple and equally fast program for writing operating system images to a flash drive. Its main advantage is that it is completely free: the user does not have to spend a penny to record the first, second or two hundredth removable media. The main drawback is the lack of a Russian interface in the standard version, which, however, is compensated by an intuitive menu.
To burn a Windows XP image using WinSetupFromUSB, you will need:
- Launch the application and select the desired removable media from the drop-down menu - as already mentioned, it is better to leave only one flash drive in the slots of your computer or laptop during recording.
- In the second section Add to USB disk, check the Windows XP checkbox. Using this application, you can also create multi-boot flash drives, however, to transfer one operating system to a memory card, you only need to check one box.
- Click on the three horizontal dots next to the checkbox selected.
- And select in Explorer the directory containing the Windows XP image or files.
- Read and accept the license agreement from Microsoft.
- Check the Advanced options checkbox.
- And in the panel that opens, check the Prepare Windows XP to be installed on USB checkbox.
- The next step is to check the top Auto format it checkbox located in the main window.
- Specify the method of data distribution - FAT32 is best suited for recording Windows XP.
- And to ensure uninterrupted recording, check the Force CHS checkbox and uncheck the Copy BPB.
- Preparatory work has been completed. The user can click on the Go button.
- Agree to write the image or directory to the flash drive.
- And formatting the device with the specified parameters.
- The process of writing Windows XP to a flash card takes several minutes. The user can monitor progress by focusing on the filled bar at the bottom of the main window and the very bottom line, which shows from left to right the total amount of transferred data, the capacity of the removable media, the name of the file being written, its recorded and total size.
- If desired, the user can check the Show Log checkbox and track operations with each file transferred to the flash drive.
- At the end of the process, the user will receive a flash drive completely ready for installation; All that remains is to remove it, restart the computer and start recording.
Let's sum it up
The easiest way to burn Windows XP to a USB flash drive is to use the UltraISO and WinSetupFromUSB programs. In both cases, it is recommended to pre-format the media before starting the process. Recording takes, depending on the size of the source image or directory, from five to ten minutes to half an hour.
Programs that allow you to create an installation flash drive
Those who want to reinstall Windows have at their disposal a large number of different programs for creating bootable flash drives. The programs include both paid and free programs. If you use them only for the specified purpose, then they do not have any special advantages over each other. There are only a few differences in the interface. Therefore, the use of a particular program is determined by personal preferences. In addition, paid programs usually have a limited period of use, so for one-time use to create a bootable flash drive they can also be used.
The Command Line method has broader capabilities for creating bootable, and especially multiboot, flash drives, but only trained users can do it. For the vast majority, this method is not applicable due to its high labor intensity and complexity.
Among the most common programs for writing bootable flash drives are:
- Win32 Disk Imager;
- Ultra ISO;
- UNetBooting;
- PeToUsb;
- WinSetupFromUSB;
- WinToFlash;
- Rufus.
For the Windows XP operating system, the bootable USB flash drive must have a capacity of up to 4 GB. It all depends on the size of the ISO image.
When creating a bootable flash drive, all data previously located on it will be irretrievably lost without the possibility of recovery.
Therefore, before making a bootable Windows USB flash drive, you need to take care of saving the necessary files and data. It is not necessary to format the drive in advance, since most of the programs listed can do this on their own.
UltraISO stands out . The program allows you not only to make a bootable USB flash drive for Windows XP, but also to perform many actions to create, copy and edit ISO images. On the other hand, the abundance of functions makes it difficult for less-skilled users to use such a utility.
To create multiboot flash drives, you can use the following programs:
- WinSetupFromUSB;
- SARDU;
- Easy2Boot.
When using these programs, you can create bootable flash drives with almost any set of installation images and test utilities. The only limitation is the amount of flash memory. It is very convenient to place anti-virus programs and driver sets on multiboot drives for various hardware configuration options, which in some cases allow you to avoid the process of reinstalling the operating system. That is, using a bootable USB flash drive with Windows XP, you can scan and “cure” the system in the event of a virus attack, test your hard drive for bad sectors, or copy important data to a third-party drive.
Why XP?
Many will no longer remember this operating system. However, not so long ago it was the most stable and worked almost without errors or crashes. It is cost-effective to install it because it requires fewer resources from the computer, compared even to the same seven and eight. For example, if you have a weak laptop and you only work on it, then it is more cost-effective to leave the XP operating system on it.
Imagine that you wanted to feel nostalgic and decided to play an old game. It will not run on new systems. Downloading some emulators is dangerous for the OS itself, but having an old “piggy” (Windows XP) on board the hard drive will come in handy. It is easy to install, weighs little, the only problem is with the drivers, but this issue can also be solved.
XP is much more stable than its newer counterparts. Of course, it is not currently supported by manufacturers. However, if your computer was purchased solely for work, and the machine is weak, then this is the best choice for it.
The OS itself is quite compact; even on a 120 GB hard drive it will take up minimal space. Even the 64-bit version will not require more than 30 gigabytes for full functionality. Of course, it doesn't support DirectX version 10, but you don't need it. And software such as office, photoshop, various readers and sound editors work quite well on this shell.
Another advantage is that such an OS can be written to a flash drive that is only 4 gigabytes in size. After all, not everyone has larger storage media. You can take a completely old card, lying around somewhere in a closet, and make a boot device out of it.
How to create a bootable USB flash drive for Windows XP
In most cases, creating a bootable USB flash drive only requires specifying the location of the source image of the operating system and the designation of the drive on which the recording will be made. In a few minutes, the Windows XP bootable USB flash drive will be ready.
The Windows XP image can be on any media. If you are recording from the original installation disk, then you first need to create an image with any disk burning program, specifying an existing hard drive with the required capacity as the location of the final file. Using a bootable USB flash drive with Windows XP, copied from the original DVD, guarantees the stability of the newly installed system.
For faster installation and to avoid failures, it is recommended to disable anti-virus programs while preparing the bootable drive. The recording speed depends on many factors: the power of the computer, the DVD reading speed, the speed of the flash memory and the amount of RAM.
For example, you can show how to make a bootable USB flash drive with Windows XP using the examples of the most common programs UltraISO and WinToFlash .
Ultra ISO
To make a bootable USB flash drive using the UltraISO , you must perform the following sequence of actions:
- After starting the program, you need to click on the “ Open ” menu button or select the “ File ” item in the standard menu bar, and click “ Open ” in the list.
- In the Explorer window that appears, you must select the desired image file and click on the “ Open ” button. Now in the program window on the right side you will see the contents of the image of the bootable Windows XP operating system.
- After the flash drive is inserted into the computer slot, you need to go to the menu item "Bootstrapping» select the item «Burn a Hard Disk Image...».
- In the window that appears "Write Disk Image" select the path to the installed flash drive and specify the recording method "USB-HDD+" To format the flash drive, click the Format button, and then select the file system type FAT32 and start the formatting process.
- Next, after formatting is completed, in the “ Write Disk Image ” window, click the Write button and confirm the start of the operation.
WinToFlash
To make a bootable USB flash drive using the WinToFlash , you must perform the following sequence of actions:
- After starting the program, the easiest way is to go to the “Master Mode" and click on the button "Windows Setup to USB Wizard».
- In the window that appears, select the path to the drive and image file. Click the Next> button.
- In the next window you must accept the license agreement.
- After consent, the operating system image will be loaded onto the drive and can then be used to install the system on the computer.
As you can see, the latter program is much easier to use, but has a significant “minus” - it cannot be used for anything else. In this regard, more complex software provides greater opportunities due to its versatility and multifunctionality.
Selecting a drive
Media is an important component in creating a Windows XP installation flash drive. The OS takes up a little disk space in the form of an archive or in an unpacked state from an ISO image. The following media types are suitable:
- USB flash drive. The most preferred option, since the corresponding connector is present in any computer.
- SD or MMC memory cards. Laptops have ports for the specified types of media, which are used in cameras or video recorders. For a desktop computer, you will need to purchase a card reader.
- MicroSD. A version of a memory card used in cell phones. To connect, you will need an adapter for a regular SD or card reader.
When choosing media for creating a bootable flash drive, important aspects are:
- Connector type. Applies exclusively to USB flash drives. There is version 2.0 and 3.0. The first has a standard color connector, the second has a blue tint. The difference lies in the data transfer speed.
- Memory size. To record Windows XP on a flash drive, a device ranging from 4 to 8 GB is suitable.
Is it possible to boot from a flash drive?
Naturally, the possibility of booting a computer from a flash drive must be clarified before proceeding with all the steps listed below.
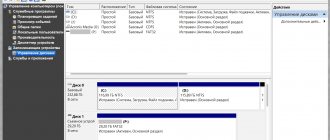
Make sure your computer's BIOS supports booting from USB devices. Enter the BIOS and go to the boot priority setting menu - “First Boot Device”, which is located in the “Advanced BIOS” or “Boot” section, depending on the BIOS version. The “First Boot Device” menu should contain the “USB-HDD” option - this is an external hard drive connected via a USB port, which is a flash drive. This point most likely applies to older machines, since almost all new computer devices necessarily provide the ability to boot from a flash drive.
The “USB-HDD” option is in the “First Boot Device” menu of the BIOS and will need to be selected during Windows installation from a bootable USB flash drive.
UltraISO is a simple and convenient program for creating bootable media
UltraISO is a highly focused and quite functional program that, in addition to creating and burning ISO files, also allows you to edit disk images, changing their contents. Its main feature, which is of value in our case, is the ability to create bootable media - disks and flash drives. Plus, UltraISO is equipped with a function for converting image files into ISO format if the disk image of your operating system is recorded in a different format - for example, “.BIN”, “.NRG”, “.CIF”, “.IMG” or ".BWI".
UltraISO has a simple and intuitive interface that will not cause you any difficulties if you have worked with disc burning programs. Ideally, the program is paid, however, if you are not new to computer technology, moreover, you know how to install the operating system yourself, it will not be difficult for you to find a “cured” version of UltraISO on torrent trackers.
If you have a bootable CD/DVD for installing Windows, but do not have an ISO image of it, UltraISO will solve this problem very easily. Insert the disc into the drive, launch the program and in the top “Tools” menu select the “Create CD image” command. In the window that appears, you must leave all the settings unchanged, just indicate the location where you want to save the ISO image of the boot disk.
Click the "Make" command and wait a couple of minutes while the program creates the image.
UNetbootin
Another free utility that easily copes with the task of burning Windows to a USB drive. A distinctive feature of this application is its primary orientation for Linux. Using drop-down lists, we can select a distribution (for example, Ubuntu or Mint), then specify the version and download the operating system from the official website in 1 click.
The program can easily handle Windows as well. However, here you will have to work with an ISO image. How this is done is described in more detail in the corresponding article. Advantages:
- Availability of Russian language in the user interface.
- Supports any versions of Microsoft operating systems.
- Minimum system requirements and excellent performance.
- An automated tool for installing any version of Linux.
Flaws:
- Lack of a large number of additional features that are, for example, in Rufus.
- Some part of the user interface is made in English.
| Name: | UNetBootin |
| Developer: | Geza Kovacs |
| Supported OS versions: | Windows XP, 7, 8, 10 x32/64 Bit |
| Language: | Russian |
Instructions for CD/DWD disks
You need to download the Windows XP image you need in .iso format from some resource, usually there are a lot of them on popular torrent trackers.
- First of all, you need to install the program on your PC (trial version, which loses its functionality 30 days after the first installation). Then you need to insert a blank disc into the CD drive and run the program.
- After starting the program, you need to go to the “Tools” menu and select the “Burn CD image” option. Then you select the required drive (which contains the disc) and the .iso file containing the downloaded (or purchased) Windows XP image. It is recommended to set the value for the recording speed to the minimum, since it is at this speed that the disc will be written in the best way, and you will not have any problems when installing Windows XP, although if you do not have extra time, you can risk recording at high speed, rather There won't be any problems at all.
- Then you need to click on “Record” and wait, after which you can proceed directly to the process of installing Windows XP on your personal computer.
- Restart your computer and select CD-ROM/
Is it possible to boot from a flash drive?
Naturally, the possibility of booting a computer from a flash drive must be clarified before proceeding with all the steps listed below.
Make sure your computer's BIOS supports booting from USB devices. Enter the BIOS and go to the boot priority setting menu - “First Boot Device”, which is located in the “Advanced BIOS” or “Boot” section, depending on the BIOS version. The “First Boot Device” menu should contain the “USB-HDD” option - this is an external hard drive connected via a USB port, which is a flash drive. This point most likely applies to older machines, since almost all new computer devices necessarily provide the ability to boot from a flash drive.
The “USB-HDD” option is in the “First Boot Device” menu of the BIOS and will need to be selected during Windows installation from a bootable USB flash drive.
UltraISO is a simple and convenient program for creating bootable media
UltraISO is a highly focused and quite functional program that, in addition to creating and burning ISO files, also allows you to edit disk images, changing their contents. Its main feature, which is of value in our case, is the ability to create bootable media - disks and flash drives. Plus, UltraISO is equipped with a function for converting image files into ISO format if the disk image of your operating system is recorded in a different format - for example, “.BIN”, “.NRG”, “.CIF”, “.IMG” or ".BWI".
UltraISO has a simple and intuitive interface that will not cause you any difficulties if you have worked with disc burning programs. Ideally, the program is paid, however, if you are not new to computer technology, moreover, you know how to install the operating system yourself, it will not be difficult for you to find a “cured” version of UltraISO on torrent trackers.
If you have a bootable CD/DVD for installing Windows, but do not have an ISO image of it, UltraISO will solve this problem very easily. Insert the disc into the drive, launch the program and in the top “Tools” menu select the “Create CD image” command. In the window that appears, you must leave all the settings unchanged, just indicate the location where you want to save the ISO image of the boot disk.
Click the "Make" command and wait a couple of minutes while the program creates the image.
Is it possible to boot from a flash drive?
Naturally, the possibility of booting a computer from a flash drive must be clarified before proceeding with all the steps listed below.
Make sure your computer's BIOS supports booting from USB devices. Enter the BIOS and go to the boot priority setting menu - “First Boot Device”, which is located in the “Advanced BIOS” or “Boot” section, depending on the BIOS version. The “First Boot Device” menu should contain the “USB-HDD” option - this is an external hard drive connected via a USB port, which is a flash drive. This point most likely applies to older machines, since almost all new computer devices necessarily provide the ability to boot from a flash drive.
The “USB-HDD” option is in the “First Boot Device” menu of the BIOS and will need to be selected during Windows installation from a bootable USB flash drive.