Good afternoon friends. In the tenth years of this century, ssd drives appeared, which are becoming increasingly popular over time, as they have many advantages over conventional HDD drives. For example:
- Speed of work;
- Reliability;
- Increased productivity;
- Low energy consumption;
- Silence;
- Low thermal conductivity and others.
But quite often, when you connect this drive, the computer does not see the Windows 7 - 10 ssd drive. Moreover, in most cases, these problems can be easily solved using Windows system software. For example, this happened with my new ssd drive. It simply did not appear in Explorer. Typically, a solid-state drive is not displayed by the system when it simply has not initialized it. In worst cases, the drive is not detected due to BIOS or motherboard incompatibility.
Of course, if the system has not initialized it, then it is not assigned another drive letter, such as C or D. Of course, in this case it will not be recognized in Explorer. Also, it may have a different file system that Explorer does not see. There may be incorrect settings in the BIOS, or you simply connected the disk itself to the motherboard incorrectly (perhaps your motherboard is too old, and such disks are simply not suitable for it). What to do?
You need to initialize the SSD Disk
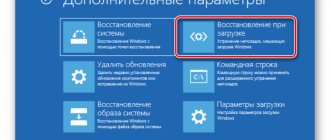
This was the case in my case. The system simply did not see the disk. What to do in this case? You need to mark it in Windows and assign a letter to it. To do this, call the “Run” command using the “Hot Keys” Win + R. We will have an input line in which we will enter the command compmgmt . msc . After that, click OK.
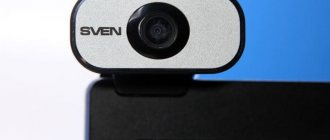
Next, in the new window, in the left column, select “Disk Management”. Among the drives, select the one that we want to record in the system, right-click on it and find “Initialize disk” in the drop-down menu.
So, put a checkmark above the desired disk, and then put a checkbox above the line “Main boot...”.
After going through this step, let's try to make the section we need. So, right-click on the selected drive (it is marked “Not allocated”) and in the drop-down menu we find “Create a simple volume”.
Next, go to the “Create a New Volume Wizard” and click “Next”.
In the new window we set the required drive size. I advise you not to change anything here, and if you have a 500GB disk, leave the size at 476937, as the system suggests (in fact, the disk is slightly smaller than stated by the manufacturer).
Next, we need to assign the desired drive letter. You can agree with the letter that the system suggests, or choose the one you like best from those suggested by the utility. To do this, click on the triangle above the proposed symbol and select from the remaining ones. I agree with the system and choose N (the letter can then be changed).
The utility changed the volume letter.
The system offers to format the disk, we agree.
Then, the utility specifies exactly how we want to format the disk. I advise you to leave the format that the OS suggested.
We have reached the final stage. The disk is now initialized and should be visible to Windows.
Changing a letter
When you connect the solid-state drive for the first time, the OS may simply not see it. That is, physically it can be fully functional, but it will not be displayed among other local disks.
Fixing this problem is quite simple as follows:
- We repeat step 1-2 from the previous instructions.
- In the middle of the window that opens, the drives connected to the PC will be shown, including the one that the system does not see. This is due to the wrong letter being assigned to it.
- Find the problem drive, right-click and click “Change letter”.
- In the new window, click “Edit”.
- Select any letter from the list, click "OK".
This way, you can quickly change the letter and solve the problem when a computer or laptop does not see the SSD device.
How to change the hard drive letter?
This applies to all drives, not just ssds. The system may not see your “Solid State Drive” precisely because it is not marked with a letter. Therefore, let's look at how to assign a drive letter. So, let's go into Disk Management again using the same method that I described above. Select our ssd drive, right-click on it, and in the drop-down menu we find “Change drive letter...”.
A new window appears, where we click “Change”.
Click on the triangle on the right side of the window and select the desired symbol from the letters presented. Click OK.
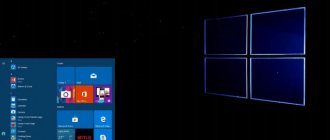
Now, most likely, your ssd will appear in Explorer.
Basic SSD faults
An external drive may not be recognized by your computer for a variety of reasons. The most common faults are:
- Problems with the operating system, including driver failures, malware, incorrectly set system parameters, etc.
- Errors in the file system of the SSD drive.
- Software malfunctions of the control controller (failures in the firmware).
- Hardware failures of the disk, ranging from the inoperability of the USB port to the failure of one of the functional electronic components.
Many of the listed problems can be removed without the help of specialists. Let's start with the simple ones.
Windows doesn't support file system
Does your system still not see the ssd? In this case, it may be that it is formatted in a special system that Windows does not recognize (the system is used to NTFS and FAT32). A similar disk in the “disk manager” may be displayed as RAW. So, let's start fixing the situation.
Enter “Disk Management” as described above. Then, right-click on the desired disk and find “Delete volume” in the drop-down menu. Click on the command.
The system will warn us:
Click “Yes”.
Now, as you can see, the disk has changed its status to “Free”.
After this, we just have to re-create the volume as I described above.
SSD resuscitation or remember everything
A reward was awarded for the post
This material was written by a site visitor and was compensated for.
Modern PCs are designed to make our lives more convenient, to become a reliable tool for work and creativity, or a good tool for spending leisure time. However, as is the case with any other equipment, failure of individual elements is always possible, and failure of the storage medium can be a particularly sensitive point.
A very unpleasant situation is when information important to the user was located in a single copy on a medium that suddenly lost its functionality. If in the case of a HDD the process of “death” of the media is usually not sudden and is accompanied by a set of alarming signs, which can be detected in a timely manner, the data can be saved in a timely manner, in the case of an SSD the death can be completely sudden and almost instantaneous, and the restoration of lost information is labor-intensive and often hopeless .
announcements and advertising
RTX 3070 Ti Aorus at a non-Ti price
RTX 3080 for 288 tr in Citylink
RTX 3090 MSI for 539 TR
Earn money by participating in the content of our site
Another 3080 is even cheaper - see the price
Cool 3060 Ti Gigabyte Aorus fell in price 2 times
Today I have at my disposal two such deceased carriers. The first is a SATA SSD of M2 format, Transcend with a capacity of 128 GB, the second is a Chinese noname of M2 format with an NVMe pci-e 2 line connection interface and a capacity of 256 GB.
Both media served as a system disk at the time of death. Transcend worked for 9 months without any problems; the diagnostic programs did not provide any information foreshadowing its imminent death. Death occurred while surfing the Internet. Suddenly everything started to slow down a lot, after which the system froze completely. When rebooting, the disk was no longer visible even at the BIOS level, however, the boot process, starting from the very first stage, occurred with a very strong slowdown. The same slowdown persisted when trying to start the system from another physical disk. This continued for some time, but then it stopped, the SSD finally died and stopped affecting the system boot process.
The Chinese noname worked for about 4 months and died under similar circumstances, the difference was that the disk simply stopped being detected immediately and did not have any effect on the PC boot.
Fortunately, these media did not contain any important information, but now they have simply turned into useless garbage that is almost impossible to repair, and this circumstance opens up wide opportunities for the most merciless experiments.
A fairly well-known fact is the occurrence of self-healing processes inside damaged electronic components. This process occurs slowly and does not always lead to the restoration of the device’s functionality.
This process can be somewhat accelerated by carrying out a temperature treatment process. The application of this method to SSD media is quite controversial. You can count on some positive result if it is the controller that is damaged; for memory cells, long-term temperature treatment can have a sharply negative result, leading to loss of information or loss of performance. However, now we assume the death of the controller, and since there is absolutely nothing to lose in this situation, we will try to use this method.
First stage
We proceed with extreme caution and place both SSDs in a drying cabinet at a temperature of 120°C for two hours.
After the process is completed, take out the SSD and connect it to the PC using the corresponding M2 slot on the board.
The Chinese is dead and shows no sign of life; it is never detected in the BIOS and does not have any effect on the operation of the PC.
However, when installing Transcend, the phenomenon of severe slowdown again occurred when loading the system from another physical medium. It turns out that we have somewhat returned back, and the SSD began to show some signs of life.
Second phase
We increase the temperature and exposure time. The samples are now placed in an oven for 4 hours at 160°C.
We start with Trancend, insert it into the slot and see that absolutely nothing has changed, the system also slows down when loading, and the disk is also not detected in the BIOS.
Without much hope, we insert the Chinese and voila, the disk is suddenly detected by the PC. True, it is called differently, the SSD has completely forgotten about its proud Chinese origin.
Now we are trying to start working with the disk using the Acronis Disk Director 12.5 program
A disk with an initial capacity of 256 GB is now defined as an uninitialized disk with a capacity of only 2 GB. This cannot be called a success, but the result is interesting. However, it is already clear that restoring lost information in this way is out of the question.
An attempt to initialize the disk as GPT fails miserably, but the same thing works in MBR format. Now we are trying to create a disk, occupying the entire available space in order to check the speed and reliability of the available memory.
However, unfortunately, the attempt to create a disk with the NTFS file system fails. Trying to use other file systems also fails. Attempts to create a disk that takes up part of the available space also fail.
After rebooting the PC, the disk is no longer detected in BBIOS, but if the computer is turned off and turned on again, it appears again with the same capacity and also not initialized.
We try to use another utility to work with the disk.
This time it is possible to create the disk, so that Windows Explorer even sees it, but again it is impossible to use the disk space
Windows cannot format it, no positive result has been achieved.
Third stage
Let's try to find out whether a longer temperature treatment can somehow change the situation, so we send both drives to a drying cabinet at a temperature of 160°C for 48 hours.
As a result of prolonged temperature treatment, both drives change their color.
However, their subsequent testing shows that the situation that arose after the second stage has not changed at all, which suggests that to restore properties there is no need for a very long heat treatment process and all the possibilities for self-regeneration of devices were achieved at stage 2.
conclusions
1. Partial self-restoration of the SSD’s performance during its heating is possible, but the probability of success is extremely low, and restoration of the information located on the SSD is out of the question.
2. Low-temperature treatment is ineffective, at least for a short period of time; to activate the self-healing process, it is necessary to overcome a certain minimum temperature threshold.
3. The maximum efficiency of self-healing of the device is achieved after just a few hours of heat treatment; very long heat treatment does not have an additional effect on this process.
The post was rewarded.
This material was written by a site visitor and was rewarded.
SSD Disk is not connected correctly
If, after the proposed operations, your disk is still not recognized by the system, then all that remains is to open the cover of the system unit and check all the contacts going to the disk. Look at the cable connecting the drive to the power supply. If there is another connector, connect the drive to the power supply through it. Also, carefully inspect the SATA connection to the motherboard. Try plugging this cable into a different connector.
If you have a drive in addition to an ssd and a hdd, swap their cables. Where the hdd was, insert the ssd on the motherboard.
Carefully examine the cables themselves, both SATA and those going to the power supply. It is advisable that the cables be new.
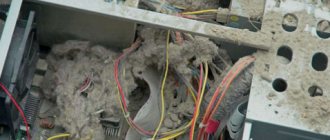
Power supply failure
If your computer or laptop does not see the SSD drive, then you should check the power supply. Often, due to its defects, many devices fail, and it becomes extremely difficult to repair them.
For example, the following situation may arise. You purchased a new SSD, connected it, but it shows no signs of life, it simply does not work. The right decision would be to return it under warranty and exchange it for another one. But if the same problem arises with the next one, then most likely either the batch is defective, which happens very rarely, or the problem is in the power supply.
Without understanding electronics, it is not possible to repair the power supply yourself, so it is best to take it to a trusted service center for diagnostics.
BIOS problem
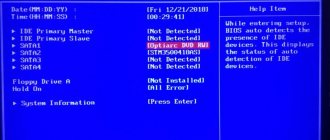
In this case, you need to enter the BIOS and see if it sees your disk or not? If he sees it, it’s one less problem. I won’t tell you in detail how to enter and view the ssd in the BIOS, because... BIOS varies from computer to computer. I'll tell you briefly.
To enter the BIOS on Windows 10, you need to restart the computer and, when it starts loading, press and hold Delete. Moreover, you need to have time to do this before the Windows window appears. Then, if the BIOS is old, go to the BOOT menu and look at the installed disks.
If the ssd drive is missing, then either the problem is in the BIOS and needs to be updated, or in your motherboard. In this case, you need to change the motherboard itself, which is problematic. In addition, you may have a SATA IDE connection, and for the solid-state drive to work correctly, it is advisable to switch to AHCI in the BIOS. This problem is very common.
In any case, it is advisable for a master to understand this, and not for a simple user. Therefore, if you suspect that your BIOS is configured incorrectly in relation to the ssd, contact a service center. There they will help you understand the situation in a matter of minutes!
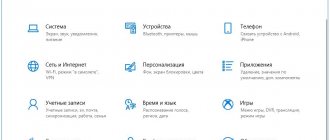
How to fix external drive problems on Windows 10
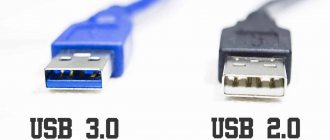
The instructions below should help overcome most problems, whether you're trying to connect a traditional spinning hard drive, a solid state drive (SSD), or a flash drive using a USB interface.
Debugging the Drive Connection
A poor physical connection is one of the most common problems that can prevent Windows 10 from detecting an external drive.
While most small drives and almost all flash drives don't require a special power connection, if you're connecting a large external hard drive, you'll need to make sure it's plugged into a working outlet.