08/17/2018 Category: SettingsAuthor: Dmitry Maidan
BIOS is the most important part of a personal computer. This small piece of code, written into non-volatile flash memory, provides access to storage devices - floppy and hard drives, I/O ports, keyboard and mouse. In the beginning, the main task of the BIOS was to search for the operating system on available drives and launch it. Over time, the BIOS acquired a settings menu, a graphical interface, and even the ability to surf the Internet without loading the main operating system. Today, motherboards are equipped with two different types of BIOS: classic and UEFI. How to call, configure, update the BIOS is the topic of our article.
- What is the difference between UEFI and BIOS
- BIOS versions on computers
AWARD BIOS
- AMI BIOS
- PHOENIX BIOS
- UEFI
- How to find out the BIOS version in Windows 10
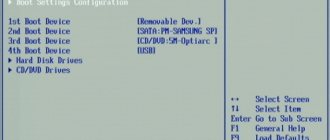
- Entering BIOS when turning on the computer
Table: keyboard shortcuts for calling various BIOS functions of desktop PC motherboards
- Updating with a system utility in Windows environment
Video: updating the motherboard BIOS using the qFlash utility
- Video: BIOS update in DOS environment
How to open the BIOS if Windows 10 boots normally (i.e. there are no special problems)
Open BIOS directly from Windows 10 itself
It still won't work - the session will have to end.
- Click on the notifications icon: we are interested in the “All settings” section.
- Go to “Update and Security” / select the “Recovery” tab on the left.
- In the “Special boot options” sub-item, click on the gray “Restart now” button (just don’t forget to save everything before doing this).
- After the restart, we get to the Windows 10 blue menu, like this:
- And the last step: go to the “Diagnostics” section / then click “Advanced Settings” / click “UEFI Firmware Settings” / click “Reboot”.
All! After the restart, you will automatically enter the BIOS (as you remember, in Windows 10 it is most often replaced by UEFI, but it will probably be called the old fashioned way for many years to come).
I can't enter BIOS from a USB keyboard
Check its functionality. Try connecting to another PC. It may not be supported by the BIOS. If you are using a wireless keyboard, the BIOS may not see it at boot. Connect a wired model to the device. Older PCs may not support the USB keyboard interface. Try to find a model with a PS/2 connector or purchase an adapter. Check the port to which the keyboard is connected.
How to enter the BIOS from the welcome screen if logging into Windows 10 itself is blocked
What to do if Windows 10 won't let you sign in
and start a new session without "letting" you go beyond the login screen (the one where the OS usually asks for the user's password)? This can happen, for example, if you have installed some drivers or applications that conflict with the operation of the OS. Or even just forgot your password.
It's OK! Here's how to enter the BIOS
in this case.
- Click the “Power”
. - Hold and, without releasing, select "Reboot"
.
After the restart, the system will direct us to the above-described “Select action” menu, and then everything will follow the same pattern as in the section above: “Diagnostics” / “Advanced parameters” / “UEFI firmware parameters” / “Reboot”.
BIOS versions on computers
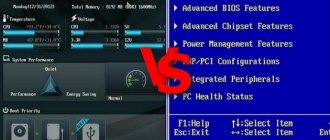
Depending on the manufacturer of the motherboard or laptop, the BIOS version may be different, and accordingly, the user interface in the configurator control program may be different. The classic BIOS version provides approximately the same functionality for setting up the motherboard; depending on the BIOS developer, only the appearance of the interface and the hot keys for calling BIOS settings when starting the computer change.
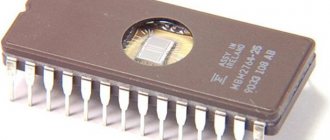
The BIOS chip is installed in the socket: if the update is unsuccessful, you can remove the chip and flash it with a programmer
AWARD BIOS
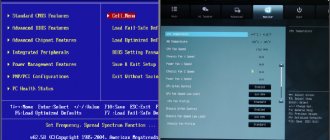
One of the most common BIOS on motherboards in the mid-range and budget segment. The proprietary interface is a main screen with a list of sections, which can be navigated using the cursor keys - “arrow”. By pressing the Enter key you can go to the desired section in which the necessary settings are made.
BIOS Award main menu
To get into the AWARD BIOS settings, hold down the DEL key when turning on the computer. By holding the F12 key while turning on the computer, you can call up the boot media selection menu. This is useful if you are reinstalling the operating system and need to boot from a flash drive or optical disk.
BIOS Award Initial Boot Screen
AMI BIOS
BIOS of this type can be found both on motherboards of desktop computers and on laptops; the control program interface is a top menu with sections and settings screens that you can navigate through. When you turn on the computer, press the DEL key to get to the main BIOS screen, which contains system information (processor type, amount of RAM, connected hard drives) and current time and date settings.
BIOS AMI Initial Boot Screen
Exiting the BIOS and saving the settings is done using the F10 key.
PHOENIX BIOS
Phoenix Inc has long been developing BIOS for laptops, as well as motherboards for workstations and servers. After the company acquired AMI, the BIOS functionality became unified, and the interface of AMI BIOS and PHOENIX BIOS was absolutely the same.
Phoenix BIOS main menu
The laptop version of PHOENIX BIOS has a reduced number of settings - all options for fine-tuning RAM, processor and chipset control are blocked to reduce the risk of damage to the laptop by an untrained user.
UEFI
Unlike the classic BIOS, where almost all motherboards were equipped with two varieties, the UEFI interface differs: ASUS, Gigabyte, Lenovo, MSI - everyone approached the development of the UEFI shell in their own way, equipping it with their own.
Asus offers a performance tuning utility called EZ Booster, which automatically configures the system for maximum performance by selecting the highest possible frequencies for the RAM and processor.
UEFI interface of ASUS motherboards
Gigabyte has equipped its UEFI systems with a proprietary 3D BIOS shell, which combines graphics and mouse controls with the classic BIOS menu from a decade ago. This interface will appeal to conservative users.
3D BIOS - a bridge between the classic BIOS interface and modern UEFI graphical shells
All modern MSI motherboards are equipped with the company's latest development - Click BIOS 4. This is a UEFI graphics system that provides the user with the most flexible level of settings for computer components, anti-virus protection for bootable media and a built-in UEFI Internet browser.
Click BIOS 4 - maximum settings in a colorful graphical interface
As you can see, practically the shell is a mini-operating system with an intuitive graphical interface, so managing UEFI settings on different motherboards will not be difficult even for a beginner.
As a second-year student, I bought a second-hand IBM Thinkpad laptop, the BIOS of which turned out to be a “tough nut to crack” for me - the laptop did not display any boot prompts on the screen, and attempts to access the BIOS settings using the DEL or F1 keys were unsuccessful. As it turned out later, to enter the BIOS settings, the manufacturer placed a special key on the keyboard - THINKVANTAGE, pressing which allows you to enter the BIOS settings both when loading the operating system and from the WINDOWS environment. Now the Thinkpad line of laptops is manufactured by Lenovo, and the BIOS on them has changed to UEFI, but the blue THINKVANTAGE button is still present on the keyboard.
How to find out the BIOS version in Windows 10
You can find out the BIOS version using the CPU-Z program, which is distributed completely free of charge. The program works in any current version of Windows - from XP to Windows 10, does not require registration and, in addition to information about the BIOS, allows you to learn a lot of interesting things about the components of your computer: motherboard, video card, processor, RAM modules.
- Download the program from the developer's website.
Download the CPU-Z program from the website - Launch the program and go to the Mainboard tab.
Go to the Mainboard tab - In the BIOS block you can find out its type, version and date of last update.
Version information is displayed in a block in the center of the window
How to enter the BIOS when starting Windows 10 (refuse fast boot)
Is it still possible to enter the BIOS (UEFI) on Windows 10 using the classic method
, simply by setting the desired key combination at startup? It's possible, but to do this we'll have to turn off fast boot.
We described additional methods and ways to enter the BIOS in our article “Here”
- "Start"
/ go to
"Control Panel"
/ chapter
"Power supply"
. - On the left side click on "Power button actions"
. - In the next menu click "Change settings that are currently unavailable"
. - Remove the checkbox opposite at the very bottom "Enable fast startup"
(in Shutdown Options).
All!
Now the computer will start in the usual slow mode.
We find the inscription “Press
(...that same button or combination...)
“to setup”
on the black screen while loading Windows 10 and press it constantly until we open the BIOS.
If you didn’t see the required hint, in our article “How to enter the BIOS on Windows 7” you will find the most complete table with the treasured keyboard shortcuts for various laptop and PC models.
Keystrokes when starting the computer
The standard way to enter the BIOS is to press certain keys when starting the PC. They may differ for each specific computer or laptop model. It all depends on the BIOS version and the manufacturer of the computing device. In the tables below you can see common options.
| For different BIOS versions | |
| AMD | Typically, the basic I/O system is called up by pressing "F1" |
| DTK | Most often, the “Esc” key is used to access device settings. |
| AMI | After launching, you should try pressing “Delete” or “F2” |
| A.L.R. | Login using the “F2” key or the “Ctrl + Alt + Esc” combination |
| Phoenix BIOS | The combinations “Ctrl + Alt + Esc” and “Ctrl + Alt + S” have become widespread. |
The second table suggests options for service keys, which depend on the laptop manufacturer.
| For some brands of laptops | |
| Asus | The “F2” key is often assigned to enter the BIOS. |
| Acer | The following options are popular - “F1”, “F2” or the combination “Ctrl + Alt + Esc” |
| Toshiba | Typically, the “Esc” and “F1” keys are used. |
| Lenovo | You can get into the BIOS by pressing “F2” when the computer boots. |
| Sony | For these purposes, the “F2” and “F3” keys are provided. |
Help: You may need to enter the BIOS when installing Windows 10 from a flash drive so that it can boot from it. It happens that this feature is disabled by default.
How to enter BIOS (UEFI) on Windows 10 via command line?
This method is good when, for some reason, Windows 10 does not want to reboot using any of the standard methods described above. Your case? Then we do the following.
- Go to “Start” and type CMD in the search field.
- Right-click on the command line icon that appears and select “Run as administrator.”
- Set the command: shutdown.exe /r /o (it will restart the computer).
- We get into the “Select Actions” menu that is already familiar to us and do all the steps described above (one by one click “Diagnostics” / “Advanced options” / then “UEFI Firmware Settings” / finally, “Reboot”).
What is BIOS and what is it for?
Using the BIOS, you can configure the operation of both the entire computer and its individual components. For example, change the RAM timings, adjust the rotation speed of case fans, the operating frequency of the central processor, video card, etc.
The BIOS of the motherboard contains all the technical characteristics of the computer. Also, through this program you can install the operating system when purchasing a PC.
How to enter the BIOS on Windows 10 if it is password protected?
If it's a laptop, we don't recommend tinkering with it - it would be better to take it to a workshop. But on a standard PC, you can easily reset the BIOS settings (and with them the password).
For this it is enough:
- CMOS jumper on the motherboard
- move it to adjacent contacts for 15 seconds (from position 1-2 to position 2-3),
- and then return everything back.
!!! Before doing this, do not forget to completely turn off the computer and remove all cords from the outlets!
You can read more about this simple procedure in our article “Here”.
How to update BIOS on a computer with Windows 10
A modern personal computer is a modular device, and its motherboard is the longest-lived component. To support system components that were released later, such as new processors, hard drives, or memory modules, you may need to update the BIOS microcode. This can be done in several ways - using a Windows application, using the BIOS itself, or creating a special bootable media.
To support new processors, the motherboard BIOS will probably need to be updated.
Updating with a system utility in Windows environment
ASUS has released the WinFlash utility, which allows you to update the BIOS directly from the Windows operating system. Although the utility is intended for updating the BIOS of laptops and computers only from ASUS, enthusiasts have posted modified versions of the program on the Internet, which can now update the BIOS of any computer. To carry out the update procedure, you will need to follow a few simple steps:
- Make sure that the laptop battery is charged at least 75%; if you have a desktop computer, connect it to the mains via an uninterruptible power supply.
- Download the required BIOS version from the motherboard or laptop manufacturer's website and unzip the archive with the file.
Download the latest BIOS version from the website - Download and install the WinFlash program on your computer, and then run it.
WinFlash start screen - Open the downloaded BIOS file with the program.
On ASUS equipment, the BIOS file can not only be opened from the disk, but also automatically obtained via the Internet - Before clicking the UPDATE button, make sure that the model of the old and new BIOS versions are the same.
Check BIOS version - The BIOS update process will take place within two to three minutes, when it is completed, press the EXIT button to exit the program.
Completing the BIOS update process - The computer will automatically reboot and make additional settings for the new BIOS version in automatic mode.
- The BIOS has been updated and the system is ready to use.
Updating using BIOS
Most modern motherboards contain a built-in BIOS update utility, for ASUS it is EZ FLASH2, for MSI it is QFlash. The procedure for updating the BIOS using these utilities is no more complicated than updating from a Windows environment.
- Prepare a 1-2 GB flash drive and format it with the FAT16 or FAT32 file system, then write the new BIOS file to this disk.
To update the BIOS, the media with the firmware file must be formatted in the FAT file system - Restart your computer and run the update utility. To launch the QFlash utility, you must press and hold the END key when starting your computer.
Confirm QFlash launch in the main BIOS settings screen - Select the drive containing the new BIOS and press ENTER.
Select the disk containing the firmware file - The utility will first write a backup copy of the old BIOS to the drive, and then begin the update procedure, which will take 2-3 minutes.
- After rebooting, the computer will be ready to use.
Some motherboard models from 4-5 years ago could only read the BIOS update file from floppy disks. For such devices, before the update procedure, you need to enable the USB-FLOPPY emulation mode in the BIOS settings.
Video: updating the motherboard BIOS using the qFlash utility
Updating in DOS environment (via bootable USB flash drive)
Award, AMI and Phoenix companies have developed simple utility programs that run in the DOS environment. Updating using such utilities is the most universal, although also the longest, method, because it works on absolutely any model of motherboard and laptop, even very old ones. The update process will consist of two stages: creating bootable media and running the update program in a DOS environment. Let's look at the update procedure using the Award BIOS as an example:
- Using the Rufus program, create a bootable USB flash drive with the DOS environment. Creating a DOS boot disk with RUFUS
- Write the BIOS file and the update utility - awdflash.exe - to the flash drive.
- Boot from the created media and wait for the command prompt to appear.
- At the command prompt, type "awdflash.exe bios_filename" and press ENTER.
Run the BIOS update utility from the command line - When the program asks you to save a backup copy of the old BIOS, answer in the affirmative.
- After reading and saving the old BIOS version to a file, the program will begin the update procedure, which will take several minutes.
If the firmware process is successful, there should be no red segments in the field - After the message “update successful...” appears, the update process will be completed successfully.
- Restart your computer for the update to take effect.
Have you tried all the methods, but still can’t get into the BIOS? Possible problems
- cause
. You recently updated the BIOS on your Windows 10 or replaced it with UEFI yourself, and mistakenly installed an incompatible version (or maybe your ROM simply “can’t handle” the rather resource-hungry UEFI).Solution. We take the computer to a service center, where it is repaired quite quickly.
- cause
. The ROM chip in which the BIOS is “stored” has become unusable.Solution. For the “system unit”, you can buy a new ROM and carefully replace it with your own hands (since in 99% of cases it is not soldered, but simply inserted into a special socket). But the laptop will most likely have to be re-soldered, so it’s easier to go to a workshop.
- cause
. The keyboard or part of it does not work. This happens - for example, if you rarely use the “upper” keys F1-F12, you could easily not notice that this particular group of buttons is out of order.Solution. Use some other login method described in the article - buttons in most of them are not needed. Replace or repair the keyboard.
Additional Information
If all the above methods did not bring a positive result, the reasons may be as follows:
- When upgrading to UEFI, the wrong version was installed for the motherboard. In addition, there are cases in which the ROM does not have enough capacity to service the new system, taking into account its resource consumption. To solve the problem, it is recommended to contact a service center;
- The ROM board containing the BIOS has become unusable. The way out of this situation is to purchase a new ROM chip;
- Failure of keyboard shortcuts that provide access to the BIOS system. There are two ways to solve the problem. The first involves logging into the system without using keys, the second requires replacing the keyboard.
BIOS settings for Windows 10
After installing the operating system, the user does not need to radically configure the BIOS. You only need to adjust a few parameters for stable computer operation. Eg:
- Change the timings of the RAM, adjust the frequency of its operation according to the manufacturer’s recommendations. These RAM parameters are changed manually through the BIOS and do not require the installation of additional software.
- Set the maximum processor frequency, if the CPU supports such a function. Modern processors usually increase the frequency themselves in Boost mode, depending on the type of task being performed.
- Adjust the rotation speed of the cooler and case fans. It is not recommended to change this parameter without knowledge.
- Reflash the BIOS to the latest version. The updated firmware can be downloaded from the official website of the manufacturer of the motherboard used. This process does not need to be performed if the computer is stable and the operating system boots without problems.
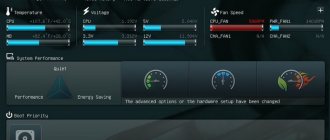
- Set the required computer operating mode. As a rule, the BIOS can be set to low, balanced or maximum PC performance. The desired option is selected depending on the goals pursued.
Experienced specialists do not recommend that inexperienced users change other BIOS settings not described above. This will lead to PC malfunctions.
How to understand the BIOS version and information about the OS?
Windows 7, 8.1, 10 have an embedded program to view information and characteristics of the system and PC. This utility makes it possible to understand the actual BIOS version of the motherboard of a computer with a laptop:
- msinfo 32 in the search bar and click OK;
- The “System Information” program window pops up. In this program you can immediately see what BIOS version you have, where you will see the manufacturer, motherboard brand, version and date when the BIOS was installed.
Let's check the BIOS version through the Windows editor
- Now we need to launch the “Registry Editor”. To do this, press the Win + R buttons and enter the word regedit and click OK;
- In this window we need to go to the address in the left window HKEY_LOCAL_MACHINE\HARDWARE\DESCRIPTION\System\BIOS and check the command value BIOSVersion – this tab is your BIOS option.