Sergey Efimov
October 27, 2021
Comments (0)
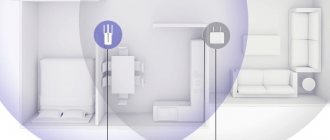
Many people are trying to figure out how to make a repeater out of a router in order to transmit the Internet with good quality around the room. You can boost the signal in remote areas of your home, apartment, or office if the power of the main device is not enough. It is enough to use the main device and amplifier. Together they will help you catch a signal even over long distances.
A regular router can be turned into a repeater
Why do you need a repeater?
A repeater is needed so as not to create many additional wireless networks. This is bad in terms of interference and traffic efficiency. It is better to make a larger network using additional equipment. This may be necessary for a number of reasons:
- A large room with several floors or entrances.
- Powerful ceilings in walls or between floors using concrete, metal, plumbing, electrical wiring and other materials that block the WiFi signal.
- Other reasons to boost a weak signal.
The question of which is better, a router or a repeater, is a question of what you need in a particular situation. If you just need to expand your network, then a repeater is undoubtedly a more convenient device. If the list of your needs is wider, then your choice is more comprehensive equipment. The most ideal option is for the router to be configured as a repeater by the manufacturer, so that it initially supports the operation of a repeater. However, even if this mode is not available, I will tell you how to still configure the router in repeater mode.
What is WDS status?
Wireless Distribution System (WDS) is an outdated technology that allows you to expand the coverage area of a wireless network by combining several WiFi access points into a single network without the need for a wired connection between them (which is mandatory in the traditional network design).
Interesting materials:
How to write to support on Instagram? How to write an objection to the decision of the magistrate? How to write an application for an administrative day? How to write a statement of your own free will? How to write a comment? How is sick leave calculated? How are vacation pay calculated for six months? How to infuse bee pestilence? How to infuse ginseng? How to infuse bee pestilence?
Repeater and Bridge Mode
You shouldn’t buy a new gadget specifically to turn your router into a repeater. In this case, it is better to purchase a special device. But if you have an unused router, then depending on the model, settings and firmware, you can use it to extend the signal: either as a repeater or in bridge mode.
What is the difference between these two modes? A repeater is a device that retransmits the same Wi-Fi. Moving around the room, you will not notice that, in fact, you are connecting to different networks. The bridge or WDS, for its part, will make a new WiFi network. All traffic goes through the main device, but technically you have to connect to different connections.
However, both types of operation are quite convenient and suitable for making an extension to the network. Provided that there is no way to configure a WiFi router as a repeater, it can be connected using a bridge if the devices are compatible with each other.
Open the settings of the old router
Disconnect your computer from the main router by unplugging the LAN cable and turning off Wi-Fi. Then take your old device and connect it to your computer with a LAN cable. It is not necessary to connect it to the Internet. Turn on the router.
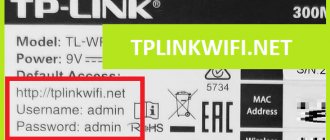
Go to the settings of your old router. To do this, open your browser and enter the address 192.168.0.1 or 192.168.1.1 into the search bar.
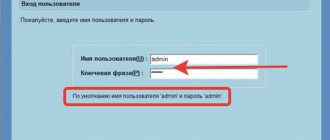
A menu will appear to request the administrator password. If this does not happen, look at the router’s documentation and find out what default address the manufacturer sets in its settings.
How to find out if your router can be configured as a repeater
The question of whether a router can work as a repeater is decided by the manufacturer at the stage of creating the firmware. You can read about this in the descriptions or instructions for the gadget. If this point is important to you, then you should worry about it at the purchase stage.
For example, Asus and Zyxel routers are pre-designed for repeater mode, but until recently Tp-Link devices could only make a WDS bridge. Setting up the router as a repeater on these devices will take a little longer. However, manufacturers do not stand still, and in new models or in new firmware versions, options appear in which you can configure gadgets as signal amplifiers. Therefore, before proceeding to the instructions below, check what type of operation your device supports.
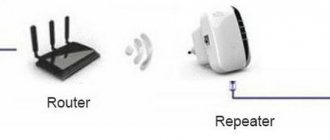
What is a repeater and its necessity?
A repeater is equipment designed to enhance the Internet signal, which is not picked up at long distances from the main device (router). For example, a tablet or laptop does not catch the network from the far rooms of the house. Other repeater names:
- repeater;
- repeater.
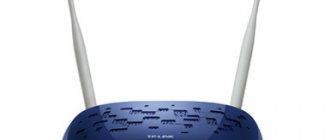
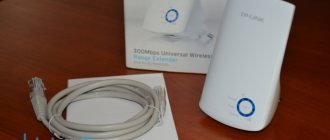
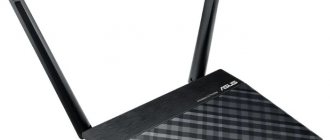
Most manufacturers that make routers also make repeaters. For example, TP-Link, Asus, Netis. Therefore, they can be purchased at any store. Repeaters are small in size, often similar to regular routers in shape and size.
TP-Link often produces routers and repeaters in the same form.
A router with a repeater function is needed to distribute home Internet to rooms where the signal from the Wi-Fi router does not reach. That is, the device is designed to distribute waves received from other devices. This is a signal amplifier that receives a Wi-Fi network and transmits it further. Transfer can be carried out from a variety of devices (router, PC, mobile phone).
TP-Link equipment
How to check the operation of the router in repeater mode
If you managed to configure the router as a repeater, then you will immediately notice an improvement in the signal in those areas where it was weak or completely inaccessible. If you have configured your device in bridge mode, then you will have a new WiFi network to which you can connect and receive the Internet.
To check if the router is working correctly, you can go to the settings and look at the parameters there:
- Go to settings.
- On the main screen, in the Status section, the line WDS Status – Run will be displayed.
- This means that everything is done correctly and the device works as a repeater.
Setting up a wireless bridge (WDS) on a TP-Link router
Go to the Wireless .
Near Wireless Network Name, indicate the name of the new wireless network that our new so-called “Repeater” will distribute. And next to Region, indicate your region.
Opposite Channel, I advise you to change the channel to number 6 (or better yet, set it to 1 so that the channels do not coincide. Try this and that).
Attention! If, when installing identical channels (for example, 6) on the main router and the “repeater” router, the Internet does not work, then install channel 1 (or another) on the second router. Try this and that.
To enable operation in bridge mode (WDS), check the box next to Enable WDS Bridging .
Well, all that remains is to start searching for Wi-Fi routers. To do this, click on the “Survey” .
A page will open with a list of wireless networks (there may be only one network). Select the network (main router) and click the “Connect” .
You will see that the SSID (to be bridged) and BSSID (to be bridged) are filled in. If the main router has a password set for the Wi-Fi network, then in the Key type , specify the encryption type, and in the Password , enter the password for accessing the main router’s wireless network.
Click the “Save” and reboot the router.
Everything should work. On the main router settings page you can see the connection status. If it says Run WDS Status , then this means that the router has connected to the main router and should distribute the Internet.
Also, do not forget to set up wireless network security on the new router (the one that is the repeater); read more in the article How to set (change) the password for a Wi-Fi network on a TP-Link TL-WR841N router.
Possible problems when setting up a wireless bridge (WDS)
If on the main page of the router settings in the WDS Status Scan... for a long time , then this means that our repeater router cannot connect to the main router.
1. Check whether you have correctly specified the encryption type and password for connecting to the main router.
2. Try playing around with changing channels. Wireless tab Channel item (on both routers).
3. If you have the Wireless – Wireless Bridge (for example TD-W8960N), then on both routers you need to set the following settings:
Only when setting up the main router, you need to specify the MAC address of the secondary router. And when setting up a secondary one, specify the MAC address of the main one. The MAC address of the router can be found at the bottom of the device.
4. Just in case, check if MAC address filtering is enabled on your main router.
If after configuration, the routers connect, but the Internet does not work, then try disabling DHCP. Go to the router settings on the DHCP tab and change the value to Disable. Save the settings and reboot the device.
Possible problems and solutions
If you failed to connect the router as a repeater the first time and it does not broadcast the network, I suggest doing the following:
- Make sure that you have changed the IP address of the second router and that you do not have an address conflict.
- Check that the channel number is the same on both routers. Try changing it to a different number.
- On the second device, WPS and DHCP modes must be disabled.
- Make sure that the encryption type on the second router is the same as the first, and that you have entered the correct network password.
- Reset the settings of the second router - press the Reset button, which can be pressed with a long sharp object, and hold it for 10-15 seconds.
- If all actions do not lead to the desired result, then perhaps your router models conflict with each other. Try setting up repeater mode with other devices to eliminate this option.
Now you know how to make a repeater from a router - and you know several methods of this operation. Your extra router can make your life a lot easier. Keep an eye on official firmware updates - sometimes they introduce new changes that will make working with your equipment even easier.
Connecting the router to the computer
When combining several WiFi access points into one network, a conflict in IP addresses may arise, which is why it is first necessary to vary the IP address of the WiFi device, which in the future will function as a “repeater”.
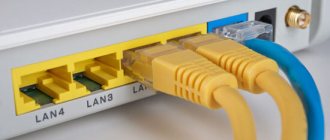
To do this, we connect an access point to a computer or laptop via twisted pair cable. Although you can change the router settings via a WiFi connection, it may be that your device does not support such capabilities. Another nuance, in older models of routers, may be that the LAN cable will have to be connected to port number 1 on the router in order to configure it.
By the way, power is connected to the router directly by the power supply or thanks to a POE injector. It all depends on the specific model.
Setting up the TL-WA854RE V3 repeater
Video instructions for setting up a wireless amplifier are available here:
Using the example of TP-Link - TL-WA854RE V3, we will consider the connection between devices to strengthen the Wi-Fi signal and cover a larger range.
Instructions for connecting and setting up a TP-Link repeater:
- On the main router, press the WPS button (or activate the corresponding function in the admin panel).
- Plug the repeater into a power outlet in the place where you want to strengthen the signal.
- Press the central button with a “lock” on it and wait for the RE button on it to light up.
- Ready. You can evaluate the signal level using the indication scale under the button. Two or three bars is already a stable signal.
If you need to place the repeater at a greater distance, connect several repeaters in a row in the same way.
Setting up a network on a computer
I recommend doing this step only if we cannot access the router settings, which are described below.
Click “Start”, find “Control Panel”, and then “Network and Sharing Center”.
Right-click on the active adapter and click on “Properties”.
The window may have a different appearance; to change the appearance, click on the drop-down list of the “View” category and select “Small icons”.
In the case of Windows 10 or 8, 8.1, you can do it differently, just right-click on the “Start” or the Windows icon that is located in its place.
Select “Control Panel” from the menu. Further actions are similar to those described above.
So, you need to click on “Change adapter settings”.
Select connection protocol version 4 (TCP/IPv4) for the Internet and click “Properties”.
We set the receipt of IP addresses in automatic mode, and similarly repeat the setting if there are other connections, both over a local and wireless network.
Change Password
The default password can be changed in the router's web configurator.
Instructions:
- Expand the “System Tools” section.
- Select "Password".
- Please provide a valid username and password.
- Enter your new login, password and confirmation.
Don't forget your new password, without it you won't be able to access the web configurator.
Firmware update
You can download the current router firmware on the official website.
To flash TP-Link TL WR740N, follow the instructions:
- In system tools, select “Firmware Update”.
- Select the file by clicking on the button, specify the path to the firmware file.
- Select it and click "Open".
- Click Update.