When we take the router out of the box and turn it on, in 99% of cases it starts automatically distributing wifi. This connection is used for the initial setup of the network, which has its own name - SSID. It is indicated on a sticker on the router case and is needed to distinguish the signal from your router from the rest. However, for safety reasons, it cannot be left in this form. It is necessary to change the network name, for which the router web interface provides a setting for changing the SSID name. How to change it on TP-Link, Asus, Zyxel Keenetic, D-Link, Apple, Upvel and Mercusys models? Let's find out right now!
How to change the SSID name on a TP-Link wifi router
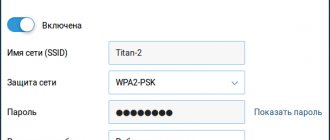
You can change the SSID of the WiFi network in the old version of the software on your TP-Link router by going to the “Wireless Mode - Settings” section. Here we are interested in the value of the “Wireless Network Name” field. By default, it will be called something like “TP-LINK_137B00” after the name and serial number of the router - just erase the text and write your name. Then we save the settings.
To change the name of the WiFi network in the new version of the TP-Link administration panel, you need to open the “Basic setup” tab, the “Wireless mode” item and find the same text entry field called “Wireless network name”.
Preparatory activities
First, you should find out the address at which you enter the router settings, since it is in the settings interface that the Wi-Fi name is changed. For a significant number of routers, logging into the web interface is possible via IP “192.168.1.1.” or "192.168.0.1."
The exact address is usually written on a sticker located on the bottom cover of the device itself. If it is not there, it must be indicated in the accompanying documentation of the router.
The device sticker also contains a login and password that are needed for authorization. And you can always find out exactly by reading the documentation of the wireless device or the subscriber’s contract with the communication service provider.
We look and change the wifi SSID name on the Zyxel Keentic router
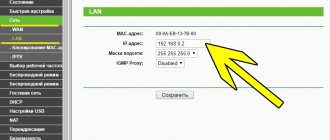
For Zyxel Keentic, the SSID is changed in the “Wi-Fi Network” section, “Access Point” tab.
We come up with our own name without changing anything else in the configuration. Save the settings and reboot the router. After changing the network name, you will need to reconnect all your devices that accessed the Internet via a wireless signal.
To change the SSID on updated Kinetic routers, you need to open the “Home Network” menu. And change the value in the “Network name (SSID)” column
The new name is also activated after the device is restarted.
How to find out the router address?
You can find the address to view the settings:
- on the device itself (most often a label with special information is located at the bottom of the device);
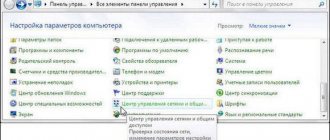
- by entering the “ipconfig” command into the command line, which displays network parameters;
- by viewing the properties of your active Internet connection.
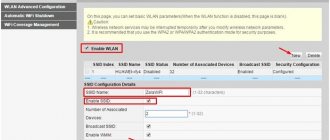
How to change the WiFi network SSID name on an Apple Airport router?
The Apple Airport router assigns a network name itself by default in the form of “Apple Express Network 123456”. To change the name of the Apple Airport Wi-Fi network, which operates at a frequency of 2.4 GHz, launch the Airport Utility program and go to “Manual Setup”.
Here we will need the “Wireless” tab, where we look for the “Wireless Network Name” item - this is the network name displayed on laptops and smartphones. We erase and write in our own. Then we save with the “Update” button.
What is your opinion: is WiFi harmful?
Yes
22.91%
No
77.09%
Voted: 36488
If you need to change the name of the network at the 5 GHz frequency, then additionally go to the “Wireless Network Options” section
and replace the value of the line “5G Network Name”
How to change SSID and password from iPhone?
Those who have already read articles about Apple Airport on this blog know that there is also a special mobile application for iPhone to manage the router without a computer. So, you can change the WiFi name through this program. To do this you need to launch it
and click on the picture with the router
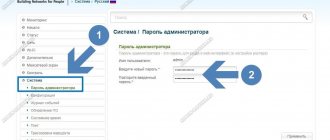
Next, log in with the administrator password in the system.
And click on the “Change” button
Next, go to the “Network” section
and change the meaning of the item - what would you think? That's right, “Network” again, and passwords for the heap.
Then save the changes with the “Done” button.
In order to change the network name on a 5 GHz network, you will have to dig deeper again, as was the case in the computer version of the application. Namely, we go back to the start page for changing settings and go not to “Network”, but to “Advanced”
And then - to “Wi-Fi Settings” (damn, it was impossible to put all this in one place..??)
Here you can already change the 5GHz network configurations. But pay attention - the password remains the same as on the main network at 2.4 GHz - this is such a feature.
Apparently, Apple developers put such a small screw on our connection security.
We tidy up the Torrent-TV playlist (“Superwash”)
UPD. The Torrent TV service, which was the main source of content, has died, so the article is devoid of practical meaning.
The overwhelming majority of streams in the illegal service Torrent-TV (“Superpomoika”) are original streams from operators or from a satellite without compression. These are mainly interlaced video streams. Torrent TV provides the highest possible quality, but low stability. Today some channels are there, tomorrow they are not. Today some channels work well, tomorrow they work poorly. This service is not suitable for continuous hassle-free use - what you paid for, i.e. If you didn't pay, that's what you got. But it’s great when you need to watch something with high quality (if the channel works stably at that moment). Another problem is creating a convenient personal playlist. This is exactly what will be discussed in this note.
Access point settings
When the connection to the Global Network has been verified, you should begin to make the necessary settings. To do this, from the device that will adjust the parameters, you should go to the router settings. This can be done by opening any convenient browser and entering the network address of the device into its address bar, then pressing the “Enter” button.
Depending on the manufacturer of the device, its network address may differ. The easiest way to recognize it is to look at the sticker on the box or the router itself.
Important! The network address may also be indicated in the technical documentation for the device. Manufacturers rarely change their default addresses, so you can try one of the following:
Manufacturers rarely change their default addresses, so you can try one of the following:
- manufacturers D Link, Netgear, Qwest, Trendnet, Senao use this set of numbers - 192.168.0.1;
- Tp-Link, Asus, Linksys, US Robotics, 3Com, Dell, Zyxel Keenetic brands use 192.168.1.1 by default;
- SMC, Belkin, Microsoft brands use the address 192.168.2.1;
- only production specifies 10.0.1.1.
There is another way to determine the original address - use the command line of the operating system. Often the address of the network connection gateway and the router are identical. Therefore, to perform the operation, you should perform the following steps:
- Press the “Win+R” keys simultaneously;
- type cmd command and confirm by pressing Enter;
- after opening the command prompt window that pops up, you should install ipconfig.
In the connection parameters that open, you need to find the gateway and copy the value.
Note! On devices from that work with support for the iMac operating system, you will need to open the main menu and system parameters. After that, find the item with network settings, which will have a special section for the access point - Router
The searched access point address will be displayed in the window that opens.
Using additional software
A certain number of routers come with special drivers, which have built-in specialized programs for managing parameters. However, to access them, you will need to enter your login and password information.
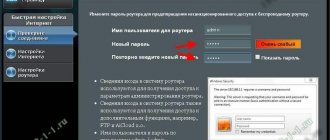
Entering login and password data
To enter any settings and menus for changing router parameters, you also need to enter this data. If the password and login have not been changed by the user during operation, then the values presented will be the original factory settings. You can see them on the box sticker, on the device itself, or in the instructions for the device. In addition, the data can be found on the Internet, where values are presented for all models and manufacturers.
Important! Most often, Admin values are used as login and password.
Entering Wi-Fi connection settings and searching for SSID
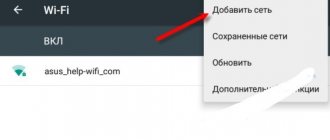
When all the necessary privacy data has been entered, you will be entered into the router settings. It's worth going to the wireless network settings. Different brands have different menu item names, so it's a good idea to look for a name related to the wireless connection type.
Just like the settings for wireless networks, in the case of SSID, various names of items and lines can be used. You should find something like “Connection name”, “Access point name”, etc. After this, the original name will be indicated opposite, for example, simply “Zyxel”, “Tp Link” or any other.
Entering and saving a new connection name
At this step, you should come up with a new name for the access point. You can be as sophisticated as you like and come up with something completely original to stand out in the list of available connections, which will be available to any user who has monitored the available connections within Wi-Fi range.
When the name is invented and entered into the required line, you must save all the changes made, only then the name can change.
Important! Without first saving, the connection name will remain the same
To save the name being changed, there is a button with the corresponding name at the bottom of the menu. After all actions have been completed, you should check the steps completed. To do this, you will need to take any gadget and go to the search for available networks. The access point with the recently saved name should appear in the list.
Updating connection settings
It is noteworthy that after the connection name is changed, all connected devices will lose connection to this network. You will need to reconnect each one separately and enter the password.