Home » Uncategorized
Vladimir 10.30.2021
TOP 10 disk cloning programs: advantages and disadvantages
When storing information on computers, there is always a risk of data loss. There can be many reasons. Starting from basic deletion of necessary data to PC malfunctions.
In order to ensure the safety of important information and not spend too much time installing programs in the event of a failure, cloning is necessary.
This means that in a few simple steps you can regain what you have lost.
This article is intended to help experienced and novice users choose the most convenient program for cloning a hard drive.
What is disk cloning
Cloning is the process of sector-by-sector transfer of the operating system, software and personal files of the user from one disk to another. Unlike backing up or creating a disk image (ISO), cloning creates a 100% copy of the original media: the main partitions, structure and software are preserved.
The new cloned disk turns out almost identical to the old one. This means you don't have to re-configure your work environment, activate the system, or restore software licenses. The difference between it and the original media is that the operating system is removed from the binding to the computer hardware, but it also becomes impossible to roll back the system to its original settings while saving user data and reinstall it in update mode.
Preparing for cloning
Before you start cloning, make sure that nothing will interfere with the process:
- If you are using a laptop, charge the battery;
- Troubleshoot problems that cause your computer to reboot or shut down (if any).
It is also advisable to make backup copies of important data.
Connect the receiver disk via any available interface. The process will go faster if both media are connected to SATA 6 Gb or faster connectors, but if this is not possible, use, for example, USB (USB-SATA adapters are sold in computer stores).
The time it takes to clone a hard drive depends on the following factors:
- Program capabilities.
- Disk capacity. The larger it is, the longer the utility takes to transfer files, partitions and structure.
- Speed and type of source and destination drive: When working with SSD (solid state media), the process is faster than with HDD (magnetic hard drives).
Using Farstone RestoreIT Pro Utility
This paid application is used to create backups of any information on disks, saving the current state of the system, and in case of unexpected failures, restoring it literally by pressing a single button.
The way it works is that it overwrites the boot sector of the disk, adding itself to it, and also creates an additional logical disk for recording all the backed-up information. In fact, Farstone RestoreIT Pro creates system restore points, and it can be used to roll back not only the entire disk, but also individual partitions.
You can activate and deactivate the application in the context menu; the latter is opened by clicking on the tray icon. This feature allows you to save system resources when you are sure that its state does not change at the moment. Farstone RestoreIT Pro can create bootable CD/DVDs or even floppy disks, with which you can not only restore a disk if it cannot boot normally, but also the MBR master boot record with a partition table.
How to quickly copy a hard drive to another hard drive (HDD/SSD)
3.6 (71.11%) 27 votes.
Cloning utilities
We present to your attention the best, in our opinion, utilities for cloning hard drives.
Renee Becca
Renee Becca is a convenient tool for easily cloning disks, folders and individual system partitions. Its main advantage is ease of use. You can transfer information from one physical drive to another in a few simple steps.
- Install Renee Becca on your computer and launch it.
- In the utility interface, go to the "Clone" Select the tool " Hard drive clone».
- In the window that opens, specify the clone source and destination. Source is the source drive that you plan to clone.
- To start the application workflow, click "Clone».
The “ + More ” button will open a menu of additional functions. Here you can check the box to copy all sectors.
This allows you to create a 100% clone of the disk, however, the task execution time will increase.
AOMEI Backupper
Convenient software for creating backups and cloning hard drives, operating systems, and individual partitions. The standard version of the software is available free of charge.
- To use the cloning tool, open the application on your PC.
- In the utility window, go to the "Clone" To transfer files from the source HDD or SSD to the destination, select the " Disc Clone" A list of available storage devices will open.
- Select Source Disk and click "Next».
- In chapter "Destination disk» specify an available target storage medium. Click " again" Next».
- After completing these steps, the automatic cloning process will start. Wait until the job is completed and restart your PC.
Macrium Reflect
The main advantage of Macrium Reflect is its simple and user-friendly interface. The program is also free for home use.
While the utility is running, disable heavy applications, as the program is demanding on computer resources.
To make a clone of a storage medium, you need:
- Open the application.
- In the software interface, select "Clone this disk", which is located in the main section "Create a backup».
- Check the box next to the partitions you want to clone.
- In the window "Destination» the original storage will be displayed.
- Click " Next ". The data transfer process will start. Once cloning is complete, restart your computer.
Handy Backup
Handy Backup is an easy-to-use program for creating physical and logical copies of disks. The utility creates an exact copy of the HDD while completely preserving its structure.
Cloning is performed automatically: you do not need to manually clean up garbage, transfer files, or fix registry errors.
To use this software permanently, you need to purchase a license. A 30-day trial is available for free. It is sufficient to perform basic functions. The interface has been translated into Russian.
How to use Handy Backup:
- Open the application. When starting for the first time, select the type of task: check the option to create a backup copy and click " Further».
- Now you need to specify the data to copy. Expand the section " Disk Clone" and highlight the item "System Recovery" Click " Add».
- A: This is your hard drive.
- In the next window, select a location for the copy. In our case, this is the target disk. Select it on the right side of the interface.
- When choosing a copy type, leave "Complete».
- In the fifth step, you can compress and encrypt your files. Leave these points unchanged. Click " Further».
- In the next window, you can set a schedule for running this task using the scheduler. We don't need this function either. Click " Further».
- Enter the name of the task and click "Ready" The process of completely cloning the hard drive will begin.
- When finished, restart your computer.
HDClone
HDClone is another universal hard drive cloning tool that allows you to work with drives with a capacity of 137 GB or more.
- To start the cloning process, in the main menu of the program "Quick selection» click «Disk" In chapter "Clone».
- In the next window, you must select the source disk from the list of available ones.
- Now specify the target drive by selecting it from the same list.
- Make copy settings. Enable or disable the SmartCopy . It allows you to create a 100% copy and speeds up the data transfer process.
- If you wish, you can activate the defragmentation function. It will be executed immediately after the main task is completed. Click " Further».
- When finished, you must restart your computer.
Acronis True Image WD Edition
Perhaps the most popular brand of hard drives in our country is Western Digital, and if at least one of the installed hard drives on your computer is from this manufacturer, then Acronis True Image WD Edition is what you need.
The program supports all current and not so current operating systems: Windows 10, 8, Windows 7 and XP, there is a Russian language. You can download True Image WD Edition from the official Western Digital page: https://support.wdc.com/downloads.aspx?lang=ru
After a simple installation and launch of the program, in the main window, select “Disk cloning. Copying partitions from one disk to another." The action is available both for hard drives and if you need to transfer the OS to an SSD.
In the next window, you will need to select the cloning mode - automatic or manual; automatic is suitable for most tasks. When you select it, all partitions and data from the source disk are copied to the target disk (if there was something on the target disk, it will be deleted), after which the target disk is made bootable, that is, Windows or other OSes will start from it, just like earlier.
After selecting the source and destination disks, data transfer from one disk to another will begin, which may take quite a long time (it all depends on the speed of the disk and the amount of data).
Acronis
In Acronis, everything was simple and clear: the window interface, prompts and previous experience working with CD images made the process uncomplicated. I removed the image, inserted a new screw, turned the image onto it - there’s not even anything to talk about. In the case of Linux, the process bogged down at the stage of removing the image - it was absolutely unclear how to do this. There was no special program with hints, or a program that added a virtual DVD to the list of devices - like Daemon Tools too. And the list of devices itself turned out to be quite problematic, so you can start right there.
Seagate DiscWizard
In fact, Seagate DiscWizard is a complete copy of the previous program, only to work it requires at least one Seagate hard drive on the computer.
All actions that allow you to transfer Windows to another disk and completely clone it are similar to Acronis True Image WD Edition (in fact, it is the same program), the interface is the same.
You can download the Seagate DiscWizard program from the official website https://www.seagate.com/ru/ru/support/downloads/discwizard/
Samsung Data Migration
The Samsung Data Migration program is designed specifically for transferring Windows and data to a Samsung SSD from any other drive. So, if you are the owner of such a solid-state drive, this is what you need.
The transfer process is carried out in the form of a wizard with several steps. At the same time, in the latest versions of the program it is possible not only to completely clone a disk with operating systems and files, but also to selectively transfer data, which may be relevant, given that the size of SSDs is still smaller than modern hard drives.
The Samsung Data Migration program in Russian is available on the official website https://www.samsung.com/semiconductor/minisite/ssd/download/tools/
Important: other SSD and HDD manufacturers also have the same utilities for transferring Windows to another drive. Typically, you can find it by asking a query consisting of the brand and the phrase “Data Migration”, this is how you will find, for example, Intel Data Migration Tool and similar programs for other brands of drives.
Viewing a list of partitions on the drive
Each section in the dev directory also has a corresponding file. Its name is based on the name of the file corresponding to the drive and the partition number. That is, for an sda drive that has 2 partitions, 2 files will be created in the /dev directory - sda1 and sda2. You can view the list of partitions on the sda drive with the command ls -1 /dev/sda[0-9]
the complete list of partitions on all devices is obtained from the output of the command
ls -1 /dev/sd[az][0-9]
, and if necessary If you include the devices themselves in the list, you can simply write
ls -1 /dev/sd*
, which is much less meaningful, but it’s short and most importantly works.
Or, as suggested in the comments, there is another option cat /proc/partitions
Often the owner can identify the disk simply by this list (this is when he does not have 452 disks), but if this is not enough, then you can use the hdparm
.
Specifically hdparm -I /dev/sda
will display detailed information about the /dev/sda device.
The same information, but scattered across different files, can be found in the /sys/block/sda
.
For example, the disk model is located in the file /dev/block/sda/device/model
.
If this is not enough, then all that remains is to mount the devices one by one and see what is recorded on them. But that's a completely different story.
How to transfer Windows from HDD to SSD (or other HDD) in Aomei Partition Assistant Standard Edition
Another free program, also in Russian, that allows you to conveniently transfer an operating system from a hard drive to a solid-state drive or to a new HDD is Aomei Partition Assistant Standard Edition.
Note: this method only works for Windows 10, 8 and 7 installed on an MBR disk on computers with BIOS (or UEFI and Legacy boot), when you try to transfer the OS from a GPT disk, the program reports that it cannot do this (possibly , here simple copying of disks in Aomei will work, but it was not possible to experiment - failures when rebooting to complete the operation, despite Secure Boot being disabled and checking the digital signature of drivers).
The steps for copying the system to another disk are simple and, I think, will be clear even to a novice user:
- In the Partition Assistant menu, on the left, select “Transfer OS SSD or HDD”. In the next window, click "Next".
- Select the drive to which the system will be transferred.
- You will be prompted to resize the partition to which Windows or another OS will be transferred. Here you can not make changes, but configure (if desired) the partition structure after the transfer is complete.
- You will see a warning (for some reason in English) that after cloning the system, you will be able to boot from the new hard drive. However, in some cases, the computer may boot from the wrong disk. In this case, you can disconnect the source disk from the computer or change the cables of the source and destination disk. I’ll add on my own behalf - you can change the order of the disks in the computer’s BIOS.
- Click "Finish" and then the "Apply" button at the top left of the main program window. The last step is to click “Go” and wait for the system transfer process to complete, which will begin automatically after the computer restarts.
If everything goes well, upon completion you will receive a copy of the system that can be booted from your new SSD or hard drive.
You can download Aomei Partition Assistant Standard Edition for free from the official website https://www.disk-partition.com/free-partition-manager.html
How to convert a disk to dynamic using the command line or Windows PowerShell?
the Command Prompt or Windows PowerShell to convert basic disks to dynamic disks .
It is worth noting that the entire conversion procedure consists of several commands, so even if you are not familiar with the command line, you should not have any problems converting the disk to dynamic.
So, in order to convert a basic disk to a dynamic one , you should:
Step 1: Right-click on “ Start ” and select “ Windows PowerShell (Admin) ”
Step 2: Windows PowerShell . Enter after each one to execute it):
- diskpart – this command launches the diskpart utility, which is used to work with disks;
- list disk – to display disks connected to the computer;
- select disk N - this command selects a disk for further work. Replace N with the number of the disk that will be converted to dynamic;
- convert dynamic - to convert the selected disk to dynamic;
- exit – to exit the diskpart utility;
These commands should be run for all disks that you want to convert to dynamic.
Transfer Windows 10, 8 and Windows 7 to another disk in Minitool Partition Wizard Bootable
Minitool Partition Wizard Free, along with Aomei Partition Assistant Standard, I would classify as one of the best free programs for working with disks and partitions. One of the advantages of the product from Minitool is the availability of a fully functional bootable ISO image of Partition Wizard on the official website (the free Aomei allows you to create a demo image with important functions disabled).
By writing this image to a disk or flash drive (the developers recommend using Rufus for this) and booting your computer from it, you can transfer your Windows or other system to another hard drive or SSD, and in this case we will not be hampered by possible OS limitations, since it is not running.
Note: I tested cloning the system to another disk in Minitool Partition Wizard Free only without EFI boot and only on MBR disks (Windows 10 was transferred), I can’t vouch for its performance in EFI/GPT systems (I couldn’t get the program to work in this mode, despite Secure Boot being disabled, it looks like this is a bug specifically on my equipment).
The process of transferring a system to another disk consists of the following steps:
- After booting from the flash drive and logging into Minitool Partition Wizard Free, select “Migrate OS to SSD/HDD” on the left.
- In the window that opens, click “Next”, and on the next screen select the drive from which Windows will be transferred. Click Next.
- Specify the disk to which cloning will be performed (if there are only two, it will be selected automatically). By default, options are enabled that resize partitions during transfer if the second disk or SSD is smaller or larger than the original one. Usually it is enough to leave these parameters (the second item copies all partitions without changing their partitions, suitable when the target disk is larger than the source one and after the transfer you plan to configure the unallocated space on the disk).
- Click Next, the action to transfer the system to another hard drive or solid state drive will be added to the program's job queue. To start the transfer, click the “Apply” button at the top left of the main program window.
- Wait until the system transfer is completed, the duration of which depends on the speed of data exchange with the disks and the amount of data on them.
Once complete, you can close the Minitool Partition Wizard, reboot your computer and set it to boot from the new disk to which the system was transferred: in my test (as I already mentioned, BIOS+MBR, Windows 10) everything went well and the system booted as usual which did not happen with the source disk disconnected.
You can download the Minitool Partition Wizard Free boot image for free from the official website https://www.partitionwizard.com/partition-wizard-bootable-cd.html
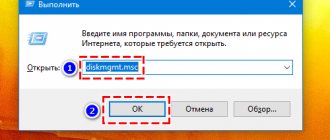
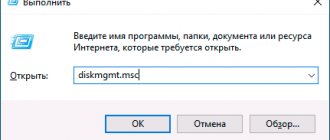
How to convert a disk to dynamic using Disk Management?
If you have analyzed all the advantages and disadvantages of dynamic disks and decided to use them, you can convert a basic disk to a dynamic one in just a few steps:
Step 1: Right- on “ Start ” and select “ Run ”. The same operation can be performed using the key combination “ Win + R ”
Step 2: In the window that opens, enter the command “ diskmgmt.msc ” and press “ Enter ” to confirm.
A system utility called “ Disk Management ” will open in front of you. In the “ Type ” column next to each disk it will be written which disk it is - dynamic or basic.
Macrium Reflect
The free Macrium Reflect program allows you to clone entire drives (both hard drives and SSDs) or individual sections, no matter what brand your drive is. In addition, you can create an image of a separate disk partition (including Windows) and later use it to restore the system. Creating bootable recovery disks based on Windows PE is also supported.
After launching the program, in the main window you will see a list of connected hard drives and SSDs. Mark the disk where the operating system is located and click “Clone this disk”.
At the next stage, in the “Source” item the source hard drive will already be selected, and in the “Destination” item you will need to indicate the one to which you want to transfer the data. You can also select only individual partitions on the disk to copy. Everything else happens automatically and is not difficult even for a novice user.
Viewing a list of drives
For each connected drive (hard drive, flash drive), you can find the corresponding file in the /dev directory. Its name consists of the letters sd
and a letter indicating the device number.
That is, the hard drive connected to the first channel will correspond to the sda file, the second sdb, and so on. Accordingly, the easiest way to view the list of devices is ls -1 /dev/sd[az]
. This command will show a list of drives, but will not give us any information about them. And we need to at least see the list of sections.
Additional Information
Once you have transferred Windows and files, be sure to either set the new drive to boot in the BIOS or disconnect the old drive from the computer.
Hard drive cloning is a procedure for completely copying and transferring files contained on the HDD. This operation is mainly resorted to when replacing the source of information storage with a more capacious one.
Data cloning allows you to get a new hard drive that is completely identical to the previous one. The procedure can be carried out manually, but depending on the size of the storage medium, it may take several days. To speed up the process, you can use specialized programs that allow you to create an exact copy of your hard drive.
Example programs
Programs for cloning a hard drive can be universal, which work with all types of media, or specialized (created to work with drives from a specific manufacturer). Among them are the following utilities for automatically copying information:
EASEUS Disk Copy
EASEUS is offered free of charge. The program clones the hdd by sector and works with any file system. EASEUS developers pay attention to the following advantages that their product has:
- the ability to clone the entire disk or its individual parts, including deleted, hidden and protected files;
- launch is carried out from a boot disk or flash drive;
- works with all operating systems;
- supports dynamic disks, Firewire, SAS, USB, SCSI and SATA l-ll;
- copies up to 1 TB of information;
- simple interface.
Among the main disadvantages of EASEUS are:
- not Russified, and therefore some users may have problems working with the program;
- When working with Windows, many adware programs are installed.
The latter is offset by the fact that there is no charge for using EASEUS Disk Copy.
Paragon Drive Backup Personal
What sets Paragon Drive Backup Personal apart is its ease of use. The program runs under Windows or from a boot disk. All actions performed during the process of creating a disk copy are constantly accompanied by pop-up tips. The main advantages of the program are as follows:
- several operating modes;
- supports all file systems and hard drives;
- provides the ability to copy individual files and entire sections;
- provides fast copying speed;
- Russified interface.
The program is available for a fee. You will have to pay $39.95 for the right to use it.
Macrium Reflect
Macrium Reflect not only clones data, but also creates images of individual partitions or disks, which, after restoring the system, can be embedded directly in Windows Explorer. Features of the program are as follows:
- copies the entire hard drive or individual files;
- does not require a system reboot after creating images;
- checks the identity of the received images;
- works at high speed;
- provides a high level of security for stored information through the use of multi-level encryption.
Among the disadvantages are:
- interface in English;
- Advertising products are installed along with the program.
Macrium Reflect is a completely free product.
FarStone RestolerIT Pro
The program is mainly used to recover user data lost in cases of system failure, computer failure and other situations. Essentially, Farstone RestolerIT Pro does not clone information, but creates backups, in this case a hard drive backup. The advantages of the product include:
- ability to configure the frequency of data saving;
- information is restored after pressing one button;
- data is restored even if the bootloader fails;
- depending on the selected mode, backs up all information or saves changed data;
- allows you to configure monitoring modes (the entire disk or its individual parts);
- saves the entire file modification history.
In addition to the fact that the program is unable to clone a disk, the developer requires a payment of $24.95 for its use.
Acronis True Image
Acronis True Image is one of the most popular products used for hard drive cloning today. The program is capable of copying information from various drives and file systems.
Acronis True Image supports most versions of Windows, including older editions. The user is asked to select several cloning modes: individual partitions, files or the entire disk. Acronis True Image has a number of significant features that determine the program’s popularity:
- loaded from a DVD or flash drive;
- is distinguished by its multifunctionality and high speed of operation;
- interface in Russian;
- ease of use due to intuitive settings;
- the product operates in manual or automatic modes;
- the user can specify what data needs to be copied;
- transfers any information, including hidden files.
Using Acronis True Image will cost 1,700 rubles.
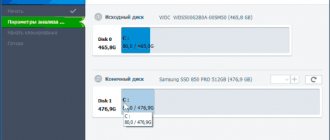
Cloning example
As an example of how information is cloned from a hard drive, below is work with Acronis True Image. Although this product has an intuitive interface, you need to pay attention to the following terms:
- Original hard drive. This term refers to the medium from which data is copied.
- Target hard drive. Indicates the medium on which information is recorded.
To copy information using Acronis True Image, after launching the program and logging in to it, you need to perform a number of actions:
- Select the “Tools” tab (located on the left side of the window). In the menu that appears, click on “Clone disk”.
- The Disk Clone Wizard appears in the program window. Having selected automatic mode, you need to click on the “Next” button at the bottom of the screen.
- The third step involves selecting the hard drive from which the information will be copied. It is important to note that the program names the media differently than “Explorer”.
- In the next window, the program provides the opportunity to select the disk on which the information will be written. If any data is saved on the media, Acronis True Image will warn you about the possible loss of the latter after cloning is complete.
- In the window that allows you to select a recovery method, it is recommended to leave o.
- If complete cloning of information is intended, then in the window that appears, you must click on the “Proceed” button. Otherwise, when you need to select specific files to copy, you should go to the "Exclude Files" menu (in the lower left corner). In it, you should select the data that is to be copied by placing the appropriate mark next to it.
After completing all actions, Acronis True Image prompts you to reboot the system. Before it is re-downloaded, the program will clone the information.
The next time you start the computer, the BIOS opens, in which you must select the priority for loading the operating system (from a hard drive or a cloned drive).
How to convert a dynamic foreign disk to a basic one without losing data?
All of the methods described above for converting a dynamic disk to a basic one one way or another lead to data loss . But what if a dynamic disk stores data that is worth thousands of dollars, or is of particular value to its owner, and suddenly the operating system stops working, and after reinstalling the system, the disk is displayed as “ Dynamic, foreign ”?
In such a situation, not convert it to basic and do not try to import it, as the possibility of data loss is very high .
It's best to immediately use RS RAID Retrieve - the best RAID reconstructor that can retrieve data from dynamic disks.
The program has an intuitive interface , so you do not need to have in-depth PC knowledge to successfully extract data from the “Dynamic Foreign Disk” .
In addition, the built-in RAID constructor can automatically determine all the parameters of a dynamic disk , for example, the type of RAID that was used, the starting block for reading information, the order of disks, etc.
You only need a few clicks of the mouse.
So, in order to extract data from a dynamic foreign disk , first connect all the drives that made up the dynamic disk to the computer, and then follow a few simple steps:
Step 1: Download and install RS RAID Retrieve . Launch the application after installation. The built-in “ RAID constructor ” will open in front of you. Click " Next "
[donload_raid]
Step 2: Select the type of adding RAID array to scan. RS RAID Retrieve offers three options to choose from:
- Automatic mode - allows you to simply specify the disks that made up the array, and the program will automatically determine their order, array type and other parameters;
- Search by Manufacturer – This option should be selected if you know the manufacturer of your RAID controller. This option is also automatic and does not require any knowledge of the RAID array structure. Availability of data about the manufacturer allows you to reduce the time for building an array; accordingly, it is faster than the previous one;
- Manual creation - this option should be used if you know what type of RAID array you are using. In this case, you can specify all the parameters that you know, and the program will automatically determine those that you do not know.
After selecting the appropriate option, click “ Next ”
Step 3: Select the drives that made up your dynamic disk and click Next . This will begin the process of discovering array configurations. Once it's completed, click " Done "
Step 4: After the designer assembles the dynamic disk, it will be displayed as an ordinary drive. Double click on it. The File Recovery Wizard will open in front of you . Click " Next "
Step 5: RS RAID Retrieve will prompt you to scan your dynamic disk for files to recover . You will have two options available: quick scan and full array analysis . Select the desired option. Then specify the file system type that was used on your drive. If you do not know this information, check all available options as in the screenshot. It's worth noting that RS RAID Retrieve supports ALL modern file systems .
When everything is configured, click “ Next ”
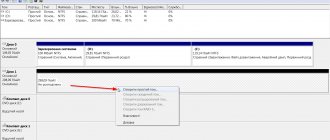
Step 6: The dynamic disk scanning process will begin. When it finishes, you will see the same file and folder structure. right-click on them and select " Recover "
Step 7: Specify the location where the recovered files . This could be a hard drive , a ZIP archive , or an FTP server . Click " Next "
After clicking the “Next” button, the program will begin the recovery process. When it completes, the selected files will be in the specified location.
Once the data is in a safe place, you can convert your dynamic disk to a basic one using any of the methods described in the previous paragraph of this article.
Copying information from HDD to SSD
Modern operating systems allow you to transfer information from a hard drive to faster SSDs. Before starting the process, you need to prepare the last drive, which will require you to perform a number of steps:
- Through the “Control Panel”, select the “Backup computer data” menu.
- Next, you need to click on “Create a system image”, specifying the new drive as the source for copying information.
The system will copy all data to the SSD in a few minutes. To avoid conflicts between pre-installed operating systems, it is recommended to remove it from your hard drive.
You can create a backup copy of information stored on your computer yourself. However, specialized programs (Acronis True Image, EASEUS Disk Copy and others) will perform this procedure faster and more efficiently, transferring even hidden files to the new drive. Cloning a hard drive allows you to eliminate in advance the possibility of losing information in the event of a computer failure, system damage, or hacker attacks.