Wi-Fi is one of the best inventions in digital technology. This is a wireless method of transmitting information that allows all devices in a certain space to access the Internet. However, the presence of a router in the room does not mean that the phone automatically gains access to the World Wide Web. You must be authenticated first and then enjoy all the benefits of digital technology. To do this, you need to know what this check is, how to pass it and what problems may arise.
Reasons for the error
Activating an access point looks like this: Connection - Authentication (Authentication) - “Saved, Protected”.
A little later the status changes to “ An authentication error occurred.”
"or "
Authentication error
" and the connection naturally does not occur.
There are only two main reasons why an “Authentication Error” occurs when connecting to Wi-Fi on Android.
- The first
is due to an invalid ID. This means that the password for the access point was entered incorrectly. An error is also possible after changing the Wi-Fi password in the router itself - when, when automatically connecting to the point, the old password is pulled up. - The second
is due to a mismatch in the type of data encryption. In this case, the problem is in the security settings in the router itself. Also, the error may occur due to unstable operation of the device itself (which is especially common in cheap models, for example, when connecting a large number of devices to Wi-Fi).
Bug Android
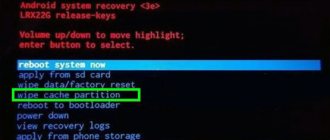
In some versions of Android, the Wi-Fi authentication error occurs due to a bug in the Android operating system itself. To connect to a wireless network in this case, you can try selecting the WEP encryption type on the router or completely disabling encryption (see the steps in the previous paragraph).
If you have any questions, ask them in the comments.
Authentication error when connecting to WiFi is one of the most common problems that is associated with a problem connecting the device to the router (router).
Let's take a closer look at the error itself and what to do if it occurs.
Debugg
For reference!
As an example, we use a Samsung Galaxy S4 smartphone running Android 5.0.1 and a TP router - Link TL-WR740N. The interface of your devices may differ, but by analogy you can easily find the information you need.
On an Android device
To start:
Advice!
If you are sure that the password you entered for the access point is correct and you did not write it wrong, there is probably a problem with the router's data encryption. In this case, you do not need to do any manipulations on the tablet.
In the router settings
Important!
The inability of Android to connect to a Wi-Fi network and, as a result, “Authentication error,” may be associated with unstable operation of the router itself. Due to overload, provider line failures, power surges, etc. The router may malfunction. This can be cured by simply rebooting the device.
Connect the router to your computer/laptop via the same Wi-Fi or LAN cable:
Advice!
Do not forget to reboot the router after each manipulation in the settings for the changes to take effect. After each change in the settings, try reconnecting to the network on Android.
Also pay attention to the authentication version. Try setting only WPA-2 instead of WPA and vice versa. Please use AES encryption.
The capabilities of modern phones go far beyond voice communication. With no less success, they can be used to store and edit files and, of course, to connect to the global network. Since mobile standards are most often limited by providers, owners of gadgets based on Android and iOS most often use Wi-Fi technology to connect to the Internet. But the mere presence of a Wi-Fi module in a mobile device does not guarantee a connection to the network.
It happens that the phone does not connect to Wi-Fi, displaying errors or notifying the user that the connection is impossible. Most often this happens due to a failure or incorrect settings of the device itself, but the same results can be caused by incorrect router configuration, modification of system files, installation of custom firmware, inconsistency of communication standards, virus infection and, in rare cases, failure of the Wi-Fi module . So, let's try to look in more detail at why the phone doesn't connect to Wi-Fi and how it can be fixed.
How does authentication work?
In essence, authentication is a procedure during which the correctness of the ID and password is verified. Several types of authentication are used. The desired one is selected in the settings menu of the device used as an access point. Authentication usually refers to the type of router data encryption.
The most commonly used technology is WPA-2, which uses the symmetric AES algorithm. The authentication method for wireless clients is WPA2 Personal. It is impossible for an attacker, regardless of his qualifications, to bypass this protection. In normal conditions, for example, at home, one key is installed for everyone. Its use creates a connection to the network.
In conditions where more serious protection is needed, for example, at sensitive facilities, a different approach is used. Each subscriber who has the right to connect to the network receives his own password.
Steps to connect to wireless Internet
The process of connecting a phone or tablet to Wi-Fi looks like this. First, Wi-Fi is turned on on your own device. To do this, in most cases, it is enough to swipe - a sliding movement with your finger - from the top of the screen down and click on the desired icon. The name of the network will appear on the screen and prompt you to connect to it. After that, you just need to enter the password in a special field, and everything will go well: the user will gain access. However, sometimes an error occurs during authentication.
Incorrect password entry, temporary failure
This error usually occurs when the Wi-Fi network cannot recognize the device connected to it. The reason is most often trivial - the user makes a mistake when entering the password and, as a result, receives a corresponding message.
Check that the password you entered is correct and try to connect again. Also pay attention to the name of the network. The Wi-Fi module on your phone detects not only your network, but also other access points, which may have similar names, for example, mydoms and mydons. Make sure you are connecting to your network and not your neighbor's.
If up to this point there have been no problems with authentication, first try rebooting your smartphone and the router itself; perhaps there was some kind of temporary glitch. Is your phone still unable to connect to your Wi-Fi network? Delete the saved network in the WLAN settings and try to reconnect.
The example discussed above is the simplest, but more often everything is a little more complicated, being associated with incorrect settings of the router itself.
Other options
If nothing helps at all, then it is difficult to predict something - there are always more causes of problems than the problems themselves. I already wrote about rebooting the router and phone at the very beginning - are you sure you did this?
Did not help? You need to take extreme measures - do a complete reset of the router to factory settings and configure it again (usually there is a Reset button on the back panel - hold it for about 10 seconds until the router reboots). And it didn't help? Reset your phone to factory settings too. Just remember to save all your data before doing this! I sincerely hope it doesn't come to that.
That's all! Did you solve the problem? Write about it in the comments. We found an interesting solution - tell our readers about it there. And that's all, see you in the next articles!
Router settings
You connect to the network, but the phone does not connect to Wi-Fi, it says saved WPA2 or WPA. After a few seconds, the “Authentication Error” message appears. If the password is correct, there is most likely something wrong with the router's security settings. It may also be that the phone says “Saved,” but the connection is still not established. It’s easy to get into the router settings; you just need to go to the internal address in the browser 192.168.0.1
or
192.168.1.1
. It is more difficult to understand its interface, since it can differ significantly in different router models.
By default, the login and password for logging in is admin/admin
(look at the bottom of the case). Before making any changes to your router settings, remove the network from your phone, or at least disconnect. It is also advisable to create a backup copy of your router settings - if you suddenly get confused or do something wrong, you can always restore. After making changes to the router settings, it also requires a reboot.
Region
Now a little more about setting up an access point. First, try changing the region.
In the settings, this option is located in the Wi-Fi section – Advanced settings
, c – on the “Wireless” tab. In other models it may be located in a different location. In short, you need to first study the interface of your router. In the regional settings, the country in which you live should be selected, although this is not critical. Save your settings and reconnect.
Network mode
A much more important setting that can prevent a gadget from connecting to Wi-Fi is the wireless network operating mode. This is perhaps the main reason for authentication errors when connecting to Wi-Fi on a phone that may not support the current mode. There can be several modes: B, G, N, etc. If you have B/G/N mixed, install it, and you can try experimenting, choosing one or the other mode. Pay attention also to the channel. It should be auto.
Security Settings
Find the security section in your router settings and try playing with the settings. It is advisable that the network authentication be set to WPA/WPA or WPA-PSK (if mixed, enable it), encryption is AES, the key contains only Latin characters, only numbers, or both.
After changing the router settings, reboot it and re-establish the connection on the phone. Unfortunately, the two methods described above can cause problems with connecting other devices, such as a laptop or TV, if they do not support the changed parameters, so everything is not so simple here. If the password has changed, in any case it will also have to be changed on other devices.
Channel width
It is highly unlikely that this will help solve the problem, but just in case, you can try changing the Wi-Fi network channel width. In D-Link routers, look for the setting in the Wi-Fi subsection - Additional settings
, in TP-Link –
Wireless Settings – Channel Width
. There are usually several available options: 20MHz, 40MHz, Auto and others.
Filtering by MAC address
Each electronic device has its own unique identifier - MAC address. Find the MAC filter subsection in the router settings and make sure filtering is disabled.
If it is enabled, determine the MAC address of your smartphone, check the settings in the router and, if necessary, remove the phone from the “black” list or, conversely, add it to the “white” list.
Solutions
Overloading all devices
This may seem strange, but in reality, rebooting is the solution to a huge number of problems. This is due, first of all, to the fact that devices cannot operate without failures. For example, a power surge in the network or simply a software conflict due to new firmware. Therefore, try rebooting both the wifi adapter and the device from which you are receiving this error.
Reconnection
One option is to simply reconnect again. It is enough to go into airplane mode, for example, this is how it works on the Flyme system (Android system). Thus, you turn off Wi-Fi on your phone.
- Open the toolbar and select Airplane mode.
- Wait a few seconds and turn it off. The device will automatically connect to your adapter.
If this does not happen, then select your adapter from the list.
Re-entering your password
Another option is to re-enter your password. To do this, you need to forget your network, not in the literal sense, but through the device.
- First, go to the phone settings and find WLAN (WiFi-related settings, in some systems it may be written simply as Wi-Fi)
- Find your adapter from the list and go to it by clicking on the i icon (on Android systems the interface is quite unified)
- Now in the new menu select “Forget network”. This removes all data (including the password) about the adapter from your device.
- We reconnect to your adapter again, as you did before.
The method works and has cured many devices.
Update your device
Always update your device and monitor the release of each update, otherwise you risk getting a lot of errors and conflicts between your device and others. To do this, take a couple of steps:
- Step 1 : Go to “Settings” -> “About phone”.
- Step 2 : select “Check for updates”. On some Android models, the Check for updates section may be separate from the About phone section. In this case, look for it directly in Settings.
- Step 3 : If an update is available, then put your phone on charge and wait until the gadget updates automatically. Charging is required to ensure that the device does not lose charge, as updating requires a lot of resources.
- Step 4 : If the device does not reboot, then do it manually. After these steps, try connecting to WiFi again, maybe this method could help you.
Use WPS
WPS (aka Wi-Fi Protected Setup or QSS) is needed so that you can connect to the router’s wireless network without entering a username and password, which is very convenient. Sometimes there may be a PIN, which, if something happens, can be changed directly in the router via the web interface. To enable WPS, find the button c. Most often it is located on the back of the adapter:
Use Android Utilities
iMyFone Fixppo
This utility will allow you to get rid of many software failures that are not possible for an ordinary user to solve. As an option, you can download an alternative utility, of which there are a great many.
Factory reset your router
Sometimes, even after a reboot, the adapter refuses to work as expected; in this case, you can try resetting your router to factory settings. To do this, hold down the WPS/RESET button for 10 seconds; on some models it is labeled simply Reset and can only be pressed using a thin object (rod, needle). After resetting to factory settings, your router will no longer be called as you signed it, but in its original version. The password can be found directly on the label of your router:
Factory reset your phone
This method is at the very end for a reason. If nothing helps you, then it will be much easier not to take your device to service, but simply reset it to factory settings.
Phone stuck on getting IP address
Another common problem is the device getting stuck at the stage of obtaining an IP address. The phone does not connect to Wi-Fi, it says “Obtaining an IP address,” and this message can appear for hours. The cause of the problem, again, may be hidden either in the settings of the mobile device or router. The latter is indicated by problems connecting to Wi-Fi and other devices. The DHCP server in the router is responsible for distributing IP addresses to devices, changing the address pool and the router itself. If it is disabled, your device will never receive an IP address.
Is DHCP enabled?
Let's check the operation of DHCP. The location of this setting differs in different router models. In TP-Link you need to look for it in the Local Network or LAN section, in D-Link it is usually located in the Network - LAN
.
The mode must be selected "Allow". Instead of a drop-down menu, the “Enable” and “Disable” radio buttons can be used in the router settings. Here, we believe, everything is clear too.
Static IP
You can solve the problem of “eternally” obtaining an IP address by setting a static IP in the advanced connection settings of your device.
To do this, click on your connection in the list of networks, select Change network – Advanced settings – DHCP – Custom
(in earlier versions of Android you will need o).
In the panel that opens, enter the IP address 192.168.X.YYY in the appropriate fields, where X is 1 or 0, this depends on the address at which you access the router settings (you can try both options), and YYY is any number from 0 up to 255.
The gateway must match the address of your router, leave the prefix length at default, do not touch DNS 1 (8.8.8.8) and DNS 2 (8.8.4.4). If you have other data instead of those indicated in brackets, do not change them either - they are given by your provider. The exception is DNS 2, which can be left blank. If something is unclear or you doubt the correctness of the data entry, it is better to contact your provider’s support service - it is their direct responsibility to connect their clients’ devices to the network.
First of all
Clarify password
First of all, check that the password you entered is correct. This is the main protection against unauthorized access attempts. It is quite possible that while typing you forgot to change the keyboard language setting or you have the Caps Lock key pressed. To see the entered characters, o (eye icon).
Check SSID (network name)
Check the name of the network you are connecting to. Usually the SSID has a name that includes the make and model of the device, then when choosing it is easy to make a mistake and choose the “neighbor”. You can set the original name through the router's web interface.
Remove network from settings
Enable or disable airplane mode
Airplane mode turned on is another reason for the lack of wifi connection. They activate it to save charge, and then forget to turn it off. See if you have an airplane icon on your home screen.
Reboot both devices
When there is a power outage or power surges, software failures occur: banal electronic freezes, firmware failures, and loss of Internet connection data. As a result, the signal disappears. Not a single network equipment manufacturer is immune from this: Asus, D-link, Tp-link, Zyxel, Eta, MTS, Megafon, Beeline and others.
If the gadget has stopped receiving or seeing a signal that was previously active, reboot, check the specified characteristics and try to make a WiFii connection again.
Try to distribute the Internet from your phone
To check the functionality of your Tablet PC, try distributing the Internet from your phone. See if the available WLAN connections are updated, connected and loading. If no fault is detected, there is a high probability that the problem is on the side of the wifi modem.
Rename device
In very rare cases, the problem is hidden in the name of the mobile computer being too long. In Wi-Fi Direct advanced settings, set a different name: simple, short and in English only, ideally without using numbers.
FXR WiFi fix app
Software is often the cause of connection failures: unofficial firmware or a crooked update can trigger a glitch. In this case, there is an endless “Obtaining an IP address”, but the connection never occurs. Install the FXR WiFi fix utility on your Android device. The utility is easy to use and does not require additional adjustments or settings. After downloading the installation and launching, restart the device. The error should go away.
Automatic error correction tools
If you encounter an authentication error when connecting to Wi-Fi on Android, but your mobile Internet is working, install the Android Wi-Fi Fixer
. This utility is an analogue of the connection troubleshooting tool in Windows and is designed to find and automatically correct Wi-Fi connection errors on mobile devices running Android. Once launched, the application checks all network settings and tries to bypass Wi-Fi.
WPS on Android
At the time of writing, the current version of Android is Android 7 with WPS support. There are rumors that it might be removed in the next version of Android, i.e. Android 8.
Check it out - How to Use the Nearby Tracking Feature in Pokemon Go
Open the Settings app and tap Network & Internet. On the Network & Internet screen, tap Wi-Fi. On the Wi-Fi screen, you will see a Wi-Fi settings option. Touch it. There are two WPS options on the Wi-Fi settings screen; WPS button and WPS PIN input.
If your router does not have a WPS button and the feature is activated using a PIN code, you need to click on the WPS Pin Entry option.
Check it out - How to search the Windows Registry for a key, value or data
Typically, you need to press the WPS button on your router first, however, once you press the WPS option on your Android phone, you will have a small window of time to press the button on your router to establish the connection.
When you click on the WPS Pin Entry option, Android will give you an eight-digit PIN. This PIN needs to be added to your router's control/admin panel. This means you'll need access to a device, preferably a desktop computer, that's already connected to a Wi-Fi network so you can enter the PIN. As with the WPS button, you have a short period of time during which you must enter a PIN in your router's admin panel.
It goes without saying that if you need to use a PIN code to connect to a Wi-Fi network, then it is better to simply use the network's SSID and password method to connect. The WPS button is faster and more convenient, but the PIN code method is definitely not.
It's worth noting that WPS is not considered secure, so unless you use it to connect devices, it's best to disable it on your router.
Most of the capabilities that are provided in modern tablet computers require a network connection (if not permanent, then at least periodically).
Therefore, all mobile devices have modules for connecting to the wireless Internet. Also, many devices have built-in mobile communication modules that allow you to connect to 2G, 3G and LTE to use the Internet via a SIM card.
Wi-Fi routers are found not only in homes, but also in public places. In this article, all problems and their solutions are related specifically to the home network.
Other reasons
The above examples of problems and how to fix them are the most common. In reality there may be more reasons. Why doesn't my smartphone connect to Wi-Fi? Perhaps you installed a proxy server program that was not fully developed, caught some kind of virus, rooted the device, changed the firmware, etc. Here you need to look at the circumstances. There have been examples where the wireless connection was blocked by antivirus programs.
In general, if the connection is lost after making some changes, most likely this is the reason. If all else fails, reset your device to factory settings, remembering to first back up important applications and data.
Well, the most unpleasant thing that can happen is the failure of the Wi-Fi adapter. In this case, not only yours, but also other wireless networks will not be detected. There is nothing to do here; you will have to take your gadget to the service center.
Many happy owners of tablets actively use Wi-Fi to solve everyday problems. But every now and then, when trying to connect, a Wi-Fi authentication error occurs. The reasons why such a problem occurs usually lie in inattention when entering data, a failure of wireless equipment, or incorrect operation of the tablet. Let's consider solution options.
This feature allows you to eliminate unwanted connections to your wireless network.
What is authentication
First, you need to understand that authentication is control of the security key and the method of encoding the transmitted information. This is important so that no one else can connect to the access point in your home. Security options include a strong password and the right encryption standard.
If you have an authentication error, the reasons may be:
- Incorrect network access password.
- The tablet and router use different types of encryption.
- Inappropriate communication channels.
The error most often occurs when you enter the password incorrectly. Enter it as carefully as possible. You can check and change the security key in the router settings, where you can also change the channel and encryption. It is possible to change network access parameters without much effort, even for a non-specialist.
No Internet: what to do?
Below are the options when there is no Internet on an Android phone, but this is not related to authentication.
Switch to airplane mode
This works on some phone models. Turn on airplane mode, wait 10 seconds and turn it off.
Is Bluetooth turned on?
Bluetooth can create a conflict with Wi-Fi (due to a factory defect or incorrect firmware), since some users have noted that on some phones, when Bluetooth is turned on, Wi-Fi does not work. So if you have bluetooth turned on, then why the hell not, turn it off and check the connection.
Energy saving mode
Power saving mode is designed to reduce the phone's battery consumption. Since, as you know, turned on Wi-Fi quickly drains the battery, so turning on the power saving mode can turn off your Wi-Fi (it all depends on the device model and firmware version). Make sure power saving mode is turned off. You can access the power saving mode in your phone's Settings/Battery menu.
Leave your solutions in the comments to help other users
Solving problems connecting to the Internet via WiFi on Android
Changing your security password
We have already written in detail. In short, you need:
- Enter the IP address, login and password of the router in the browser. You can view them on the back or bottom of the device or in the user manual. If you can't find it, enter Win+R - cmd - ipconfig. The “Default Gateway” line displays the router’s address. The default login and password is admin/admin.
- Go to the Wi-Fi security tab. In the “Encryption Key” or “Security Password” line, look at the existing one or enter a new password.
- On your Samsung or other Android tablet, turn on Wi-Fi, go to Settings - Wireless networks - Wi-Fi - press the name of the connection with your finger - Change this network. Oh, enter it again, carefully checking it with what was entered in the router.
Why do I need a WPS PIN code?
This is another way to connect to the router.
The end device (for example, an Android smartphone) itself generates a new PIN code, which must be entered on the router:
You can save the link to this page to your computer as an htm file
You will see our website in your feed
Read in the section: Wi-Fi
- Total articles in the section: 5
- Articles shown in the list: 4
- Sorting: name alphabetically
Wi-Fi network settings do not match
Real WiFi connection speed
What affects the actual WiFi connection speed? The simplest mystery is the connection speed of 54 Mbps. There are two main options: either the 802.11n range is limited on the device (blocked) or the TKIP encryption protocol is used. Let's look at more complex options. Router operating mode 802.11n, AES encryption. Should it be like 300 Mbit/s with two antennas (150 Mbit/s per stream)? No? Options for real smartphone connections: 65 Mbit/s or 72 Mbit/s What to do and what to check? In fact, this is how it should be. The first and the most. (Read completely. )
WiFi channel width 40 MHz or 20 MHz
What WiFi channel width should I choose? The picture from the router settings is usually like this. Which is better - 20 MHz channel width or 40 MHz channel width? And why does the user need such a choice? Of course, 40 MHz is better; at this channel width, both 802.11n and 802.11ac will operate at their maximum speed. But this is in theory. In practice, this works if you (more precisely, your router) are alone on the air. Let's see what's really happening on the air at frequencies of 2.4 GHz and 5 GHz. This is 2.4 GHz This is 5 GHz Yes, both 802.11n and 802.11ac can operate on two frequencies. It’s just that routers began to be released at both frequencies, mainly with the introduction of the 802.11ac standard. It can be seen that on. (Read completely. )
AES or TKIP encryption
AES and TKIP are two alternative encryption types that are used in WPA and WPA2 security modes on Wi-Fi networks. Advanced Encryption Standard (AES), also known as Rijndael, is a symmetric block encryption algorithm (block size 128 bits, key 128/192/256 bits), adopted as an encryption standard by the US government based on the results of the AES competition. This algorithm has been well analyzed and is now widely used. The US National Institute of Standards and Technology (NIST) published the AES specification on November 26, 2001, after a five-year period during which 15 candidates were created and evaluated. May 26, 2002. (Read completely. )
Changing the Wi-Fi channel
To organize the operation of the wireless network, a frequency of 2.4 GHz is used. To prevent signals from different equipment from overlapping each other, the router is capable of working on 11 channels, automatically selecting the most suitable one. But sometimes there are glitches, the signal gets better, which can cause a Wi-Fi authentication error. To change the channel manually:
- Enter the router interface - Wireless network settings.
- Check that the region is defined correctly - Russia.
- In the “Channel” tab, select one of the 11. Test several times until the tablet connects successfully.
You can check the congestion of each channel using the Free Wi-Fi Scanner for Windows or WiFi Analyzer for Android utilities. Once launched, they will scan all available networks in the room and display the load level of each channel. Choose one that is not loaded at all or is minimally busy.
Problems with the router
Check blocking by MAC or IP address
In the router settings, connection restrictions can be set by MAC code and IP address. To check the settings, you need to go to the web interface of the network equipment and remove all limiting filters in the corresponding tabs, and then restart the Wi-Fi device.
Register a static IP address
The DHCP server assigns its own IP address to each connected gadget. If there are problems with address binding or you want to use the same IP all the time, this can be done in the characteristics of the tablet’s MAC address.
Step-by-step instructions using TP-LINK as an example:
Restart the device, and while it is loading, change the IP in the gadget itself from DHCP to static.
- Settings - Wi-Fi - Find the desired SSID;
- Hold it down, open the extended menu and select the section - Edit;
- Change DHCP to Static and enter the IP specified in the parameters;
- Save
Change network security standard
It is better to choose WPA2, but try all the suggested options: WPA, WPE and others.
After each change of protection type, be sure to restart the device, and only then try to connect the tablet.
Change channel
The Wi-Fi connection uses a frequency of 2.4 GHz. The downside of the technology is the so-called “field overlay”. This happens in an apartment building, where each apartment has a separate wireless access point. To avoid overlaps, the router independently changes channels. If they are combined, login and password verification fails. In this case, you can manually replace the channel:
- WiFi modem interface, item - Wireless settings;
- Check to see if the region is specified correctly;
- Go to the “Channel” tab and set a custom value from the drop-down list.
- Reboot your device.
After this, check if the connection is working. This way you can check all available channels.
Most devices see only 11 channels, and if you set the router to channel 12 or 13, then outdated laptops, smartphones, and tablets simply do not find the signal. You just have to remove this channel in the parameters, and the equipment enters the World Wide Web, the network icon appears, the device logs into Viber, social networks.
Set a different network standard
Any wifi modem supports 3 data transfer modes:
- b - slow;
- g - average;
- n - fast up to 500 MB/sec.
The mode is automatically set to 802.11b/g/n mixed. This is done so that devices with any data transfer speed can connect to it.
If you only connect new modern gadgets, it is better to set the speed to 802.11n. This can be done in the menu, in the sub-item “Wireless mode settings”. Remember to reboot your router and tablet after making any changes.
Increase transmitter power
Through advanced functions you can increase the data transfer speed to maximum. If you own a router with a replaceable antenna, you can improve the functionality of your router by installing a more powerful version of the radio antenna.
Set another region
A very common mistake is an incorrectly specified region in the router settings. Just go to the web interface and select the desired country in the “Region” section. Save your changes and restart it.
Change router firmware
Reflashing may help if:
- Does not establish a connection;
- Freezes;
- Speed below stated parameters;
Brief instructions for flashing the device:
- Determine the make, model and version;
- On the official website of the manufacturer, find and download the firmware that matches your parameters;
- Disconnect the network cable from the device;
- Complete the Wi-Fi reception and transmission processes;
- Go to the web interface;
- Create a restore point in the System Tools - Backup and restore section. Save the file;
- Go to “Firmware update” and select the previously downloaded file;
- Confirm the update, wait for the reboot;
- Set up a new software version. To do this, in the Backup and restore sub-item, select Restore and specify the file to download.
If all else fails
Although the Wi-Fi authentication error should not occur again once you have completed these settings, in some cases you will have to take more drastic action. You can also try:
- Reboot the router. Unplug the power cord, wait half a minute or a minute, then plug it back in.
Modern mobile devices may have different power levels and different functionality, but they are all designed to work with Wi-Fi and the Internet. And probably every user of a mobile gadget has at least once encountered a situation where a phone or tablet does not connect to a wireless network. In this article, we will look at typical errors that occur on Android devices when trying to connect to Wi-Fi, and we will tell you about methods for eliminating them.
The tablet does not connect to WiFi
If the tablet does not connect to Wi-Fi, this does not mean that the problem is with the gadget. Sometimes it also writes “connection saved”.
The nature of the failure can be different, ranging from the fact that the tablet does not see Wi-Fi or the connection often disappears, ending with a filter based on the mac or IP address.
Before moving on to diagnosing and solving specific problems, try the following:
- Reboot your device. Often the problem is resolved after a normal reboot. Also, in the case of a tablet, you don’t have to restart the gadget, but turn on the “Airplane” mode and turn it off after 10-15 seconds. After that, try connecting again.
- Turn off your router. The principle of turning it on and off works, only in this case it’s not the device, but the router. If it doesn't have a power button, unplug the cable, wait a minute, and then plug it back in. Also pay attention to whether the router works at all. This is evidenced by diodes on the case. Important: providers will indicate in advance how to enable specialized routers. But no one installs these in their homes.
- Check which router the device is connected to. The device may have automatically connected to a neighbor's router.
- If another device sees the same network and you have already tried rebooting it, it may be due to malware. Download one of the popular antiviruses from the app store and conduct an in-depth scan. If malicious code is detected, it is better to remove it rather than cure it.
If this simple diagnostic doesn't help, move on to the next heading.
Typical errors connecting to a Wi-Fi network
Connected should appear under its name.
. Any other signature indicates that it was not possible to connect to the network for one reason or another. In practice, when trying to connect to Wi-Fi, the following error messages are most often encountered:
- Message Saved.
- Messages Authentication Error
or
Authentication Problem - Infinitely stuck message Obtaining an IP address...
- An authentication error occurred
.
How to solve the problem on a Samsung device?
If a Samsung wifi authentication error occurs, it is recommended that you start solving the problem with the correct settings on your Samsung, which runs on the Android operating system.
- Settings – Network connections – Wi-fi.
- Now you need to select an access point to connect to the Internet and enter the correct password.
- It is advisable to check the password by visually opening the entered combination. The password must correspond, both in Cyrillic - Latin alphabet, and in letter case, to the order of all letter and numeric values.
- If it is not possible to re-enter data to change it, it is recommended to click on “Forget network” and re-enter the information.
Now let's see what can be done if none of the proposed solutions have a positive effect. In most cases, it all comes down to performing a full reset.
First, perform the following actions on the router, using the appropriate section for this. After the reset, use the information you received from your ISP and set up your wireless connection again.
Then, in the wireless connection settings on your mobile device, delete the connection you are using and confirm the “Forget this network” option. Reboot your device and connect again. If this does not work, reset the settings to factory settings on this device as well. But in most cases, such actions are not required on a mobile device. If this is still the problem, remember that personal data will be destroyed along with other information, so take care of creating a backup copy in advance by saving it on a removable memory card or on your computer (for a PC you can use even the simplest utilities like MyPhoneExplorer ).
"Saved" message below the network name
Most likely reason:
Weak signal.
Solutions:
- try to reduce the distance to the access point. If the error disappears when the Android device approaches the access point, it means that it was observed due to the fact that the smartphone’s transmitter power was not enough. This, in turn, can be not only due to the large distance of the mobile device from the router, but also due to clogged airwaves - when there are many wireless devices and networks around.
- try changing the channel on the router to a freer one.
- try changing the channel width in the router settings.
"Authentication Error" or "Authentication Problem"
Reason #1:
security mode and encryption type incompatible with the client device.
Solution:
If the mode is WPA2-PSK, try changing it to WPA-PSK.
Reason #2:
Invalid security key.
Typically, if the security key does not match, the Android device will prompt you to enter a password. However, there are other manifestations.
Solution:
Please enter the correct security key. Be careful with layout and register. It is strictly forbidden to use the Cyrillic alphabet in SSIDs and passwords, and the registers can become confusing. If you are in doubt about your password, temporarily set a 10-digit key on your router.
Reason #3:
weak signal.
Solution: check the network operation from a closer distance from the router. If the problem disappears when you approach the router, try to find a freer Wi-Fi channel and install it on the router. Then reconnect to the network.
Encryption type
We recommend that you perform this setup simultaneously with changing the connection name and password. The optimal and reliable connection today is WPA-PSK/WPA2-PSK. This setting should be set in the Wireless Security section.
After this, you need to check the Version parameter. It is advisable to have the Auto version of the security standard installed. This may solve the problem on older devices that simply cannot work with the WPA2-PSK standard. Sometimes on new devices the operating system firmware version does not allow support for WPA2-PSK. The encryption type allows the device to use both WPA-PSK and WPA2-PSK2. It is supported by all modern mobile gadgets and has more advanced settings than WPA2-PSK.
Endless Obtaining an IP Address
Reason #1:
weak signal.
Solution:
try reducing the distance to the access point (read above in point 2.)
Reason #2:
The MAC address filter is enabled on the router. Your device's MAC address is not whitelisted or blacklisted.
If receiving an IP address is blocked by a MAC address filter, errors may also appear on your smartphone:
- Failed to obtain IP address
; - Network is down due to slow internet connection
.
Solution:
add the MAC address of your device to the white list or remove it from the black list. If the router is not yours, ask your administrator to perform these steps.
"An authentication error occurred"
Reason #1: weak signal.
Solutions:
- If possible, reduce the distance to the access point;
- Try
selecting a free channel.
Reason #2:
Invalid network security key.
Solution:
Enter the correct security key (read above in step 2.)
Below we provide a checklist for troubleshooting most wireless network problems. If you do not want to delve into each individual case described above, follow the steps listed sequentially. If after performing the action the problem is not resolved, move on to the next one.
- Disconnect from the wireless network on your Android device. To do this, click on the network name in the list and hold for more than a second. When the menu appears, select Forget network.
After that, connect to the network again by entering the security key. - Reboot your router and Android device to eliminate the possibility of unexplained crashes and freezes. After rebooting the router and gadget, wait a couple of minutes and try to connect to Wi-Fi again.
- Check the correctness of the wireless network security key (popularly “Wi-Fi password”). Set the key to 10 random numbers so as not to get confused in layouts and registers.
- Check your MAC address filter settings. Try temporarily disabling the filter and connecting to the network.
- Check the region settings in your router. Please enter the correct region. Try choosing Russia, then the USA, then Chile. This may affect receiver sensitivity and transmitter power. Keep in mind that many router models may not have region settings.
- Set the security mode on your router to WPA2-PSK
and
the encryption type to AES
. Save the settings and wait a couple of minutes. Delete the network on your Android device and try connecting to it again. - Mixed 11b/g/n
mode for maximum compatibility with various devices and standards.
Save the settings and try to connect to the network after 2 minutes. For reference: if you install 802.11n only
, only those devices that support the
n
. - Set the channel width setting to Auto
. Save the settings and try connecting to the network again after a couple of minutes. - Do a hard reset of the router and configure it from scratch. There are cases when this action corrects a router failure.
Illustrations for points 5
,
7
And
8
:
We correct possible errors and connect to the Internet
The wifi authentication error on tablets and Android phones can be fixed in the same way. The simplest and most accessible way may be to reboot the device. It will help in cases where there is some malfunction of the device, then you won’t have to change the settings. If this does not help, then we look for the reason and correct it.
Reconnecting the network
If wifi does not connect on your phone, try rejoining the network:
- Go to your phone/tablet settings and select “Wireless Networks”. They can be designated as "Wi-Fi", "WLAN". Next, click on the network you are using and delete:
- Facebook
- LiveJournal
- Blogger
- Now deactivate the network and turn it on again. The phone will show us all available networks. The list will include signals from your neighbors’ modems and from yours. Choose yours, enter your password, and connect.
- LiveJournal
- Blogger
Go to your phone/tablet settings and select “Wireless Networks”
Now deactivate the network and turn it on again
- LiveJournal
- Blogger
when the network is working, the wifi icon will wink with an arrow.
If everything is done correctly, the tablet or phone will begin to receive a signal; in the top line of the drop-down menu, the wifi icon will wink with an arrow.
Authentication Error
Not as common, but still a common problem.
- LiveJournal
- Blogger
If there is a wifi authentication error, you may have entered the password incorrectly or the wave source is far away.
If a wifi authentication error has occurred, you may have entered the password incorrectly or the wave source is far away. How to solve a problem:
- If you enter an incorrect password, the system will prompt you to enter it again. In this case, you can use the first method (see above);
- You can try moving closer to the router, where the waves have more powerful characteristics.
We are looking for the reason in the router
If your phone or tablet does not connect to wifi after the above fixes, then the problem lies in the router settings. To check this, you need to connect to the router using a computer or laptop.
Before hacking into your router, try rebooting it. In many cases, the problem of wifi authentication is solved in this way - the device may simply freeze. Also check the connection of channels in the router.
- LiveJournal
- Blogger
Before entering the router’s system, try rebooting it.
To get into the router’s settings, enter the code 192.168.0.1 or 192.168. 1.1 into the line of the browser you are using. If you don’t know which one is right for your device, enter them one by one. Next, create a username and password:
- LiveJournal
- Blogger
In the Mode section, change the Mixed mode (802.11b+802.11g) to Mixed (802.11b+802.11g+802.11n)
In the Mode section, change the Mixed mode (802.11b+802.11g) to Mixed (802.11b+802.11g+802.11n)
Let's save this change.
If after this the wifi authentication on the phone still fails, setting the type of signal encryption may help. We use WPA-PSK/WPA2-PSK2. Reboot the router. Penetration into this space is individual for all router models, therefore, refer to the factory instructions.
Changing passwords
There are external intrusions into the operation of the signal source: hacking, virus attacks. For such cases, it is necessary to periodically change the password on the router. Use long combinations using numbers, lowercase and uppercase letters of the Latin alphabet. After that, accordingly, remove the network settings on the phone and enter new values.
If wifi does not connect automatically, most likely, changes have been made to the database and you should change the password on your device.
If nothing helps
In the case when you have gone through all the possible options for changing the settings on your phone/tablet, reprogrammed the router, but there is still no authentication, the last 2 options are possible:
- There are interruptions in the provider's network;
- Something happened to the device itself (router or phone).
In the first case, all you have to do is wait for the operator to fix the problem; in the second, contact the service center, where they will help you sort out the problem.
Cautions
Attention! Use only Latin characters and numbers in SSID and security keys! If you use Cyrillic in these fields, you may encounter the following problems:
- you will not be able to connect to Wi-Fi from client devices;
- The router may freeze and you will have to do a hard reset.
Remember! After making changes to any wireless network security settings on the router (key, security mode, encryption type), delete the network on Android devices and connect to the network again. Don’t wait for your smartphone or tablet to prompt you to log in to the network again. Yes, in some cases, Android OS detects the changed parameter better than Windows computers. But it may turn out that after changes on the router, your device will simply start generating authentication errors.