Telemetry was introduced into the tenth version of the Windows operating system, which is carried out to collect user data to improve the quality of software products. This feature causes performance degradation on some computers due to increased load on the hard drive and processor. For this reason, users are looking for a way to permanently disable tracking in Windows 10.
Why disable telemetry in Windows 10?
This feature should be disabled to improve PC performance by relieving the load on components. In addition, telemetry should be removed for those users who care about the safety of personal data. If you follow the steps below correctly, Microsoft will not be able to monitor your specific computer.
Ways to disable telemetry and tracking in Windows 10
To disable this feature, you can use 2 different methods:
- Using third-party software;
- Manually changing system settings.
The first method is more effective, since utilities can change settings that are hidden from the average user. Another method can be used to turn off telemetry in Windows 10 more quickly, for example, after purchasing a new device.
What is system surveillance or telemetry?
Telemetry in Windows refers to the procedure for collecting and transmitting information about user actions on a PC. Data is sent to Microsoft servers, where they are already processed and, if necessary, used for various purposes. The components that carry out the collection are popularly called spy modules.
Microsoft monitors Windows 10 users through special modules for collecting and sending information
We list the main data that is transferred to Microsoft:
- Last name, first name of the user, all his addresses (physical, IP, email addresses) and actual location.
- Logins and passwords entered in browsers, as well as search queries, information from some sites and advertising preferences. This includes not only Internet Explorer and Microsoft Edge, but also alternative browsers.
- All entered information and actions in the Tor browser, VPN connection data and system reports of some anonymizers. It is not known exactly what information Windows is able to collect from here.
- Payment information and more, specified in the Microsoft account - it is known that information is collected from installed applications of some payment services, but this is still in doubt.
- Information about all installed applications and some data from the hard drive.
- Typed text and microphone recordings. The camera footage has long been refuted.
Some of these points are present in the license agreement and settings, and some were calculated by various methods when measuring sent data packets. All this data is used only to customize advertising shown on your PC, auto-update drivers, system support and other purposes, unless, of course, you are doing something illegal.
Should I disable surveillance in Windows 10 or not?
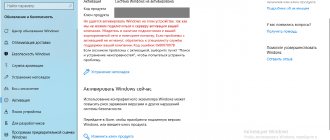
The answer to this question depends on your personal perception of the situation and your willingness to do without those valuable options that distinguish the “top ten” from previous versions: auto-update of the system and drivers, weather display, browser and search engine presets, the “Cortana” option, the ability to roll back the system from clouds, etc.
Whether or not to disable surveillance in Windows 10 is up to you, but it is worth remembering that you will deprive the system of support from the corporation if you still disable spying
Thanks to spy modules, the “ten” is able to work for a long time without reinstallation: they detect operating system errors in a timely manner and, after “consulting” with the corporation’s server, eliminate them. By the way, the “ten” already has the ability to view telemetry data that is sent to the servers.
If you do not agree with Microsoft's policies, you are uncomfortable with someone spying on you, and you do not perceive surveillance as an action for the benefit of your computer, you have the right to deactivate it in various ways. At the same time, you can, to one degree or another, reduce the load on the computer’s hardware components, since modules take up some of the resources.
How to protect yourself from surveillance via smartphone
In general, the real danger in terms of surveillance is not cellular networks and certainly not GPS. It is much easier and more effective to monitor a person through an application installed on his smartphone. So you don’t have to go completely offline and put two bags of chips on your smartphone—it’s enough to properly protect your devices and accounts:
- Use strong passwords and two-factor authentication on your accounts, especially important ones like your Apple ID and Google Account.
- Protect your devices with a secure, complex PIN and don't share it with anyone. No one will be able to install spyware on a password-protected device.
- Install applications only from official stores. Although sometimes dubious developments leak into both Google Play and the App Store, there are significantly fewer of them there than in third-party sources.
- Don't give mobile apps permissions that you think are unnecessary. You can always expand the program's rights when needed.
- Use a reliable security solution. For example, Kaspersky Internet Security for Android recognizes not only malware, but also legitimate spyware, and warns the device owner about it.
Standard methods for removing surveillance
Using the methods presented below, you can disable only those tracking components that you consider unnecessary, if, for example, you find some options useful. This way you will simply reduce the amount of information collected.
Changing your account
The first step you need to take if you want to stop being tracked is to stop using your Microsoft account and create a local account on your PC. Your corporation account is not a spy service, but information about it is still sent even if telemetry is turned off. If you are already using a local account, you do not need to complete the following steps:
- Open the OS settings panel: hold down the Win and I keys or click on the gear icon in the Start menu.
Windows Settings can be quickly opened from the Start menu - Click on the block with account settings.
Open the “Accounts” section by clicking on the tile - In the “General” tab, follow the link to change your account to a local one.
Click on the link “Sign in with a local account instead” - Write the password for your current Microsoft account. Click “Next”. Enter your Microsoft account password and click “Next”
- On the next screen, create a local “account”: create a user name and, if necessary, a password. Click "Next".
Enter your username and, if required, password - Click on "Log Out". Wait until you sign out of your Microsoft account - the PC will not turn off. All open utilities will, however, close and the login screen will appear. If you have set a password, write it down. Log out of your current account and log into your local account
Limitations for spy services
The collection of many privacy parameters can be disabled in the OS settings. However, this will not help to completely get rid of surveillance - you will only reduce the amount of data collected and the load on the PC's RAM. Some data will continue to be transmitted until you disable the telemetry option. You can set restrictions for spy services as follows:
- In “Windows Settings” (the panel is called up with the Win and I buttons), expand the large block called “Privacy” - we will have to go through almost all of its sections indicated in the left column. You can disable absolutely all functions in blocks. Let's look at some of them in detail.
- In the “General” tab, click on all active switches so that they turn to the “Off” position: advertising identifier (statistics about interests will be collected, but will not be used by utilities), access to the list of languages (setting the interface language for your region and country), monitoring which applications are opened, and showing recommended content in the Settings panel. In the “General” tab, disable all options at once
- In the second tab about speech and text input, click the key to deactivate speech services. This way, texts you type and microphone recordings will not be sent to Windows services. Click the button to turn off voice services
- The “Diagnostics and Feedback” and “Application Diagnostics” sections contain useful and spyware options at the same time. Sending feedback and reports on the performance of your OS helps the corporation improve the platform. However, if you are determined to get rid of surveillance, turn off all the options in these tabs: set the basic mode.
Set a Data Baseline - Deactivate handwriting recognition, individual capabilities.
Turn off personalized features and handwriting recognition enhancements - Scroll down the diagnostics tab a little more and delete diagnostic data from your PC.
Click “Delete” to get rid of data that was previously collected and sent - In the “Action Log”, uncheck two items, and also clear the log itself. Uncheck all the boxes in the “Action Log” section
- In the "Location" tab, deactivate recognition of your location. However, remember that this disabling will practically not change anything, since there are many other ways to determine the place in which you are. In addition, most sites and utilities receive location information automatically and independently - here you already need to use VPN services (for example, in the form of extensions in browsers). Disable location detection
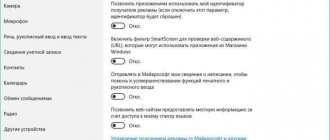
- Disable the options in the Microphone and Camera tabs. This way the system will notify you to turn on the microphone when some site or program tries to listen to you.
Turn off camera access for all apps - In Calendar and Messaging, it is advisable to disable services completely or at least for one program called People that sends information about you. In “Calendar” we also disable access
- Be sure to move the slider to the Off position. in the section on running background applications. This will also help reduce the load on RAM.
Stop running apps in the background to save RAM
Restriction for "Defender"
The standard OS Defender antivirus also collects information and sends system reports to the company. This is necessary primarily to improve the performance of future versions of the built-in security program. If you decide to disable tracking in it, you must have another active antivirus:
- In the “Options” panel, open the block dedicated to security and updates. In the second “Windows Security” tab, click on the “Open Security Center” button.
Open Defender through the Settings window - You can expand the window - find the icon in the form of a white shield in the miniature menu and click on it. The Defender icon is in the Windows tray
- Click on the first tile, “Virus and Threat Protection.”
Click the Virus & Threat Protection tile - Go to the block with protection parameters.
Open protection settings using the link - Disable cloud protection and automatic sample submission here. It makes no sense to disable the first option “Real-time protection”, since this will only temporarily deactivate the antivirus - it will turn on itself after a while. In this case, it is recommended to completely disable Defender in the Local Group Policy Editor, in the Services window, and other methods.
Disable cloud protection and automatic sample submission - Now return to the Defender main screen and launch the block for setting up browser and application management, or go to it through the list of blocks on the left. Deactivate all options on this page. After this, be sure to restart the device.
In the "Application Management" section, set everything to "Disable"
Disabling secondary services
Some other services were built into Windows that cannot be directly called spyware, but nevertheless they also interact with the corporation’s servers. If you care about your privacy, you should also deactivate them. So, let's turn off the following options:
- To the right of the Start icon there will be a magnifying glass icon - click on it. You don’t need to enter any search query - just click on the gear on the left of this panel.
In the Search panel, click on the gear icon on the left - Disable all options and click on “Clear device history”. Disable all items in the “Permissions and Log” tab
- Now you need to go to another section. Click on “Home” and go to the “Update and Security” tile. Click on the link with additional options in the first tab for Update Center.
Click on the "Advanced options" link - Go to the “Delivery Optimization” section. Access the Delivery Optimization page using the link below
- Disable the option to download updates from other computers. Disable downloading updates from other computers
- Return to the main Settings screen. Go to the “Network and Internet” tile. In the section with Hotspot networks, deactivate the only option. This completes the configuration of secondary services.
Disable Hotspot networks in the Wi-Fi tab
Changing Microsoft Edge settings
The classic Ten browser called Microsoft Edge also collects and sends data about you to Microsoft servers, even if you have never used it and do not intend to. The OS can still sometimes launch certain sites in the browser, for example, when you call up help. As a result, your connection data is automatically sent to the corporation’s server. We'll tell you in the instructions how to set up your browser correctly so that it doesn't track you:
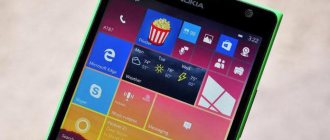
- Launch Microsoft Edge. If you have a shortcut on your desktop, great, double-click on it. If it is not there, open the Start menu and scroll down the list of utilities to the English letter M - find and open the browser. The Microsoft Edge icon is in the Start menu
- In the browser interface, click on the three dots in the right area, go to the “Options” section and open it.
In the browser menu, open the “Options” section - Scroll down the menu again - click on the gray key to open additional settings.
Click on the “View additional” button. options" - In the privacy section, activate the Do Not Track request option.
Enable the Do Not Track option in your browser settings - Scroll down the list - we need the last two parameters dedicated to SmartScreen and page prediction. Feel free to turn off these two items. This completes the browser setup.
Disable the last two items in the list
Video: How to stop data collection in Windows 10
Why is this necessary?
It's simple - statistics. For the most part, all data collected, both on the site page and in the system, is anonymized. Neither Microsoft, nor Google or Yandex are tracking you personally.
- For example, Yandex and Google track the sites you visit in order to know its potential audience - gender, age, interests.
- This is necessary to personalize search and advertising (Google and Yandex are the largest advertising systems in Russia).
- It is too difficult and costly for search engines to store and track personal information (implementing the Yarovaya Package may require 30 billion rubles), in addition, it is prohibited (by the recent GDPR).
On Microsoft's side things are the same. Most of the information the system collects is needed to personalize or recommend content, solve problems, or improve features.
But in fact, no one except the developers themselves knows for certain what information is actually collected. Therefore, users who are concerned about data privacy violations try to enable Windows 10 Tracking Protection.
Let's look at ways to set up Windows 10 against tracking, from its installation to special programs.
Stopping tracking and telemetry
The method described below will help deactivate the transfer of data to Windows servers. However, OS spy services will continue to accumulate information about you on your PC, but will not be sent yet due to the transmission being turned off. In this regard, it is best to use this deactivation method together with the previous ones in order to immediately stop both the collection of information and its sending.
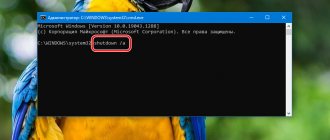
We will disable tracking in the “Command Line”:
- Open the “Search” panel by left-clicking on the magnifying glass icon located on the “Taskbar”. Paste or type the cmd key yourself.
Enter a search term for the command line - Right-click on the console in the results, and in the drop-down menu on the option to run the program as administrator.
Select "Run as administrator" from the context menu - Allow your console to change settings on your PC. Click “Yes” to allow the console to make changes to the OS
- Now you need to successfully execute the following commands in turn (after entering each one, press Enter):
- sc delete DiagTrack;
Paste and run each of the given commands in the console - sc delete dmwappushservice;
- echo "" > C:\ProgramData\Microsoft\Diagnosis\ETLLogs\AutoLogger\AutoLogger-Diagtrack-Listener.etl;
- reg add "HKLM\SOFTWARE\Policies\Microsoft\Windows\DataCollection /v AllowTelemetry /t REG_DWORD /d 0 /f.
- sc delete DiagTrack;
Video: how to disable telemetry in the “ten”
How do you know if you are being followed?
There are ways to indirectly understand that your device is being monitored that is not obvious to many people. The table also includes useful security features.
| Code | Description |
| *#21# | If any forwarding is enabled on your phone, this code will show its status on the screen. |
| *#62# | Shows where calls, SMS and data are redirected. |
| ##002# | Disables all types of forwarding on the phone. It is recommended to use before traveling abroad to avoid unnecessary expenses. |
| *#06# | Shows the IMEI of the device. Helpful if your phone is stolen. When contacted by law enforcement, this code allows the device to be tracked. |
How to turn off surveillance immediately during the installation of Windows 10
You can get rid of surveillance at the tens installation step, but the procedure will differ depending on the version of Windows 10 that you want to install on your PC:
- If you're installing Windows 1703 Creators Update or later on your PC, you should be presented with a one-step screen with a list of privacy options. The system will prompt you to disable or leave activated the following options: sending diagnostic information, individual advertising, determining the location of your PC, speech recognition and others. For all items, set the value to “Disabled” and click on “Accept”.
Disable all options and click “Accept” - If you have a version lower than 1703, after the first restart of the device and the prompt to enter the activation key, the “Increase download speed” window will appear on the display. If you immediately click on the “Use standard settings” button, spying services will be activated on your system. To prevent them from working, first click on the link on the left “Configure settings”. Follow the link "Settings"
- All parameters will be divided into two windows. In the first, immediately deactivate personalization (information about entering data using printed text, voice, as well as data about contacts and calendar), the ID of the advertising recipient, and determining the place in which you are located. Click “Next” when “Disabled” appears everywhere.
Deactivate personalization and layout on the first screen and click “Next” - In the second window we also turn off almost all options: browser and protection, connection and error reporting. The first point about SmartScreen should still be left enabled. In addition to disabling all these options, later when installing Windows, you can abandon the Microsoft account and use a local account immediately. Disable all items except SmartScreen and click “Next”
What does Windows know about you?
Microsoft has never hidden the fact that it collects various data from users of its systems. But what exactly?
The user provides general information about the name, version, and language of the operating system. The OS scans data about the applications used, sends information from the search engine, and provides for embedding application advertising in the Start menu.
When using Windows, users provide Microsoft with various data to allow access to different applications.
The OS provides a huge number of built-in programs, often inferior in functionality to existing analogues. These programs access the user's microphone and camera, read keyboard input, and more.
When the system was first released, even the legislation of the Russian Federation was concerned about the security of its services, which fully use Windows in their work.
But, despite the dissatisfaction of many users, almost all of this can be disabled in the control panel of the system itself or during installation.
Third-party utilities to disable Windows 10 tracking
As you can see, disabling spy modules using built-in tools takes quite a lot of time, since you need to “wander” through different sections with OS settings and execute different commands in the console. You can block unwanted data transmission channels faster with the help of special applications from third-party developers.
DoNotSpy 10: English interface and a large number of privacy options
The DoNotSpy 10 utility is an effective tool for disabling surveillance. It provides the maximum list of spy components of the system, which can be disabled either together or individually: reading data from various biometric sensors, determining the location of the PC, monitoring the microphone, camera, transmitting entered text, information from the calendar, etc.
You can turn off many privacy options in DoNotSpy 10
The program has the following strengths: the ability to return the PC to the state before the program was running by creating a restore point, as well as a convenient and simple interface. The disadvantage of the utility is that it is not translated into Russian - this will cause difficulties for users who do not speak English. Also, this program should be installed on a PC - it is not portable.
The developer of the PXC-coding application offers a choice of free and various paid versions. The differences are, of course, in the number of functions. However, even the free option is enough to disable surveillance. The cost ranges from $5 to $15.
The cost of the paid option is $5 - $15
Let's move on to the tool interface:
- Open the official download page for the program. Click on the blue Download button to download the free version.
Click Download to download the free version of DoNotSpy 10 - Run the installer file and complete the installation by following the simple steps in the wizard window (accepting the terms of use and specifying the installation folder).
- Open the program - in its window you will immediately see a list of components to disable. Blue lines are parameters that can be safely disabled, orange lines are with caution (you should first read the description of the component to be disabled and then decide whether you need to deactivate it or not), red lines are with extreme caution (which are not recommended to be disabled).
On the left side of the window there is a list of spyware components that can be disabled - Before you start selecting any items, create a restore point on your PC - this can be done through the program interface itself. When you first start it, you will be prompted to do this - click “Yes”. Click "Yes" to create a restore point
- The items that begin with Advertising are dedicated to advertising in Windows: ads in Internet Explorer, collections of applications in the Start menu and on other panels, removing the advertising identifier.
Advertising items will disable advertising in a standard browser - Active lines starting with the word Apps will disable access to the microphone, calendar, Email, diagnostic data, and also deactivate telemetry, etc.
Apps items disable data collection in standard applications: calendar, microphone, camera, etc. - Using the Defender and Edge options, you can deactivate Defender completely (the only red line), only cloud protection, and also disable Adobe Flash Player in the Microsoft Edge browser, the option to guess search queries, and more.
Edge and Defender options disable Defender and Microsoft Edge browser components - Activated Privacy items free the user from being tracked via OneDrive, sending information entered on the PC, biometrics, downloading maps and many other system functions.
Privacy items include components such as OneDrive, telemetry, biometrics and much more - When you have selected all the necessary lines, click on the Apply button for the utility to start working.
Destroy Windows 10 Spying: Portable Tool with Extra Features
Destroy Windows 10 Spying is developed by user Nummer on the GitHub platform. Its obvious advantages are portability and freeness. The program does not need to be installed on the device - it works immediately after launching the downloaded file. It is suitable for beginners, since it has an interface option in Russian and one button that automatically starts disabling surveillance, that is, the program does not need to be configured. However, there are still settings - for more advanced users.
You can disable surveillance in Destroy Windows 10 Spying with one click of a button
The program is suitable for Windows 7, 8, 8.1, 10. It disables telemetry and the main components that spy on the user, and also offers some additional functions. In addition, before starting work, the utility itself creates a restore point on your system in case a rollback is needed. Now we’ll tell you how to use the program:
- Go to the official developer page and click on the DWS.exe link (find and download the latest version). The file weighs only 320 KB.
Click on the link DWS.exe to download the executable file of the program - We launch the executable file of the utility and click on “Yes” to allow it to make changes on the PC.
Click “Yes” to allow a third-party program to make changes to your PC - In the “Home” tab, immediately start automatically turning off surveillance using the large Destroy Spying key if you are a novice user.
Click on the Destroy Spying button to start the program without any preliminary configuration - If you are an advanced user, try setting up the program - go to the second tab. Check the box next to “Enable Professional Mode”. All items in the list will immediately become clickable.
In the “Settings” tab, first of all, activate the professional mode - Select the specific operations that the tool should perform. For example, you may not want to turn off Defender, then uncheck o.
By enabling and disabling items, customize the deactivation of surveillance for yourself - In the “Utilities” section, additional program options are available: disable telemetry components in Microsoft Office, update Windows, as well as remove OneDrive, old Firewall entries, all Metro applications, or restore the system if you need to cancel the program’s actions.
In the “Utilities” section you can turn off OneDrive, Windows updates, and also restore the operating system. - The “About” tab contains basic information about the application. Here you can also select the interface language.
In the “About” tab, change the language if necessary - The section with the stimulating title “Read Me” will tell beginners about the capabilities of the utility. The last section contains basic information about the utility's functions
Disable Win Tracking: a compact solution for experienced users
Disable Win Tracking is a compact anti-spyware tool from the developer of the GitHub platform, user 10se1ucgo. The tool has a rather unusual interface. Basically, all actions occur by executing commands in the editor, so the utility is not recommended for beginners. In addition, it does not have a Russian version.
Disable Win Tracking is more suitable for professionals than for beginners
The program is free and open source. Disabling all items is reversible. However, it is only suitable for versions of Windows 10 with a 32-bit system. Let's talk about the program interface and work in it:
- We go to the GitHub platform on which the developer works. Click on the link to download the DWT archive on the panel with the latest version (Latest Release). Click on the link with the DWT file
- Open the downloaded archive and launch the application with the exe extension.
Run the executable file in the archive - All actions in the utility are performed through the console - an editor on a black background, similar to the “Command Line”. We enter a certain key - press Enter to execute it. However, this method, of course, is not suitable for novice users. For them, a graphical shell was also built into the application, in which you can disable one or more spyware modules without entering commands. The Disable Win Tracking interface includes a console and a graphical shell with some options
- The list of components includes: telemetry, OneDrive, spy domains and more. In the Service Method panel, select Delete or simply Disable.
In Disable Win Tracking you can either simply disable or completely remove a particular spyware component - On the Mode panel, set Privacy if you need to disable modules, and Reverse to resume their operation.
Using the values of the Mode parameter, you can start the program or turn it off - Click on the File menu and select Settings. This will take us to the window where you can block domains and IP addresses. On the right are domains and addresses that, according to the utility, can spy on your activity on your PC. Using the Add button, you can add certain items to the fields on the left to create your own black list. All these entries are added to your hosts file on the PC - this is how blocking occurs. In the Settings tab you can configure blocking of domains and IP addresses
Denying network access
The built-in Windows Firewall allows you to prevent spyware from sending data to your network.
To get to the firewall settings, find the search icon in the taskbar next to Start. Click on it and enter “Control Panel”. This will allow you to quickly access Windows 10 settings. The settings window also has a search. Through it we find the item “Firewall”.
On the left side of the window, select “Allow applications or components in Windows Firewall.” On the right side, uncheck the following functions:
- Wireless Display - This feature allows you to display images on a wireless display.
- Remote Assistance - This feature allows you to request remote assistance from other users on your network.
As a supplement, I suggest reading the article “Disable the CDPUserSvc service.”