How to clear the cache of all applications at once?
How to clear the cache on Android in all applications at once
- Enter the “Settings” application on your Android smartphone (tablet).
- Go to the "Storage and USB storage" settings section.
- Go to the “Cache Data” subsection.
- Confirm deleting the cache.
Interesting materials:
What is literature and why is it needed? What is hypocrisy in simple words? What is a security guard license? What is activity licensing? What is Chizhevsky Chandelier? What is a storm drain? What are boolean variables? What is a loyal customer? What is local civilization? What is a local connection?
Where did it come from on the phone?
Information in the Dalvik cache folder appears after the Android OS virtual machine of the same name is running. The elements themselves remain from using the programs. There are both residual elements and active ones.
There are 3 types of cache memory:
- Dalvik Cache – elements from the Android OS virtual machine. The contents inside the folder are updated;
- System type cache - built into the OS memory with data about it.
- Program cache – residual program files. They are located in the gadget’s built-in memory.
Over time, files begin to take up a significant part of the memory, which subsequently causes problems with the availability of free space.
It is possible to avoid problems with free space by transferring information to external media. The function is available on smartphones that support Android 6.0 and higher.
Where is the user cache stored in Android
The user application cache is stored on the internal storage or memory card. A separate folder is allocated for it - Android. But don’t
delete it right away!
It also stores application data.
There are two more folders in it - /data and /obb.
The fact is that application data comes in two types - divided into separate files and packaged into a kind of archive. File-by-file files are stored in /data. Archived – packaging is carried out in a special format.obb – in the /obb folder. Therefore, for example, installing games with a cache involves copying the cache to the /obb folder.
The name of each folder in these directories corresponds to the full name of the application (which looks like com.android.google.vending or similar - the name is different for each application). And if suddenly some application has already been uninstalled from the device, but the folder with its information remains, you can safely delete it.
TWRP Menu Structure
Unlike standard recovery, TWRP uses a sensor rather than buttons to navigate the menu. The purpose of the buttons in the menu is given in the table.
| Menu section | Subsection | Purpose |
| Settings | Ignore image size errors | Ignore image size errors |
| Force MD5 check for all zips | forced verification of MD5 checksums for all ZIP archives | |
| Restore Defaults | Revert to default TWRP settings | |
| During backup | enable ignoring errors in file size when creating a system snapshot; | |
| Time | Set the default time zone for the Clock app | |
| Skip MD5 generation during backup | Skip the creation of MD5 checksums for system snapshots | |
| Zip file signature verification | checking signatures of ZIP archives | |
| Use rm –rf instead of formatting | Delete files rather than format the partition when using any command in the Wipe partition | |
| Install | – | installation of firmware, application sets (Google Apps), root applications (Magisk), patches for the system kernel from ZIP archives. Archives of other types are not supported |
| Reboot | – | restart |
| Mount | System | Connecting the /system partition |
| Data | Same for /data | |
| SDCARD | Same for /sdcard | |
| Cache | Same for /cache | |
| USB Storage | Connecting a flash drive | |
| Backup | – | Creating a System Backup |
| Advanced | Copy Log to SD | copy the event log to a microSD card; |
| Fix Permissions | correcting access rights to sections, folders and files; | |
| Reload Theme | Reload template | |
| Partition SD Card | Repartition the memory card; | |
| Terminal Command | command line. | |
| File Manager | file manager | |
| Wipe | Android Secure | Clears /android_secure |
| Cache | Same for /cache | |
| Dalvik Cache | Same for Dalvik Cache | |
| System | Same for /system | |
| Internal/External Storage | The same for built-in/connected memory | |
| Factory Reset | Factory reset | |
| Battery Stats | Resetting battery operation statistics | |
| Restore | – | Restoring from a created system copy |
How it really is and which is better, ART or Dalvik
On the Internet there are already many different comparisons of the performance of Android devices in two environments and the results vary. One of the largest and most detailed such tests is posted on androidpolice.com (English):
Summarizing the results, we can say that ART has no obvious advantages at this point in time (it must be taken into account that work on ART continues, this environment is still only at the experimental stage): in some tests, work using this environment shows better results (especially in , as for performance, but not in all its aspects), and in some other special advantages it is not noticeable or Dalvik is ahead. For example, if we talk about battery life, then contrary to expectations, Dalvik shows almost equal results with ART.
The general conclusion of most tests is that there is no obvious difference when working with ART or Dalvik. However, the new environment and the approach used in it look promising and perhaps in Android 4.5 or Android 5 such a difference will be obvious. (In fact, Google will probably make ART the default environment.)
A couple more things to note if you decide to enable the ART environment instead of Dalvik - some apps may not work properly (or not work at all, such as WhatsApp and Titanium Backup), and a full reboot of Android may take 10-20 minutes: i.e. , if you turned on ART and after rebooting your phone or tablet it froze, wait
Cleaning options
There are four known methods for clearing internal memory from cache data on a phone:
- Cleaning through internal means.
- Use of third party applications.
- Complete cleaning of residual elements on your smartphone.
- Reset to factory settings.
Using the latter method will not only clear it, but will also erase all settings along with the files that were there before the reset. Therefore, it should only be used when problems occur.
Using internal tools
Each owner of an Android OS device has the opportunity to delete information completely through built-in tools.
We recommend: Setting up Skype on an Android phone
To do this you will need:
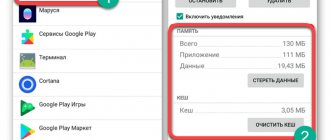
- Open the "Settings" , go to the "Storage" (the path may differ depending on the OS version).
- In the window that opens, find the item “Cache data” .
- After the transition, a summary of information about the items located will appear on the screen. After this, a window will appear with the question “Clear cache?” . To confirm, select “OK” .
- At the end of the operation, all cached items will be deleted from the device.
The method does not provide flexible settings for the deletion mode.
Cleaning in apps
It is not necessary to completely clear information on the entire phone. It is possible to delete files from specific applications.
Procedure:
- Go to "Settings" - "Applications" .
- Select the one you need and click “Clear” .
- Click on the “Cache” - “Clear” .
This is how the application cache is cleared.
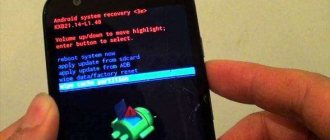
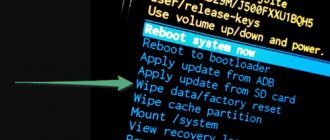
Cleaning via Recovery
Clearing Dalvik Cache is only possible in Recovery mode. To navigate, press the appropriate key combination, depending on the smartphone model.
The basic combination is to simultaneously press the volume buttons and turn off the phone.
Algorithm of actions:
- Turn off the device.
- Go to Recovery mode.
- Scroll down to Wipe cache partition using the volume down button.
- Press the smartphone shutdown button to confirm removal of Dalvik Cache .
- A notification about file deletion will appear at the bottom of the display.
- At the end Reboot System Now to exit this mode.
- The phone will reboot and work in standard mode.
It is important not to confuse or accidentally launch the Wipe data/factory , otherwise all files will be deleted and the factory settings will be returned.
Removing cache using a third-party application
Now let's see how to clear the cache on your phone using third-party software, using the example of the most popular data cleaning program Clean Master. The program can be downloaded from the Google Play Market; the Clean Master application supports the Russian interface language.
Open the Clean Master program on your mobile device. If the program warns you in its window that unnecessary files have been found, click the “Clean” button. If there is no warning, click on the “Trash” button yourself.
After scanning, the program will offer to delete unnecessary data. The Clean Master window will display detailed information about what exactly will be deleted from the gadget, and the size of unnecessary data will be indicated.
The user has two options: immediately delete the entire cache, or first uncheck the boxes next to those applications whose data should not be deleted.
Click on the "Clean up trash" button.
If the Clean Master application is not suitable for you to free up phone memory, use another similar program.
Reset to factory settings
An effective method, but painful, because all applications that the user has downloaded during the entire operation of the system will be deleted. Everything in the phone's memory will be cleared, and the OS will return to its factory state.
- Go to system settings.
- Go to the section "Recovery and reset».
- Select the option "Reset».
- Confirm resetting your phone.
- We wait.
Thus, you can get rid of many freezes associated with improper operation of the system and software.
More information about wipe on Android
This information is for those who want to know more about wipe.
About the subtleties of performing Wipe on Android
Many people are faced with the question of when to perform wipe? Before the firmware or after? It is better to do this before installing the firmware, since many firmwares may have a built-in automatic reboot function after installing the firmware!
If the firmware contains files that are uploaded to the data section, then it’s worth checking how the system behaves; if it boots, it’s good; if not, then run wipe data.
About the subtleties of performing Wipe on Android 2
Based on personal observations, I noticed the following feature: in the popular custom firmware CyanogenMod (LinageOS) there is a script that performs a backup during the installation of the firmware and restores the data after it is completed. Because of this script, errors can sometimes arise and migrate from firmware to firmware.
Therefore, if you use LinageOS firmware or you know that the updater-script contains a script that backups system files, then it is better to make a format system before updating the firmware.
That's all, stay with the Android +1 site!