The Windows 10 microphone does not work - a fairly popular error, not only after a system update, but also during normal use of the system. Sound recording is not the most popular function during normal computer use, and the problem may appear at the most inopportune moment. In this article, we will tell you what to do if the microphone does not work on a Windows 10 PC.
Before you begin to solve the problem, it is worth analyzing the system for the reasons that resulted in this situation.
These situations can be divided into specific scenarios:
- After a system reinstall or major Windows update;
- Another microphone or recording device was connected to the computer;
- The microphone simply stopped working (this is important when it has not been used for a very long time).
All these scenarios have one thing in common - the solution to this problem can be accomplished using 5 methods.
The first option, which will be discussed further, will help in a situation where microphones on a Windows 10 computer do not work, although they previously worked correctly.
Main reasons for failures
Why doesn't the microphone on my headphones work? The answer may not be as easy as it seems. And this is normal. After all, microphones are considered complex devices. Their performance may be impaired for various reasons.
Most often this happens due to:
- lost settings;
- incorrect connection of the device;
- technical malfunctions of the device;
- incompatibility with the system;
- port breakdowns;
- viral infection of the OS;
- lack of drivers in the system.
Headphones with a microphone for a computer are very convenient to use. But what should you do if the device’s operation is disrupted?
Possible malfunctions and ways to eliminate them
The main problems with the headset can be divided into two groups: mechanical and system
All problems with the headset can be divided into mechanical and systemic. The first ones arise suddenly, most often some time after purchasing headphones. The latter appear immediately or are directly related to changes in the gadget’s software, for example, reinstalling the operating system, updating drivers, downloading new programs and applications.
Most microphone malfunctions on a wired or wireless headset can be easily fixed at home.
Checking your microphone settings
Before taking your headphones to a service center, you should check the settings. To assess whether your microphone settings are correct, perform the following steps:
- Select “Control Panel”, find the “Sound” section.
- In the “Recording” and “Microphone” items, click “Properties”.
- The user must check all the tabs that open.
Checking may show that not all parameters are configured correctly. Or the device may not be connected correctly. After correcting the settings or reconnecting the headphones with a microphone, you need to check their functionality.
Headphones with microphone for PC
Adjusting Volume Levels
To improve sound quality, you should adjust the volume. This can be done in Realtek HD Audio or in the recording devices tab.
- You need to set the gain to 0% and the volume to 50%. Then use the program to check the sound quality.
- If the sound parameters remain unsatisfactory, you can try increasing the volume to 80%.
- If the result still does not suit the user, you can add software enhancement. As the recording quality improves, increase the gain step by step. After this, you should return to the volume settings.
- If the volume is set to maximum and the problem remains, it means that the headphone model is not suitable for this PC or is damaged.
Some headset models do not have a software amplification option. You can only adjust the volume. In this case, the user will have to either choose another model, or move the microphone closer.
Setting up a microphone on a computer
Windows Troubleshooting Wizard
Let's start simple.
- Call Settings using the Win + I key combination or another method.
- Visit the latest Update & Security section.
- In the vertical menu on the left, click on “Troubleshooting”.
- Scroll down the list of subsections on the right to the “Sound recording” item and click on it.
- Click “Run the troubleshooter...” and wait for the procedure to complete.
The tool will detect and solve most software problems, for example, the audio service does not work, the driver is not installed. It will also notify you about hardware problems, for example, the device is not connected (the cable is damaged, the wrong connector is used for switching). Allows you to select which audio recording device will be the main one in the system when two devices are detected, including virtual ones.
Web application
The third method is the online service WebcamMicTest.
- Follow the link or visit the main page of the resource, and in the upper right corner click “Test microphone”.
- Select the recording device if the computer did not detect it correctly, and open access to the equipment.
- Say something to evaluate the incoming signal.
Based on the test results, the web application will conclude that the device is working. The icon to the left of the cross switches the view of the diagram, displaying the dynamics of sound over time in the form of a diagram and a wave.
A similar test can be performed in any application: standard Voice Recording, voice capture function in AIMP, Audacity and dozens of other programs.
As a result, you will conclude whether there is a problem with a specific program or the microphone does not work everywhere.
Incorrect microphone connection
If the device does not work, experts advise checking the cable for mechanical damage. You also need to inspect the headset itself with the microphone. If defects are found, the cable or device will have to be replaced.
The cause of the malfunction may be an incorrect connection of the cable to the PC. You can choose a different socket: connect the wire to the rear panel or vice versa. If the headphones are wireless, you need to insert the Bluetooth connector into the socket. Next, find the device on your computer and activate it. After connecting the headset, you need to go to the settings of the “Sound” section on the computer and check all the tabs.
There are computer models that have only one option for connecting a cable. In this case, it must be inserted into the connector near which the headset is drawn.
Recommendations for choosing headphones
Headphones with a microphone are one of those types of equipment that often fails. If you want your headset to serve you for a long time, choose trusted companies, such as fornication, Sony, Philips, etc. An excellent solution for gamers and simply for lovers of virtual communication, combining quality and relatively inexpensive cost, is the a4tech model bloody g500. In addition to its attractive appearance, the model boasts impressive characteristics that will provide high quality sound to its owner.
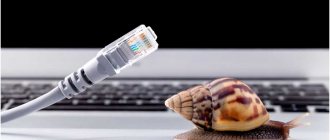
Conductor break
Often the problem is due to a faulty wire
In 90% of cases, problems with the sound in headphones or the microphone signal that arise during the operation of the headset are associated with a violation of the integrity of the electrical circuit. The most sensitive areas to breakage are the joints of conductors:
- TRS connector standard 3.5 mm, 6.35 mm or other;
- audio line branching unit (usually made in the form of a separate block with a volume control and control buttons);
- positive and negative microphone contacts;
- Bluetooth module connectors in wireless models.
Smoothly moving the wire in different directions near the junction area will help detect such a problem. Usually, a signal appears periodically; in some positions of the conductor it can even be relatively stable.
If you have skills in repairing electrical appliances, try testing the headset circuits with a multimeter. The figure below shows the pinout of the most popular 3.5 mm Mini-Jack combo connector.
Pinout of the combined Mini-Jack 3.5 mm connector
However, some manufacturers use connectors with a different pin arrangement. First of all, this is typical for older phones from Nokia, Motorola and HTC. If a break is detected, it can be easily repaired by soldering. If you have never worked with a soldering iron before, it is better to contact a specialized workshop. Of course, this is only relevant for expensive and high-quality headphone models; repairing a “disposable” Chinese headset is impractical.
Can it be fixed and how?
If this malfunction is detected, it can be easily eliminated by soldering. This option is suitable for those who have experience with a soldering iron. But this is true for expensive and branded models. There is no point in repairing cheap Chinese headphones in this way.
Additionally
If the previous options did not help, use a selection of tips that may also help you.
Reconnect and test on another PC or device
If the microphone is detected but does not work in Windows 10, the connection may be incorrect. There is always a chance that the cable is not fully inserted into the microphone jack or that the jack itself no longer works.
To make sure the microphone is working correctly, check it on other devices, if we are talking about a headset or a separate microphone (not built-in). The connector is checked in the same way.
Inplace Upgrade System Update
Finally, if all of the above methods do not help, you can try updating the system without losing data - this is called Inplace Upgrade.
To perform Inplace Upgrade, download the Media Creation Tools utility from the official website (https://www.microsoft.com/ru-ru/software-download/windows10) and run it.
After that, select “Update this computer now” - after this, the download and subsequent update of system components will begin. This process takes from 15 minutes to a couple of hours, it all depends on the performance of the computer.
In this short article, we tried to talk about possible solutions to the problem when an application or system does not see the microphone in headphones or a headset in Windows 10. We hope that this information was useful to you.
Solving the problem with microphone drivers
Let's check the driver's operation. To do this you need:
- Go to "Control Panel".
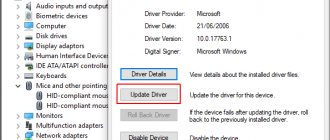
- Next, open “Device Manager”.
- We find “Sound, video and gaming devices”, the line “Realtek High Definition Audio” will open below. The English entry may be slightly different, depending on the manufacturer of the installed driver.
In the last paragraph, instead of an entry, there may be a question mark icon - this means that the driver either did not exist at all, or it is faulty. In this case, you need to install new ones. Go to the official website of the sound card and download the drivers.
Setting up access to the microphone on the headset using Windows 10
Sometimes the microphone on the headphones does not work only because the computer does not see it or sees it, but the operating system cannot access it. How to fix it?
1). Click the Start button in the lower left corner of the screen, then click the gear icon in the Start menu to access Windows Settings.
You can open “Windows Settings” in version 10 of “Windows” in another way:
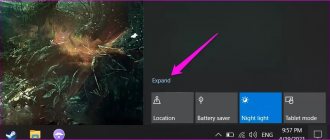
- click the notification icon in the tray, it is the very first one on the right;
- Among the options tiles you see at the bottom of the sidebar, find the tile with the “All Options” gear. Clicking on this tile will open the desired window.
2). In the Windows Settings window, select and go to the Privacy section. Location, camera."
3). In the menu on the left panel, select “Microphone”, click and go to the microphone settings.
4). Check if the microphone is turned on: the slider under the “Allow apps to use the microphone” option should be in the “On” position.
5). Also check if the "Select apps that can use your microphone" option is enabled. You may need to additionally switch the slider to the active position for individual applications that are listed under this option.
In most cases, it is enough to configure the system as recommended above, and the problem with the microphone is solved. If not, here are three more options.
Connecting the device
First of all, the user needs to check that the device is connected correctly. A headset with headphones can be:
- usb;
- bluetooth;
- wired.
Depending on the situation, the connection algorithm will change. The following layouts are possible:
- Plug the USB cable into the appropriate connector on the computer. You don't need to do anything else.
- Turn on the headset, insert the Bluetooth connector into the USB socket, find the headphones on the computer and click on the “Connect” button. The algorithm is only suitable for wireless devices.
- Take the end of the cable from the headset. Insert one “plug” (with the image of a headset) into the corresponding round connector on the computer (it is also labeled), the second into the socket marked “microphone”.
Important: some wired (non-USB) headphones have only 1 connection plug. In this case, it is recommended to insert it into the socket near which the headset is drawn.
I guess that's all. Now we understand how to connect a headset with a microphone to a computer. It's not as difficult as it might initially seem.
Contact contamination
During operation, the connectors may become dirty.
In some cases, for example, after long-term storage or with frequent exposure to dust and moisture, the connector contacts may accumulate dirt and oxidize. This is easy to detect externally - there will be lumps of dust, brown or greenish spots on the plug or socket. Of course, they break the electrical contact between surfaces, preventing the headset from working properly.
You can remove dirt from the nest with a thin wire or a toothpick. The plug is even easier to clean - any flat, but not too sharp, object will do. Try not to leave deep scratches on the surface - they will become a source for subsequent oxidation of the connectors. Final cleaning is carried out with cotton wool soaked in alcohol.
System failure
Sometimes incorrect operation is caused by a failure in the system - the microphone can be forcibly turned off. In this case, you should find the “speaker” icon in the tray and click on “open sound settings”.
Next, select “sound”, find the “input” item and click “manage sound devices”.
The microphone may be muted. Clicking on it opens the “on/off” button.
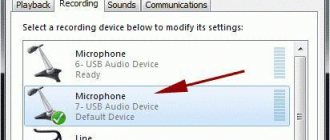
For the Windows 7 operating system, the submenu is different; in the tray on the sound icon you need to select “recording devices” - “recording” - “microphone” - “properties” - “enable”. Here you can turn on the microphone sensitivity; perhaps it is set to a minimum, and the node simply does not pick up the voice.
If the connection is made to a device with a built-in microphone, then it may work by default, but the microphone on the headset is not active. In this situation, the equipment list shows two microphones. You just need to select the one you need and, if necessary, activate the “default” button so as not to switch manually every time.
We check on our own
How to check your headphone microphone? Let's start by studying Windows tools to implement the task.
The algorithm of actions in such circumstances will look like this:
- Connect the microphone with headphones to the PC.
- Open “Start” - “All Programs” - “Accessories”.
- Click on the “Sound Recording” button.
- Click on the button with the image of the start of recording.
- Start speaking into the microphone.
- After speaking, click on the “Stop” button.
- Listen to the received recording.
So, if there is no sound, then the device is not working. Everything is extremely simple. But there are other ways to check.
The microphone on the headphones does not work when connected to iPhone, Android phones
Mobile phones released no later than 2011 were equipped with connectors wired according to the OMTP standard (in common parlance, “Nokia-style”). Headsets Panasonic RP-TCN, Samsung GH59-09752A, etc. are suitable for them. As for modern smartphones running Android OS, they all have headset connectors wired according to the CTIA standard (in common parlance - “for Samsung”) and Compatible with devices such as Beats Tour, Earphone MEP 100, etc.
It should be noted that when connected to a smartphone running Android OS, the headset, which was developed for iPhone 5-8 models, will not work well. The impossibility of using all its functionality is due to differences in the principles of identifying control signals. Mobile devices manufactured by Apple work with its own headsets. An example is the Apple EarPods with Remote and Mic headphones. Also, Apple smartphones and tablets are compatible with Marshall Major FX, Monster Turbine Pro Copper and other headsets designed specifically for Apple models.
Recently, Sony MDR NC-31 smartphones have appeared on the market, equipped with headsets with noise reduction functions. These accessories are equipped with two microphones, and a 5-pin TRRRS type plug is used to connect them to a smartphone. This headset will not work with phones equipped with other types of connectors.
Sources
- https://www.syl.ru/article/368857/pochemu-ne-rabotaet-mikrofon-na-naushnikah-kak-proverit-mikrofon-naushnikov
- https://TechnoSova.ru/cifrovaja-tehnika/garnitury/ne-rabotaet-mikrofon-na-naushnikah/
- https://AudioTop.ru/info/ne-rabotaet-mikrofon-v-naushnikah
- https://pcpro100.info/pochemu-ne-rabotaet-mikrofon-na-naushnikah/
- https://it-doc.info/pochemu-ne-rabotaet-mikrofon-na-naushnikah/
- https://www.orgtech.info/ne-rabotaet-mikrofon-na-naushnikah/
- https://tehnika.expert/cifrovaya/naushniki/perestal-rabotat-mikrofon.html
- https://hitech-online.ru/audio-video-foto/naushniki/ne-rabotaet-mikrofon.html