What is the hidden section for?
You can hide your secret files in a hidden section and no one will find them
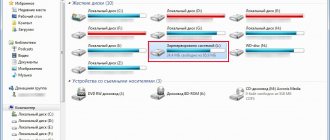
If you only use your computer to play games or watch movies and read sites on the Internet, you may not need this theme. If you use it more deeply and often delve into the intricacies of its setup and operation, sooner or later you will end up in the disk management utility, where you will find a hidden partition of the hard drive, the space in which is reserved for recovery. What’s most interesting is that the space is occupied, and the drive is not displayed in Windows Explorer.
The main purpose is to store the necessary files for computer backup recovery. But in no case should they be confused with the recovery image, because its size will be much larger than the allocated 100 to 500 megabytes, depending on the version of Windows. The newer the operating system, the more space it takes up. In addition, manufacturers themselves, especially laptops, can provide their devices with a small hidden partition so that they can be painlessly reset to factory settings with the possibility of recovery. Thus, each laptop will display two hidden volumes: system backup and recovery. Most often, their volume will be almost identical.
What does this opportunity give to the average user?
- First, data on a hidden volume is stored separately from public files, so it cannot be affected by various file and drive operations, such as formatting or compression. In this regard, you will be able to avoid some errors associated with the operation of Windows, and with certain knowledge and skills it will be much easier to restore the operating system instead of reinstalling it.
- Secondly, the presence of such hidden recovery partitions will make it much easier to resolve the issue of running several operating systems simultaneously.
- Thirdly, the most vital processes will be reliably protected from the actions of inexperienced users. For example, in Windows 7, the boot loader was stored on the system disk and therefore could be removed quite easily, which led to the loss of computer functionality. Now, to do this, you need to try hard, because these files are stored in a section marked “Reserved by the system.”
- And finally, if you are concerned about the safety of some files and documents, you can hide certain volumes in the settings; this way, an attacker or simply an overly curious friend will not be able to gain access or accidentally delete important data.
Method 3: MiniTool Partition Wizard
If there is no system tool for working with disks in your edition of the "seven", and you have neither the time nor desire to tinker with the "Command Line", a convenient third-party solution, MiniTool Partition Wizard, will come in handy.
- Run the program and wait for the list of drives to load. After that, find the one you need, select it, right-click and use the “Hide Partition” item.
- A list of planned operations and a button to start them will appear in the column on the left; click on it.
- Confirm the operation, after which the program will begin to perform the selected action - at the end of the procedure, the disk will be hidden.
The main advantage of this method is its versatility, since the third-party application does not depend on the version and edition of the operating system.
We are glad that we were able to help you solve the problem. In addition to this article, there are 12,719 more instructions on the site. Add the Lumpics.ru website to your bookmarks (CTRL+D) and we will definitely be useful to you. Thank the author and share the article on social networks.
Describe what didn't work for you. Our specialists will try to answer as quickly as possible.
How to find a hidden system partition
You can find an existing hidden drive partition quite easily. To do this, you need to launch the built-in disk management utility, with which you can view all the necessary information and perform the necessary operations. How to get into it?
- On Windows 10 or 8, right-click on the Start button and select “Disk Management”.
- On older versions, click Start - Computer - right-click - Manage - Disk Management.
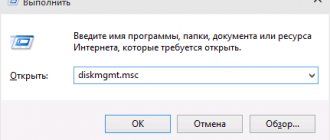
- On all versions, press Win + R and then copy from here and paste diskmgmt.msc into the search bar.
After the utility starts, you will see at least 4 lines: drives C and D, recovery partition and system reserved. Each of them can have the following attributes:
- System - a partition that contains files required for booting and normal operation of the system;
- Active - BIOS defines it as bootable;
- Main partition - allows you to select it to place system files and boot.
If everything is clear with the first two, then “Recovery partition” and “Reserved by the system” are worth understanding in more detail. In the first case, it will be displayed only in the disk management utility, and it is impossible to make it visible using standard tools. You can open the second of them by simply assigning a letter to it, after which it will appear in Explorer.
Command line
The first method is to hide HDD or SSD partitions using the command line. It is most suitable for system partitions. Run the line as administrator. Here are detailed instructions on how to do this.
We need to execute the following commands one by one. Pay close attention to which letters are chosen in stages 3 and 4.
- diskpart;
- list volume - the command shows a list of existing partitions. At stage 3, the “volume” number is selected, at stage 4 – the letter designation of this partition (by default we put N instead of the number, choose the correct one for your HDD or SSD);
- select volume N;
- remove letter=E;
- exit.
Close the command line and go to Explorer. The selected section is no longer displayed.
How to create a hidden section
When automatically created during system installation
When installing Windows from scratch, you can create a hidden recovery partition. In new OS versions it will be created automatically. To do this, a number of conditions must be met:
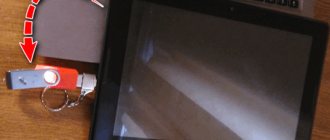
- Installation from external media (disk, flash drive).
- No more than three volumes created; otherwise, the files will be copied to the already existing active partition.
- The top section where installation is carried out.
- Partitioning the drive from scratch, rather than installing it into an existing partition.
Having reached the stage of choosing an installation location, format the built-in drive, after which you need to delete all existing partitions, and then create at least two new ones, which will eventually appear as drive C or D. If you want to hide very important information from prying eyes, we recommend you need to create three volumes, one of which will not be very large in size, for example, 25–30 gigabytes. In almost all cases, you will notice that the very first thing on the list will be “Reserved by the system” with a volume of 100 to 500 megabytes. What’s most interesting is that you can delete this partition when reinstalling, but it will be created again. If you delete only drive C or D, and leave the hidden partition in place, then the data will be overwritten into the existing “System Reserved” volume. If you want to save the data on drive D and not delete existing volumes, the information will also be overwritten to the hidden partition.
By going to the Disk Management utility, you will be able to see both the main volumes and the hidden ones. To hide a section you want:
- Right-click on the one you want and select “Change drive letter or drive path.”
- In the window that opens, hover over the letter and select “Delete.”
Now this drive will not be displayed in Explorer, since it is hidden.
If a hidden partition was not created during installation
For example, you used a computer and realized over time that you need to create a new hard drive partition. But it is impossible to do this using standard Windows tools. Therefore, we recommend that you use the excellent Acronis Disk Director program. With its help, you can perform almost any operation with your hard drive: resize, split, copy, clone, merge volumes, make them hidden, and much more. The program costs money, a lot of it, but it's worth it. In addition, we will rarely feel remorse in our minds if we use a pirated copy. So, having found and installed Acronis Disk Director, follow these steps:
- The first step is to open the main program window, where you will see a list of all your volumes, including the recovery partition and “Reserved by the system.”
- Select the volume whose size you want to resize by clicking on it once.
- In the left column you will see a list of operations that can be performed on the selected volume.
- Select “Split volume”, after which the window for allocating space on the hard drive will open.
- Enter the size of each volume manually or automatically by moving the adjustment slider.
- Wait for the operation to complete and click the “Apply Pending Operations” button.
- If necessary, restart your computer.
- Next, you should re-open the program and select the volume you need.
- Select “Make hidden”, after which it will not appear in Explorer.
This way you can change the sections you need and make them hidden when you need it.
Method No. 2. Hiding disks through group policies
- Go to Group Policy Management
- User Configuration
- Administrative Templates
- Windows components
- Conductor
- Open the policy: Hide selected drives from My Computer window
- Set the value to enabled and select the option
But here’s the catch: the standard policy can hide only standard disks or all of them at once. If that's what you needed, great. I needed to hide the Z drive, and for this I need to go a different way, and therefore...
How to hide a local drive in Registry Editor
A hard drive partition can be made hidden by changing the registry of the Windows operating system.
To launch Registry Editor, press “Win” + “R” on your keyboard and enter the command “regedit” (without quotes).
In the Registry Editor window, follow the path:
Right-click on an empty space in the Registry Editor window, select “New” in the context menu, then “DWORD Value (32 bits)”. Give the parameter a name: “NoDrives” (without quotes).
Right-click on the “NoDrives” option, select “Edit...”. In the Edit DWORD (32-bit) Value window, under Numeral System, switch to decimal, and then enter a numeric value that corresponds to the drive letter in this table:
For example, I want to hide the Local disk “D:”, in the table the letter “D” corresponds to the number “8”, so I must enter this number in the “Value” field.
Click OK, close Registry Editor, and then restart your computer.
To cancel the changes, delete from the registry the previously created “NoDrives” parameter located at the following path: