We can talk about the Yandex company and its products for a long time. Software developers have tried to cover all possible needs of PC users. One of the company's most popular products is Yandex.Disk. It not only frees up the “territory” of the computer, providing its own “areas” for storing important information, but also provides the user with the ability to create screenshots - the entire screen or its fragments. This function is easy to use and convenient because it automatically uploads the created images to Yandex.Disk, so that everything is always at hand, no matter where a person is physically located at the moment. This article will talk about how to take a screenshot through Yandex Disk.
A screenshot of the entire working area of the screen is performed by traditionally pressing the PrtScr key or using a special Lightshot screenshot program. To “photo shoot” the selected areas, you need to use a special tool called “Screenshot Editor”. It is launched through the shortcut created when installing Yandex.Disk, or using the Alt hotkeys (Alt+PrtScr).
In order to take a screenshot, you need to click on the Yandex.Disk icon. Then select “Screenshots” in the menu and then “Take a screenshot...” depending on the object.
Install Yandex.Disk for free immediately with a screenshot
The Yandex.Disk cloud program is free, but you will need to register an account (Yandex.Mail) if you did not have one before. By the way, having this email allows you to use a lot of other free services.
Download Yandex.Disk for free in Russian from the official website: https://disk.yandex.ru/
Rice. 1. Download Yandex.Disk for free along with a screenshot
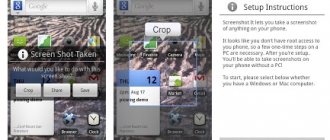
Screenshots provide convenient communication with other Internet users on issues that screen images can demonstrate better than words. A screenshot allows you to clearly show system or software errors, game achievements, personal correspondence, as well as information found on the Internet, etc. With the help of a tool from the first Runet search engine, all this is possible
- quickly capture
- edit and add your notes,
- get a link and post it on the Internet for public access.
Take a screenshot
If you want to take a screenshot and then select an area of it, use these shortcuts:
- Screenshot of a screen area: Ctrl + Shift + 1 .
- Screenshot of a window: Alt + Print Screen , Ctrl + Shift + 4 .
- Screenshot of an entire screen: Print Screen , Ctrl + Shift + 3
The new screenshot opens automatically in the image editor.
To change keyboard shortcuts, follow these steps:
- Go to File → Settings.
- Click the field to the right of the action.
- Press a new key combination.
If you want to disable one of the combinations, click in the box to the right of the action. To disable all keyboard shortcuts for making screenshots, disable the Keyboard shortcuts option.
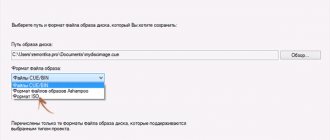
Note. By default, screenshots are saved in PNG format. To change the format to JPEG:
- Choose File → Settings from the menu.
- In the Format list, select JPEG.
Launch Screenshot to take a screenshot
To capture what is happening on the screen or edit an existing picture, launch a screenshot. You can use one of three options:
- click on the shortcut on the Desktop (Fig. 2);
- open the icon on the right in the taskbar (Fig. 3);
- press hot keys.
Let's take a closer look at the options listed above.
1. The easiest way is to use the shortcut, if, of course, it is present on the Desktop:
Rice. 2. Shortcut “Screenshots in Yandex.Disk” on the desktop
As can be seen in Fig. 2, you can choose the best option for capturing an area of the computer screen:
- in the form of an arbitrary area,
- or this is a separate window,
- or the whole screen.
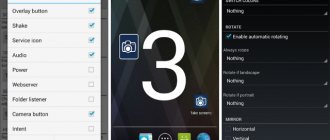
2. After installing the Yandex.Disk program, its icon appears in the taskbar (Fig. 3). If you click on it, a menu will appear in which we are interested in the “Screenshots” item. Then you can choose something suitable from the available options:
- Take a screenshot of the area
- Take a screenshot and get a link
- Take a screenshot of the entire screen
- Take a screenshot of a window
- Open Screenshots folder
- Open the file in a graphics editor
- Turn off keyboard shortcuts
Rice. 3. Screenshot icon on the right side of the taskbar and menu
To launch a screenshot, you can use hotkeys. The default keys are the following:
- screenshot of the area - Ctrl + Shift + 1;
- window screenshot - Alt + Print Screen, Ctrl + Shift + 4;
- screenshot of the entire screen - Print Screen, Ctrl + Shift + 3.
The user can change hotkeys at his own discretion in the program settings.
After creation, the screenshot goes into the editor window, where you can add graphic and text marks to the image, blur something out (that is, blur it out, blur it out) or cut it out, crop the entire picture along the edges of the required part.
Next, in the graphic editor window we can select:
- “Copy” to copy the image to the clipboard and save it to the cloud;
- “Save” to save in a local cloud folder and in the cloud itself;
- “Share” to save in a local cloud folder and in the cloud itself, along with generating a link for access on the Internet.
Rice. 4. A screenshot in the Yandex.Disk editor can be copied, saved, shared
When you select the “Share” option, the link to the screenshot published on the Internet will be immediately copied to the clipboard.
Rice. 5. The link to the screenshot is ready and placed on the clipboard
Screenshot settings: hotkeys, screenshot name and format
Right-click (right-click) on the Yandex.Disk icon in the taskbar, more precisely, in the Windows tray (Fig. 6). A context menu will appear where we open Yandex.Disk “Settings”:
Rice. 6. Screenshot settings in Yandex Disk
Using the settings, we can change a few things in the screenshot’s operation:
- assign hotkeys to replace those installed by default (1 in Fig. 7),
- specify a convenient template for assigning names to pictures (2 in Fig. 7),
- change the preset image file type PNG to JPEG (3 in Fig. 7).
In the Yandex.Disk settings, open the “Screenshots” tab. Then, if desired, you can change the hot keys by entering in the field, for example, instead of Ctrl+A another combination:
Rice. 7. “Screenshots” tab in Yandex.Disk Settings for changing hotkeys, template for name and file format
The name and format of the file containing the screenshot can only be selected from those suggested (2 and 3 in Fig. 7).
Editor
The created screenshots are automatically opened in the Editor. Here you can crop the image, add arrows, text, draw randomly with a marker, or blur the selected area. You can also customize the appearance of arrows and shapes, set their line thickness and color.
Using the buttons on the bottom panel, you can copy the finished screen to the clipboard, save it from the screenshots folder on Yandex Drive, or receive a public link to the file (copied to the clipboard).
The Editor has the function of adding any image to a screenshot. The desired image is dragged into the working window and edited like any other element.
If there is a need to edit an already saved screenshot, you need to open the program menu in the tray, find the image and click “Edit” .
Settings
PNG format by default . To change the format, you need to go to the settings, open the “Screenshots” , and select a different format ( JPEG ) from the drop-down list.
Hot keys are configured on the same tab. In order to exclude or change a combination, you need to click on the cross next to it. The combination will disappear.
Then click on the empty field and enter a new combination.
The Yandex Disk application provided us with a convenient screenshot for use. All pictures are automatically uploaded to the disk server and can be immediately accessed by friends and colleagues.
Thank the author and share the article on social networks.
Where is the screenshot stored and how to get a link to it
Finished screenshots are stored in the local Yandex.Disk folder on your computer and in the cloud, in the “Screenshots” subfolder. You can go to any of these places later in order to open the screenshot to public access and get a link for it.
Rice. 8. You can copy the link to the screenshot to send it via the Internet or post it online
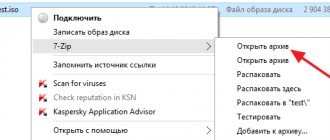
Moreover, Yandex.Disk, which works in the background, allows you to transfer any screenshots, pictures and other types of files from any location on your computer to the cloud and share (open) for public access. To do this, right-click on the desired file in Explorer, after which a context menu will appear in which you should select the “Copy link to Yandex.Disk” option.
Rice. 9. In Explorer there is a command “Copy link to Yandex.Disk” (if Disk was installed)
A link to the file will be placed on the clipboard, and the file itself from Explorer will be copied to the root of the cloud storage, as shown below:
Rice. 10. The file was copied from Explorer to Yandex.Disk
To use this link (in other words, extract it from the clipboard), you must
- open in your browser, for example, mail or a social network (or the object where you need to paste the link),
- place the cursor in the right place and
- press Ctrl+V (paste from clipboard).
- After this, the link should appear where it was needed.
Possibilities
It was assumed that the new function would be named “Yandex.Screenshot”, however, this did not happen. The updated version simply added a “Screenshots” folder. And when you press the standard hotkeys, the screenshot tool is automatically activated and the editor opens.
To create screenshots, use a hotkey: by default this key is Print Screen or Ctrl+Shift+4, it can also be the key: PrntScrn, PrtScn, PrtScr, PrtSc (on different devices they are called differently, but perform the same function - take a screenshot and place it on the clipboard). But for convenience, you can set the hotkey yourself in the settings. On laptops, these are hotkey combinations along with Fn.
- To take a screenshot of a specific area, you need to use the key combination Ctrl+Shift+1.
- To create a screenshot and link to it, use the combination Ctrl+Shift+2.
- Screenshot of the active window - Ctrl+Shift+4.
- Hotkeys can be changed at your discretion.
- In the editor, you can add various shapes to a screenshot: rectangle, circle, straight line, blurring a separate area. Curly and straight arrows and text, you can also choose the font and text size. You can adjust the color and thickness of added objects, and crop the image.
Screenshots are saved in the “Screenshots” folder on Yandex Disk. To ensure that images, as well as other files, do not take up space on your hard drive, you need to uncheck the “Save on computer” option in the settings. And about. After installing cloud storage, the ability to create and edit images will appear in the tray when you right-click on the disk icon.
Save, share, or print a screenshot
Save to your Yandex.Disk
Click Save to save the screenshot to Yandex.Disk.
Copy to clipboard
Click Copy to copy the screenshot to your clipboard and automatically save it to Yandex.Disk.
Share public link to screenshot Print
Go to File → Print.
How to take a screenshot in Windows using the capabilities of Yandex.Disk will be discussed below.
Contents: 1. Install Yandex.Disk along with a screenshot 2. Launch the screenshot and take a screenshot 3. Screenshot settings 4. Where to look for a screenshot and how to get a link to post on the Internet
- Online Earn: How to create a Google account without verifying your number?
It’s better to see once than to hear a hundred times. Don’t trust other people’s words, but believe your own eyes. (Proverbs about the benefits of screenshots)
So, a screenshot (or screenshot) is the “Screenshots” application, which is part of the Yandex.Disk program. In other words, if you install the Yandex.Disk cloud on your device, then at the same time you will have access to a screenshot, as well as notes.
Modifying a screenshot
To make a screenshot and then modify it in the editor, press Ctrl + Shift + 1 and select the area. In the editor, you can crop the screenshot, or insert arrows, simple geometric shapes, or text. When the screenshot is ready, you can save, print, or share it.
When you edit an image and click Save, an edited copy of the image is saved to Yandex.Disk. The original file will remain unchanged.
To make working with the editor more convenient, you can use keyboard shortcuts:
| Cut object | Ctrl + X |
| Copy object | Ctrl + C |
| Paste object | Ctrl + V |
| Copy screenshot (if no object is selected) | Ctrl + C |
| Paste text or image on screenshot | Ctrl + V |
| Change the scale of the pasted image while preserving its proportions | Shift + LKM |
| Move object | ← ↑ → ↓ |
| Quickly move object | Shift + ← ↑ → ↓ |
| Draw a rectangle or circle | Shift + LKM |
| Draw lines and arrows at a 45° angle | Shift + LKM |
| Zoom in | Ctrl + + |
| Zoom out | Ctrl + – |
| Go back to 100% scale | Ctrl + |
| Delete object | Delete , Backspace |
| Undo last action | Ctrl + Z |
| Undo last action | Ctrl + Shift + Z |
| Save | Ctrl + S |