Hello.
I think many people know and have heard that you can connect a second monitor (TV) to a laptop (computer). And in some cases, it is impossible to work fully without a second monitor: for example, accountants, financiers, programmers, etc. And in general, it is convenient to turn on, for example, the broadcast of a match (film) on one monitor, and slowly do work on the second :).
In this short article, I will look at the seemingly simple question of connecting a second monitor to a PC or laptop. I will try to touch on the main issues and problems that arise in this case.
Connection interfaces
Remark! You can find out about all the most common interfaces in this article: https://pcpro100.info/popular-interface/
Despite the abundance of interfaces, the most popular and in demand today are: HDMI, VGA, DVI. Modern laptops usually have an HDMI port, and sometimes a VGA port (example in Fig. 1).
Rice. 1. Side view - Samsung R440 laptop
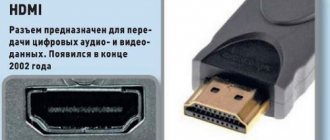
HDMI
The most popular interface, present on all modern equipment (monitors, laptops, TVs, etc.). If you have an HDMI port on your monitor and laptop, then the entire connection process should go without a hitch.
By the way, there are three types of HDMI form factors: Standard, Mini and Micro. On laptops there is usually a standard connector, as in Fig. 2. However, pay attention to this as well (Fig. 3).
Rice. 2. HDMI port
Rice. 3. From left to right: Standard, Mini and Micro (a type of HDMI form factor).
VGA (D-Sub)
Many users call this connector differently, some VGA and some D-Sub (and manufacturers are not guilty of this either).
Many people say that the VGA interface is reaching its end (perhaps this is true), but despite this, there is still quite a lot of technology that supports VGA. This means he will live another 5-10 years :).
By the way, this interface is available on most monitors (even the newest ones), and on many laptop models. Manufacturers, behind the scenes, still support this popular standard.
Rice. 4. VGA interface
On sale today you can find many adapters connected to the VGA port: VGA-DVI, VGA-HDMI, etc.
DVI
Quite a popular interface. I should immediately note that it is not found on modern laptops, but on PCs it is (most monitors also have it).
DVI has several varieties:
- DVI-A - used to transmit only an analog signal;
- DVI-I - for transmitting analog and digital signals. The most popular type on monitors;
- DVI-D - for transmitting a digital signal.
Important! The sizes of the connectors and their configuration are compatible with each other; the only difference is in the contacts involved. By the way, please note that next to the port, it usually always indicates what type of DVI your equipment has.
Self-test mode
Self-testing of the display is necessary in order to check its functionality before connecting to the system. To start this mode, you need to supply power to the backlight and voltage to the controller. This can be done using a 10 or 50 kOhm potentiometer or multimeter by connecting the following contacts:
- VSS and grounding;
- VDD and 5V power supply;
- V0 and potentiometer;
- A and 5V power supply;
- K and ground.
Once the circuit is connected, the entire top line of the display should light up as solid dark rectangles. If this happens, the LCD 1602 is fine; if not, either the contrast is not adjusted or the device does not work. You can adjust the screen contrast using the potentiometer by turning its knob.
How to choose a cable and adapters for connection
To begin with, I recommend inspecting both the laptop and the monitor to determine what interfaces they have. For example, my laptop only has one HDMI interface (so there's really no choice).
Rice. 6. HDMI port
The connected monitor had only VGA and DVI interfaces. What’s interesting is that the monitor doesn’t seem to be “pre-revolutionary”, and there was no HDMI interface on it...
Rice. 7. Monitor: VGA and DVI
In this case, 2 cables were needed (Fig. 7, 8): one HDMI, 2 m long, the other - an adapter from DVI to HDMI (in fact, there are quite a lot of such adapters. By the way, there are universal ones that provide all kinds of interfaces for connecting one to another).
Rice. 8. HDMI cable
Rice. 8. DVI to HDMI adapter
Thus, having a pair of such cables, you can connect your laptop to almost any monitor: old, new, etc.
Description of the I2C protocol
Before discussing connecting the display to Arduino via an i2c adapter, let's briefly talk about the i2C protocol itself.
I2C / IIC (Inter-Integrated Circuit) is a protocol originally created to communicate integrated circuits within an electronic device. The development belongs to Philips. The i2c protocol is based on the use of an 8-bit bus, which is needed to communicate blocks in control electronics, and an addressing system, thanks to which you can communicate over the same wires with several devices. We simply transfer data to one or another device, adding the identifier of the desired element to the data packets.
The simplest I2C circuit may contain one master device (most often an Arduino microcontroller) and several slaves (for example, an LCD display). Each device has an address in the range from 7 to 127. There should not be two devices with the same address in the same circuit.
The Arduino board supports i2c in hardware. You can use pins A4 and A5 to connect devices using this protocol.
There are several advantages to I2C operation:
- Operation requires only 2 lines - SDA (data line) and SCL (sync line).
- Connecting a large number of leading devices.
- Reduced development time.
- Only one microcontroller is required to control the entire set of devices.
- The possible number of microcircuits connected to one bus is limited only by the maximum capacity.
- High degree of data security due to a special surge suppression filter built into the circuits.
- A simple procedure for diagnosing emerging failures and quickly debugging faults.
- The bus is already integrated into the Arduino itself, so there is no need to develop an additional bus interface.
Flaws:
- There is a capacitive limit on the line - 400 pF.
- Difficult to program an I2C controller if there are several different devices on the bus.
- With a large number of devices, it becomes difficult to isolate a fault if one of them erroneously goes low.
2. Connecting a monitor via HDMI to a laptop (computer)
In principle, when connecting a monitor to a laptop or desktop computer, you won’t see much of a difference. Everywhere the same principle of action, the same actions.
By the way, we will assume that you have already chosen the cable for connection (see article above).
1) Turn off the laptop and monitor.
By the way, many neglect this action, but in vain. Despite this seemingly banal advice, it can save your equipment from damage. For example, I have encountered several cases where a laptop’s video card failed due to the fact that they tried to connect them “hot” with an HDMI cable without turning off the laptop and TV. Apparently, in some cases, residual electricity “struck” and disabled the iron. Although, a regular monitor and a TV are still slightly different equipment :). But still…
2) Connect the cable to the HDMI ports of your laptop or monitor.
Then everything is simple - you need to connect the monitor and laptop ports with a cable. If the cable was chosen correctly (use adapters if necessary), then there should be no problems.
Rice. 9. Connecting the cable to the HDMI port of the laptop
3) Turn on the monitor, laptop.
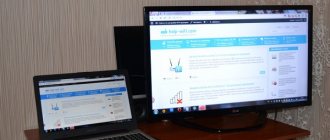
When everything is connected, turn on the laptop and monitor and wait for Windows to load. Usually, by default, the same picture appears on the connected additional monitor as is displayed on your main screen (see Fig. 10). At least, this is what happens even on new Intel HD cards (on Nvidia and AMD the picture is similar; you almost never have to go into driver settings). The picture on the second monitor can be corrected, more on this in the article below...
Rice. 10. An additional monitor (left) is connected to the laptop.
Library liquidcrystal.h
By default, when connecting the LCD 1602 display to Arduino projects, the standard LiquidCrystal.h library is used. It is designed specifically for LCD screens based on the HD44780 chip and handles data processing well on both 4-bit and 8-bit connections. The library controls cursor behavior (movement, visibility, blinking), information output, display clearing, output order (left to right or right to left), and character offset.
When using an I2C adapter, it is recommended to use the LiquidCrystal_I2C.h and Wire.h libraries together. They can be included in the Arduino IDE software package by default, and can also be downloaded additionally.
You can connect new libraries directly in the Arduino interface by sequentially selecting the following menu items:
- sketch;
- connect the library;
- manage libraries.
After connecting, you can run the example program code from the library kit and thus check the correct operation of the module. The standard way of checking is to display the inscription “Hello, Word”.
3. Setting up a second monitor. Types of projection
A connected second monitor can be “made” to work in different ways. For example, it can display the same thing as the main one, or maybe something else.
To configure this moment, right-click anywhere on the desktop and select “Display Settings” in the context menu (if you have Windows 7, then “Screen Resolution”). Next, in the parameters, select the projection method (more on this later in the article).
Rice. 11. Windows 10 - Screen settings (In Windows 7 - screen resolution).
An even simpler option would be to use special keys on the keyboard (if you have a laptop, of course) - . Typically, a screen will be drawn on one of the function keys. For example, on my keyboard it is the F8 key; it must be pressed simultaneously with the FN key (see Fig. 12).
Rice. 12. Calling the second screen settings.
Next, a window with projection settings should appear. There are only 4 options:
- Computer screen only. In this case, only one main screen of the laptop (PC) will work, and the second one, which is connected, will be turned off;
- Repetitive (see Fig. 10) . The image on both monitors will be the same. It is convenient, for example, when the same thing is displayed on a large monitor as on a small laptop monitor when presenting some kind of presentation (for example);
- Expand (see Fig. 14). Quite a popular projection option. In this case, your workspace will increase, and you will be able to move your mouse from the desktop of one screen to another. It’s very convenient, you can watch a movie on one and work on the other (as in Fig. 14).
- Second screen only. In this case, the main laptop screen will be turned off, and you will work on the connected one (in some form analogous to the first option).
Rice. 13. Projection (second screen). Windows 10
Rice. 14. Expand the screen to 2 monitors
The connection process is now complete. I would be grateful for additions on the topic. Good luck to all!
It’s not that everything was better before, but it was definitely simpler. The abbreviation HDMI stands for High Definition Multimedia Interface, that is, a high-definition multimedia interface.
By connecting a monitor via HDMI, you may find that the image is very blurry and does not occupy the entire area of the screen—there are black bars (margins) at the edges and lacks the required clarity. Moreover, we see this picture both during boot, and in the BIOS, and in Windows.
First of all, we make sure that the HMDI cable is in good condition and its length should not exceed 5 m.
Disable auto-scaling on the monitor. You may have to select the “Fit to screen” option in the monitor menu.
If your computer has a video card, built-in or external, AMD Radeon, then we try to correct the image using the AMD Vision Control Center (Catalyst Control Center) drivers. Find the “My Digital Flat-Panel” item and select the “Scaling Options” sub-item.
A slider will appear that needs to be moved to zero.
The image should now return to normal. When updating or reinstalling drivers, you will have to repeat the procedure.
If you have a video card from Nvidia, then you need to launch the Nvidia Control Center (Nvidia Control Panel) by clicking on the tray icon or right-clicking on the desktop and selecting the appropriate item.
Next, in the menu on the left, select “Adjust desktop size and position” (adjusting the size and position of the screen) and set “Overscan” to the “Do not scaling” position.
When connecting the TV to the computer, the TV and computer must be turned off, only then connect the HDMI cable. Turn on the TV first, then the computer. Switch the TV to display the signal via HDMI.
Modern flat screens are capable of displaying images without distortion over the entire surface, including the edges. Yet many TVs use what's called Overscan technology: the image is electronically enlarged by about 5% and cropped at the edges so that LCD and plasma TVs show the same portion of the image as CRTs.
As a result, the number of pixels of the video card and the screen do not always match - the sharpness of the image deteriorates. In this case, even the Windows “Taskbar” may end up in an invisible part of the screen.
Most TVs allow you to turn off this magnification. On some models this function is called “Underscan”, on others “Only Scan” or “Pixel for Pixel”.
But it also happens that the Overscan function is always active when connected via HDMI and DVI. Many graphics cards smooth out this, making the overall image smaller. In this case, the entire Windows “Desktop” fits on the screen, but, unfortunately, pixel-accurate image transmission is impossible. Thus, TVs with a switchable Overscan function are more preferable.
If you don't have a monitor connected to your computer, you may see that the resolution on your TV does not match the screen or will remain black. Additionally, connect to the system unit via a VGA or DVI monitor. It will show the image and this will allow you to configure the correct resolution for the TV in the video card driver.
Finally, if the previous options did not help, try connecting the TV via a DVI -> HDMI to DVI adapter of the video card, but the sound will have to be connected via a separate cable to the TV or output from the computer to speakers.
Main characteristics of lcd 1602
This 16x2 character LCD display is one of the inexpensive, simple and yet popular monitors for displaying lines with different backlights. It runs on the HD44780 controller from Hitachi, is equipped with 16 outputs and uses an 8-bit Parallel Interface.
Below are the main characteristics of the LCD 1602 display:
- size – 80×36 mm;
- LED lights;
- 6 required ports out of 16 with a standard connection to Arduino;
- ST7066U and ST7065S chips;
- operates at temperatures from -20°C to +70°C;
- power supply - 5V;
- viewing angle - 180°C;
- 2 output lines of 16 characters each;
- size of 1 character – 4.35×2.95 mm;
- dot size - 0.5×0.5 mm;
- The LiquidCrystal library is used as standard.
The display can be used with different sets of libraries, which are available free of charge. If the necessary symbols are not available in the controller’s memory, you can create them yourself.
Connecting a TV via HDMI in Windows 10
1. Make sure your computer and TV are turned off.
1. Connect one end of the HDMI cable to the TV in the HDMI connector, the other to a laptop or desktop computer.
2. Turn on both devices.
3. On the TV you need to select the signal source. There should be a special button on the remote control, usually it is labeled INPUT or SOURCES or HDMI (see the instructions for the TV). Click on it and select the HDMI connector to which you connected the cable as the source.
4. On the computer, press the [Win]+[P] keys simultaneously.5. In the “Project” window that appears, select the projection type, depending on your preference: - Computer screen only (Display desktop only on the first screen) - Repeated (Duplicate screens) - Expand (Extend screens) - Second screen only (Display desktop only to the second screen).
You may need to adjust (change) the screen resolution on your computer to a resolution that your TV supports (see your TV manual). If you do not synchronize image extensions on the monitor and TV, then on one of the devices it may turn out to be cropped.
6. Confirm the changed parameters “Apply” - “Save changes” - “OK”
7. To properly connect sound, you need to right-click on the computer the sound adjustment icon on the taskbar (notification area - tray) and select “Playback devices”.
Installation of updates fails in Windows 10
When you try to install updates from Windows 10 Update, you may receive a message: "Updates failed with errors: 0x80073701, 0x800f0988."
Intel Graphics Windows 10 Driver Package DCH 26.20.100.7463
On November 14, 2022, Intel introduced graphics driver package version DCH 26.20.100.7463 for 64-bit Windows 10 systems.
AMD Radeon Software Adrenalin Edition Driver 19.11.2
AMD Radeon Software Adrenalin Edition Driver 19.11.2 includes support for the new Star Wars Jedi: Fallen Order.
Skype - version 8.54
Skype version 8.54 has received a number of improvements in terms of translating conversations into different languages.
Windows 10 Cumulative Update 1903 KB4524570
On November 12, 2022, Microsoft released cumulative update Windows 10 Build 18363.476 (KB4524570) for Windows 10 May 2019 Update (version 1903) and Windows Server 2022 (1903).
© 2000-2019
- 312 530
- Author: admin
- Date: 07/20/2013
- How to connect a TV to a computer via HDMI, but so that the image is duplicated on the computer monitor, in other words, the image needs to be on both the monitor and the TV? I have a large collection of films and cartoons on my computer, including digital high-definition Blu-ray and HD formats. I really want to watch all these films on my new TV. The TV is in another room. How to do this and how long should the HDMI cable be? I seem to be connecting everything correctly, the computer is connected to the TV using an HDMI cable, and to the monitor via a DVI cable. There is an image on the monitor, but not on the TV, only the inscription on the black screen “Cable not connected” “Check cable connections and source parameter.” Your articles How to connect a laptop to a TV via HDMI and How to connect an Acer laptop to a Philips TV, How to connect a SONY laptop to a TV via HDMI, How to connect a laptop to a Toshiba TV I read, I do everything as written in them. In the TV settings, I select HDMI from the list of all available video sources, but there is still no image from the computer. Dmitriy.
- Hello Admin, in short, this is the case: I bought a new TV with a screen resolution of 1920x1080, connected the TV (as a second monitor) to the computer via HDMI, everything is basically fine, there is a picture on the TV, but I can’t set the resolution correctly on the monitor. The computer monitor does not support the maximum TV resolution of 1920x1080. The maximum that can be set on my monitor is 1280x1024. Therefore, on the TV the resolution is normal 1920x1080, but on the computer monitor everything is a little flattened. In principle, the resolution on the monitor is not important to me, the most important thing is that everything is fine on a large TV, but still, maybe there is some solution to the problem?
- Maybe you can help me, I have a simple system unit with a video card with an HDMI output and a TV with an HDMI input. I sometimes want to use the TV instead of a monitor, but many people do this, for example, to watch movies, of which I have a lot. I really want to watch all these films on my TV, but I can’t, or rather it works, but not quite. When I connect the TV to my computer via HDMI
, there is no sound, but the picture is very good. The operating system is Windows 7, I tried several HDMI cables, maybe it’s not them, but the operating system settings?
5Creating your own characters for the LCD display
Let's take a closer look at the issue of creating your own symbols for LCD screens. Each character on the screen consists of 35 dots: 5 wide and 7 high (+1 reserve line for underlining). In line 6 of the above sketch we define an array of 7 numbers: {0x0, 0xa, 0x1f, 0x1f, 0xe, 0x4, 0x0}
.
Let's convert hexadecimal numbers to binary: {00000, 01010, 11111, 11111, 01110, 00100, 00000}
.
These numbers are nothing more than bit masks for each of the 7 lines of the symbol, where “0” denotes a light point and “1” a dark point. For example, a heart symbol specified as a bitmask will appear on the screen as shown in the figure. Creating your own symbol for the LCD screen
HDMI input location on PC
In view of all the above advantages, a large number of people strive to connect a TV or monitor via HDMI to a computer. This is where the first problem arises: not everyone knows where this interface is located on a PC. The answer is quite simple: on the back panel of the system unit . It is located on the video card, next to one of several additional interfaces for a similar purpose:
For clarity, you can turn your attention to the photo.
How to make an HDMI output on a computer if it is missing
There are situations when there is no HDMI interface on the rear panel of the system unit. This is primarily due to the age of the video card. On earlier models this connector was completely absent.
If you have an outdated video card, but you really need this input , there are two outputs on how to make HDMI on a computer:
- Change the video card to a more modern one . This will require financial investments, and significant ones at that, since a brand new video card (especially gaming analogues) cost quite a lot.
- Choose an adapter from your interface to HDMI . This can be done either in a computer parts store or via the Internet. In this case, the investment amount will be significantly lower.
Choose the option that suits you best.