Every Android device has two types of memory.
- The first type is a version of the internal memory of the device itself, the so-called ROM, its size can be easily changed: made much larger by inserting a special small card (microSD) into the slot; as a rule, such space expansions are intended for storing files with music, video , images, etc.
- The second type is memory used by programs for a certain time, also called random access memory or RAM. The size of this memory on the phone does not change.
You can increase the internal memory on an Android device using several methods, the most common and simple ones:
- Basic manual cleaning of all unused software: uninstalling programs, deleting files.
- Introducing a micro SD card into a smartphone.
Two ways to analyze program size
It should be clearly understood that the memory on almost all Android gadgets can be:
- Internal memory of the device itself.
- When it is expanded in various ways, it becomes an external option.
- Fast or random access memory for urgent data processing by the processor.
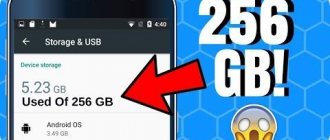
If an unpleasant situation arises, when at the time of installing a utility the installation process does not start due to insufficient space, there is a quick solution to the problem. If your phone does not have built-in maps or other features, you just need to find the application manager in the settings menu, by entering it it will be easy to find out which of the running programs are the most voracious.
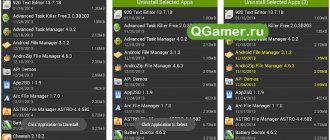
Not all gadgets with Android OS allow you to use the device itself to control everything that is installed - to analyze the space occupied by each file or folder. A third-party application, DiskUsage, can come to the rescue; by installing it, detailed information about all the contents of folders on your smartphone will be available.
This utility will allow you to get to the most invisible folder sections using standard methods, and detect cached data of some applications, which can be terrifying in size. Using the program is so easy that a person with any level of training can do it - everything is intuitive.
Reset to factory settings
A device reset is used after checking all available removal methods.
When returning to factory settings, Android smartphones erase all information located in the built-in memory. To save and restore user content, it is recommended to create a backup copy. Many users prefer to limit their use of this method, because restoring from a backup does not always ensure the safety of text messages or achievements in gaming applications. However, this method allows you to speed up the response when starting the software.
Android 5
It is recommended to carefully study the forum with topics on manually cleaning a smartphone after the user decides to independently clean the OS from the accumulation of information. If you carelessly delete system data, the smartphone may stop functioning, then a trip to a repair shop is inevitable.
Clearing the program cache
Temporary cached application data can take up incredibly large amounts of space.
To free up space from these files, do the following:
- Go to the phone settings menu and enter the section with all applications.
- Among the installed programs, touch the inscription of the desired program.
- Next, find out the amount of space it occupies in the memory storage.
- And by clicking on the clear cache button, you can rid your smartphone of unnecessary files.
Causes
Let’s immediately figure out why Honor is constantly running out of memory. There are two situations here:
- The phone is really dirty and needs cleaning.
- The mobile device has no unnecessary applications, but it still complains about the lack of memory.
In the first case, the following reasons are highlighted why there is not enough memory on the Honor 4c or devices of other models. This may be due to the following problems:
- temporary malfunctions in the operation of the Honor 7a PRO smartphone;
- cache contamination;
- a large volume of applications or unnecessary files. You may have gone overboard with app cloning;
- Device RAM is full.
In a situation where your Honor 7a is constantly running out of memory, start by cleaning the device. If everything unnecessary is removed, but the smartphone still complains about lack of space, the reason may be a system settings failure. To solve the problem, a factory reset may be required, but we will discuss this issue in more detail below.
How to transfer individual programs to a memory card?
Using the manager for managing applications on Android, you can move almost any program to an external card in order to save space on the memory of the device itself, while keeping the program in working order. I note that quite a lot of space will be freed up after such an operation - after all, the transferred application will be followed by the entire cache, which can be quite large.
After the release of Android Marshmallow, this transfer procedure became much easier. Formatting an external card for internal storage will be enough for programs to function on it as on a regular partition of a smartphone.
I recommend using the FolderMount utility to easily mount directories from your phone to an expansion card. The program operates on Android version 4.2.1 and later, and also has support for multi-user mode. But for it to work, you need to run root rights on the phone, read about it further.
When installing any program on a phone or tablet, it will be installed by default on the partition located on the device itself, despite the fact that there may be an external memory card. On Android gadgets with version 2.2, a choice of program location was introduced when installing it.
However, starting with version 4.4 of this operating system, it became impossible to change the installation location with one click. But the possibility of transfer remains. Here's how it's done:
- After inserting the micro SD into its slot, you will need to format it.
- By pressing special key combinations, activate Recovery mode on your phone. Combination options will vary depending on the brand of smartphone. For example, on Nexus you need to press the sound key to minus and to the one that is responsible for turning it on and off.
- Then go into advanced settings and select the Partition SD Card tool.
- Then create the EXT partition.
- Set the Swap partition size to “0”.
- Then you should leave this settings menu and reboot your smartphone.
The newly created partition on the SD card is suitable for installing any program.
Advantages and disadvantages
Strengths of memory expansion:
- Extra space . The ability to unload the internal partition by moving data and/or applications to a microSD card.
- Safety . The information on the microSD card is encrypted, which prevents access to important information by unauthorized users.
- Increased work speed . A high-performance microSD card increases device performance by 5-10% or more.
Weaknesses of memory expansion:
- Reduced operating speed . Low-quality and slow microSD drives degrade the phone's performance. Applications may not work or may be unstable.
- Possibility of information loss . Problems with your mobile device or memory card can result in the loss of important data. Therefore, it is important to back up frequently.
- Linking a microSD card to one device . After combining, the microSD drive cannot be read and does not work with other devices without formatting.
Getting rid of some system programs
I do not recommend deleting all programs related to the functioning of the system. However, some of them can be uninstalled. Getting rid of unused programs will free your smartphone from unnecessary load and reduce the rate of battery drain.
Not everything is so simple here, for example, for those who do not use email from Google, they do not need to have the Gmail program pre-installed. But try to remove it - nothing will work.
To remove such “persistent” programs, you can use one of the options:
- Install a program that will help you remove a lot of things on Android.
- Activate root rights on your phone - this will open up the ability to uninstall any system applications.
One of the most common ways to obtain superuser rights on Android is to use the capabilities of the KingRoot utility. Here's how to use this popular app:
- You need to download KingRoot from the official website kingrootapp.net and install it.
- Open the program.
- If the inscription “Try to root” appears, then there are no problems, all you have to do is click on these words.
- You will have to wait patiently for some time until root rights are activated.
But not in all cases this operation is successful. After an unsuccessful attempt, you can try installing the KingRoot for PC version on your computer. I will list the action items in order:
- Log in to the website of this program on your PC and download the KingRoot installation file to your computer. Perform installation.
- After connecting your device to the system unit with a USB cable, launch KingRoot, which will automatically “see” the desired device.
- A window will appear on the smartphone display asking you to give permission to debug using a USB cable. Be sure to allow this action by clicking on “OK” - without this the process will not advance further.
- Next, in the utility window on your PC, you will need to click on “ROOT” and that’s it – superuser rights on the device will be activated.
- On some brands of phones you will need to restart - a corresponding message should appear asking you to click on “OK” for the reboot to occur.
- If a restart is not required, the long-awaited “Finish” message will appear in the application on the computer - clicking on it will end everything.
The obtained root rights will allow you to do anything with any applications. It will be possible to remove system programs in the usual way.
KingRoot has many analogues. I will list them, maybe someone will find it useful:
- Towelroot.
- Root Genius.
- WeakSauce.
- IRoot.
- Framaroot.
- Kingoapp.
- UniversalAndroot.
- Vroot.
Many of these programs can also easily provide root rights.
It is worth mentioning another way to get rid of the unwanted presence of unused applications using the Super Cleaner utility. This brainchild of the famous application developer Hawk App Studio appeared not so long ago - in 2022.
Using Super Cleaner is very simple, but first you need to download it to your device from Google Play: https://play.google.com/store/apps/details?id=com.apps.go.clean.boost.master.
- Find the section in it responsible for uninstallation.
- Those programs that can be eliminated without affecting the operation of the system will be indicated. Those that cannot be deleted will also be marked.
- Next, you need to select the required application and delete it.
There are also similar programs, the principle of using them is identical - you should find the partition with the installed software and remove everything unnecessary. These are the analogues:
- CCleaner.
- Clean My Android.
- DU Speed Booster.
- Clean Master Lite.
The latest Clean Master Lite program is also a popular cleaner for Android mobile phones. It has many useful settings for automatically and manually clearing your phone's memory. In addition, it is extremely easy to use.
- First, you need to download it from the Google Play page: https://play.google.com/store/apps/details?id=com.cleanmaster.mguard&hl=ru.
- After launching it, use the “Garbage” button, which you need to click on.
- Wait until the program determines the number of files to delete. To get a system clean of all unnecessary things, all you have to do is click on the word “Clean”.
Check your device's compatibility
Before using the ROEHSOFT RAM Expander application, you should check your device for compatibility. Download the MemoryInfo & Swapfile Check app. Launch this application and give it superuser rights. Then click on the icon that says “Start ramexpander test” at the bottom of the screen. Select the option you need - “SD card” or “Ext. SD card." Then click on “Show result”. If the display shows “Congratulations,” your device is compatible with the RAM expander app.
Use the MemoryInfo & Swapfile Check app to find out if your device's firmware is compatible
Cloud service capabilities
Using remote storage for various types of files can greatly relieve the load on your mobile phone’s memory. Using the advanced settings of these services, you can immediately send images, video content and music there. For example, the well-known Dropbox service allows you to configure what type of files will be immediately uploaded to storage.
Modern cloud storage services are improving their capabilities, being able to clear the phone of files that are already stored on them. The most convenient and advanced services include Microsoft OneDrive, which provides customers with 5 GB upon connection and an additional 1 TB if you subscribe to Office365.
It would not be amiss to mention such popular storages as Yandex.Disk, Google Drive, Box.
Summarizing
These were the three easiest ways to add memory. Smart programmers will say that any smartphone has some hidden area of permanent memory, which is reserved by the operating system for its needs. Theoretically, part of this volume could be unlocked. However, this is too difficult; root rights and skillful operation of the computer are required. And not all smartphones can pull off such a trick, not to mention the meager amount of this amount of memory. It's much easier to use a microSD card or a good old USB flash drive.
Use swap file
Adjusting the size of the paging file will also help increase the internal memory of the device with applications and OS services. The so-called paging file exists to back up the RAM if it suddenly runs out. There are many programs that will help you create such a file.
One of these utilities is ROEHSOFT RAMEXPANDER. First you need to download it from Google Play: https://play.google.com/store/apps/details?id=com.swapit.expander.de&hl=ru/.
- By moving the slider in the running utility, determine what size the swap file will be.
- Click on the Swap activation sign.
- Wait for the operation to complete.
After this, along with other system files, another one will work - called the paging file.
Expanding Android memory using an SD card
Happy owners of Android devices with version 5.1 and later have a unique opportunity to increase the device memory using Micro SD. And this is perhaps the only type of memory that can be expanded. This can be done through the menu or terminal.
To do this through the menu, you need to back up your data from Micro SD to your computer. Next, go through “Settings” to “Storage” or “Storage”. Select “SD card” and go to additional settings. In the new window, you need to click on the “Connect to internal memory” item.
Note! To expand via the terminal, you need to download the ABD utility. The application is free, available in the Android market.
Of course, the question of the volume of RAM and permanent storage, as well as the expansion of the system memory of Android devices, is very relevant. And many users sooner or later encounter this problem. But by using the above methods and recommendations, everyone will easily cope with the task and will again be able to delight themselves with the extensive capabilities of their devices. The main thing is not to forget about regular garbage disposal and monitor the state of the internal and RAM memory of your favorite gadget.
Another way to add memory
We install the MiniToolPartitionWizardHomeEdition program on the computer, connect the phone’s memory card to the computer via a card reader. Open the program and find our memory card in it, delete the card section (select Delete in the pop-up context menu).
Next, use the Create button to divide the map into two parts. What does this mean: two sections will be created on the card, independent from each other, one of which will be perceived by the phone as internal memory, the other as a memory card for photos, music and your other personal data.
So, we create partitions, in the system they are called FAT. If the card is capacious, it is better to select FAT32 formatting (for cards from 4 gigabytes of memory). If the flash drive is small, FAT will do. The first partition is created for your files; you can name it as convenient, and also set the size. Remember that this section is NOT for expanding memory, so the more it weighs, the less space there will be on the card.
The second section is created from what is left of the map. It's called EXT2.
Note: This section cannot be more than 2/3 of the total capacity of the memory card. Typically, on high-capacity cards, 512 megabytes are left for it.
When the card is broken, install the UnlockRootPro program on the computer. At the same time, we install TotalCommanderforAndroid on the phone. We insert the card into the phone and launch Commander.
Select the Settings item and enter the words com.android.settings:.DevelopmentSettings in the com.android.settings:.Settings line. An icon will appear at the bottom of the screen that was not there before. This is the Development icon. Launch Development and connect the device to the computer via a USB cable. Launch the UnlockRootPro program on your computer.
The process of obtaining root rights, that is, administrator rights, will begin on the phone. When the phone reboots, it is ready to use the increased internal memory.
Another tip for using such a “broken” memory card is to not store files that you use frequently on it.
How to increase your RAM while rooted
In this part, we will talk about how to increase the amount of RAM if your device has root rights. The trick in this case is to create an additional partition on your SD card, which will then act as a secondary source of RAM. To perform the necessary actions we will use the ROEHSOFT RAM Expander (SWAP) application.
This description of this application can be seen in the Play Store:
- Clearing SD card memory to use as RAM;
- The maximum size of a RAM SWAP file is up to 4 GB (system limitation);
- No restrictions on the SWAP section;
- The performance penalty from memory paging may not occur with a Class 8 (or higher) SD card;
- Widget for quick turn on. and off SWAP;
- Detailed information and memory analysis;
- Autostart;
- Configuring swap kernel parameters;
- Easy to use and 1-click optimization;
- Supports all Android devices that have root rights and are compatible with the SWAP kernel.
You will need a minimum class 4 SD card, but for better results use a higher class card.
External memory expanders
You can connect a rather large drive via a USB connection, which will solve the problem of lack of memory instantly. To connect, use an OTG adapter: it is included in many mobile phones, you can buy it - it is inexpensive.
There is a more convenient alternative to such an external expander - an OTG flash drive with a USB Type-C connector - easy to connect to a mobile phone. A special USB Type-A plug allows you to connect the device to the PC system unit without any difficulty.
This compact storage device will be convenient for travel. Somewhere for 2500 rubles. You can buy such a thing with a capacity of 128 GB - an indispensable thing for movie lovers. You won’t have to worry about free phone memory at all, and you won’t have to take a laptop with you – you’ll be able to work on your mobile phone outside the home.
Disks such as SSD or HDD when connected to a smartphone can create great difficulties for the functioning of the USB port of the mobile phone. Here, before purchasing, you need to check everything in advance for compatibility.
You should also remember the need to format such drives in FAT32 or NTFS, due to the fact that via a USB cable the smartphone will only function with such file systems, despite the fact that it can work with memory cards with exFAT.
Requirements for increasing memory
For stable operation of combined drives, it is important to use a high-quality, reliable and productive MicroSD card. Otherwise, the speed of the device will decrease, freezes will appear, and applications will not start or will begin to close during operation.
The most universal and balanced solution is a card with speed class A1. Such a drive provides a minimum write speed of 10 MB, and the number of data input and output operations is 500 and 1500 IOPS, respectively. The card is suitable for storing data, recording and playing videos, as well as launching applications. A similar card with speed class A2 will increase the data writing speed, as well as the number of data input and output operations to 2000 and 4000 IOPS, respectively.
Write and read speed of sandisk ultra SDSQUAR-032G-GN6IA memory card.
Sandisk ultra SDSQUAR-032G-GN6IA memory card input and output speed.
For tasks with cyclic data rewriting, it is worth considering cards of the Endurance or High Endurance class. Such drives have a longer working life and are less suitable for running games and applications.
Speed of the SanDisk High Endurance SDSDQQ-032G-G46A memory card.
SanDisk High Endurance SDSDQQ-032G-G46A memory card input and output speed.