Since a PC is purchased every few years and its components are periodically replaced, the software and hardware components sometimes do not match each other well. The PC itself may be quite old, but you've equipped it with a modern SSD. Windows 10 has been available for several years now, but you still prefer the usual “seven”.
In addition to such things that are noticeable to everyone, such as processor performance and software interface, there are significant characteristics that begin to be of interest only in cases where they cause failures.
These include the format of HDD or SSD partition tables. You may not have heard of the existence of a drive characteristic that has unexpectedly upset you, preventing you from installing Windows 7, 10 or 8.
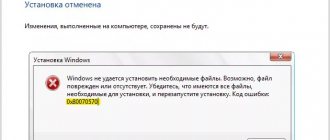
The PC says that Windows cannot be installed. Reason: The disk partition table is GPT or MBR. Alas, technologies of the past are not always “friendly” with modern ones. Fortunately, this is easy to fix.
Present (UEFI and GPT) and past (BIOS and MBR)
Previously, the PC motherboard was equipped with BIOS software. It carried out diagnostics and analysis of the hardware, and then loaded the OS, relying on the boot record of the MBR partition.
In more modern models, the role of BIOS is performed by UEFI. Loads faster and supports:
- Secure boot.
- HDDs encrypted at the hardware level.
- UEFI Drivers.
- GPT disks.
- Installing Windows 10 on an MBR and GPT disk with BIOS or UEFI
GPT is superior to MBR in important ways:
- Works with larger HDDs.
- More partitions on HDD.
Which “format” is better for SSD and HDD
With all the advantages of GPT markup, it is difficult to use modern technology on some computers. At the same time, when the motherboard supports Legacy BIOS Boot Mode or UEFI Boot Mode, you should abandon the BIOS.
But if the user is still dealing with Windows XP, then even if he wants to, he will not be able to boot from a GPT disk. Otherwise, use a protective MBR.
As you can see, modern markup greatly outperforms its opponent, MBR.
Otherwise, if the opportunity allows, it is advisable to switch to the GPT structure. As a result, computer performance will improve significantly. Programs will also launch faster. In addition, the user will not have to face many problems.
Selecting a method
Still try to install the system on an “incompatible HDD” or convert it to MBR and thereby make sure that the error no longer appears. In each case, the decision depends on a number of factors:
- For an old PC with an old-fashioned BIOS and a 32-bit processor, the optimal solution is to convert GPT to MBR.
- For PC owners with a 64-bit processor and UEFI, it is preferable to install the system on a GPT disk.
Remember:
- The maximum size of an MBR disk is 2 terabytes.
- It is difficult to create more than four partitions on an MBR disk.
Most often it is impossible to install Windows 7
Difficulties with installing the system on a GPT disk are more likely to occur among users who prefer Windows 7.
To install Windows on a disk with a GPT partition style, two conditions must be met:
- 64-bit OS.
- Boot in EFI mode.
I assume that you are installing a 64-bit version of Windows. This means that the error message appears because the second requirement is not met.
It is possible that changing the BIOS settings will be enough. Enter it by pressing the key provided for this. You will see which key to press as your computer boots. In laptops, F2 is most often used, in desktop models - Delete.
Change the CSM (Compatibility Support Mode) boot to UEFI.
- Can't install Windows on a GPT or MBR disk. We fix it
Look in the sections “BIOS Setup”, “BIOS Features” or similar ones. In AHCI, define the mode as SATA, not IDE.
For the seventh (and even older) versions of Windows, you also need to turn off Secure Boot.
The BIOS of your computer model may look different. Menu item names may also be different. But the meaning always remains.
After you change and save the new BIOS settings, you will be able to install the system on a GPT disk. If you are installing the OS from a DVD, then the error message will most likely not appear when you try to install again.
If installing from a USB storage device, the message may appear again. In this situation, you need to recreate the installation flash drive so that it supports UEFI boot.
If the drive supports two boot methods, delete the “bootmgr” file in the root directory of the flash drive. This will prevent you from booting in BIOS mode. If you need to boot in BIOS mode, delete the "efi" directory. Do not do this in cases where there is even the slightest doubt. The distribution may be damaged.
Which disk partition style should I choose for Windows 10?
If during the installation of Windows 10, the selected disk displays an error regarding the correct choice of the style of device partitions, you should first determine the current version of volumes for your PC. There are two ways to determine:
- If you have a new computer with a UEFI interface, then when you enter the BIOS settings you can control the mouse, not just the keyboard. The GUI is colored rather than blue with white lettering. In this case, you need to correctly install Windows 10 on a GPT disk.
- If your computer is old and you have changed components a long time ago, the BIOS has a standard blue interface, you will need to convert the GPT style to MBR, and only after that will it be possible to install Windows 10 on your hard drive.
Installing Windows 10 on a GPT disk with UEFI interface
Installing Windows 10 on a GPT disk is a complex process. To implement it, you need to adhere to two recommendations, namely:
- Boot in EFI mode;
- Installing a 64-bit version of the system.
To fulfill the first condition, you need to make changes to the BIOS UEFI settings. To do this, restart the PC and continuously press “F2” or “Del” (there may be other keys, depending on the motherboard model). Next, we follow the following recommendations:
- Go to the BIOS Features or BIOS Setup section. We set it to boot from UEFI, not from CSM.
- In SATA mode, we specify the AHCI environment instead of IDE. This setting is usually found in the Peripherals section.
- Save the changes and restart the computer.
Once you have saved all the changes, your computer will be ready to install Windows 10 and format the partitions. By performing this process from disk, there is a low chance of an error occurring. If you use a drive for this purpose, it is worth recording the image again so that it supports the UEFI interface.
IMPORTANT! You can create a flash drive with an image in UEFI only for 64-bit versions of operating systems.
You can create such a flash drive using the command line with Administrator rights. To do this, perform the following steps. Press “Win+R” and enter “cmd”.
Next, enter the commands:
Select the flash drive on which the image of the dozen will be written. We write the following commands one by one:
- select disk N
- clean
- create partition primary
- format fs=fat32 quick
- active
- assign
- list volume
- exit
After completing these steps, you need to mount the ISO image on the system by clicking on the file and selecting “Mount”. Next, select the contents of the virtual disk and send it to the flash drive.
Now install Windows 10 from a flash drive or disk.
How to Convert GPT to MBR for Windows 10 Installation
If installing Windows 10 and formatting partitions fails due to GPT style mismatch, you need to convert the non-UEFI drive to MBR.
At the stage of selecting partitions when installing the operating system, you should perform the following steps:
- Press “Shift+F10”. A command prompt will open. Type “diskpart” and then “list disk” to display a list of connected disks.
- Next, enter select disk N, where N is the number of the disk that needs to be converted.
- To clean the hard drive completely, enter “clean”. If you want to delete only partitions, use the commands “detail disk”, then “select volume” and “delete volume”.
- To convert, enter “convert mbr”.
- To complete, enter “exite”.
If you converted partitions at the disk setup stage, you need to click the “Update” button. Further installation on the MBR will start as usual and the error will not recur.
Convert GPT to MBR
If you have a PC with a classic BIOS and are going to install Windows 7, this option will be the best (and perhaps the only one). During the conversion process, all information from the drive will be deleted.
- GPT or MBR - what is it, which technology is better and what to choose?
While the OS Installation Wizard is running, press F10 and Shift. In some laptop models - F10, Fn and Shift. In the command line that opens, enter the following commands sequentially:
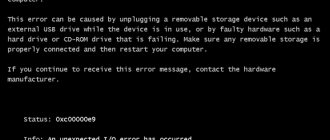
It is impossible to install the OS on a disk with MBR partitions
The opposite situation is likely. An error:
“Windows cannot be installed on this disk. The selected disk contains an MBR partition table. On EFI systems, Windows can only be installed on a GPT disk."
It means that you are trying to install the system from a DVD or USB drive in EFI mode. The old HDD or SSD partition table is MBR. In this case you can:
- Convert SSD or HDD to GPT.
- In UEFI or BIOS, change the installed boot method from Legacy to EFI.
The first option is preferable because it is simpler and faster. Remember that information from all partitions of the drive will be completely lost.
Convert MBR to GPT. All information will be deleted
In the system installer, run the command line:
- F10 and Shift (on desktop PCs).
- F10, Fn and Shift (on some laptops).
In the window that opens:
- Enter the commands shown sequentially.
- Press Enter after entering each one.
Command sequence:
When the commands are applied:
- Close the Command Prompt window.
- Click "Update" in the partition selection window.
- Click “Create” to create several partitions on the HDD or SSD.
- Select free space and start OS installation.
A simpler method of conversion with loss of information on the drive:
- Delete all partitions on the HDD or SSD.
- Select free space.
- Click Next.
The result of your actions will be automatic conversion to GPT. The next step is to install the OS.
How to avoid losing data during conversion
Use a third-party utility, Minitool Partition Wizard Bootable. Download the ISO image and burn it to a flash drive formatted in FAT32. The necessary conditions:
- Uses EFI boot.
- The Secure Boot feature is disabled in the BIOS.
Boot your PC from the drive you created. In the software tool window:
- Select the HDD or SSD whose partition table you want to convert.
- On the left side of the program window, select “Convert MBR Disk to GPT Disk”.
- Apply the changes by clicking the “Apply” button.
- Give a positive response to the utility's warning.
- Wait for the conversion to complete. The time it takes depends on the size of the drive and the occupied space on it.
If the drive is a system drive, you may receive a message stating that it cannot be converted. To still convert it:
- Select the OS bootloader partition, which is located at the very beginning.
- Delete it by clicking “Delete” and confirming the action with the “Apply” button. Instead, you can immediately create a new bootloader partition, but in the FAT32 file system.
- Repeat the steps to convert the partition table.
How to do without conversion
Go into the BIOS and set the boot mode to CSM (Compatibility Support Mode) or Legacy, disabling EFI. Disable Secure Boot.
Previously, I took a detailed look at the clean installation processes of Windows 10 and Windows 7.
What other problems have you encountered while installing Windows?
—> —>
When installing Windows 10 (the problem is also relevant for the G8), users are faced with the following message.
We are primarily interested in the mysterious MBR partition table, due to which the operating system cannot be installed. Nothing complicated: MBR is a standard for organizing HDD and SSD disks, which is gradually being replaced by GPT.
The MBR standard is closely related to the classic, already outdated BIOS. At the same time, the GPT standard is used with the more advanced UEFI.
The situation is as follows: it is impossible to install an OS in UEFI mode on your hard drive with MBR partitions. There are two options: either change the disk structure (convert MBR to GPT), or change the boot mode from UEFI to standard BIOS.
The first way to solve the problem seems more appropriate. Therefore, we will describe how to change the hard drive to GPT, but at the end we will also tell you how to boot in a different mode.
Content
Converting partitions using OS tools
Windows 10 allows you to convert an MBR partition to GPT using the standard Disk Management tool.
- You can call it by executing the “diskmgmt.msc” command or the “Start” context menu.
- We select each hard drive and delete it using the context menu.
- Through the context menu of the hard drive, call the “Convert to GPT disk” command.
Please note that it will become active after all volumes are deleted, and in the event that running Windows is not on the media whose table you want to convert.
“Convert to GPT disk” command
Conversion will take ten or two seconds if the disk does not have damaged sectors. After this, partitioning the disk and installing Windows 10 on its active partition becomes available.
Converting MBR disk to GPT
There are two ways to convert MBR to GPT: with or without data loss. The first one is quick and simple. But be prepared that all data from the disk will be deleted. If you are ready, better use it.
And here there are two options: direct conversion or deleting partitions and then installing the OS.
- Conversion.
Right in the operating system installation shell, you need to press the key combination Shift+F10 to open the command line. On some laptops, the key combination is different - Shift+Fn+F10.
Execute the following commands one by one:
- diskpart
- list disk (the command will display a list of disks, we need to note its number and enter it in the next command instead of the N symbol)
- select disk N
- clean
- convert gpt
- exit
Close the command line, update the list of partitions - and install Windows 10 on the reformatted disk. You may have to restart your computer for the drive to appear.
- Removing partitions.
An even simpler method: delete all disk partitions directly in the installation shell, select unallocated space. The disk is automatically converted to the GPT standard, and the OS is installed without errors or problems.
Installation problems
If installing Ten on your hard drive was stopped by an error stating that installing Windows 10 in a UEFI system on MBR partitions is impossible, to continue you need to convert GPT to MBR. The problem is encountered by most users who did not perform the conversion before installing the OS.
This is done using a set of commands executed through the command line.
- To convert a disk, you need to restart your computer, and in the installation program, when the “Install” button appears, click “System Restore”.
Keep in mind that following the instructions in the next step will clear your hard drive of all information and convert its partition tables to the new GPT standard, making it impossible to recover anything stored on the hard drive prior to conversion.
- After opening the command line, we sequentially enter the following chain of system commands into it:
- diskpart – launch a utility for working with partitions;
- list disk – visualization of a list of volumes in order to select the future system disk for conversion;
- select disk X – select the desired volume;
- clean – cleans the active partition numbered X;
- convert mbr – converting an mbr partition;
- create partition primary size xxxxxxx – create a new partition of the size specified in bytes;
When entering the volume size, keep in mind that 1 GB = 1024 megabytes, so to obtain a 50 GB disk, its size must be multiplied by 1024 twice.
- active – make it active;
- format fs=ntfs quick – perform quick formatting in ntfs;
- assign – the disk will bear the letter label of the first free letter of the English alphabet, starting with “d”;
- exit – exit the Windows 10 command line.
- Click “Refresh” to get the latest information about the disk and its partitions again.
If installing Windows 10 on a GPT partition failed and a familiar window appears, several additional conditions must be met:
- a 64-bit system must be installed;
- The computer must be turned on in U mode
Most likely, setting the “ten” is impossible due to the second factor.
- To solve it, you need to go into UEFI, which is done mainly with the F2 (for laptop) or Del (for PC) keys.
- Find and activate (set the value to “Enable”) the UEFI boot function.
Typically, it is located in the BIOS Features or BIOS Setup section.
- Switch the SATA operating mode to AHCI instead of IDE mode. Most often, changing this option is not necessary, but you should check it just in case.
- Save the new settings.
In different versions of UEFI, settings options may be located in different sections and even have different names.
After this, installing Windows 10 on a partition with a new standard for placing file tables is carried out like a regular “tens” installation.
Conversion with data loss
If it is important to save information on disk, you will have to use another method. You have to make another bootable flash drive (in addition to the flash drive with the OS) with a program for formatting disks.
This is a very inconvenient way. Despite the fact that most programs are paid. We recommend using the method described below. This will allow you to save the disk data and not “dance with a tambourine” around disk conversion.
Changing UEFI to standard BIOS
We have already talked about this method to solve the Windows 10 installation error. You need to boot not in UEFI mode, but in an earlier version of the BIOS (in Legacy mode).
In the BIOS settings we need to change the boot mode. The settings are different on every laptop. Here's what it roughly looks like.
You can also put the installation USB flash drive into the boot without the UEFI mark. This is done in the Boot Menu. Another way is to give priority to the flash drive (put it in the first boot location), but also without the UEFI mark.
Installing Windows 10
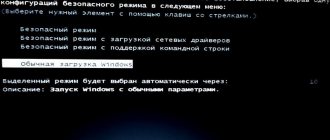
After finding out what BIOS the motherboard uses and what structure of the hard drive, we will highlight 3 ways to install Windows:
- Using classic BIOS, to a disk with MBR partition style.
- Using UEFI (EFI), to a disk with MBR style.
- Using UEFI to a disk with GPT partition style.
If you use the Rufus program to create a bootable USB flash drive, below is an example for creating a flash drive with the necessary settings.
Using classic BIOS, MBR
This is the classic way to install an OS. Insert the disk/flash drive into the drive/USB connector. When you boot your computer, enable the BIOS:
- Go to Boot Menu.
- Move your bootable DVD-R/USB flash drive to the first location.
- Or select in 1st Boot Device which device the system should boot first.
- Press F10 and Yes and after rebooting the Windows installation will begin.
Using UEFI, MBR
When using a modern UEFI with graphical design, choosing to boot from a flash drive/DVD-R is even easier than with the old BIOS interface. The UEFI interface supports installation on MBR and GPT disks; you just need to correctly specify the boot priority (see figure).
After choosing a priority, restart your computer and begin installing Windows.
Using UEFI, GPT
The only useful property that the GPT structure provides for the average user is support for system disks with sizes of 2.2 TB or more. Otherwise, its use brings more problems than benefits. If a large hard drive does not have an OS installed, then it can have any structure.
To install the OS:
- Burn the image using Rufus, as shown in the GPT example.
- In boot priority, select the lock image that says UEFI.
- In the Boot Menu, select the UEFI line: “name of the flash drive” (shown in the previous figure).
- After reading the installation files, the OS installation process will begin.
If you have questions about installing Windows 10, write about it, we will try to help you.
Let's sum it up
There are two ways to fix the error when installing Windows on an MBR disk is impossible: converting partitions to the GPT standard or booting in Legacy mode rather than UEFI. The first method is suitable for those for whom the safety of data on the disk is not important. Use the second method if you need to save information on the disk.
Many more interesting articles:
Detailed instructions on how to find out the MBR or GPT disk format.
4 ways to hide a hard drive partition in Windows 10.
Simple ways to create a recovery disk.
How to merge hard drive partitions: a detailed guide.
Progress is moving forward, the volumes of information that we need to process are increasing, and along with them the capacity of computer disks is increasing. Hard drives larger than 2 TB and with a large number of partitions will not surprise anyone, but have the developers taken care of the software for them? Let's look at the hard drive formats that are currently used to store a set of partitions and to boot the operating system.
What are MBR and GPT hard drive standards and what are their features?
Before you start working with a hard drive or solid-state drive, you need to format it, dividing it into several logical partitions. The sizes of the partitions depend on how much space needs to be allocated for the operating system and how much for other programs and other files. After dividing into sections, information is recorded in them according to a certain standard. Currently there are 2 standards in use - MBR and GPT.
Externally, MBR and GPT hard drives often look the same
Advantages and disadvantages of each standard
MBR (master boot record) - this standard appeared in the early 80s along with the DOS operating system. It includes special program code, a set of data with information about loading the operating system, and a hard disk partition table. The MBR standard is simple, but is now considered obsolete. Disks of this standard can work with both BIOS and UEFI. Its main disadvantages are as follows:
- The partition size cannot be larger than 2.2 TB;
- you can create no more than four main partitions on your hard drive;
- The boot record of the operating system is stored in one specific place, which is why it can be accidentally overwritten or damaged by a virus.
GPT (or GUID Partition Table) is a new partition table storage standard that was proposed by Intel for use with UEFI (Extensible Firmware Interface). A feature of the GPT standard is the duplication of the table of contents and section table. Compared to MBR, this standard has the following advantages:
- supports a maximum partition size unattainable for the MBR standard;
- You can create many partitions on one hard drive (for operating systems of the Windows family - up to 128);
- due to the fact that the master boot record is a duplicate, it is easy to restore if damaged and it is almost impossible to accidentally overwrite or introduce malicious code into it;
- loading operating systems of the Windows family of versions 8 and older is much faster.
How to find out the disk type in a laptop or computer
Let's look at ways to determine the type of disk in a laptop or personal computer.
Determining the disk type using the Disk Management utility
In Windows, the easiest way to determine the hard drive partition standard is to use the Disk Management utility.
The main window of the Disk Management utility contains basic information about the disks installed on the computer
In Windows 10, to launch the utility, you need to right-click on the Start menu and select “Disk Management” from the context menu.
In Windows 7, right-click on the Computer icon. Next, select the “Manage” context menu item, and in the “Computer Management” window, select the “Disk Management” section.
An alternative way to launch the Disk Management utility is to press the Win+R key combination, and then in the Run window, enter the command diskmgmt.msc and press Enter.
Enter the command diskmgmt.msc to launch the Disk Management utility
We wait until the Disk Management utility starts. Its main window will display all the disks and partitions that are currently on the computer. Right-click on the name of the disk you are interested in (it is located at the bottom of the “Disk Management” window), select “Properties” in the context menu and go to the “Volumes” tab.
Select the desired disk, right-click on it, open the context menu and select the “Properties” line in it
In the Disk Information section, you will see an option for Partition Style: Table with GUID Partitions (GUID) or Partition Style: Master Boot Record (MBR). The first option means that the disk has a GPT partitioning standard, and the second means that the disk has an MBR master boot record.
For a GPT disk, the information window looks like this:
For a GPT hard drive, the style is “Table with GUID partitions (GUID)”
And for an MBR disk - like this:
An MBR disk has a Master Boot Record (MBR) style.
Determining the disk type using the command line
The hard disk partition format (GPT or MBR) can be determined using the command line. To do this, you need to launch the command line console as an administrator, enter the command diskpart and press Enter. After downloading the utility, enter the list disk command and confirm the action with the Enter key.
To view a list of hard drives, run the command diskpart
Among the displayed hard drive parameters there is a GPT column. A disk that uses the GPT standard is marked with an asterisk. The remaining disks not marked with an asterisk have MBR partitioning.
Determining the disk type using the AOMEI Partition Assistant utility
AOMEI Partition Assistant Standard is a free utility for working with hard drives and solid-state drives in the Windows operating system. The program has extensive functionality and can convert GPT disk formats to MBR and vice versa.
After launch, the utility displays all disks and the logical partitions on them. At the bottom of the window, under the name of each disk, its type is shown: GPT or MBR.
At the bottom of the utility window, all hard drives on the computer are shown, indicating their types, as well as the logical partitions of each drive.
The methods described above will help you easily find out which standard a particular drive belongs to.
Creating a bootable USB flash drive for UEFI (GPT)
I would like to start the article with one of the most popular questions: “How do I know if my computer has UEFI or BIOS, what is the difference between them. ".
In general, if we discard some unnecessary terms for most people, then UEFI is, in fact, an improved BIOS (you can also enter it using a special button (most often F2 or Del), it also has all the same settings as in the BIOS ) .
You will see a clear difference right away - UEFI has a more modern graphical interface with mouse support, there is no blue screen (look at the screenshot below, I think the difference is visible to the naked eye). In addition, just read the top line on the screen: “UEFI BIOS Utility” - speaks for itself.
UEFI and BIOS: a clear difference.
In terms of fundamental differences between UEFI and BIOS, which are worth paying attention to:
- UEFI allows you to boot from disks larger than 2 TB. The fact is that BIOS uses MBR (master boot record), and UEFI uses GPT - this is another standard for placing partitions on a hard drive (allows you to use disks of tens and hundreds of TB!). Because of this difference, installation errors often occur, because... You need to prepare bootable media differently!
- As a rule, a computer with UEFI boots faster than with BIOS (due to parallel initialization of devices);
- UEFI is more advanced in terms of security (for example, you can use cryptography);
- in UEFI you can work with the mouse, a modern graphical interface is used (it is much more convenient to configure).
Find out GPT or MBR
By the way, to see what standard you are using: GPT or MBR, just go to “Disk Management” and at the bottom of the window open the properties of a specific disk (not partition!). See example below.
In the “Volumes” tab, the “Partition Style” will be indicated:
- or “Table with GUID” (as in the example below) is GPT;
- or MBR.
Volume Tab - Partition Style
By the way, in Disk Management you can convert one standard to another (for example, GPT to MBR). To do this without losing data, it is recommended to use special. utilities: Minitool Partition Wizard, Acronis Disk Director, Aomei Partition Assistant.
Now let's move on to creating a bootable USB flash drive.
- Rufus utility - https://rufus.akeo.ie/?locale (one of the best for preparing installation media);
- Bootable ISO image with Windows: I recommend choosing an official ISO image from one edition of the system, and no more than 4 GB (for example, “Windows 10 Pro x64”; Options such as “Windows 10 5 in 1 x32+x64”, etc. — I recommend not to use them, various problems often arise with them!).
You might find this article useful on how to download an ISO image from Windows 10 [officially and legally] - https://ocomp.info/kak-skachat-win10-legalno.html
- flash drive 4-8 GB (preferably at least 8 GB, because not always and not every image can be placed on a 4 GB flash drive).
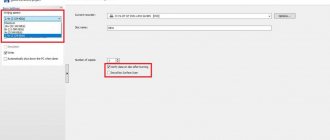
- indicate the flash drive in the “Device” column (see screenshot below);
- specify the ISO image with Windows 10;
- partition scheme and interface type: “GPT for computers with a UEFI interface” (this was discussed half an article above);
- file system - FAT 32;
- Make sure that the “Quick format”, “Create a boot disk (standard installation)”, “Create an extended label” checkboxes are checked.
- to start creating, click the “Start” button.
Actions in order:
1) The first thing you need to do is insert the flash drive into the USB port and copy everything important that is on it from it (in the process of further work, everything will be deleted from it!).
2) The Rufus needs to be run as an administrator (if anyone doesn’t know, just log in as an administrator in Windows, right-click on the program’s executable file and select this function in the pop-up context menu).
Running Rufus as Administrator
3) Next is the most important thing (do it in order!):
Rufus 2.1 settings for burning installation media
Update from 01/24/2019. The Rufus utility changed its design slightly when updated to version 3. Just in case (to avoid confusion), I will add a screenshot of the window of a newer version.
Rufus 3.4 - creating a flash drive for UEFI (GPT)
4) Rufus, by the way, will warn you that during recording all data on the flash drive will be deleted, and will ask you to confirm the operation. If you copied everything you need from the flash drive in advance, click “OK.”
Data Deletion Warning
5) In 5-10 minutes* (the time depends on the operation of the USB, flash drive, and the selected ISO image) - the flash drive will be ready and you can start installing Windows.
Actually, the media created according to the recommendations above should work on all modern PCs and laptops.
How to install Windows 10 on a GPT or MBR disk
Before you start installing the Windows 10 operating system on your personal computer, you need to figure out which firmware interface is supported by its motherboard. This can be the UEFI Extensible Firmware Interface or the Basic BIOS Firmware Interface. Then you should decide on the partitioning standard for your hard drive or solid-state drive. Installing Windows 10 begins by copying files from the installation media, which can be either a flash drive or an optical disc (CD) .
Determining the motherboard type: UEFI or BIOS
Users often encounter the problem of determining the motherboard interface type. Let's look at how to recognize it correctly.
BIOS is easy to distinguish from UEFI: it looks like old software and uses a small number of colors. It's mostly blue, black and white. Also, the BIOS has few settings and does not have the ability to select a boot mode with UEFI and Legacy options.
Boot mode cannot be selected in BIOS settings
Another difference is that UEFI supports computer mouse control, which is not available in BIOS. The graphics quality of the UEFI interface is also significantly higher.
The UEFI system interface looks more modern compared to the BIOS
Choosing the most suitable standard for installing Windows 10
On new computers whose motherboard supports the UEFI system interface, it is recommended to install Windows 10 on a disk partitioned using the GPT standard. This will eliminate problems with data loss and ensure faster loading. Separately, it should be noted that if you need to install a second operating system, it can only be Windows version 8 and higher. Older systems will fail to boot.
If the computer is old or you need to install two or more operating systems younger than Windows 8 on it, then it is better to leave the MBR partitioning of the disk, but you will have to additionally configure UEFI (how exactly will be described below). Please note that 32-bit versions of Windows operating systems do not support the GPT standard.
Preparing installation media
Before installing the operating system on a computer, we must prepare media containing the necessary installation files. Let's say we have an operating system image in ISO format and an empty flash drive with a capacity of 8GB or more. To correctly write an image to a flash drive, it is recommended to use the Rufus program. It does not have unnecessary settings that can mislead the user, perfectly configures the bootable USB flash drive and allows you to avoid many errors when data is not readable or BIOS and UEFI cannot recognize it.
Before starting the process of burning a Windows image to a flash drive, configure the necessary settings in the program window
Creating installation media consists of the following steps:
- select the flash drive on which the installation image of the operating system will be written;
- in the “Partition scheme” drop-down menu, select the type of disk partition (GPT or MBR) and the type of system interface of the motherboard (BIOS or UEFI);
- in the “File system” menu, select FAT32, leave the “Cluster size” parameter as default;
- check the boxes “Quick format” and “Create boot disk”;
- select the system image iso file and click the “Start” button.
After finishing recording the image, we will receive media that can now be used to install Windows on computers with the appropriate partition layout and type of system interface.
Installing using classic BIOS on a disk with MBR partition style
Installing an operating system using the BIOS interface on a disk in MBR format will not cause any problems. You just need to follow the following instructions:
- turn off the computer and connect the installation media;
- When the computer boots, enter the BIOS, usually you need to hold down the F2 or Del key;
- find the Boot tab and select the installation media as the primary boot device;
- save the settings, reboot and follow the prompts for the classic Windows installation.
Select the device from which Windows will be installed.
No further manipulations are required. When installing the operating system, you can format the disk if there was any information on it before.
Installing using UEFI on a disk with MBR partition style
When installing Windows 10 using UEFI on a disk with MBR partition style, problems may arise. More fine-tuning of UEFI will be required, so if it is possible to convert the disk to GPT format, then it is better to do this right away. For those who still want to keep the MBR disk format, you need to switch the boot mode from EFI to Legacy. For this:
- in the BIOS Boot Menu, select the option to boot from a USB drive without UEFI in the name and move it to the first place in the boot settings;
- in UEFI, instead of EFI boot mode, set Legacy or CSM mode.
Select Legacy boot mode.
The installation media must have an MBR partitioning scheme. After completing these steps, the system will read it and the installation will begin.
Installing using UEFI on a disk with GPT partition style
Using UEFI, you can install only the 64-bit Windows 10 operating system on a GPT disk. The installation process using UEFI is not much different from the same process in BIOS. Let's look at the key points:
- when you boot the computer, go to UEFI, usually you need to hold down the F2 or Del key on the keyboard, and start setting up;
- in UEFI the UEFI Mode boot mode must be selected and Secure Boot mode must be enabled;
- In the Boot tab, the installation media should be in the first place.
Enable Secure Boot mode in the boot options settings.
The hard drive on which the operating system will be installed must have GPT partitioning, otherwise it will have to be converted to this format. We'll talk about the problems associated with converting hard drive layout below.
Creating a UEFI flash card for installing Windows 10
To install Windows 10 from a flash card, you must first assign boot priority in UEFI . There is a choice of primary boot for both a hard drive with MBR partitions and a hard drive with a GPT table. To assign a priority in UEFI, go to the “Boot priority” block and set the flash card with Windows 10 installation files.
- Loading installation files using a UEFI flash card onto a disk with MBR partitions:
- in the UEFI start window in “Boot priority”, assign the first boot module with the usual disk drive or flash drive icon; For MBR partitions, select the boot module with the normal drive icon
- save changes in UEFI by pressing F10;
- reboot and install "top ten".
- Loading installation files using a UEFI flash card onto a hard drive with a GPT table:
- in the UEFI start window, in “Boot priority”, assign the first boot module with the disk drive or flash card icon labeled UEFI;
For a GPT table, assign a boot module with a drive icon and the label "UEFI" - save the changes by pressing the F10 key;
- in the “Boot Menu” select the option “UEFI - flash card name”;
- After reboot, start installing Windows 10.
Video: How to assign boot priority in UEFI
Creating a bootable flash drive that supports UEFI
In cases where a bootable flash drive for Windows 10 is created in the MediaCreationTool program, a product of Microsoft Corporation, the FAT32 file allocation table structure is generated automatically. The program simply does not offer any other options, immediately making the flash card universal. Using it, you can install “tens” on a standard hardware with BIOS or UEFI. There is no difference.
If your computer has an integrated boot loader that supports the UEFI interface, you may only use storage media formatted according to the FAT32 standard to install Windows 10.
There is another option for creating a universal flash card using the Command Line administrator console. The algorithm of actions in this case will be as follows:
- Launch the Run service through Accessories services in the Start button menu.
- Type the following commands and confirm them by pressing Enter:
- type the word diskpart and run the utility for working with the hard drive;
- type the phrase list disk to display on the display all the areas created on the hard drive for logical partitions;
- select a volume by entering the word select disk, not forgetting to indicate its number;
- do a complete cleanup of the volume by typing the word clean;
- type the phrase create partition primary to create a new partition;
- to designate an active partition, designate it by typing the phrase select partition;
- make this section active by entering the word active;
- format the flash card by changing the file system structure to FAT32 by entering the command interpreter format fs=fat32 quick;
- Having finished formatting, assign a drive letter by entering the word assign and the selected letter;
- Type exit to exit the utility.
In the console, enter commands according to the specified algorithm - Download the tens ISO image file from the Microsoft website.
- Double-click the image file, opening it and simultaneously connecting it to the virtual drive.
- After selecting all the files and directories of the image, copy them by clicking the “Copy” button.
- Insert everything into the free area of the flash card.
Copy files to free space on the flash drive - This completes the process of creating a universal bootable flash card. You can start installing “tens”.
The removable disk is prepared for installing Windows 10
The created universal flash card will be bootable both for computers with a basic BIOS input/output system and for those with integrated UEFI.
Video: how to create a bootable USB flash drive for Windows 10 using WINDOWS 7 USB/DVD DOWNLOAD TOOL, Command Line or Windows Media Creation Tool
Creating a flash card only for computers with MBR partitions that support UEFI
Quickly creating a bootable flash drive for Windows 10 that can be installed on a UEFI-enabled computer requires the use of third-party software. One such program is Rufus. It is quite widespread among users and has proven itself well. Its main disadvantage is the impossibility of creating a universal bootable flash card. Does not provide installation on a hard drive. Allows you to perform a wide range of operations:
- flash the BIOS chip;
- generate a bootable flash drive using an ISO image of Tens or systems such as Linux;
- use on devices with an uninstalled operating system;
- carry out low-level formatting.
To create a bootable flash card using Rufus, you first download software from the developer’s website.
When creating a flash card for a computer that supports UEFI with a hard drive that has MBR partitions, the procedure is as follows:
- Run the Rufus utility to create bootable media.
- Display the type of removable media in the “Device” area.
- In the “Partition scheme and system interface type” area, select “MBR for computers with UEFI”.
- In the File System area, select FAT32 (default).
- Next to the line “Create a bootable disk”, select the “ISO image” option.
Set the parameters for creating a flash drive in Rufus - Click the button with the disk drive icon. Select the ISO image by clicking on the drive icon
- In the Explorer that opens, select the file selected for the “tens” installation.
In Explorer, select the image file to install - Click the "Start" button. Press the "Start" key
- After a short period of 3–7 minutes (depending on the speed and RAM of the computer), the bootable flash card will be ready.
Video: how to use Rufus
Create a flash card only for GPT computers that support UEFI
When creating a flash card for a computer that supports UEFI with a hard drive that has a GPT boot table, you need to use the following procedure:
- Run the Rufus utility to create bootable media.
- In the "Device" area, display removable media.
- In the “Partition scheme and system interface type” area, select the “GPT for computers with UEFI” option.
- In the File System area, select FAT32 (default).
- Next to the line “Create a bootable disk”, select the “ISO image” option.
Select settings in Rufus - Click the drive icon on the button.
Click the drive icon key - In Explorer, select the file to be written to the flash card and press the Open button.
Select the Windows 10 ISO image file and click Open - Click on the “Start” button.
Click on the “Start” button to start recording the image - The utility will create a bootable flash card.
The Rufus program is constantly being improved and updated by the manufacturer. The new version of the program can always be obtained from the official website of the developer.
To avoid problems with creating bootable media, you can resort to a more effective option for restoring the “dozens”. To do this, you need to install the system from the Microsoft website. Once the installation is complete, the system will prompt you to create rescue media for recovery. Select a flash card in the media selection and wait until the copy is created. In case of any failures, restore system parameters without deleting documents and installed applications. In this case, there will be no need to re-activate the system product, which disturbs the user with a constantly pop-up reminder.
How to change the hard drive partition type
There are various methods for changing the hard drive standard, but it is worth remembering that conversion almost always leads to data loss, even if the program promises to leave the data safe and sound. Therefore, before starting the operation, save all important information on another drive or copy it to external devices.
Problems installing Windows on a specific type of disk
The main problem with installing the Windows 10 operating system is receiving notifications that it is impossible to continue or start the installation.
Error message when converting from MBR to GPT appears before Windows installation begins
When installing Windows, the following typical errors are possible:
- errors related to the system bit size: the 32-bit operating system is not suitable for installation on a GPT disk;
- a malfunction of the installation media or incorrect recording of information on it: you need to use another media or overwrite the current one;
- for UEFI mode, a media with a name containing UEFI is not selected, and vice versa - for BIOS, a media with UEFI in the name is selected;
- The installation media loader is formatted in the wrong format: the format must match the type of hard drive or solid state drive.
Changing disk format via command line
One of the fastest options for converting a disk from one format to another is conversion using command line utilities. Let's say you need to convert an MBR disk to GPT. Attention: all information contained on the disk will be deleted. This option can be successfully performed already during installation of the operating system. After loading the Windows installer, press the key combination Shift+F10, which opens a command line in which you need to sequentially enter and execute the following commands:
- diskpart (disk management utility will start);
- list disk (a list of disks will be displayed on the screen; you need to remember the disk number (N) where the operating system will be installed);
- select disk N (select disk N);
- clean (clean the selected disk);
- convert gpt (convert the disk to GPT format);
- exit (exits the Disk Management utility).
Enter the commands sequentially to convert the disk format, waiting for each of them to complete.
Then you can continue installing the operating system on a disk in GPT format. If the installation program does not see the disk, you must restart the computer and repeat the installation.
Changing the format using Windows Disk Management utility
This type of conversion requires an installed and running Windows operating system version 7 or later. Let's say you need to convert a disk from GPT to MBR format. To do this, you will need the Disk Management utility, which we discussed above. Do the following:
- Launch Disk Management.
- Select the hard drive you want to convert and remove all partitions from it. To do this, right-click on the partition and select “Delete volume” in the context menu that opens. Delete all partitions from the disk one by one by selecting “Delete volume” in the context menu
- Right-click on the disk name and select “Convert to MBR disk” from the context menu. After the operation is completed, you can re-create the necessary partition structure on your hard drive or solid-state drive.
Select and run the “Convert to MBR Disk” function
Programs for converting between GPT and MBR formats
In addition to the standard tools built into the Windows operating system, there are various third-party programs for converting disk formats. Among them are the Acronis Disk Director and Minitool Partition Wizard utilities. They allow you to convert the format without losing data. Let's take a closer look at the Minitool Partition Wizard program.
Select the boot mode of the Minitool Partition Wizard utility
We create a bootable drive with the image of the Minitool Partition Wizard utility and boot from it. Please note that in UEFI Secure Boot mode must be disabled. After the download is complete, select the desired hard drive and click on the Convert MBR Disk to GPT Disk line, which is located on the left in the Operations tab. Then click the Apply button and wait for the operation to complete, which can take quite a long time.
Select the disk and start the conversion with the Convert MBR Disk to GPT Disk command
Sometimes the program fails to convert the system disk, and a corresponding warning is displayed. To solve this problem you need:
- select the partition in which the operating system loader is located (usually it is located at the very beginning of the list and takes up to 500MB);
- delete it and create the same partition in the FAT32 file system in its place;
- repeat the conversion steps described above.
Third-party programs open up additional opportunities for working with hard and solid-state drives. In particular, they allow you to convert them to MBR and GPT formats without data loss if the standard functionality of the operating system does not work or is unavailable.
Video: working with hard drive partitions in the Minitool Partition Wizard program
It is impossible to say for sure which technology is better: the time-tested but technically outdated MBR, or the new promising GPT. Both standards perform the same function: they store operating system boot data and the disk partition table. Each user must decide for himself what he needs from a hard drive, how many partitions there will be on the disk and what size, and whether he needs a new level of security and reliability implemented in the GPT standard.
Sources used:
- https://poznyaev.ru/blog/oborudovanie/gpt-mbr
- https://public-pc.com/kak-preobrazovat-mbr-v-gpt-pri-ustanovke-windows-10/
- https://winda10.com/ustanovka-i-aktivatsiya-sistemy/mbr-v-gpt-pri-ustanovke-windows-10.html
How to install Windows on a GPT disk if the computer does not boot from a UEFI flash drive
BIOS UEFI support is a fundamental requirement for installing Windows on a GPT disk. Without UEFI or at least a hybrid BIOS, which supports EFI software only in terms of the ability to boot from GPT disks, the OS installed on such a disk will not be able to start. Another important requirement for the existence of an OS on GPT disks is their installation from a UEFI bootable USB flash drive. The one marked UEFI must be selected in the BIOS, in the list of computer boot devices. But what if a flash drive marked UEFI is not listed in the BIOS? Or it is listed, but it does not start. How to install Win7, Win8.1 or Win10 on a GPT disk under such conditions?
If the flash drive is not visible in the list of BIOS boot devices as a UEFI device, and the computer supports UEFI, this is usually due to incorrect creation of the flash drive itself. For example, when it was formatted not in FAT32, but in NTFS. Or when the USB-HDD was selected as the recording method. Less commonly, the cause may be problems in the Windows distribution - when a homemade assembly from some Sanka or Vaska with damaged files in the “efi” directory is used. In this case, you can remake the flash drive and create it in the most correct way - using the MediaCreationTool utility from Microsoft. But in the case of hybrid BIOSes, which implement partial support for EFI software, booting from UEFI flash drives may simply not be provided. But only from UEFI DVDs. And here, without a DVD or drive, you can install Windows on a GPT disk only using workarounds.
So, the computer does not boot from the flash drive in UEFI mode. And when we try to install the OS, we see a message that the installation is impossible due to the fact that it is a GPT disk.
There are several options on how to proceed.
WinToHDD program
Ideal conditions are when you have old Windows, and it somehow works. In this case, we can install the new OS on a GPT disk from the environment of the old OS using the WinToHDD program from Hasleo Software. This program is free for home use. We can reinstall any edition of Windows, except Enterprise, for free. For the corporate edition you will need a paid version of WinToHDD Professional.
How to work with WinToHDD? We mount the installation ISO image from Windows. In Win8.1 and Win10, this can be done using standard tools, using the context menu.
In Win7 you need to resort to programs like Daemon Tools. Next, launch WinToHDD. Select reinstallation.
Specify the path to the install file with the extension “.wim” or “.esd” (these files are located in the “sources” folder on the mounted ISO). Select the Windows edition.
On the partition map, the program itself will indicate the boot EFI partition and drive C. But if there are several partitions with Windows installed on the disk, the program may need to indicate which one it should use.
Next, WinToHDD will ask you to approve the creation of WinPE to work outside the current Windows environment, warn you that the system partitions will be formatted, and ask you to reboot. We answer “Yes” to everything. After the reboot, we will observe the process of copying Windows files for some time.
After rebooting and installing drivers, we can begin to personalize the new OS.
Live disk
If the old OS does not boot, we will need a WinPE-based LiveDisk from Sergey Strelets. His image can be obtained on the website sergeistrelec.ru. We write the downloaded image to a flash drive. Whether it is a regular flash drive or UEFI does not matter. Having booted from this LiveDisk, we can first try to start the old OS using the “Search & Start Windows...” item in the disk startup menu.
If the OS's inability to boot is caused by a damaged bootloader, LiveDisk will boot it. And you can reinstall Windows using the WinToHDD program, as described above. But this LiveDisk item will not help if the cause of the OS inoperability is damage to its system files on drive C. In this case, we reboot from LiveDisk and launch a full-fledged WinPE environment (the first item in the boot menu).
In the WinPE environment we connect the Windows ISO image. We use the explorer and the options in its context menu.
Next, run the WinNTSetup utility. And reinstall the OS:
- Specify the path to install.wim/install.esd on the mounted ISO;
- We check whether the EFI boot partition is selected correctly by the program;
- We indicate the system partition - the future drive C;
- Formatting sections;
- Select the OS edition;
- Click “Install”.
We are waiting for WinNTSetup to copy the files of the new OS. Then we restart the computer and create our profile.
Convert MBR to GPT with Windows
The two options discussed above involve installing Windows on an existing partition structure. Those. The disk must be initialized as GPT in advance, and it must have an EFI boot partition and a system partition. If the disk has an MBR style, or we are dealing with an empty, uninitialized disk, you can install Windows on MBR, and then, together with the OS, convert it to GPT.
We have, for example, Windows on an MBR disk with a typical structure consisting of a “System Reserved” boot partition and the C drive itself.
Using special programs and tools from Windows itself, this structure can be converted into the structure of an EFI system with, accordingly, a boot EFI partition.
3.1. AOMEI Partition Assistant
Many software such as disk space managers can convert MBR disks to GPT, as well as work in the opposite direction, while maintaining Windows functionality. But usually this function is provided only within paid editions of this type of software. For example, if you use AOMEI Partition Assistant, you will need a program edition no lower than Pro. In its window, click on the MBR disk and select the operation of converting it to GPT.
We are waiting for the transformation to take place.
After starting Windows, we see that the program has turned the “System Reserved” partition into an EFI partition.
3.2. Windows Installation Disc
In order not to resort to paid programs to carry out this operation, you can use the standard capabilities of Windows itself. To do this, you will need to boot from its installation media. At the first stage, press Shift+F10. Next, enter into the command line:
This is necessary to determine what number the convertible disk is listed under. If the computer has only one storage medium, it will be listed as number 0. But if there are several disks, and even a flash drive, you need to find out the number. We recognize and enter the command by type:
mbr2gpt.exe /convert /disk:0
Where instead of 0 we enter our number.
Then we launch the OS. And look at the disk map. In this case, the “System Reserved” partition remained untouched, the EFI boot partition was simply added at the tail of the disk.