Good day, friends.
Have you set a password for certain information on your computer and now want to remove it? Don't know how to do this? This article provides simple instructions on how to disable Bitlocker, the very program that protects your data from hacking.
Bitlocker is a built-in utility in Windows systems designed to keep sensitive information safe from unauthorized access. Having installed it, the computer owner puts a password on all or individual files. The application allows you to save it on external media or print it in order to leave the PIN only in memory, because it can fail.
Encrypting information means that the program converts it into a special format that can only be read after entering a password.
If you try to open a file without it, you will be presented with unrelated numbers and letters.
Initially, you can configure the utility so that the lock is removed when a flash drive with a key is inserted. It is better to have several media with a password.
Important! If you forget and lose all the keys, along with them you will lose access to all data on the disk (or flash drive) forever.
The application first started working in the extended version of Windows Vista. Now it is available for other generations of this system.
Ways to disable Bitlocker
To unblock a block, you don’t need to be a hacker or a professional IT specialist. Everything is done simply; of course, if you set the password yourself and are not going to hack other people's data. This is true? Then let's start the analysis.
There are several ways to unlock files. The simplest one looks like this:
- Right-click on the desired drive and in the window that appears, click “Manage BitLocker”;
- A new menu will open where you should select “Turn off”.
When you reinstall Windows 10 or another version of the OS, you will need to pause encryption. To do this, follow the instructions below:
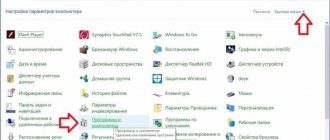
- Open Start - Control Panel - System and Security - BitLocker Drive Encryption;
- Select “Pause protection”, or “Manage BitLocker” - then “Disable BitLocker” (In Win7).
- Click "Yes" to confirm that you are deliberately disabling it.
Through the same menu, you can completely turn off the blocking by pressing the corresponding button.
Keep in mind that Windows Vista and other versions of the system may have different names for the sections described above. But in any case, you will find the necessary settings through the control panel. For example, in Windows 8 you can open it like this:
- Swipe down from the top right corner of the desktop.
- Is there a menu? Click on "Search".
- In the line, enter “Control Panel.” When it opens, you will see Bitlocker settings among other things.
To be honest, I don’t know how to disable this encryptor if the password is lost. I can only recommend formatting the device - as a result of which the disk will be available for work. But in this situation, naturally all the data on it will be lost.
If your computer is lost or stolen, a password will not protect your data. The thief doesn't even need to log into the system - he will simply remove the hard drive and connect it to another computer.
However, if the data is encrypted, it is almost impossible to retrieve it.
So what can you protect:
- clients from identity theft;
- business from claims related to confidentiality violations;
- reputation.
Microsoft BitLocker provides easy encryption of drive data on your computer. This way you can remain protected if your device or drive is lost or stolen.
To get started, do the following:
- Before performing any of the following methods, back up your system;
- Check if Windows supports device encryption.
Most PCs with system version 8.1 or higher (but not all) are capable of encrypting devices. Mostly new computers running Windows 10 have this feature.
When you sign in as an administrator, BitLocker only encrypts your drive.
The recovery key is uploaded to Microsoft servers. It will help you recover important files if you forget your password or are unable to log into the system.
To find out if your computer supports device encryption, follow these steps:
Step 1: Open the Settings app using the Win+I keys.
Step 2: Select System and then go to the About tab.
Step 3: Find the Device Encryption section at the bottom of the window. If you don't find anything, it means your computer doesn't support this feature. Otherwise, you will see a section like in the screenshot below.
Features of Bitlocker in Windows 10
If you suddenly need to activate the function again, it is recommended to take into account its features. This will give you a complete understanding of how Bitlocker works.
BitLocker is a built-in encryption feature for hard drives, solid state drives, and flash drives. Unlike account protection, Bitlocker allows you to protect not the computer itself, but its contents. After all, it will not be difficult for an attacker to remove the HDD or SSD and then connect it to his device. But in this case, he will not be able to remove the blocking.
On a note. BitLocker is not available on Windows 10 Home. It only works in professional and enterprise versions of the OS.
The likelihood of a drive protected by Bitlocker being hacked is very low. But it exists. To unlock, the attacker must find the key, and this can take several days or months, subject to constant attempts to enter the password.
Requirements
The first requirement is the availability of the required OS version. Typically, BitLocker supports Windows Pro or Ultimate, for example:
- Windows Vista and Windows 7: Enterprise and Ultimate;
- Windows 8 and 8.1 editions: Pro and Enterprise;
- Windows 10 editions: Pro, Enterprise and Education.
If you're using Home Windows, it's worth considering upgrading to the Pro version.
Note! It is better to combine the operating system update with the purchase of a new computer, since almost all models include TPM.
Your PC must support Trusted Platform Module (TPM). Many PCs designed for business have it (for example, Dell Precision and Optiplex, Lenovo ThinkCenter series, HP Pro and Elite). By the way, you can use BitLocker even without a TPM.
If you want BitLocker for Windows, pay $100
BitLocker has been a part of Windows Professional since Windows Vista. However, the typical PC comes with the home version of Windows 10, and Microsoft is asking around $100 to upgrade to Windows 10 Pro.
It's normal that Microsoft wants to charge extra for business features. The average home user does not need Hyper-V, Remote Desktop Server, or Domain Join technology. However, BitLocker is a feature that would benefit any user.
It's especially stupid that BitLocker is only available on the Pro version, when Windows 10 gives home users the ability to use Storage Spaces, that is, mirror data across multiple physical drives.
How to check for TPM
You already know that a computer must have a TPM. A TPM is a special microchip that allows a device to support advanced security features and provides a tamper-proof way to store encryption keys.
You can check if your computer has TPM by following these steps:
Step 1. Select the “Windows+R” keys.
Step 2: Type "tpm.msc".
Step 3: Press Enter.
Step 1. To open the “Power User” menu, use the “Windows + X” key combination. Then select Device Manager.
Step 2: Expand security devices. The TPM is represented as a Trusted Platform Module with a version number.
Note! To support BitLocker, your computer must have a TPM chip version 1.2 or later.
However, if you see a "Compatible TPM not found" message, then this means that your computer does not have a TPM.
Unlocking your BitLocker drive
If your system drive is encrypted, unlocking it depends on the method you choose (and whether your PC has a TPM). If you have TPM and choose to automatically unlock the drive, you won't notice anything new - you'll boot straight into Windows as always. If you choose a different unlocking method, Windows will prompt you to unlock the drive (by entering a password, plugging in a USB drive, or something else).
If you've lost (or forgotten) your unlock method, press Esc at the prompt screen to enter your recovery key.
If you encrypted a non-system or removable drive, Windows will prompt you to unlock the drive the first time you access it after Windows starts (or when you connect it to your computer if it's a removable drive). Enter your password or insert your smart card and the drive should unlock so you can use it.
In File Explorer, encrypted drives are indicated by a gold padlock. This lock changes to gray when the drive is unlocked.
You can manage a locked drive—change your password, disable BitLocker, back up your recovery key, or perform other actions—from the BitLocker Control Panel window. Right-click on any encrypted drive and select Manage BitLocker to go directly to that page.
How to enable BitLocker
After verifying that your computer has a TPM chip, follow these steps to activate BitLocker:
Step 1: Click the Start button. In the Utilities folder, look for “Control Panel.”
Step 2: Click System and Security.
Step 3: Click BitLocker Drive Encryption.
Step 4: Then click on the text link “Enable BitLocker.”
Step 5. Choose how to unlock the drive during startup: you can insert a USB flash drive or enter a password (we chose the second method because it is easier).
Step 6. Next, enter the password that will be used when loading Windows 10 to unlock the drive (however, you must remember it well). After that, click "Next".
Note! Make sure the password you create is strong, using upper and lower case, numbers, and symbols.
Step 7: Don't worry about forgetting everything. You will be given several options for storing the key, which will help restore access to your files:
- in your Microsoft account;
- on a USB stick;
- as a file;
- on paper.
Make sure to choose the option that is most convenient for you and keep the recovery key in a safe place.
Step 8: Click Next.
Step 9: Now select the encryption option that best suits your needs.
Step 10. Then decide on these two parameters.
Step 11 : Click Next.
Step 12: Now check the box next to Run BitLocker System Check and click Continue.
Step 13. You're done! Before starting the encryption process, simply restart your computer.
Step 14. To unlock the drive, BitLocker will prompt you to enter a password. Enter it and press "Enter".
Potential vulnerabilities
You've probably noticed that you have to wait a long time when you activate BitLocker for the first time. This is not surprising - the process of sector-by-sector encryption can take several hours, because even reading all the blocks of a terabyte HDD is not possible faster. However, disabling BitLocker is almost instantaneous - how can that be?
The fact is that when disabled, BitLocker does not decrypt data. All sectors will remain encrypted with the FVEK key. Simply, access to this key will no longer be limited in any way. All checks will be disabled, and the VMK will remain recorded among the metadata in clear text. Every time you turn on the computer, the OS bootloader will read the VMK (without checking the TPM, asking for a key on a flash drive or a password), automatically decrypt FVEK with it, and then all files as they are accessed. For the user, everything will look like a complete lack of encryption, but the most attentive may notice a slight decrease in the performance of the disk subsystem. More precisely, there is no increase in speed after disabling encryption.
There is something else interesting about this scheme. Despite the name (full-disk encryption technology), some data still remains unencrypted when using BitLocker. The MBR and BS remain open (unless the disk was initialized in GPT), damaged sectors and metadata. An open bootloader gives room for imagination. Pseudo-bad sectors are convenient for hiding rootkits and other malware, and the metadata contains a lot of interesting things, including copies of keys. If BitLocker is active, then they will be encrypted (but weaker than FVEK encrypts the contents of sectors), and if deactivated, they will simply lie in the clear. These are all potential attack vectors. They are potential because, in addition to them, there are much simpler and more universal ones.
Recovery key
In addition to FVEK, VMK, and SRK, BitLocker uses another type of key that is created “just in case.” These are recovery keys, which are another popular attack vector. Users are afraid of forgetting their password and losing access to the system, and Windows itself recommends that they make an emergency login. To do this, the BitLocker encryption wizard prompts you to create a recovery key at the last stage. It is not possible to refuse its creation. You can only choose one of the key export options, each of which is very vulnerable.
In the default settings, the key is exported as a simple text file with a recognizable name: “BitLocker Recovery Key #”, where the computer ID is written instead of # (yes, right in the file name!). The key itself looks like this.
Emergency login to BitLocker
If you forgot (or never knew) the password you set in BitLocker, then simply look for the file with the recovery key. Surely it will be saved among the current user’s documents or on his flash drive. Maybe it's even printed on a piece of paper, as Microsoft recommends. Just wait until your colleague goes on a break (forgetting to lock his computer, as always) and start searching.
Login with recovery key
To quickly locate a recovery key, it is convenient to limit the search by extension (txt), creation date (if you can imagine when BitLocker could have been turned on) and file size (1388 bytes, if the file was not edited). Once you find the recovery key, copy it. With it, you can bypass standard authorization in BitLocker at any time. To do this, just press Esc and enter the recovery key. You'll log in without any problems and you'll even be able to change your BitLocker password to a custom one without specifying the old one! This is already reminiscent of tricks from the “Western Construction” section.
Changing your password without entering the current one
What you need to know
After restarting, the computer will quickly open the desktop. This is not the end!
After going to Control Panel>System and Security>BitLocker Drive Encryption, you will see that the drive is not yet encrypted.
What to do in this case?
Absolutely nothing. Just wait for the process to complete. It takes some time, depending on the option you choose and the size of the drive. Use your computer in peace and let the finishing touches happen in the background.
Once you find that the encryption process is complete, a corresponding BitLocker icon should appear above the drive in Explorer.
This way you can check whether it is enabled or not.
What can be encrypted and what cannot
You can encrypt any drive except network and optical. List of supported drive connection types:
- USB;
- Firewire;
- SATA;
- SAS;
- ATA;
- IDE;
- SCSI;
- eSATA;
- iSCSI;
- Fiber Channel.
Encryption of volumes connected via Bluetooth is not supported. When you connect your mobile phone to your computer via Bluetooth, its memory card appears as a separate storage medium. Such media cannot be encrypted.
File systems supported are NTFS, FAT32, FAT16, ExFAT. Other file systems are not supported, including CDFS, NFS, DFS, LFS, software RAID arrays (hardware RAID arrays are supported).
You can encrypt solid-state drives (SSDs, flash drives, SD cards), hard drives (including those connected via USB, see earlier) and hardware RAID arrays. Encryption of other types of drives is not supported.
A huge advantage of BitLocker is its support for GPT disk encryption. Among the proven encryption tools, products from Symantec (for example, Symantec Endpoint Encryption) provide support for GPT, but you have to pay for them, and the cost of BitLocker is already included in Windows.
How to enable BitLocker if your computer does not have a TPM
To do this, follow these steps:
Step 1. To open the “Local Group Policy Editor” (not all versions of the system have it), use the key combination “Windows + R”. Type "gpedit.msc" and press Enter.
Step 2: Under Computer Configuration, expand Administrative Templates.
Step 3: After that, expand “Windows Components”.
Step 4: Now open BitLocker Drive Encryption and select Operating System Drives.
Step 5 . On the right side, double-click on the option highlighted in the screenshot.
Step 6: Select Enabled.
Step 7. Now check the box next to the appropriate option as in the screenshot below. Click OK.
Step 8: Close the editor.
Video - Encrypting system drive C with BitLocker in Windows 10, activating TRM
Encrypt the entire disk or create a container
Many tutorials talk about creating a BitLocker container, which works the same as a TrueCrypt or Veracrypt encrypted container. However, this is a little wrong, but you can achieve a similar effect. BitLocker works by encrypting all drives. This could be your system drive, another physical drive, or a virtual hard drive (VHD) that exists as a file and is mounted in Windows.
The difference is largely semantic. In other encryption products, you typically create an encrypted container and then mount it as a drive in Windows when you need to use it. With BitLocker, you create a virtual hard drive and then encrypt it.
In this article, we'll focus on enabling BitLocker on an existing physical drive.
Encrypt all drives
You must enable BitLocker on all storage drives, both internal and external. Simply repeat the steps above for each drive you have on your computer.
External storage devices include any USB drives, flash drives, SD cards, etc. We do not recommend using them because even after encryption, these devices run the risk of being stolen and unlocked. There is no guarantee that any such disk will not be accidentally decrypted or that you will remember the password or recovery key.
On a note! Instead, consider using free and reliable cloud storage.
If you need an external drive to back up your files, then enable BitLocker. For convenience, you can set automatic unlocking when connecting to a specific computer. This way, you won't have to constantly enter your password to unlock the drive. However, always have either your password or recovery key with you. Therefore, save them in a safe place (for example, in your Microsoft account).
Crypto containers, or virtual disks
It is not always possible to encrypt an entire hard drive or even a partition. A typical example is an office computer. You want your data to remain secret and inaccessible to other colleagues who may be working on your same computer (shared workstation), but at the same time you do not have administrator rights, which are necessary when encrypting a disk or partition.
In this case, virtual disks, or cryptocontainers, will come to the rescue. A virtual disk is a file that contains your data - files and directories. You can look at a virtual disk as an archive. Only the contents of this archive are encrypted. You can also mount a virtual disk to a letter, for example Z:, and work with it as with a regular disk.
What is better - encrypting partitions or using encrypted virtual disks? Here everyone decides for himself, since each method has its own advantages and disadvantages. Encrypting partitions is just as secure as encrypting a virtual disk, and vice versa.
The advantage of a virtual disk is that it can be easily copied to another hard drive or flash drive (if the size allows). For example, you can create a 4 GB virtual disk (there are no restrictions on the size of a virtual disk, except for natural ones) and, if necessary, copy the virtual disk file to a flash drive or external hard drive. And with the right choice of encryption programs, you can use the same disk on both your computer and your smartphone. For example, the EDS Android app uses the same virtual disk format as TrueCrypt. Therefore, transferring a container from a computer to a smartphone is as easy as shelling pears (as long as there is enough space on the SD card). You won't be able to do this with an encrypted partition.
Of course, if necessary, you can create an image of the encrypted disk in case you want to back it up or move it to another computer. But that's a different story. If you have a similar need, I recommend the Clonezilla program - it is already a reliable and proven solution. Transferring an encrypted partition to another computer is a more complex undertaking than transferring a virtual disk. If there is such a need, then it is easier to use virtual disks.
Which method should I choose? If you can afford to encrypt the partition, then you can choose this method. It is also better to encrypt the entire section if the size of your secret documents is quite large.
But there are situations when using the entire section is impossible or makes no sense. For example, you have only one partition (drive C:) on your hard drive and for one reason or another (no rights, for example, because the computer is not yours) you cannot or do not want to change its layout, then you need to use virtual disks. There is no point in encrypting the entire partition if the size of the documents (files) you need to encrypt is small - a few gigabytes.
How to encrypt a drive using BitLocker without restarting the system
By default, Windows will automatically unlock the drive after you sign in to your account. If this feature is disabled, then try removing protection from the disk manually. We'll show you how to do it yourself.
Part 1. How to encrypt a disk
Before you set a password on your drive, make sure the auto-lock feature is turned off. Once completed, the disk will be automatically encrypted.
If you want to lock the drive yourself, you must do it using the “Command Line”:
- Open a command prompt with administrator rights.
Note! Replace d: with the drive letter on which you want to install the “manage-bde -lock d: -forcedismount” protection.
Close Command Prompt. From now on, your drive is securely protected, so you cannot access it without the specified password.
Part 2. How to unlock the drive
Removing protection from a disk is much easier than putting a password on it. Follow these steps:
- Open File Explorer and right-click on the encrypted drive. In the context menu, find "Manage BitLocker."
Now the protection is removed and you can access the files stored on the disk.
Of course, you can also unlock the drive using the command line.
- Open Command Prompt.
What and how hard drive encryption works: a simple explanation
Encrypt or encrypt is a method by which we can hide information from other people. This uses algorithms to change the original information into random data so that anyone trying to access the data cannot read or understand it.
Encryption usually has two ways (otherwise it makes no sense).
The first way is to convert the original information into encrypted data. For this purpose, keys (or encryption passwords) are used. They can be public in the case of asymmetric encryption or private in the case of symmetric encryption. Both methods are similar, although some steps in the encryption or decryption process change.
The second method is decryption. To do this, someone who wants to read the information will need the same key that was used to encrypt the data in order to be able to decrypt it and get the original information again.
There are many different encryption algorithms. Old ones are usually outdated and have security flaws that allow you to recover information without using an encryption key. New ones cannot be broken even by brute force.
How to find a lost recovery key
A recovery key is created the first time you use BitLocker for each selected drive. It provides access to hidden data. The key can also be used to unlock files and folders encrypted on a removable device (such as an external hard drive or USB drive) with BitLocker To Go if for some reason you forget the password or your computer can't access the drive.
The Bitlocker recovery key looks like this (it is stored in a .BEK file named Bitlocker+Recovery+Key+4C2392DC-60A8-4B98-95AA-6A91D2191EB4.BEK).
To ensure that the recovery key is correct, compare the beginning of the above identifier with the value of a similar one in the encrypted Bitlocker volume.
How/Where to find lost Bitlocker recovery key?
How you recover your lost key depends on your configured login settings:
1. If you are using a local account, then log in as an administrator.
2. Microsoft account users should check the following places:
- Microsoft account online. To get the recovery key, go to your account and get it from there;
- a saved copy of the recovery key. Perhaps you store it as a file, on a flash drive, or in paper form.
What to do with the recovery key, what if it is lost?
So, the human factor is such a thing that when it comes to memory, which at a certain moment is very necessary, it fails us. If you forgot where you put the recovery key, then remember how you saved it in BitLocker. Since the utility offers three ways to save the key - printing, saving to a file and saving to an account. In any case, you had to choose one of these methods.
So, if you saved the key in your account, then you need to go to OneDrive from the browser and enter the “BitLocker Recovery Keys” . Log in to the system with your credentials. The key will definitely be there, provided that you uploaded it there. If it's not there, maybe you saved it in another account?
It happens that a user creates more than one key, then you can determine a specific one using the identifier in the BitLocker utility and compare it with the one from the key; if they match, then this is the correct key.
How to deactivate BitLocker
First of all, turn on your computer and log into Windows.
- Open File Explorer and right-click on the drive you want to decrypt. In the context menu that appears, click Manage BitLocker.
The system will proceed to decrypt your disk.
On a note! Decryption is not a quick process. Its duration depends on the speed of your drive, CPU performance and the amount of data you have stored on the selected drive.
After some time, decryption will be completed.
All is ready! BitLocker is disabled, and you can now access files without having to enter a password.
Activating EFS disk encryption
To encrypt a folder (or file - the sequence of actions will be the same), right-click on it and select the Properties command. In the Attributes area, click Other.
Then enable the Encrypt contents attribute to protect data and click OK, then click OK again in the folder properties window. If you encrypt a non-empty directory, the system will ask you whether you want to encrypt only this folder or all subfolders and files. You need to choose the second option.
That's it, all you have to do is wait until the files are encrypted. The system will also inform you that it has backed up your encryption key, just in case. The name of the encrypted folder in Explorer will be marked in green font. Of course, a black and white illustration doesn't do a good job of capturing shades of gray, so the purpose of this illustration is mainly to grab your attention.
You can view the created certificates through the mmc console. Execute the mmc command, then select the menu command File, Add or Remove Snap-In. In the window that appears, select Certificates and click Add > and then click OK.
Next, you need to choose which certificates you want to manage. In our case, we want to manage personal certificates, so select My User Account. Then click OK on the Add Snap-in window.
In the mmc console window, you need to go to Certificates - current user, Personal, Certificates, and in the list of certificates you will see the EFS certificate. If you remove it, you will not be able to access encrypted files.
Conclusion
BitLocker is a very good feature that can protect data from loss and theft on any storage device (flash drives, hard drives, etc.). It's not a perfect tool, although it's quite useful. It is not liked by all users because it asks for a password every time an encrypted drive needs to be used. However, do not underestimate BitLocker, because one day it can save not only your valuable information, but also your business/reputation in general.
Video - How to encrypt a drive with BitLocker
Did you like the article? Save so you don't lose!
No one is at all surprised by the fact that purely personal information or corporate data of high value can be stored on a personal computer. It is undesirable if such information falls into the hands of third parties who can use it, causing serious problems for the former owner of the PC.
Depending on the circumstances, Bitlocker can be activated or deactivated.
It is for this reason that many users express a desire to take some action aimed at limiting access to all files stored on the computer. Such a procedure actually exists. Having performed certain manipulations, no outsider, without knowing the password or the key to recovering it, will be able to gain access to the documents.
You can protect important information from being accessed by third parties by encrypting your drive with Bitlocker. Such actions help ensure complete confidentiality of documents not only on a specific PC, but also in the case when someone removes the hard drive and inserts it into another personal computer.
Choosing the Best Disk Encryption Tool
Encrypting the entire disk is the most radical encryption method. The advantage of this method is that until you enter the password (or someone else who gets your computer into their hands), the operating system will not boot.
But this is far from the most optimal way to encrypt data. Firstly, you must understand that any encryption is, first of all, a transformation and modification of data. Therefore, when writing data to disk, it must be encrypted, and when reading it, it must be decrypted. As a result, overall system performance decreases.
Secondly, not all data needs to be encrypted. For example, why encrypt operating system files and executable program files?
You can argue that the operating system and applications can store sensitive data not only in user files, but also in temporary files, in Cookies, in the registry, in program files (AppData directory). When you don't have the time, desire, or ability to figure out what needs to be encrypted and what doesn't, you often encrypt your entire hard drive, sacrificing performance.
It should be noted that not all programs can encrypt the system disk. There are only two proven options (so that you can not only encrypt the system drive, but also then decrypt it) - either the standard BitLocker tool, or the well-known TrueCrypt program or its successor VeraCrypt. But again, neither TrueCrypt nor VeraCrypt support UEFI.
A less radical way is to encrypt one of the sections. You can select one of the sections for your secret documents and encrypt it. All your secret data (and applications - if desired) will be stored on this disk. Unfortunately, it will not be possible to transfer a user profile to an encrypted disk, since not all encryption programs can mount a disk before the user logs into the system. If you're concerned that someone might be able to read data from your AppData directory, it's best to play it safe and encrypt your entire hard drive.
Encrypting a partition has a huge advantage over encrypting the entire disk. Firstly, there is a larger selection of programs that can encrypt a disk partition (it’s just that not all encryption programs can encrypt a system disk, but there are many more programs for encrypting regular partitions). Secondly, after all, operating system files are not encrypted, like application files, therefore, performance will be fine.
If you only have one partition, this is not a problem. There are programs that can “cut off” free disk space and create a new partition in its place. For example, let's say you have one partition (drive C:) with a size of 500 GB. Of these 500 GB, let 250 GB be free. Free disk space can be used to create a new partition. For example, you can “cut off” 50 GB (for secret documents, I think this is more than enough). After this, this partition can be encrypted and used to store secret files.
I recommend using AOMEI Partition Assistant as a program to change the partition table. The program is much more compact and cheaper than Acronis, and it works just as well. Changing the partition table occurs without rebooting the computer (unless, of course, it is not the system partition that is being changed).
To change the size of a partition, you need to click on it and select the menu command Partition, Resize Partition. After this, a window will appear in which you will need to set the new partition size.
After the program reduces the partition size, an unallocated area will appear on the hard drive. You need to click on it and select the menu command Partition, Create Partition. Then everything is simple - you need to create a new partition (this is what the Create Partition command does), and then format it as NTFS (Partition, Format Partition command).
That's it, now you have a separate partition that can be encrypted. How to do this will be discussed later in this chapter.
It is noteworthy that after encryption it will not be possible to resize the partition. Therefore, immediately set the required size, perhaps with a small margin (20-30%).
A typical partition encryption scenario is when a computer is shared. Let's say there is a 500 GB hard drive and there are three users who periodically work with the computer. Although the NTFS file system still supports access rights and allows you to limit one user's access to another user's files, it is not sufficiently secure. After all, one of these three users will have administrator rights and will be able to access the files of the remaining two users.
Therefore, the hard drive disk space can be divided as follows:
- Approximately 200 GB – shared partition. This partition will also be the system partition. It will install the operating system, the program and store common files of all three users.
- Three sections of ~100 GB each - I think 100 GB is enough to store each user’s personal files. Each of these sections will be encrypted, and only the user who encrypted this section will know the access password to the encrypted section. In this case, the administrator, no matter how much he or she wishes, will not be able to decrypt another user’s partition and gain access to his files. Yes, if desired, the administrator can format the partition and even delete it, but he will only be able to gain access if he tricks the user into giving him his password. But I think this will not happen, so encrypting the partition is a much more effective measure than differentiating access rights using NTFS.
Algorithm for enabling and disabling the function
Bitlocker drive encryption works on Windows 7, 8 and 10, but not all versions. It is assumed that the motherboard equipped with the specific computer on which the user wants to perform encryption must have a TPM module.
Before you begin the process of encrypting all files, it is important to note that this procedure is quite lengthy. It is difficult to give an exact amount of time in advance. It all depends on how much information is on the hard drive. During the encryption process, Windows 10 will continue to work, but it is unlikely to be able to please you with its performance, since the performance indicator will be significantly reduced.
Enabling the feature
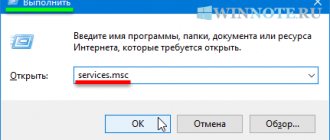
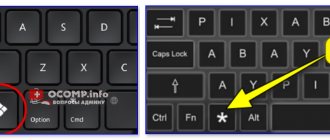
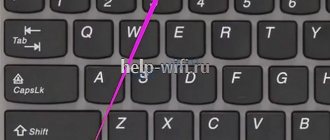
If Windows 10 is installed on your computer, and you have an active desire to enable data encryption, use our tips so that you not only succeed, but also the way to realize this desire is not difficult. Initially, find the “Win” key on your keyboard, sometimes it is accompanied by the Windows icon, hold it down, and simultaneously hold down the “R” key. Pressing these two keys at the same time opens the Run window.
Transparent disk encryption
We have already looked at two methods of data encryption - disk/partition encryption and virtual disks. However, such encryption is not always convenient.
Firstly, it is not always possible to encrypt an entire physical disk. Secondly, if you use virtual disks, container files typically take up hundreds of megabytes of disk space and are very easy for an attacker to detect. Yes, there are methods for hiding data, but human laziness wins. Thirdly, the encrypted folder can constantly grow, and the size of the crypto disk is limited by the size specified when it was created. Of course, there are programs that allow you to change the size of a crypto disk after it has been created, but you need to pay attention to this immediately when choosing a program.
Everyone wants to work with files conveniently, and at the same time, the files are reliably protected. There is such a compromise - this is transparent file encryption, when files are encrypted and decrypted “on the fly” - in the process of working with them. The files remain encrypted, and you work with them as with regular files. For example, if you encrypted the C:\Documents folder and placed your documents in it, then when you open a document from this folder, Word or Excel starts and they do not even suspect that they are encrypted. You work with encrypted files as if they were ordinary files, without thinking at all about encryption, mounting, virtual disks, etc.
In addition to ease of use, transparent encryption has another significant advantage. As a rule, a large number of files are stored on encrypted virtual disks. To work with even one of them, you need to connect the entire crypto disk. As a result, all other files become vulnerable. Of course, you can create many small crypto disks and assign each one a separate password, but this is not very convenient. In the case of transparent encryption, you can create as many encrypted folders as you need, and place different groups of files in each of them - documents, personal photos, etc. In this case, only those files that are accessed are decrypted, and not all files on the crypto disk at once.
You can organize transparent encryption of a folder using both standard Windows tools (Encrypted File System) and standard programs. Next we will talk about standard encryption tools in Windows, namely EFS and BitLocker. It will also show how an attacker can decrypt EFS encrypted files.