If you have ever done a hard reset on Chinese smartphones, then you may have noticed that recovery is also in Chinese. For many users, this causes problems with selecting the required menu item. In this article I will try to tell you step by step and with pictures what the Chinese symbols mean and what to press where. I hope this guide will be useful to you.
I'll tell you how to do:
- HARD RESET on Chinese Samsung Galaxy
- HARD RESET on Chinese HTC Desire
- HARD RESET on Chinese LENOVO
- HARD RESET on other Chinese smartphones
How to log into Recovery
ATTENTION! If the Recovery menu is missing or not installed, then it is IMPOSSIBLE to enter it!
How to Use Recovery Mode in Android
In Recovery Mode, navigation (moving) through the menu occurs using the volume control buttons (up/down) and confirmation (Home) or the power key.
As a rule, this mode is different for many manufacturers, but the main content is always present:
apply sdcard:file.zip – the file file.zip is installed, which must first be uploaded to /mnt/sdcard/file.zip; wipe data/factory reset – the data and cache partitions of the device’s internal memory are cleared, and the android_secure system folder is also cleaned. Cleaning means removing all installed applications and resetting system settings; wipe cache partition – the cache partition is cleaned (the section in which applications store their information).
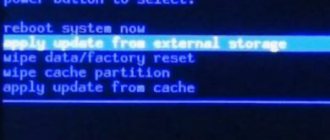
Standard Recovery
reboot system now
[reboot systems know] – reboot your Android smartphone or tablet.
apply update from external storage
[eplay update from external storage] – install the update or firmware from an external memory card.
wipe data/factory reset
[wipe date/factory reset] – reset to factory settings and delete installed programs and their data (but not pictures, videos and melodies).
wipe cache partition
[wipe cache partition] – reset temporary program data.
apply update from cache
[eplay update from cache] – install the update from the cache.
This completes the capabilities of standard Recovery. Let's move on to custom Clockwordmod or as it is briefly called CWM.
Clockwordmod (CWM) instructions
CWM main menu
Consists of points:
apply update from sdcard
– install update.zip (update, firmware) from the memory card
wipe data/factory reset
– full data reset
wipe cache partition
– cache clearing
install zip from sdcard
– install update or firmware from zip file
backup and restore
– backup and restore
mount and storage
– mounting and storage
advanced
- additional functions
power off
– shutdown
+++Go back+++
– return to previous menus
Part 1, What is Andro System Recovery > Question:
So why does the Android system recovery screen appear? In other words, what can people benefit from Android system recovery mode?
Well, this can be a useful command during a hard reset of Android. And when your Android phone or tablet isn't turned on properly, an Android system restore can help fix the problem without accessing your phone's settings. This way, your Android can enter system recovery mode automatically to fix the system error.
All Recovery items and when they are needed
Before you go into Recovery on Samsung, you should understand why this might be useful to you:
- The device does not turn on. Either there is an endless screensaver, or there is an endless cycle of reboots, or something else is wrong.
- The smartphone has become slower.
- You want to reset your phone.
- A system update needs to be installed.
All these actions can be performed in Recovery, which is sometimes called Samsung recovery mode - due to the fact that it can “bring your smartphone back to life”. Here is a description of its points:
- Reboot system – reboot the device.
- Reboot to bootloader – reboot the smartphone and enable startup mode, in which you can perform more serious actions. This is usually the first step to root. But I don’t recommend doing this step if you don’t know what you’re doing.
- Apply update from ADB / SD card – install the update using Android Debug Bridge or from flash memory.
- Wipe data/Factory reset. If other actions do not help, then you can reset the smartphone to the state in which it was when purchased. Please note: this action will erase all data from the smartphone. You also need to remember your Google password for the account assigned to your phone: when you turn it on, Samsung will ask for it.
- Wipe Cache Partition – clearing the smartphone cache. This wipe will not remove data from your Samsung. The procedure is safe and will help solve the problem if the phone does not want to turn on or crashes. Moreover, it can speed up and improve the operation of the device. But be very careful - you need to select this item.
- Mount /system restores system root folders and their names.
- View recovery logs – allows you to see system logs – view files with service information.
- Power off – turn off the smartphone.
Now you have basic information about the Recovery mode on Samsung - you will be able to reset or restore the system even if the phone does not start. This is a fairly simple solution to a serious problem, and I hope this knowledge has helped you. But be careful with some items and check several times what exactly you are doing in this menu.
Wipe Cache Partition
Another useful command in Android System Recovery 3e. The recovery instructions say that you need to use this option in tandem with Wipe Data. If the previous item clears the internal memory of the device, then this one clears its cache. Namely, this is where the working application files are stored. Of course, if this is not done before installing the firmware, then nothing bad will happen. It’s just that in the future, when installing new programs, the device’s cache will grow to incredible sizes. As a result, the smartphone will work very slowly. But this is not so scary, since there are many programs for clearing the Android OS cache. And they work great.
It is also recommended to select this function after a factory reset has been done. This will help the smartphone become even “cleaner,” which will have a positive effect on the performance of the operating system. The instructions in Russian for Android System Recovery 3e recommend performing this procedure after the reset. Before rebooting the device. Then everything will be as it should be.
A universal method for all Android devices using a PC and ADB tools
(Asus, HTC, Lenovo, Sony, HTC, LG, Samsung, Motorola and others, provided that recovery is available in this device)
Adb Run Program - Method 1
Using the site's proprietary Adb Run program (don't forget to enable USB Debugging)
ADB RUN working window
From the command line - Method 2
Another option is how to get to the Recovery menu using standard ADB tools and the ADB RUN program:
Connect Android to PC and type adb reboot recovery
Example in ADB RUN:
From the command line - Method 3
As practice shows on some devices (and more specifically on LG), it is not possible to transfer an Android device using the adb reboot recovery , in this case you should use the following command
adb shell
reboot recovery
There is also a command to switch to Recovery mode for LG, you need to enter the command
adb reboot —bnr_recovery
After which the device will begin to reboot in a few seconds!
Entering Recovery Mode via Terminal Emulator
Download Android Terminal and type the following command:
Press “Enter”, a request for root access will appear, grant it.
Then enter.
Press “Enter” again and the phone will instantly reboot into Recovery Mode.
Writes “There is no team”: what to do?
If such an inscription appears on the screen and the Android is lying down, try quickly pressing 2 buttons: “ON” and Volume “+”. After this, the Recovery menu should appear.
Every novice user of an Android tablet or phone, traveling through thematic sites and forums, sooner or later comes across a mention of the mysterious, which is especially often mentioned in instructions for firmware, replacing the system kernel and other “hacker” things.
So what is it, what is it intended for, and how to handle it correctly? I will try to answer these questions in this article, which contains complete instructions for working with ClockworkMod Recovery.
In a nutshell, or ClockworkMod
or simply
CWM
is an alternative recovery for Android devices. Instructions for working with ClockworkMod Recovery contain the following sections:
Introduction to alternative recovery ClockworkMod
- this is a much more powerful system recovery utility (menu) compared to the factory one, which allows you to make full backups of the entire system of the device, install software, firmware, kernels and much more on it, which is usually not possible with factory recovery. ClockworkMod is installed in a special system partition of the internal memory of a tablet or phone, in place of the factory recovery menu.
ClockworkMod Recovery can help you out in some seemingly hopeless situations. Even if your tablet or phone cannot boot, in many cases, using CWM you can restore the system with all its settings and applications.
Here is a rough list of what you can do with ClockworkMod Recovery:
Install custom firmware and unofficial kernels
Install factory system updates, add-ons and patches
Connect to a computer via USB in removable storage mode
Connect to a computer via USB to work with the ADB program
Create a complete backup copy of the current firmware and its individual parts (system, settings, applications)
Restore a device from a previously created backup
Reset to factory settings (Wipe – data/factory reset), clear cache (wipe cache), clear Dalvik-cache (wipe Dalvik-cache), clear battery statistics (wipe battery stats)
Create partitions on a memory card and format them
Created by developer Koushik Dutta (also known as Koush), there are versions of CWM for most Android phones and tablets.
Launching ClockworkMod Recovery
There are several ways to boot your tablet or phone into ClockworkMod Recovery.
1.
Using the ROM Manager program, selecting “Load Recovery Mode” from its menu.
2.
By pressing a specific key combination when turning on the device. This combination depends on the device model. On many devices, you can get into recovery by pressing the volume down and power buttons at the same time when turning them on.
What kind of animal is this?
What does Android System Recovery 3e mean? This is a kind of BIOS of a mobile device. Any operating system has its own BIOS - a basic input/output system that can work even if the main OS is damaged. Sometimes the BIOS is different from the standard one (as, for example, in Android devices). It is used to restore the functionality of a smartphone or tablet, apply critical updates or reset to factory settings. The Android System Recovery 3e menu has many items that correspond to one or another action. But the trouble is that the names are written in English. Therefore, many people do not even know how to use recovery correctly.
That is why this article was written. Android System Recovery, the instructions for which are absolutely necessary, is a powerful tool for setting up and resuscitating a smartphone. You need to know everything about how to use this recovery in order not to waste money on specialists. Doing everything yourself is much easier and cheaper. We will analyze each item in the recovery menu and tell you everything we can about it. So let's begin.
Method for Samsung
Before transferring your smartphone or tablet to recovery, disconnect Samsung from the charger or USB cable!
Smartphones without a mechanical Home key with Bixby
This includes Samsung S8, S9, S10, S10+, Note 8, Note 9, etc. These devices have three mechanical keys: power, volume and Bixby.
Turn off your smartphone by pressing the power key and holding it for 1-2 seconds.
A small menu appears on the screen in which you select “Shutdown”.
The smartphone is turned off. Hold it in your hands and press and hold the Volume Up, Bixby, and Power keys.
When Samsung appears on the screen, remove your finger from the power key while holding the Volume Up key and Bixby. If everything is done correctly, you will see the robot:
At this point, you can remove your fingers from the volume up and Bixby keys.
After is:
And finally, the recovery menu:
Don't press anything, just wait for the recovery menu to load.
Smartphones with a mechanical Home key
Suitable for Galaxy J1, Galaxy J2 Prime, Galaxy J3, Galaxy J4, Galaxy J5, etc.
We use the same volume up and power keys, only this time we add a mechanical Home key: press and hold them all until Samsung appears.
Then remove your finger from the power key while holding the other two. When the robot appears, you can remove your fingers from the remaining keys. For the rest, proceed the same as in the first case.
Smartphones without mechanical Home and Bixby keys
Hardly most of the company’s latest smartphones fit here, for example, Galaxy A50 (A51), A40 (A41), A70 (A71), A20, A30 (A31), etc. In general, if your Samsung only has two mechanical keys - power and volume, this method will help you.
Turn off your device in the same way as described above, then pick up the switched off device, press the volume up and power keys while holding them.
When Samsung appears, remove your finger from the power key. And when you see the robot, remove your finger from the volume up key. And wait for the recovery menu to load - similar to the first method.
Reset Hard Reset on Lenovo
Surely you will agree that a Lenovo phone is one of the best options for mobile gadgets. It works on Android and is quite reliable, and it’s quite inexpensive. Nevertheless, no matter which Lenovo model you choose, sooner or later there will be failures in the operation of the initially made installations. This is quite logical, since any technique is not ideal. This can happen due to an ill-considered installation of third-party software, or simply if you have not updated it for a long time. In such a situation, the question arises: how to reset settings on Lenovo? Don't worry, everything is quite possible to do! Resetting to factory settings on a phone is no more difficult than on a computer.
What do we do if there is a need to reset all settings on a computer or laptop? If a tough and decisive measure is needed, then we reinstall the operating system by going into Bios. This is a safe but radical method - reinstalling the OS via BIOS leads to the loss of all data. You could try to do this on Lenovo if you have a laptop manufactured by this company. For example, lenovo g50, lenovo a2020, lenovo g580, lenovo b590, b50, g50-45, S 40-40, etc.
Restoring factory settings on a Lenovo phone or tablet is also called Hard Reset. With its help, you can completely reset all parameters, but remember that the stored information will be deleted and will not come back.
How to open Recovery on Samsung
You can enable Recovery on Samsung in one of three ways. The option depends on what buttons your device has. Samsung Recovery is activated exclusively by mechanical keys: this is provided in case the display does not work. Here is the way to enter Recovery on Samsung:
- First of all, the phone must be turned off.
- If there is a mechanical “Home” button at the bottom center, then you need to simultaneously hold down three keys: and “Volume Up”.
If your phone is equipped with a “Bixby” button, then hold down it, as well as “Turn on” and “Increase volume”.
If there is neither a Bixby button nor a Home key, then simply hold down “Turn on” and “Increase volume”.
- Keep the buttons pressed until the Samsung Galaxy screensaver appears. Immediately after this, release the “Enable” key and hold the rest for another 5-10 seconds until the Android Recovery Samsung text menu appears.
- If everything didn’t work out the first time, then turn off your smartphone again and try again.
- On the display you will see the Recovery menu on Samsung.
New models
Turn off Android and hold down the Center Volume Up button + On/Off
Turn off Android and hold down the Center button + Volume Up button + On/Off button
For Samsung Galaxy S8 – S10
- Press and hold the dedicated Bixby button and Volume Up + Power
- After the splash screen appears on the screen, lower the power button, but continue to hold the Bixby button and Volume Up
- Hold these buttons until the Android logo appears on the screen with a blue background
- Release the buttons
- After a few seconds, the Galaxy S8 smartphone will boot into Recovery mode.
Older models and some tablets
- Turn off Android and hold down the Center button and the On/Off
- Turn off Android and hold down the Volume Up and the On/Off
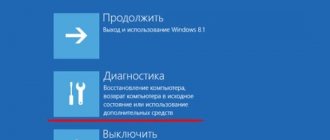
Part 2, How to Quit Android System Restore Error 3e
Here are some common solutions to fix Android system recovery screen not working. And you can also follow the below steps to check if something is going wrong and then Android system recovery error occurs.
Method 1: Test the keys/buttons to see if they work properly
Press these keys and buttons several times and then release them to test. Sometimes you just press too deep, so those buttons can still get stuck and not return to their original position. Check the functionality of the Android physical keys and buttons (Android power button not working?).
Method 2: Take out the battery and reinsert it again
Remove the battery from your Android device. Wait a few minutes and then reinsert it and turn it on to check if everything is ok.
Method 3: Reboot your Android phone
Long press the Power button and Volume Up button until its screen turns black. After that, hold down the Power button to turn on your Android phone. May work and exit Android recovery system with error 3e.
How to select items in Recovery
All actions within the menu are performed using the side keys rather than the touch screen. To move through the items, use the volume buttons. To execute the selected item, press the power key.
Most often, Recovery Samsung will ask you to confirm your actions so that you do not accidentally perform an irreversible procedure, such as resetting your data. In this case, use the side buttons to select “Yes” and press the power key.
How to boot a Samsung Galaxy smartphone into stock/CWM/TWRP recovery mode:
- Turn off the device completely.
- Press and hold the Volume Up button, Home button and Power button at the same time.
- Release the buttons when the smartphone screen turns on and you will see the stock/CWM/TWRP recovery logo. After you release the buttons, you will already see the main menu of the recovery mode. Here you can set the necessary settings or perform important actions on the system, including installing custom or other stock firmware. To boot in normal mode, you need to return to the main screen of recovery mode and select “Reboot system”.
Explanation of Recovery Mode menu items for Galaxy S8
Let's figure out a little what all these inscriptions mean.
- Reboot system now - reboot the Galaxy S8 and start the system in standard mode.
- Reboot to bootloader - reboot in “bootloader” mode.
- Apply update from adb - installation, update and restoration of firmware using a computer, a software image and a special utility - ADB.
- Apply update from SD card - similar to the previous point, only the software file is pre-loaded onto the memory card.
- Apply update from cache - again, similar to the two previous points, only for this process the firmware pre-loaded into the device memory (cache) is used.
- Wipe data/factory reset - reset settings to factory settings (there are other methods - more details here).
- Wipe cache partition - clearing the cache of your Galaxy S8 (what is it and why is it needed?).
- Mount /system - mount the system partition.
- View recovery logs—view the recovery log.
- Run graphics test—run a graphics test.
- Power off - turn off the Galaxy S8.
You definitely won’t be able to perform any operation “by accident”. After selecting the appropriate item, you will need to use the volume keys to select the line “Yes” and confirm your choice.
How to work?
We will not be able to use touch screen gestures. Therefore, our control “lever” is the volume keys and the power button. Use the keys to scroll through, use the button to open one or another section.
Attention! Do not take any action unless you have an idea of what the function you have chosen does.
How to exit recovery mode?
For this operation, you can use one of two methods:
- Press and hold the power button for about 7-8 seconds.
- In the menu, select the “Reboot system now” command.
That's all. It is worth remembering that using recovery mode is not always justified; in some cases (removing some third-party malware or fighting applications that do not allow themselves to be uninstalled), Safe Mode will be sufficient for the Galaxy S8, but that is a completely different story.
Recovery errors
Sometimes there is such a common error in Android System Recovery 3e as canceling the installation of the firmware or package. It can occur for several reasons: the firmware file is damaged, incorrect information in the binary file, or the firmware simply does not suit this device. But there is another option: before flashing the firmware, the device was not reset to factory settings. It’s good that they can be easily fixed in the same recovery. There are several ways to do this.
So, if the error occurs due to a broken firmware file, then you should download it, connect your smartphone to the computer, go to the Mount & Storage menu item and select Mount USB Storage. After this, you can copy the firmware again to the root of the memory card. If you forgot to “wipe”, then there is nothing easier than moving a few levels higher and selecting the appropriate menu item. But the Android System Recovery 3e error “No command” is very rare. It only appears when the user tries to install an update via ADB. Usually this method doesn't work. As a result, this error appears. So there is no point in using this method. Nothing will work anyway.
Management in the Recovery menu
Volume Up and Down —move through the menu. On/Off key —select an item in the menu. There are some Android devices that do not have a volume key ,
in this case, you will need
an OTG cable and a computer mouse.
As soon as you start putting Android into Recovery mode, connect your mouse. This concludes the article. If you don’t know how to use it and what items in Recovery are responsible for, then read the article
- FAQ Clockwordmod or complete instructions for CWM
- How to use TWRP RECOVERY
- If errors occurred when installing the update - Status CWM
That's all! There is nothing complicated! Read more different articles and instructions in the section Articles and Android Hacks . Stay with the Android +1 , it will be even more interesting!
Sources
- https://androidp1.ru/kak-zayti-v-menyu-recovery/
- https://wrldlib.ru/menu-of-recovery-android-decryption-samsung-what-is-the-menu-recovery-on-android/
- https://besprovodnik.ru/samsung-recovery/
- https://androidnik.ru/kak-otkryt-recovery-mode-na-telefone-samsung/
- https://nanoreview.net/7339-kak-zayti-v-rezhim-vosstanovleniya-recovery-mode-na-samsung-galaxy.html
- https://topgalaxys.ru/kak-vvesti-galaxy-s8-i-s8-plus-v-rezhim-vosstanovleniya-recovery-mode/