The use of disk images has become more and more popular in recent years, so many programs have appeared to read ISO images, which helps avoid wasting the use of a disk drive. What is ISO? This is a file image where the data and disk structure are stored. In addition, recently many laptops are sold without it. In order to use a virtual disk, you need to have a special drive where it will be written. In order to understand all the nuances, you need to download the UltraISO Pro torrent utility from our website completely free of charge. If you want to know how to use UltraISO, then read this article to the end.
Creating a bootable USB flash drive in UltraISO
In order to make a bootable USB flash drive, you need to follow this algorithm:
- Download the required Windows 10 disk image from the Internet.
- Once it downloads, open it in the Ultra ISO utility.
- Once this is done, select the self-download section.
- Click on the “burn hard disk image” section to burn to a flash drive.
- When the pop-up window appears, click on the name of the media, and then on the “Record” button. Agree to the license agreement, and then wait for the process to complete.
Please note that for full recording you need to have administrator rights. Otherwise an error will occur.
If, instead of making a Windows installation flash drive, you want to create a disk, you should click on the “Burn CD image” button located on the toolbar. When a new window appears, select the required drive, and then click on the “Burn” button. After that, wait until the process is completed.
Remember that the developers have added the possibility of hidden recording, and have also already set values acceptable for recording. If you set the Hide Boot Partition to Hidden, you will not be able to detect the recording media, because it will be hidden. Take this into account when changing settings.
Option 2: CopyToUsb
CopyToUsb is a simple, lightweight utility that is distributed free of charge and does not require installation. It does not have a website, since it was created by one person distributing his software through a file sharing service.
- To use it to write an image to a USB drive, you need to launch the program and select the flash drive to burn in the window that opens.
- Then, by clicking the “ISO Image” button, a dialog box will open in which the image file is specified.
- Select the desired file and click on “Open”.
- If you need to format a USB drive, set the required file system below and specify the drive label.
- Click on “Start” to record the image and wait until the operation is completed.
- You can close the application by clicking the cross in the window title.
Creating a disk image
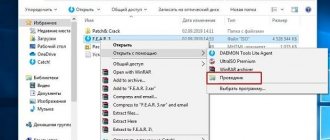
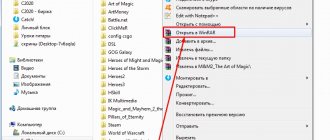
- The first step is to launch the free downloaded UltraISO 9.7 program, and then figure out how to use it. After that, rename the ISO file as you wish. In order to do this, right-click on the shortcut and select “Rename”.
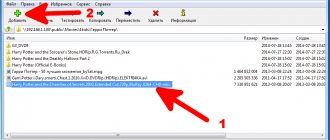
- After that, add the necessary files. At the bottom is the “Explorer”, where you can find the required materials by dragging them to the right side.
- Once the files have been added, you need to save it. To do this, press the hotkey combination “Ctrl+S”, and then click on the “Save” button.
- At this stage you need to decide on the format; it is best to choose .ISO. This is because the format is standard, so any ISO opening program will handle this material.
If you do not plan to continue using the program in question, you can change the format. Some formats are suitable for use in Nero, Alchogol 120% software.
Specify the folder where the final product will be located, and then click the "Save" button. After this, the ISO adapter will begin saving the image. It does not take a lot of time.
Congratulations, the process was successful! By following these instructions, you won’t have to spend a long time figuring out how to use the UltraISO program to unpack ISO.
Part 4: Frequently Asked Questions about DVD to USB
Are there services for copying DVD to USB?
Apart from copying DVD to USB by yourself, you can also contact a customer service to do the job. Search on Google, there are many options. However, they all require some payment, such as $15 for DVD conversion, which is expensive.
Is it possible to copy Netflix shows to USB?
First, you need to download Netflix shows and then transfer the downloaded videos to USB. However, all streaming services adhere to serious copyright regulations. Downloading shows from Netflix is not easy.
How much USB flash drive space is needed to save a copy of a DVD?
It depends on how you copy DVD to USB. If you create an ISO image file from a DVD and transfer it to a flash drive, it won't require much space. Saving videos ripped from DVD will take up a lot of space.
Burning an image to a disk or flash drive
Burning an image to a flash drive in Ultra ISO
To write Windows to a flash drive, you need to adhere to this algorithm. First, let's perform the usual and expected actions: launch the application and insert the USB flash drive into the port.
Please note that the files on the media will be erased, so it is better to save them in another location in advance.
Burning ISO to USB must be done with administrator rights to avoid problems. So, follow these steps:
- After everything starts, you should click on the “open file” section, and then start searching for the image you need to burn.
- The next step is to select the burning method: “Self-boot”, and then click on the “Burn disc image” button.
- At this point, you should ensure that all options are checked and correspond to all required settings.
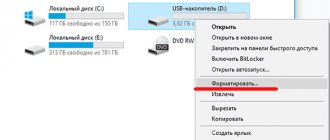
- If the media is not formatted, then you need to click on the “Format” menu, and then select the FAT32 type. If everything has been done in advance, then you should open the ISO, and then “Burn”, agreeing to the license agreement.
- In a few minutes, a startup flash drive will be created, and you can continue working with the image.
If all actions were performed correctly, the name of the flash drive will contain the name of the image. This way you can write anything, even Windows 7 64 bit or a popular game.
How to burn an image to disk
- Insert the disc you want to burn into the drive, and then open the portable ISO reader.
- Add an image to the utility by dragging the desired file onto the work surface. Or enter the application menu, then go to the “File” section, and then select the required one through “Open”. When the pop-up window appears, click on the desired material.
- Once the image is added to the software, it's time to start burning. To do this, go to the “Tools” section, then go to the “Burn CD” item.
- Once the new window appears, you will be able to see several options required to read the ISO:
- Drive unit. If the device has several connected drives, it is worth marking the one you need to record.
- Write speed. The maximum speed is set first, but it is best to set it to a lower setting for excellent performance.
- Recording method. It's best not to touch anything here.
- Image file. This location specifies the location of the file required for recording.
- If you are recording to a rewritable disc, you must first clear it. To do this, click on the special button.
- When everything is ready, you should start burning by clicking “Burn”.
Please note that you can record any image this way. If the error “unknown image format” occurs, you should use the image editor.
The process will complete in a few minutes, after which a completion notification will pop up.
Alcohol 120%
The time-tested program allows you to deploy a disk image to a flash drive using the same principle as was previously done for CDs:
- Install the utility from the official website (also a trial version).
- Launch it. To create a virtual disk for mounting, you will need to reboot the system. Then open Alcohol 120% and select “Burn images to discs.”
- In the “Browse” field, select the directory with the bootable ISO image and click “Next”. Select the remaining settings as desired and click “Start”.
Creating a virtual drive in UltraISO
This algorithm will show you how to use UltraISO premium edition to create a virtual drive:
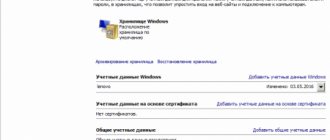
- Go to the program settings, located in the “Options” section.
- Open the "Virtual Drive" section to specify the quantity. There should be no less of them than devices.
- You can complete the process here, or you can rename all the drives to make it easier to navigate. Select the drive where you want to change the name, and then click on the “New Drive Letter” tab.
If you turned on the program not as an administrator, an error warning window will pop up. To solve it, read the article: How to fix errors in UltraISO.
The process of creating a virtual drive has been successfully completed, so you can start mounting the image, and then use the materials located in the image in UltraISO. You can read below about how to mount the image. When is it needed? When you use licensed games that do not work without a disc. You can mount the image into the drive to pretend that the disk is in the drive. If necessary, you can always unmount the image.
Mounting the image
Mounting images of an optical drive is quite simple, because it is a simple process of connecting the disk to the drive only in the virtual world. In simple terms, you simply virtually insert the disc into the drive. In the software in question, this can be done in two ways, using the application directly or the explorer.
Method 1: Launch through the application
- First, launch the application to open the image used for editing. To do this, click “File” and then “Open”.
- Specify the folder where it is located, select it, and then open it.
- Use the menu to go to the "Mount to virtual drive" section in the tools.
- When the pop-up window appears, specify the required drive, and then click on the “Mount” button.
The program may freeze for a while, but don't be alarmed, because the developers simply didn't provide a tracking line. After a couple of seconds, the mounting will be completed, after which you can continue working.
Method 2: Windows Explorer
The presented method allows you to do faster work because you don’t have to open your program.
- Open the folder where the ISO is located.
- Right-click on it, then select the “UltraISO” menu, then go to the “Mount image into virtual drive F” section.
- After completing the steps, the installation will be completed.
This method has a slight drawback, because you cannot notice that the image disk is full.
Installing games using Ultra ISO
Very often, users ask how to install a game using ISO. This question arises due to the existing copy protection. Many toys are licensed and require a disc in the drive. Read the article to the end to learn all the nuances of working with the software.
Creating a game image
First, insert the licensed disc containing the game into the drive. After that, open the software, doing it as an administrator, and then click “Create”.
Specify the required drive and the location where the image will be saved. The format must be .iso for the program to recognize it.
Wait for the process to complete.
Installation
- Close windows that are not needed while working, click "Open".
- Specify the location where the game data was saved.
- Press the "Mount" button, having previously created a virtual drive. Read above how to do it.
- Wait while the program completes the mount. Close the utility.
- Go to the drive where the mounted game is located to find the “setup.exe” file. Follow the same steps as for a normal installation.
This concludes the work on this issue. This is an interesting way to use licensed toys without a special disc. Now the game will always run as long as there is a virtual drive. Enjoy!
Program installation
First you need to choose a suitable torrent client. The most popular and most adequate is uTorrent. The utility is not bad, but its free version is crammed with advertising. However, this does not affect the download speed in any way.
Now let's start the installation.
Step 1. First, open the browser and type “uTorrent” in the search bar. Press “Enter” on the keyboard.
Step 2. In the results, click on the very first link. It leads to the official website.
Step 3. On the main page, click on the button “Download uTorrent Classic”.
Step 4. Next, select the “Free” column and click “Download”.
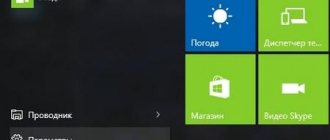
Step 5. The file download will start automatically and complete very quickly. Now open Windows Explorer, go to the downloads directory and launch the installer by double-clicking on the downloaded file.
Step 6. The installation wizard will launch. At the first stage, you just need to click “Next”.
Step 7. Next, we also simply click on “Next”.
Step 8. At the next stage, you will need to accept the license agreement by clicking on the “Agree” button.
Step 9. But at the next stage you need to be careful. The installer will try to quietly install some fraudulent application from sponsors. You must refuse by pressing the “Decline” button.
Step 10. We also do not need to install Yandex Browser. So, we also click “Decline”.
Now the installation of the client itself will begin. And upon completion, the installer will display a corresponding message. It is not necessary to run the installed program. It does not require basic setup.
Moreover, files with the torrent extension will be automatically associated with the application during the installation process. You can immediately start downloading content. And this is exactly what we will talk about in the next chapter.
Attention! When installing uTorrent, you should pay special attention to the messages that appear in the installer. If you don’t read them, you can install together with the client often unnecessary programs from Yandex or Mail.ru, which will then be very difficult to remove. Be careful when installing a torrent client.