A bootable USB flash drive with an image of the Windows operating system can be created using the UltraISO program. Why is it necessary to have such a bootable USB flash drive with an operating system image recorded on it?
Unexpected problems may occur when using the Windows operating system. The operating system may begin to work, at best, with malfunctions, and in the worst case, it will stop loading altogether. No one is immune from such possible problems; it is impossible to predict this in advance.
Sometimes problems with the operating system can be fixed using the Windows operating system recovery function. To do this, you will need to start restoring the operating system, if, of course, this feature is currently functioning.
If you cannot start such a recovery using standard Windows operating system tools, then you can try to restore the system using a disk with an operating system image recorded on it, or use a bootable USB flash drive for this.
In most cases, serious problems can only be resolved by reinstalling the operating system if you have not backed up Windows and your data in advance. Therefore, it is always necessary to have a disk with an image of the Windows operating system. Such a disk can be used for a new installation of the operating system, to restore the operating system, or to reinstall it.
Advantages of UltraIso
The advantages are huge functionality:
- UltraIso can create disk images for further use;
- you can simulate existing images, create bootable disks with various information, and much more. In addition, the program supports more than thirty different disk image formats.
UltraISO how to burn an image
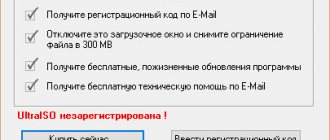
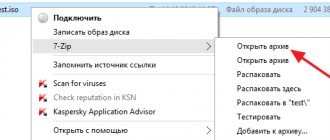
Download the program from the official website at: https://UltraISO-ezb.ru/. Installation will not be difficult even for a novice user. To make the option to burn a USB flash drive available, run the utility as an administrator. Click on the shortcut or executable file of the RMB program, select:
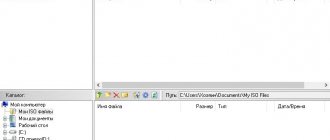
Choose File:
If it opens, go to:
Set recording settings:
- Disk drive. Drive letter of the flash drive. Information from the removable storage device will be deleted;
- Recording method. Select as in the screenshot. If the BIOS version is not visible, install a USB-HDD;
- Create an Ultra ISO image, click “Burn”.
Peculiarity
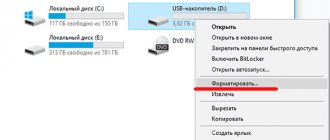
The utility automatically formats removable media into the FAT 32 file system. To leave NTFS, go to:
When unpacking to a USB flash drive, the file system will not change. Information will be displayed that the data will be deleted.
After recording is completed, the following message will be displayed:
How to record to a computer
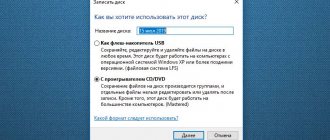
Launch the application. Give the disk a name. Press RMB, select: Use Latin letters so that after recording they are displayed correctly. An Explorer window will appear at the bottom. Select:
Further:
Specify the directory on your PC where to save the data.
How to burn to disc
Place the CD or DWD disc into the drive. Select:
Specify the storage directory on the HDD. Set the format to ISO. Click "Create".
How to record multiple images
The developers have introduced an editing function into the program. Add some images. From the file manager, transfer the data to the disk image. Click:
Problems installing Windows XP on netbooks
Many owners of netbooks or any other personal computers without CD/DWD drives often wonder how to change the pre-installed operating system to a newer, more advanced or reliable one. Perhaps someone needs to restore the system using a boot disk.
The reasons for this may be different:
- The CR-ROM in your computer has broken down along with the operating system, and there is no way to restore it.
- You can solve the problem by purchasing an external disk reader. This option also has its advantages, since in this case there should be no problems with creating a boot device at all.
However, buying an additional device equals additional unnecessary waste of money and time. In addition, you are unlikely to find a store or market with external drives for disks in small cities or towns.
Benefits of Using USB to Create a Bootable Disk
That is why every user has the opportunity to install any operating system on their personal computer using the smallest of all possible media - using a USB flash drive. Of course, ordinary PC users may encounter certain difficulties when creating a boot disk on USB media. But, firstly, everyone (or almost everyone) has flash drives in their house, and secondly, there are no real difficulties in creating a bootable USB disk if you use the UltraIso program.
Errors when writing to UltraISO
While burning an ISO image to external media, the user may encounter various errors in the UltraISO program. Here are the most common ones:
- Error 5 when writing to the device.
- Error formatting NTFS volume 121.
- Error formatting NTFS volume 34.
UltraISO: error 5 when writing to device
Once, having launched the UltraISO program, in the process of burning an ISO image to a USB flash drive, you can receive an unpleasant notification in the form of a pop-up window with the inscription: “ Device is busy. Please close all running programs ."
After closing the window, you will receive the following notification: “ Please remove and reinsert the USB flash drive .”
After closing the message, the status will appear in the main recording window: “ Error 5 when recording to the device .”
Let me note that doing the following procedures does not help:
- Replacing a flash drive
- Reboot Windows
- Update chipset and usb drivers
- Closing all programs and applications
There is a suspicion that error 5 in UltraISO appears after the next Windows update. Unfortunately, there is currently no solution to resolve error 5 when writing to a device. Therefore, either use another alternative program, or reinstall Windows 10 and install UltraISO again.
UltraISO: Error formatting NTFS volume 121/34
Errors 34 and 121 when writing an image to external media using the UltraISO program appear in two cases:
- The flash drive is faulty. Try connecting a different USB drive.
- The file being written is more than 4GB, format the flash drive to the NTFS file system.
If you have any questions about how to record using ultraiso, write in the comments, I will try to answer and help.
Did you find the article useful and informative? — subscribe in the form below to new interesting posts or share the link with friends through social network buttons. The best “Thank you” is your repost
Creating a bootable disk from an .iso image in UltraIso
Actually, the UltraIso program has gained popularity due to its ability to create a bootable USB drive. The developers offer the easiest way to create such a disk. This fundamentally distinguishes it from similar programs with similar functionality, such as Alcohol or Daemon Tools. Let's take a closer look at how to create a boot disk using UltraIso.
This article will describe in detail how to create a boot disk with an image of the Windows Xp operating system, since the algorithm for Windows 7 or Vista is similar, and there are other, special and more convenient programs for creating a disk with Linux systems or Mac Os.
Creating a bootable USB flash drive for Windows without programs
Users can create bootable flash media for the latest versions of Windows OS without resorting to special programs. This requires: a flash drive with a capacity of at least 4 GB and an ISO image or disk with the necessary Windows distribution.
The algorithm for creating a bootable flash drive is simple:
- USB – formatted to FAT32
- The ISO image with the necessary distribution package can be unpacked with any archiver;
- after extraction, you get a package with installation files on your computer;
- the folder opens - all files contained in it are copied to a formatted USB drive;
- When copying is complete, the flash drive is removed.
The bootable USB flash drive is ready, you can install Windows on any computer.
Bootable USB flash drive from the command line
Another way to create bootable flash media without special utilities involves using the command line.
A flash drive formed in this way installs Windows 8 or 10 distributions on a computer, regardless of whether it is equipped with a UEFI interface or not.
The algorithm for forming the media is as follows:
- The flash drive is connected to the computer;
- The command line is launched under the administrator name: For Windows 8 and 8.1 – press + X on the keyboard and select “Command Prompt (Administrator)” in the menu that opens. For Windows 10 - similarly, either the "Start" menu -> "All applications" -> "System" -> "Command Prompt";
- In the window that opens, type the “diskpart” command to launch the program. Press “Enter”;
- type the command “list disk” and press “Enter”, after which all disks connected to the system are displayed in the window;
- Select the media from the list of disks - type the command “select disk X” (where X is the name of the media) and press “Enter”;
- The “clean” command is typed to clear the media. Press “Enter”;
- then the “create partition primary” command is typed to organize the primary partition on the disk. Press “Enter”;
- Next, the “active” command is typed to make the section active. Press “Enter”;
- then enter the command “format fs= fat32 quick”, which starts quick formatting of the disk in FAT32. Press “Enter”;
- Upon completion of formatting, the “assign” command is entered, which automatically assigns a name to the disk. Press “Enter”;
- then to exit, type the command “exit” and press “Enter”.
After the above steps, the USB drive should appear in Windows Explorer with the letter assigned to it.
Next, you need to make the media bootable, for which an ISO image with the OS distribution is connected to the system and the command “Y: bootsect /nt60 X:” is entered on the command line (where Y is the name of the ISO image, and X is the name of the media);
Then, at the command line, enter the command XCOPY Y:*.* X: /E /F /H (where Y is the media where the copying is coming from and the name of the ISO image, and X is the name of the media) which copies the installation files to a USB drive (example commands: XCOPY “Y:win.iso” X: /E /F /H).
Instructions for CD/DWD disks
You need to download the Windows XP image you need in .iso format from some resource, usually there are a lot of them on popular torrent trackers.
- First of all, you need to install the program on your PC (trial version, which loses its functionality 30 days after the first installation). Then you need to insert a blank disc into the CD drive and run the program.
- After starting the program, you need to go to the “Tools” menu and select the “Burn CD image” option. Then you select the required drive (which contains the disc) and the .iso file containing the downloaded (or purchased) Windows XP image. It is recommended to set the value for the recording speed to the minimum, since it is at this speed that the disc will be written in the best way, and you will not have any problems when installing Windows XP, although if you do not have extra time, you can risk recording at high speed, rather There won't be any problems at all.
- Then you need to click on “Record” and wait, after which you can proceed directly to the process of installing Windows XP on your personal computer.
- Restart your computer and select CD-ROM/
Ultraiso burning a windows image to disk
Very often, to reinstall the operating system, you need to burn a boot disk. To accomplish this task, I would recommend a program such as UltraISO.
My other advice to you is that while the disc is being recorded, try not to work on the computer, in order to avoid any errors or freezes. In this case, the disc may not burn correctly.
Before recording an image onto the matrix, you should make sure that the surface of the matrix is clean, free of scratches, dust, dirt, and fingerprints. Any surface defect can lead to recording errors and damage to the purchased blank.
If the recording will be made on a rewritable matrix (RW) and this is not the first recording on such a matrix, then the disk must be completely erased. This will prevent old data from being read in parallel with the recorded track being read.
Let's start recording:
1. launch the UltraIso program;
2. If you have the program for recording information on laser discs Nero , then in order to avoid program conflicts, using the path Options > Settings > Recording, enter the Recording Settings window
3. To avoid getting a non-working disk, remove the Use NeroAPI if possible flag.
5. Call the procedure for burning an image Tools > Burn CD image... or by clicking the corresponding button on the toolbar (or the [F7] key
6. In the recording settings dialog that opens, select the drive, set the recording speed, Disc-at-once (DAO) recording method: entirely at once, set the recording check flag. You should choose the minimum speed allowed for each type of matrix. The lower the recording speed, the lower the processor load, the greater the time reserve for replenishing the recording buffer with data, and the deeper and better quality of track burning.
Source
Instructions for USB media
First, you need to insert the USB flash drive into your computer and run UltraIso. In the program window that opens, you need to open the .iso image file (File - Open) with Windows XP.
After this, you need to select the “Boot” item in the main menu, and then “Burn hard disk image”.
- In the window that opens, you need to select a drive, in this case it is a flash drive on which to record (Disc Driver). Then you select the recording method, to do this you need to press USB-HDD+. Next, you click the “Record” button and wait for the recording process to complete.
In order to use the created bootable flash drive and install Windows XP, you need to select (after restarting the PC) USB-HDD (or a similar item with the name of your flash drive) as the priority boot drive.
Which flash drive to take and how to prepare it?
Not every “extra” flash drive can be made bootable: we need at least 8 GB of capacity and support for USB 2.0 (unless, of course, you want to spend hours creating a Windows 10 installer). Before starting, transfer all files to a safe place and format the USB drive to FAT32.
- Go to “My Computer” / select our flash drive / right-click on it / select “Format”.
- File system “FAT32” / check the box “Quick format” / “Start”.
Important: We recommend opening any of the described utilities from an account with administrator rights - there is less risk of unnecessary jambs (when starting, right-click and select “Run as administrator”; if asked, enter the password).
Burning a disc
Saving data to storage media is as easy as in Nero. The user only needs to place the required files into the project and then click the record button. However, you must first create an image from a folder stored on your computer. To do this, transfer the necessary files to the upper right window of the program, and then execute the command “file” → “save as...”. Next, the image can be moved to disk (“Tools – burn CD image”), specifying the recording speed and other parameters.
What problems might you encounter?
Usually the process of working with the utility goes smoothly, but in some cases problems and additional questions may arise. Let's look at the main ones.
- Cannot create a bootable USB flash drive with Windows XP distribution. The solution would be to use the WinSetupFromUSB utility or roll back the current date in the BIOS to 10 years ago. After installation, you can return the current date.
- The capacity of the USB storage device has decreased or it is recognized as a CD-ROM. In this case, formatting using the “ImageUSB” utility, which I discussed at the very end of the article about Memtest86, will help.
- Some users try to record several distributions at once; unfortunately, this is impossible to do.
- The program freezes or the recording process freezes. Most likely the problem is on the side of the USB drive, check its functionality.
- Sometimes there is a need to create a multiboot USB flash drive with a large set of utilities. In UltraISO, there is only one way to make such a drive - to burn a ready-made multiboot image. But you won’t be able to create it yourself. The WinSetupFromUSB utility can help here.
I tried to write the most detailed article possible, I hope that I succeeded and that you now know how to use the Ultra ISO program and can independently apply it in different situations.
If you have additional questions, ask them, I will help as best I can.
Solving the problem of administrator rights
In order for this problem to be solved, it is necessary to find out why this warning appeared? I think you know that all operating systems have different file access rights. The main person in Windows is not the user, but the Administrator.
But, if you are the admin, then why did this entry appear? There is a nuance here. It turns out that the security of Windows 10 is not the standard for this OS. Therefore, in the hope of smoothing out this situation, the OS denies access to software that tries to insert changes into software parameters or personally into Windows.
Windows takes away administrator rights not only from those users who simply do not have such rights. This system can partially remove such rights from the administrator himself. In a similar way, Windows is trying to protect itself from the introduction of new rules by various software.
Also, the problem may arise if the user tries to write to removable media. In addition, this problem may appear if you try to save the image in a protected folder. As a result, Windows acts this way when there is some impact on it that affects the functioning of the OS or even the functioning of the flash drive (a rarer case).