Quiet sound in the microphone interferes with comfortable conversation with interlocutors and recording audio or video files. Sometimes even using the mixer and moving the sliders cannot fix the problem. However, you should not immediately return the device to the store or recycle it, since you can increase the microphone volume through the built-in Windows tools. If other methods are ineffective, the use of amplifiers is allowed.
StockSnap image from Pixabay.com.
How to make your microphone sound better
Many personal computer users prefer a telephone headset, where the microphone and headset are combined in a single design.
How to improve microphone quality in headphones. The functionality of the Windows operating system allows only minor improvements to the microphone sound quality. This procedure is performed in the “Improvements” column in the “Properties: Microphone” tab. To enter the workspace, you must perform the following steps: “Start” button → “Control Panel” → “Sound” → “Recording” → “Microphone/context menu” → “Enhancements”. Using operating system tools, you can get rid of reverberation (echo effect), partially remove noise and remove the constant component. This is not enough to obtain a high-quality recording. In order for the sound from the microphone to be good, you need to use a program to improve the quality.
Ways to raise microphone volume on Windows 10
Changing the volume of a sound recording device, both built-in and external, is quite simple. This is done using standard Win 10 tools or directly in applications created for video or voice communication: Skype, Discord, etc.
Sound recording program
Many people need a microphone to record audio tracks. For this purpose, Windows has built-in tools, but separately downloaded software is more functional and flexible in terms of adjusting parameters. You can boost your microphone on Windows 10 using UV SoundRecorder.
First you need to download the program from the developer’s website:
https://uvsoftium.ru/products/uvsoundrecorder
To do this, click “Download for Windows Vista, 7, 8, 10.”
Having installed and launched the program, go to the “Recording devices” section, where there will be a line “Microphone”. To increase the volume, just move the slider.
Next, check the result by clicking on “Record”.
Having said something into the microphone, they press “Stop.”
The field above shows where the recorded file is saved. After listening, they determine whether this volume level is sufficient.
Parameter adjustment in other similar programs is carried out according to a similar algorithm - the slider is turned up to the maximum or to the value that suits you.
Skype and Discord
Skype is a program for online conversations, and it has an option to increase the microphone volume. Having launched Skype and logged in to your profile, click on the button in the form of an ellipsis to the right of your nickname, and select “Settings” from the drop-down list.
Next, go to the “Sound and Video” section.
Check to see if the microphone is set correctly in the program.
To change the volume manually, disable the “Adjust microphone automatically” value.
A slider will appear on the screen, which can be moved left and right to decrease or increase the volume.
At the same time, speaking into the microphone, they monitor the volume scale.
The instructions are valid for the version of Skype released in 2020.
Discord is a messenger originally created for gamers to communicate in group chats, for example, when playing a game together. Adjusting the microphone through it will also not be a problem. After logging in to the messenger, click on the gear icon.
The settings will open, where you go to the “Voice and Video” tab. First of all, check whether the microphone is selected in the “Input device” column. If yes, then if you say something, the bar under “Input Sensitivity” will fill in green. And to fix the volume level, there is a slider in the corresponding item.
After scrolling down the settings page, it is recommended to activate the options shown in the picture if for some reason they are disabled.
Built-in Windows tool
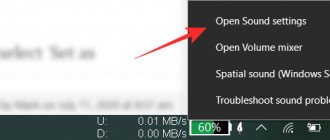
To improve the sound using OS tools, press “Start” and go to “Settings”.
Then open the “System” section.
The category you need is called “Sound”.
First, select an input device, then go to its properties.
Use the slider to set the volume value. The result is checked immediately.
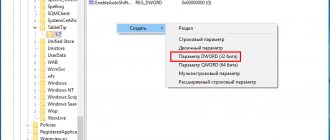
If you click “Advanced device properties”, another menu will open, where in addition to volume, gain in decibels is added.
By going to the “Advanced” tab, the bit depth and sampling frequency are set. The higher the values are set, the better the recording quality changes. It's worth going by ear.
Windows Standard Tools
If your laptop has a voice recorder and it is present in the Control Panel, but it still does not work or you hear noise, then you can set it to silent transmission. That is, to improve sound quality you need to change some parameters:
- Go to “Control Panel/Sound”;
- Go to the Recording tab, right-click on the microphone and select Properties.
- Next, go to the “Enhancements” section and turn on the noise reduction and echo cancellation features.
After the work has been done, test the recording equipment. If the voice is heard normally, without interference, then it is configured correctly. If the interference persists, read the article further.
Please note that problems may be related to the audio enhancement settings, which are configured in the Enhancements tab. It is not recommended to set the value above 10 dB. Here you can increase the volume.
The same principle will work for both a headset with a built-in microphone and a webcam.
Microphone settings in different programs
You can configure the equipment either through the built-in software or through the programs that you use for conversation. It's best to start with OS tools. If the problem lies there, changing the settings of other programs will not help.
Sound recording devices
In Windows, microphone configuration is done through the built-in Recording Devices application. You can enter it in 2 ways.
Image by Thomas B from Pixabay.com.
Either right-click on the speaker icon next to or in the tray and select the “Recording devices” line, or open the control panel through the search. In it, go to the “Hardware and Sound” category, then to “Sound” and click on “Record”. Open the properties of the problematic microphone. Click on the "Levels" category.
In the tab that opens, you can configure 2 parameters: microphone and gain. The first one adjusts the sound volume. If your interlocutors complain of poor hearing, turn the slider to the right as far as possible. Gain needs to be adjusted with care as you risk getting extraneous noise. For most gadgets, +10 or +20 dB is enough.
If you still need to turn up the volume, enter +30 dB. However, the sound may become distorted.
Skype
Skype has built-in microphone options. To access them, first log in, then go to options and select the “Sound Settings” category. Make sure the correct hardware is selected as the primary recording device. If you cannot find your model, install or update the drivers. Turn the sound level up to maximum.
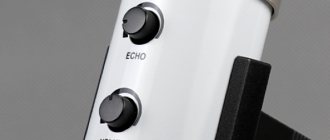
How can you improve sound quality using equalization?
Post-processing means you have VST plugins that do a great job of this. Any graphic or parametric equalizer can handle this. First, it’s worth trimming the sub-bass to remove excess low-frequency noise from the vocals. The most important thing is not to exaggerate and remove useful frequencies in the low spectrum: up to 100-150 Hz for a male voice and up to 300-350 Hz for a female voice
Secondly, you need to understand that correcting the frequency range of recorded vocals on a cheap microphone begins with finding and isolating useful frequencies. How to do it?
To understand what changes need to be made, we divide the vocal range into 3 parts: low frequencies (from 100 to 500 Hz), mid frequencies (from 500 Hz to 2 KHz) and high frequencies (from 2 KHz to 20 KHz). In my opinion, the most problematic areas of cheap condenser microphones are in the midrange - they make our sound plastic. Using a graphic equalizer as an example, let's look at the first stage of sound improvement:
What have we done? On the graphic equalizer we set the “V” shape, thereby adding the missing low frequencies to the voice, i.e. body, and increased the so-called intelligibility in the high frequency range. Be careful and listen when you raise/lower the level of a particular frequency, because you can suppress your voice or, conversely, deprive it of useful frequencies. In our case, a gain or cut of 3.5 - 5 dB will be sufficient.
But that is not all!
The passive V-shaped equalizer still needs improvement, namely in reducing the volume of dissonances across the sound spectrum. This will get rid of all the whistling and buzzing unnecessary frequencies. How to do it?
A graphic equalizer in this regard will be much more effective than a parametric one, because with its help we see which areas cause dissonance. So, to search for “hissing” and “squeaking”, the Q value (the ratio of the central frequency of the range we have chosen to its width) should be minimal. Now we can find sounds that are unpleasant to us and lower their amplification level, but it is better to do this with the help of a dynamic equalizer, so that in the absence of resonance of the selected frequencies, the voice does not lose its natural coloring.
Now our vocals, recorded on a cheap microphone, sound much better and are ready for further processing with various plugins and other mixing tools!
Therefore, we can conclude that even with a budget microphone you can achieve decent sound for your creativity!
Making a device yourself
If you don’t want to purchase a factory-made device or need to save money, you can assemble a microphone preamplifier yourself. There are several schemes for its creation.
Battery powered amplifier
The simplest battery-powered amplifier can be assembled using the domestic transistor KT837. In addition to this you will need:
- 12 V “Krona” battery;
- 220 µF electrolytic capacitor;
- 5 kOhm resistor;
- aluminum radiator.
For assembly you need:
- connect the positive output of the microphone to the positive contact of the battery, and the negative one to the negative terminal of the capacitor”;
- connect the “pluses” of the capacitor and the “Krona” to the emitter of the KT837;
- connect the negative contact of the battery to one of the contacts of the audio plug, which will be connected to the sound card;
- Solder a resistor parallel to the base and collector of the transistor;
- connect the collector to the second contact of the audio plug.
The circuit can be supplemented with a switch that will interrupt the supply of current from the “Krona” to the remaining elements.
Module on board MAX9812
MAX9812 is a module for working with the Arduino system. However, it can be used without additional firmware. In this mode it works as a microphone amplifier. To prepare the board for operation, you will need to perform the following steps:
- solder a microphone to the GND and MIN seats in the upper part;
- solder wires to OUT and GND at the bottom that will lead to the audio output plug;
- Solder wires to “plus” and “ground” in accordance with the polarity from a 3 V battery.
After completing the above steps, the amplifier is ready for use. For greater convenience, you can install a switch between the battery and the board that will interrupt the power supply. This will slow down the wear of the elements and save battery.
The MAX9812 not only increases the output level, but also suppresses extraneous noise up to 100 dBel.
Rechargeable amplifier for powerful volume boost
When you need to amplify the signal to a greater extent, you can use an amplifier circuit with 2 KT3102E transistors. If you cannot find them, you can take a foreign analogue of VT1. You will also need:
- 0.33 µF ceramic capacitor;
- 2 electrolytic capacitors of 10 μF;
- resistors of 47, 4.7, 150 and 3 kOhm;
- power supply with voltage from 3 to 6 V.
For assembly you need:
- connect the collector of the 1st transistor with the “plus” of the 1st electrolytic capacitor and a 4.7 kOhm resistor, the emitter with a 3.3 kOhm resistor, the base with the collector of the 2nd KT3102E;
- connect the 3.3 kOhm resistor to the 2nd contact of the 3 kOhm resistor, as well as to the 150 kOhm resistor and the “plus” of the 2nd electrolytic capacitor;
- connect the base of the 2nd transistor to the 2nd contact of a 150 kOhm resistor and a ceramic capacitor;
- Apply “plus” power to the free contact of the 4.7 kOhm resistor;
- to ground connect the negative of the battery, the emitter of the 2nd transistor, the negative contact of the electrolytic capacitor, 1 of the microphone outputs, 1 of the amplifier outputs;
- Connect the 2nd output of the microphone to the 2nd contact of the ceramic capacitor;
The minus of the 1st electrolytic capacitor will serve as the 2nd output. For ease of use, you can include a switch in the circuit that will interrupt the power supply.
https://youtube.com/watch?v=XRIJNmzQgN4
It is possible to use wall-mounted installation. However, this is inconvenient, so it is better to prepare the printed circuit board.
Codecs
You can improve your laptop's microphone with "Realtek High Definition Codecs", a codec and control panel for improving the sound it outputs, suitable for all types and types of audio recording equipment. We perform the following steps:
- We go to the official website.
- Select Realtek HD Codecs.
- Download the current version of the program according to the installed operating system;
- Install the utility using the installer;
After installing the program on your computer, you need to configure it:
- In the control panel, find and launch “Realtek HD Manager”;
- Open the “Microphone” tab;
- Activate echo and noise reduction functions;
- Click OK and save your changes.
Now the program is configured and ready to work. It will help significantly improve the performance of the microphone on your laptop.
Special programs
If the capabilities built into the sound card drivers are not enough for improvement, you can resort to the help of special programs that have the necessary tools. Using these applications, you can correct finished recordings or process the sound of a live microphone.
Realtek HD Audio
First of all, you need to unmount the control panel called Realtek HD Audio. This is the official software from the developers of Realtek sound cards. We decided to talk about this particular software, since in most cases the sound card built into a computer or laptop was created by the mentioned company. Realtek HD Audio not only installs drivers and codecs into the operating system, but also adds GUI software that allows you to customize the audio, including the microphone.
The available options depend not only on the sound card, but also on the peripheral device. For example, some microphone models do not have a noise reduction function, so you will not be able to configure this parameter through Realtek HD Audio. In any case, the standard volume control will be adjustable, and owners of equipment with custom positioning will be able to adjust the sensitivity of the receiving sides of the signal. However, most of the options available in this software are related to speakers. This is no longer relevant for our topic today, so we invite you to familiarize yourself with all the possibilities in a separate review on our website by clicking on the link below.
AudioMASTER
This program was developed by national providers. Its main activity is processing added audio tracks. Here you can apply various filters, remove noise and echo using built-in plugins, and work with an equalizer.
In addition, it is possible to record from a microphone and participate in preliminary settings. By increasing or decreasing the volume, you can affect the sound quality.
The saved audio track is immediately placed in AudioMASTER, which makes it possible to access it for further editing.
The program is also equipped with built-in functions that affect the recording quality. For example, you can use pre-prepared effects and completely change the track.
The “Equalize Volume” option allows you to eliminate noise that puts pressure on the ear, as well as eliminate unexpected volume jumps. If you want a little echo, use reverb.
Adobe Audition
This program is a professional tool that processes sound coming through a microphone. This is the most functional solution among all known programs.
This is because providers have focused on audio processing when developing the application. At the same time, unique features were added to the utility.
Its purpose is to raise certain frequencies or eliminate them. This makes the voice clearer and extraneous noise disappears. Special plugins can adjust the tone and apply effects.
It completely changes the sound. In addition, Adobe Audition has the ability to remove a voice from an audio track if necessary.
A novice user will not be able to immediately discover the functionality of the application, since it contains a fairly large number of panels and parameters.
This program shows excellent results even with a cheap microphone or occasional interference. In order to quickly become familiar with the utility, you can use special lessons that are available on the official website of the developers.
Programs and applications for connecting on a computer
If the output sound quality is still not satisfactory, we recommend downloading one of the professional programs for adjusting microphone settings from the proposed list:
- Realtek HD Audio;
- Audacity Potable;
- Sound booster;
- Absolute Sound Recorder;
- Free Sound Recorder.
Personalization in Realtek HD Audio
- In the main program settings menu, you can activate noise and echo suppression options for your microphone.
- In the top panel you can adjust the recording and playback volume of audio recording devices. By default, the values are set to maximum, but if you think the microphone is too loud, you can adjust these values.
Free Sound Recorder Configuration
- In the start menu of the utility, select the display mode “Show mixer windows”.
- Select the appropriate microphone and open the Options tab.
- Uncheck the box “Automatic gain control”. This will give you the option to manually configure your microphone. You can increase or decrease its volume.
Microphone gain in Sound booster
- In the lower left corner of the screen, look for the icon of the installed Sound Booster program.
- Click on it 2 times. In the window that opens, you can select the gain level of your microphone.
- The program has the ability to bind amplification and volume reduction operations to hot keys. To open the program settings menu, you need to right-click on the icon and select “Settings”. Here you can independently assign keyboard shortcuts and enable the program's autoload feature.
Useful tips
Sound quality is the most important parameter for users who actively use Internet telephony and recording programs. First of all, this is determined by the quality of the Internet connection. Also, the speed and status of the Internet are important for both parties and equally affect the conversation.
Programs such as Skype, Viber, etc. prioritize call stability, and if you do not have the fastest Internet, the program will automatically start receiving the worst quality signal so that the user can listen to it continuously. To significantly improve the sound on Skype during a call, stop uploading and downloading files. Sometimes this helps completely solve the problem of bad sound.
Sources
- https://Lumpics.ru/software-for-improving-the-sound-of-the-microphone/
- https://dinamikservis.ru/mikrofony/kak-uluchshit-zvuk-mikrofona/
- https://onoutbukax.ru/uluchshaem-kachestvo-zvuka-mikrofona/
- https://learn4joy.ru/kak-uluchshit-zvuchanie-deshyovogo-mikrofona/
- https://ProMikrophon.ru/rekomendatsii-po-uluchsheniyu-kachestva-zapisi-zvuka-mikrofona/
- https://fobosworld.ru/programmy-dlya-uluchsheniya-zvuka-mikrofona/