Warning
: file_get_contents(https://pc-consultant.ru/wp-content/uploads/2018/06/Nazhimaem-Ok-.jpg): failed to open stream: HTTP request failed!
HTTP/1.1 404 Not Found in /var/www/mebelexp/data/www/pc-consultant.ru/wp-content/themes/consultantpc/fnc/img_webp_cache.php
on line
43
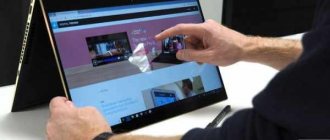
The microphone on a laptop is one of the most rarely used devices . Almost immediately after purchase, it is replaced with an external device or a device built into the headphones. At the same time, most users simply forget about it when using the peripherals. However, while remaining active, the built-in microphone can become a threat to your privacy, as it remains vulnerable to malware (viruses).
How to mute the microphone on a laptop
To avoid unauthorized collection of user information, and simply to avoid conflicts with external devices, it is best to completely turn off the laptop microphone.
In general, there are two ways to mute the microphone on a laptop - either using special keys or using Windows software elements.
Disabling in Linux
Users of Ubuntu and other similar systems can mute the microphone in the same way. Go to the Sound section, then the Input tab, check the box next to Mute.
Nowadays, many users use various peripheral equipment to make calls or record through special programs. The top devices used also include a microphone, which allows you to communicate using your voice, using the same Skype or chat in the game. However, sometimes there is a need to turn off the sound of this equipment, which can be done using completely different methods. This is exactly what we will discuss in our article today. Using Windows 7 as an example, we want to tell you about absolutely all the options for achieving your goal.
Disable via Realtek utility
It’s worth saying right away that this method is only suitable for those users who have a microphone from Realtek installed. The fact is that this manufacturer, along with the product, also provides a utility that helps to interact with its device. Often this utility is installed automatically along with the driver, and later you can find it in the system tray.
Open the tray and click on the Realtek icon. “Realtek HD Manager” will open in front of you. Most likely, two tabs will be visible - these are “Speakers” and “Microphone”. Go to the second one. Now you have all the microphone settings in front of you. Here, in addition to turning off microphone recording, you can also enable the noise or echo suppression option, as well as much more. Now you know how to turn off the microphone on a laptop if you have one from Realtek.
Disabling the microphone in Windows 7
Each of the following methods is effective in its own way in a certain situation, so we advise you to study all software and hardware methods in order to choose one or more methods that are optimal for yourself. Let's start this material with hardware solutions.
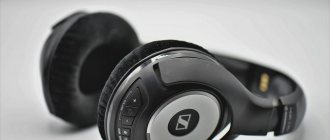
Method 1: Button on headset or microphone
Recently, headsets, that is, headphones that have a built-in microphone, have become extremely popular. Such devices are purchased by gamers and users who actively use voice communication for work or for personal purposes. The design of some models of such headphones implies the presence on one of the bowls of a special button responsible for turning the microphone on or off. Study your device or its instructions carefully to find such a switch. You can see an example of a button in the screenshot below.
Method 5: Enable/Disable Microphone via Device Manager
Enabling your microphone through Device Manager is one of the quickest ways to fix the problem, but sometimes it may not work depending on your microphone settings. However, you can try enabling voa microphone device manager once and check if it helps resolve the issue. Let's see how:
Step 1: Press the Win + R keys on your keyboard simultaneously to open the Run command window.
Step 2: In the Run command window, type devmgmt.msc in the search bar and press Enter to open the Device Manager window.
Step 3: In the Device Manager window, expand the Audio Inputs and Outputs section.
Here, right-click on the microphone and select “Disable Device.”
Now close the Device Manager window, restart your computer, and the changes should take effect.
*Note. Follow steps 1 and 2, then right-click the microphone and select "Enable Device" to turn off the microphone. Restart your computer for the changes to take effect.
How to mute/unmute microphone using keyboard shortcut in Windows 10
Keyboards have a special key to mute the speakers. Keyboards that don't come with dedicated keys still have a row of function keys (fn) that serve as controls for managing media. One of these keys will be able to mute the speakers. There is no such key to mute the microphone.
This usually happens because the microphone is not always on. It only turns on when an app accesses it, in which case users are expected to use the mute button in the app, which works but isn't fast.
You'll likely have to press a button with your mouse, and it's not as fast as a keyboard shortcut. Here's how to mute/unmute your microphone using a keyboard shortcut in Windows 10.
Need to mute or unmute your microphone using a keyboard shortcut on macOS? We have the perfect solution.
Mute or unmute your microphone using a keyboard shortcut
To mute/unmute the microphone using a keyboard shortcut, we will use a free application called MicMute . Download and install it. The application launches in the system tray and adds a microphone icon to it. Using this icon, you can access the application settings and customize the keyboard shortcut, and the current microphone status will be shown. Black means the microphone is muted, and red means it's on.
How to turn off the microphone in Skype on Windows 10
Windows 7 microphone doesn't work - why doesn't it see it in the system?
To turn off a device that transmits audio in Skype, you need to:
- Open the program.
- Go to settings (usually indicated by a series of dots in the upper right corner.
- Stop the mouse pointer next to “Sounds and Video”;
- By moving the blue switch icon that appears in the field on the right, disable automatic microphone control.
- The slider showing the volume level must be moved to zero. In this position, no one will hear sounds near the computer when the program is running or simply downloaded.
Important! For laptops running Windows 7, the procedure for muting the microphone in Skype is similar.
Disable device in Skype
Mute the microphone on a laptop programmatically
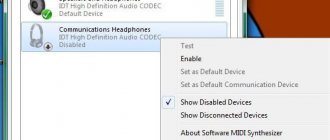
In order to mute the microphone on a laptop, you need to open the recording devices settings. To do this, right-click on the speaker icon on the taskbar and select “Recording Devices”.
After this, the “Sound” window will open in front of you on the “Recording” tab. Here you can mute the microphone. To do this, you just need to right-click on the microphone and select “Disable” in the window that appears.
If you later decide to turn on the microphone, this is done in the same way. Right-click on the disabled microphone and select “Enable”.
Possible difficulties when disconnecting
Difficulties when deactivating the microphone rarely arise. If you cannot disable the device, first check your computer for threats. If there are no viruses, use the following method:
- Open the start menu. Find the “Control Panel” category.
- In the menu that opens, select the “System” section. A window will open describing the characteristics of the laptop. On the left side of the page there is a list in which you can find “Device Manager”.
- In the list of connected components, look for the name of the built-in microphone. Right-click to open the context menu and click “Disable”.
Some users try to disassemble the computer and remove the built-in microphone. A person who does not have the appropriate skills may experience difficulties. It is not recommended to use a physical shutdown method in this case.
Mute the microphone on a laptop using a special key
In addition, very often there is a special key on the laptop keyboard to mute the microphone. This key is marked with an icon that looks like a crossed out microphone. In order to mute the microphone using this key, you need to press it together with the Fn key.
There may also be a separate button or switch on the laptop body to turn the microphone on and off. But this option is less common.
Creator of the website comp-security.net, author of more than 2,000 articles on computer repair, working with programs, and setting up operating systems.
I turned everything off, no use, the microphone still works.
Thank you, you helped me a lot. I record a lot from the screen. I sealed the microphone and the noise still bothered me. Now the record is clear, thank you.
Method 4: Enable/Disable Desktop Apps to Access Microphone
While you are allowed to choose which Windows apps have access to the microphone on your Windows 11 PC, you can also control microphone access for Windows desktop apps. Let's see how:
Step 1: Right-click Start and select Settings from the context menu.
Step 2: In the Settings window on the left, select Privacy & Security.
Step 3: Next, go to the right side of the window and click on Microphone under Application Permissions.
Step 4: Now on the next screen, scroll down to find the “Allow desktop apps to access your microphone” option.
Move the slider left to disable or right to enable this option.
Now all your desktop apps can access your microphone.
Activating the microphone and webcam
To re-enable the computer's built-in devices, you must follow the same steps. The difference lies in the last step. Instead of turning it off, you will need to activate the microphone and webcam. At this stage, it is worth rechecking the functionality of the equipment - making a test recording of a voice or video.
After turning on again, the user settings of the devices may change to the original factory settings. You may need to adjust the voice recording level, color rendering, or update drivers. But in most cases, everything necessary will happen automatically.
Laptop PC
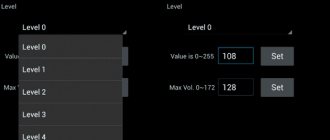
How to turn on the microphone on a laptop when it is running on Vista or Windows 7? Open the “Control Panel”. Then you need to find and select the “Hardware and Sound” menu. After the window opens, select “Manage audio devices.” Left clicking on the “Record” button will open a menu. With one click, click on the “Microphone” inscription and open the “Properties” of the microphone. Switch to the “Levels” menu. We see the volume level, which can be adjusted by moving the slider. To increase the volume level, you need to move it to the right. There is also a slider with microphone levels, which will also boost the microphone quite strongly. But at the same time, it will also increase the level of noise, which your interlocutor is unlikely to be happy to hear after just a few seconds of communication. After completing the settings, find the “OK” button, which will allow you to save the settings changes.
Now about how to turn on the microphone on a laptop in Windows XP. If you have Windows XP installed, visit Control Panel, then Sound, Speech, and Audio Devices. In the window that opens, we will need the “Sounds and Audio Devices” menu. From the bookmarks offered to us, activate “Audio”, select it with a left click of the mouse. Under the Audio Recording heading in the center of the window, set the drop-down menu to the microphone labeled USB (assuming it's built into your webcam). Below, below the list, is the “Volume” button. After activating it, a window with three volume controls will open. We are interested in the indicator called “Microphone”. Check the desired column, then set the desired volume level. The higher the indicator, the louder the microphone sound; the lower, the quieter it is. After setting the volume, activate the “Settings” key, under the volume control. Check the box next to “Microphone Boost” and click “Accept” to save the changes. The audio device setup is complete.
Tips and possible problems
The first is to analyze the need to block the webcam and microphone on the laptop. If the computer is used for work, a lot of important data is stored on it, business negotiations are conducted, temporary shutdown is recommended
It will really reduce the likelihood of unauthorized access to important information
The same is true for a home PC. However, once devices are forcibly locked, there may be problems activating them again. Therefore, after disconnecting, it is recommended to immediately turn on the webcam and microphone on the laptop. This is necessary to check their functionality.
Why block your microphone and webcam?
The main reason is security. With the help of special spy programs, third parties can remotely turn on the camera or microphone. While on desktop computers users can physically disable these devices, on laptops there is no such option. As a result, they try to solve the problem with “improvised means” - they cover the camera with tape and disconnect the cable from the microphone.
Other reasons for shutdown
- built-in devices do not allow connecting external ones, a protocol conflict occurs;
- Unstable operation, restart required;
- problems with software, incorrect detection of video and audio signal sources.
Before choosing any shutdown method, you need to consider the reverse process - activating the equipment. Otherwise, there will be no video connection at the right time, and it will not be possible to transmit voice messages.
Important: most often, unauthorized access to a computer is provided by spyware. Such viruses are embedded in “pirated” software and emails. The best protection is a reliable antivirus program.
How to remove noise?
Before removing annoying noise from the microphone, you need to check the device to find its weak points.
To do this you need:
- Enter “Voice recording” in the search field and confirm your choice (Metro Windows 10 application).
- When the operation is completed, you need to click the “Start recording” button in the window with the indicator that appears. To check if recording is taking place, the user should say a couple of phrases into the microphone, save the audio file and listen to it. If everything that was said is reproduced normally, then the microphone is fully working. When the sound file contains noise, it means there is a problem with the microphone and you need to check its design.
How to turn off your camera in Zoom
Is it possible to turn off the camera? In the mobile application, there is a method similar to muting the microphone. Thanks to this, the person will not be visible to other people during the conference.
Just like the microphone, you can turn off the camera in Zoom on both your computer and phone.
Disabling the camera in mobile Zoom
The camera can be turned off before the conference even begins. To do this, even before entering the identification number, select the line “Turn off my video” and drag the slider to the right. Thanks to this, the person will not be visible during the conference.
You can also turn off the camera during the conference itself - you need to click on the crossed out camera, under which there is the inscription: “Turn off video.” In a similar way, you can connect a camera to Zoom.
You can also configure the camera in Zoom by turning off video in the main menu. The camera is configured in the following way:
- Go to “Settings”, which is located in the upper left corner. The settings icon looks like a gear.
- Select the “Conference” line and click on it.
Next, you can select “Always turn off my video.” If you turn the slider to the right and activate it, the person will no longer be visible during the conference. And to turn on the camera, just turn the slider back.
How to disable the camera on a computer
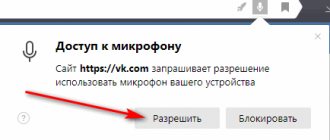
To disable the camera on your computer, go to the site settings. Select the “Camera” line - it is located above the line with the microphone. From the pop-up menu, select the “Block” line.
Once configured, the user will no longer be visible during the conference. Just the next time you broadcast a video, don’t forget to change the settings and turn on the camera.
There is also a computer version of Zoom, in which you can both check and turn off the video camera before the meeting or during the communication.
Disabling the microphone and camera is not particularly difficult. Moreover, this can be done both before and during the conference. The main thing is not to forget to return the settings to their original position. Otherwise, the person will not be able to use the camera and microphone on a regular basis.