You just bought yourself a new computer, convinced that the new hardware is worth every penny. But then a problem arises and your new powerful car no longer seems so powerful. Performance is terrible and the system struggles to complete even basic tasks.
You already know that the problem is not hardware related because 8GB of RAM is not required to open File Explorer. But what happened? Well, you've just encountered the biggest enemy of computer memory - a memory leak.
Here are some of the most common examples of memory leaks in Windows operating systems:
- Memory leak in Java . Applications using Java are more susceptible to memory leaks. So, there is a high chance that a Java-dependent application is slowing down your computer.
- Memory leak in Google Chrome . Even though Google Chrome is the most popular browser, it is also known as the most demanding and resource-hungry program for Windows.
- Memory leak in C. Applications and programs programmed in C are sometimes also prone to memory leaks.
- Memory leak in Windows 10 . Even though Windows 10 is the most advanced operating system, memory leaks still occur quite often.
- Memory leak in Windows 7 . People who still prefer Windows 7 may also experience memory leaks.
- Memory leak in Javascript . If you notice that you are using a lot of memory while browsing the Internet, there is a possibility of memory leaks caused by the Javascript code of some web page.
- Check for driver updates
What are memory leaks in Windows
To understand how to solve memory leak problems in Windows, first we need to know what exactly a memory leak occurs. Memory leak refers to memory loss in Windows caused by a program or application. And when a certain application takes up more memory than usual, the system becomes slow, even unresponsive, and users are unable to perform even the simplest tasks on Windows.
The problem is entirely software related, so if you notice a memory leak, you don't need to worry about physical damage to your RAM. This means that memory leaks are often temporary and there are various ways to fix them. But we will talk about this later in this article.
Each running process in Windows takes up a certain amount or RAM. There are programs that are more demanding and require more RAM usage to function properly, such as Google Chrome or Adobe Photoshop, and there are less demanding programs that actually take up smaller, even unnoticeable amounts of memory. So, when a program takes up more memory than it should, we call it a memory leak.
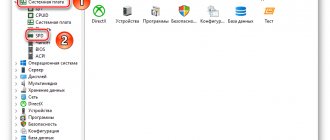
To determine which process is using the most memory, we use a tool built into Windows called Task Manager. To open the Task Manager, press CTRL+SHIFT+ESC on your keyboard or right-click the taskbar and select Task Manager from the context menu.
When Task Manager opens, go to the Processes tab and you will see how much memory each program or process is using. Sometimes the answer is obvious, for example if Sticky Notes is using 70% of your memory, we have a memory leak. But sometimes it's not so easy to determine which program is actually leaking memory.
To ensure that we can recognize a memory leak in any situation, we need to better understand what RAM is and how different programs use it.
What is RAM and how programs use it
RAM (Random Access Memory) is a relatively small amount of memory that stores data from running processes. Every program on your computer has easy access to RAM because it stores all its data there. Programs store data in RAM temporarily, in fact only while running. Therefore, when you restart your computer, the RAM is freed up.
Once a certain program is opened, it "requests" a certain amount of memory from RAM, and memory is automatically allocated to that program. Once a program is closed, the amount of memory it originally used is immediately "returned" to RAM.
Each program stores its information about its work in RAM. Because programs differ, more demanding programs and programs that actually perform more complex actions store more data in RAM and therefore require more memory. Although, of course, simpler programs use less memory.
In short, here's the complete process (simplified): you open a program, it takes a certain amount of memory from RAM, stores its data in it while it runs, and as soon as you close the program, it "returns" that amount of memory to RAM.
This is the ideal scenario. But what if this process is not performed correctly? Well, that's where memory leaks come in.
How do memory leaks occur in Windows?
Memory leaks occur when a program requests more memory than it actually needs. In this case, the program only uses the memory it actually needs, and the remaining unallocated memory just "sits" there, neither used by the program that requested it nor available to other programs that actually need it.
When a program that is subject to a memory leak is closed, it does not reclaim the originally allocated memory. Thus, less memory is available to other processes, and if they cannot use the required memory, system performance decreases.
There are many causes of memory leaks, but the most common is a programming oversight. So, we'll finally get to the bottom of it and show you how to fix memory leak problems in Windows 10, but also prevent them from happening again.
Method 7: Disable Background Apps
In some cases, standard Windows applications or those that were manually downloaded by the user from the Microsoft Store may run in the background, which also affects RAM. Such programs cannot be disabled through “Startup”, as we already talked about earlier, so you will have to perform slightly different actions.
- From the Settings menu, select the Privacy category.
Through the panel on the left, move to “Background Applications”.
You can prevent all apps from running in the background by moving the slider to inactive.
However, nothing prevents you from going through the entire list and manually selecting which programs should be disabled and which can be left active.
Fix memory leak and nonpaged pool full when working online
The most common situation is when the Windows 10 non-paged RAM pool becomes full while browsing the Internet. For example, it is easy to notice how it grows when downloading a large file and does not clear itself after that.
If the described is your case, then you can correct the situation and clear the non-paged memory pool as follows.
- Go to the registry editor (press Win+R keys on your keyboard, type regedit and press Enter).
- Go to HKEY_LOCAL_MACHINE SYSTEM ControlSet001 Services Ndu
- Double-click on the option named “Start” on the right side of the Registry Editor and set its value to 4 to disable Network Usage Monitor.
- Close Registry Editor.
Once complete, restart your computer and check if the problem has been fixed. As a rule, if the problem is really in the network card drivers, the nonpaged pool no longer grows beyond its normal values.
If the steps above do not help, try the following:
- If the network card and/or wireless adapter driver was installed from the manufacturer's official website, try removing it and letting Windows 10 install standard drivers.
- If the driver was automatically installed by Windows or was pre-installed by the manufacturer (and the system has not changed since then), try downloading and installing the latest driver from the official website of the laptop or motherboard manufacturer (if it is a PC).
A filling non-paged RAM pool in Windows 10 is not always caused by network card drivers (although most often) and if actions with network adapter drivers and NDU do not bring results, you can resort to the following steps:
- Installing all original drivers from the manufacturer on your equipment (especially if you currently have drivers installed automatically by Windows 10).
- Using the Poolmon utility from the Microsoft WDK to determine the driver causing the memory leak.
RAM load 70% at rest
laptop Windows 10 4210M 15-20% load 8GB RAM
I did not install the program, did not do anything with the laptop. He is a little over a year old. (I changed the paste a couple of months ago)
80-100% RAM load at rest Frequent network restrictions, and RAM load at rest at 80-100% Thank you.
8 RAM at rest loads at 70-100% Actually, the subject 8 RAM at rest loads at 70-100%, not any malware.
Find the time that the rocket can remain at rest 1. The rocket is maintained in the air at a constant height, throwing a stream of gas vertically downwards.
Loading the HDD at 100% in a state of idle As a matter of fact, there is a high probability that I caught a virus because it was not possible.
Those. Do you ignore the readings of the standard diagnostic utility from the OS manufacturer, but blindly trust third-party bullshit?
Apparently you didn't read the question carefully. What does this have to do with the extraneous stuff? I turn on the laptop, 70% of the memory is occupied. After installing the firewood, as written here https://answers.microsoft.com/. acb?auth=1 Now 30%
But now there’s another problem, the error “Alps Pointing-device Driver” appears, something wrong happened. This is a touchpad. How to fix it?
What to do if the system and compressed memory are loading the processor or memory
Below are a few of the most likely reasons that the specified process is consuming too many computer resources and a step-by-step description of what to do in each situation.
Hardware Drivers
First of all, if the problem with CPU usage by the “System and Compressed Memory” process occurs after waking up from sleep (and everything works fine when rebooting), or after a recent reinstallation (or reset or update) of Windows 10, you should pay attention to the drivers of your motherboard or laptop.
The following points should be taken into account:
- Most often, the problem can be caused by power management drivers and disk system drivers, in particular Intel Rap > Pay special attention to video card drivers. There may be a problem with the process, and they can be solved in different ways:
- Installing the latest official drivers from the AMD, NV website >If manipulating the drivers does not help, try other methods.
Paging File Options
In some cases, the problem (in this case, a bug) with the load on the processor or memory in the described situation can be solved in a simpler way:
You can read in detail about exactly how to disable or change the paging file settings here: Windows 10 Paging File.
Antiviruses
Another possible reason for a process loading compressed memory is that the antivirus does not work correctly when checking memory. In particular, this can happen if you install an antivirus that does not support Windows 10 (that is, any outdated version, see The best antivirus for Windows 10).
It is also possible that you have several programs installed to protect your computer that conflict with each other (in most cases, more than 2 antiviruses, not counting the built-in Windows 10 Defender, cause certain problems that affect system performance).
Anecdotal feedback on the issue suggests that in some cases, firewall modules in the antivirus may be causing the load displayed for the System and Compressed Memory process. I recommend checking by temporarily disabling network protection (firewall) in your antivirus.
Google Chrome
Sometimes manipulating the Google Chrome browser can fix the problem. If you have this browser installed and, especially, it is running in the background (or the load appears after a short time of using the browser), try the following things:
- Disable video hardware acceleration in Google Chrome. To do this, go to Settings - “Show advanced settings” and uncheck o. Restart your browser. After that, enter chrome://flags/ in the address bar, find the “Hardware acceleration for video decoding” item on the page, disable it and restart the browser again. After this, try to restart the computer (reboot) and pay attention to whether the “System and Compressed Memory” process manifests itself in the same way as before when working.
Method 10: Disabling search indexing
Let's talk a little about narrowly targeted recommendations that have a minor impact on the operation of RAM, but with complex settings they will help add a few percent to performance. One such method is to disable search indexing in Windows, which goes like this:
- Open Start again and go to Settings.
Among all categories, select "Search".
Select the "Windows Search" section.
At the bottom of the window, find the clickable inscription “Advanced search indexer settings” and click on it with LMB.
In the window that opens, you are interested in the “Change” button.
Click Show All Locations.
Uncheck all the folders present and save the changes.
The essence of this method is that now the search in Windows will work slower and you will not be able to find a file by name or other masks using this function, but this will help to slightly relieve the load on the components. Here, each user decides for himself whether he should give up the ability to search on his computer, giving the advantage of minor RAM optimization.
Method 5: Disabling startup programs
Programs that launch immediately when you log into Windows use RAM and other system resources even in the background, so it is recommended to monitor which tools are added to startup. You may not even know that after installation, an application was independently added to this list and functions on an ongoing basis. You can check and disable unnecessary software like this:
- Right-click on an empty space on the taskbar and select “Task Manager” from the context menu that appears.
Go to the Startup tab.
Look at the status of each program. If the value “Enabled” is set next to an unnecessary application, you can easily disable it to remove it from startup.
To do this, right-click on the software line and select “Disable”.
Perform exactly the same steps with all applications that you do not want to launch when the OS starts, and restart the computer for all changes to take effect.
How to unload the OP
If you are faced with the fact that the load on the OP is too high, you need to manually reduce the load on the system. It is recommended that you try all of the methods below, as using only one method will probably not bring noticeable results.
Closing applications
Look at the applications currently running. Perhaps you don't need some of them. Unused programs should be closed.
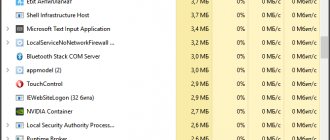
You can get a complete list of running applications and information about what part of the resources they consume in the task manager. While in it, you can select unnecessary programs and turn them off using the “End task” button.
Select the application and click the “End task” button
Before closing any program, be sure to save the files you edited in it.
Closing background applications
In addition to the applications that are clearly running on your computer, there are often programs running in the background. They are not visible to the user, but at the same time they perform some calculations or collect information. Sometimes the work of such utilities is necessary, and sometimes it is useless.
While in the Task Manager, go to the Details tab. In it you will see a list of all programs (or rather, their processes) currently running. Study it and close those applications that are not needed.
Removing the task from unnecessary processes
Please note that you should not forcefully stop programs whose task you do not know. By accidentally closing the wrong application, you can disrupt the system and cause an error. Do not stop system processes; it is better to stop running as many third-party programs as possible.
Disable startup programs
Using the instructions above, you can close unnecessary applications. But, if they are allowed to autostart, they may turn on again on their own the next time you start the computer. In order not to take away the right to autorun from such programs, you need to go to the “Startup” tab in the task manager, select all applications from the list one by one and click on the “Disable” button for each one.
Removing unnecessary programs from startup
The only program that is strictly recommended to have the right to autorun is an antivirus. If the antivirus does not start on its own, you may forget to turn it on, and the chance of catching a virus will increase greatly.
Restarting Explorer
Explorer or Explorer is responsible for working with memory. If you turn it on, the system will no longer see the hard drive and, accordingly, will stop working. But the explorer can be restarted, thereby resetting various frozen commands.
Select the explorer and select the “Restart” function
While on the main page of the task manager, find File Explorer in the list. Right-click on it and select the “Restart” function. Wait until the process reboots, and then check if this helps reduce the load on the OP.
Removing viruses
There are viruses aimed at overloading the operating system. They infect the computer and clog the system, slowing it down. Use the antivirus installed on your computer to diagnose and remove any malware found.
Removing viruses from your computer
We use special programs
If none of the methods described above helped resolve the problem, you should seek help from third-party programs. Quite a lot of applications have been developed to automatically release OP.
Mz Ram Booster
The program provides information and statistics about the workload of the software, and also allows you to change some parameters for working with the software. You can free the RAM from garbage in one click: on the main tab of the program, click the “Clean RAM” button.
Click the “Clear RAM” button
The official website from which you can download the free version of the application is https://www.mztweak.com/mzrambooster.html.
RAM Booster
This program also provides information about the workload of the OP. In addition, it allows you to configure the conditions under which the OP cleaning process will start automatically. To start cleaning manually, just click on the “Free up memory now” button on the main page of the application.
Click the “Clear memory now” button
The official website where you can download the free version or buy the full version is https://rambooster.net.
Video: clearing RAM
Clearing computer RAM in Windows 10
You can clear RAM manually and using special utilities. The difficulty with offloading memory yourself is that you must know exactly what you are disabling and whether it will harm the system.
Method 1: KCleaner
Easy to use, KCleaner will quickly and accurately clear your RAM of unnecessary processes. In addition to clearing RAM, it has a number of other useful functions.
Download KCleaner from the official website
- Download and install the software.
- Once launched, click “Clear”.
Please wait for completion.
Method 2: Mz RAM Booster
Mz RAM Booster not only can optimize RAM in Windows 10, but can also speed up your computer.
Download Mz RAM Booster from the official website
- Launch the utility and click on “Recover RAM” in the main menu.
Wait for the process to complete.
Method 3: Wise Memory Optimizer
With Wise Memory Optimizer you can monitor the status of RAM and other values. The application can automatically optimize the device.
Download Wise Memory Optimizer from the official website
- After launch, a small window will open in front of you with RAM statistics and the “Optimization” button. Click on it.
Wait for it to finish.
Method 4: Using a script
You can use a script that will do everything for you and clear the RAM.
- Right-click on an empty space on your desktop.
- In the context menu, go to “Create” - “Text Document”.
Name the file and double-click it. Enter the following lines:
MsgBox "Clear RAM?",0,"Cleaning RAM" FreeMem=Space(3200000) Msgbox"Cleaning complete",0,"Cleaning RAM"
MsgBox is responsible for the appearance of a small dialog box with an “OK” button. Between the quotes you can write your own text. In principle, you can do without this command. Using FreeMem, in this case, we free up 32 MB of RAM, which we indicated in parentheses after Space. This amount is safe for the system. You can specify your size yourself, based on the formula:
N*1024+00000
where N is the volume that you want to free. Now click “File” - “Save as...”.
Select “All files”, add the extension .VBS instead of .TXT and click “Save”.
Run the script.
Method 5: Using Task Manager
This method is complicated because you need to know exactly which processes need to be disabled.
- Hold Ctrl+Shift+Esc or Win+S and find “Task Manager”.
In the “Processes” tab, click on “CPU” to find out which programs are using the processor.
And by clicking on “Memory”, you will see the load on the corresponding hardware component.
Call the context menu on the selected object and click on “Cancel task” or “End process tree”. Some processes may not terminate because they are standard services. They need to be excluded from startup. In some cases, these may be viruses, so it is recommended to check the system with portable scanners.
Read more: Checking your computer for viruses without an antivirus
To disable startup, go to the corresponding tab in the “Task Manager”. Call the menu on the desired object and select “Disable”.
These are the methods you can use to clear RAM in Windows 10.
We are glad that we were able to help you solve the problem. Describe what didn't work for you. Our specialists will try to answer as quickly as possible.
Did this article help you?
One of the common problems of Windows 10 users, especially with Killer Network network cards (Ethernet and Wireless), is RAM filling up when working on the network.
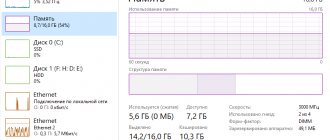
You can pay attention to this in the task manager on the “Performance” tab, selecting RAM. At the same time, the non-paged memory pool is filled. The problem in most cases is caused by incorrect operation of network drivers in combination with Windows 10 Network Data Usage (NDU) monitor drivers and can be solved quite simply, which is what will be discussed in this instruction. In some cases, other hardware drivers may also be the cause of memory leaks.
When the amount of RAM corresponds to the concept “NOT TOO”
If you are working in Word and at the same time listening to music using an Internet browser, and you see that the physical memory of the computer is 77% loaded, there is no reason to worry. But if things are different, it makes sense to look at the problem from a technical point of view and ask some questions: how many RAM modules are installed on your PC and what are their nominal “capabilities”? It is worth noting an important fact: depending on the version of the Windows system used, the requirements for the amount of RAM can vary from 256 MB to 2 GB (only for the “needs” of the operating system itself). Well, if you still decide to use a resource-intensive program on a computer with limited RAM, then it’s time to think about expanding the paging file.
Method 11: Set up a power plan
In the penultimate method of our material today, we want to talk about setting up a power plan. Here you will see two tips related to this aspect of the operating system. The first allows you to set a standard configuration for maximum performance, and the second is responsible for resetting parameters to the default state and is useful in cases where the user has changed some plan parameters.
- To begin, open the “System” section through “Settings”.
Through the left panel, go to “Power and sleep mode”.
Scroll down and click on the “Advanced power settings” line.
Here, select “High Performance” if the marker was not previously set to this item.
Otherwise, go to “Setting the power plan” by clicking on the corresponding inscription next to the active setting. There, click on “Restore default settings for the scheme” and confirm the changes.
Do not forget to restart your computer, because all changes regarding such settings will take effect and function correctly only after creating a new session.
Additional solutions to the problem
If none of the described methods helped solve problems with the load caused by the System and Compressed Memory process, here are a few more untested, but according to some reviews, sometimes working ways to fix the problem:
I hope one of the solutions will help you solve the problem. Don’t forget to also check your computer for viruses and malware; they can also cause Windows 10 to work abnormally.
No duplicates found
This service was created for the purpose of loading frequently used libraries, files, etc. into an unused area of RAM.
Method 9: Defragment the system disk
The next method is slightly related to the previous one, since it is also related to the performance of the hard drive. The fact is that over time, fragments of files on the media begin to be written in different places, and this leads to a drop in speed. The user is required to perform defragmentation from time to time to optimize the functioning of the hard drive. Carrying out such actions also affects RAM, since this way it will receive and process information faster.
Method 4: Check your system for viruses
Virus infection is one of the most common problems that reduce the performance of the operating system. Many malicious files operate in the background under the guise of various processes, consuming RAM resources and other components. The user is only required to prevent such threats from occurring by regularly checking the computer for their presence. The easiest way to do this is to use programs from third-party developers that quickly scan the system, find and remove even the most inconspicuous threats.
Method 3: Installing system updates
Next, we want to touch on the topic of installing system updates, because fixes and innovations from Microsoft also have a direct impact on the performance and RAM load of various services and processes. It is better to always keep your PC up to date to avoid various failures and conflicts. You can check system updates in just a few clicks.
- Open Start and go to Settings.
Here you will find “Update and Security”.
If you have additional questions or difficulties related to this operation, we recommend that you refer to other supporting materials on our website by clicking on one of the following headings. There you will learn all the information about installing updates and find ways to correct possible problems with finding or installing them.
Method 6: Disable apps from opening after restart
By default, Windows 10 has a feature enabled that automatically launches open programs when you restart or update the system. Not everyone needs this option, so you can disable it to free up RAM, because now the cache will not be saved. This is done in just a few clicks.
- Open Start and go to Settings.
Here select the “Accounts” section.
Navigate to the Login Options category.
Find the required option in “Privacy” and deactivate it by moving the slider.
From now on, all those applications that remained open at the time of reboot will not restore their operation, so take this feature into account when subsequently interacting with the device.
Method 12: Checking system components
In conclusion, we want to talk about the fact that violation of the integrity of the system files of the operating system also leads to slower performance, and various system failures may also appear that will affect the operation of RAM. If you suspect that Windows 10 is not functioning correctly at the moment, or that you have recently removed viruses, we advise you to check the integrity of the system components yourself. To do this, you need to use system utilities, which you can read about in more detail below.
This is all the information about RAM optimization in Windows 10 that we wanted to present in one material. As you can see, there are a huge number of ways to increase performance and get rid of excess load. You can use them all together or selectively, based on personal preferences. Do not forget to close unused software, and not just minimize it, because even in this mode it consumes system resources.
Summing up
So, with some confidence we can say that the once difficult situation for you “the physical memory of the computer is loaded, what to do” has now been resolved. Nevertheless, one important “operative” point is still worth mentioning.
- If you are using Windows Vista, OS 7, or later versions of Microsoft products, then if you do not have enough RAM, you can try disabling the Superfetch service.
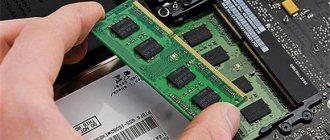
And one last thing: do not miss the opportunity to upgrade your PC - adding an additional RAM module will significantly expand the functionality and “combat capability” of your computer equipment. Don't let your computer fall into unconsciousness!