Did you know that you can save the photos you take on your Android phone directly to your SD card? Available on any smartphone, be it the aging Galaxy S3, the fancy Galaxy S7 or the sleek new LG G6, you can save phone storage space by saving your snaps directly to the SD card. Some versions of Android don't officially allow you to do this, but it's still possible. Read until the end to find out how to do this. You'll even find instructions for Android Nougat.
The process is fairly similar for most phones, so it can be applied to almost any Android phone that has a MicroSD card slot. Although these steps may vary slightly depending on the phone or version of Android, I think you can figure it out.
How to Save Photos to SD Card on Android Nougat
Those lucky enough to have phones running Android Nougat can already save photos directly to a MicroSD card instead of their phone's internal storage. There are two ways to enable this feature, and the first step for both is to install a MicroSD card and then open your device's camera app. Then the application will ask you a question about priority storage of photos, by answering which you will change the storage settings and the photos will be saved directly to the flash drive. If you don't see the pop-up window as shown in the left image below, don't worry. You can also select a MicroSD card as your preferred photo storage method in your camera app's settings menu. In the following picture on the right you can see what the menu looks like on the LG G6. You will find similar functionality on any Nougat phone. Simply go into your camera settings and find storage options, then select the SD card option.
Files cannot be transferred to a memory card
This most often applies to built-in Android applications. In the phone they can only be stored on the internal storage, otherwise the smartphone will not work. At the same time, any application from a third-party developer can be moved to the microSD.
- Open Android settings, go to the “Applications” section.
- Find the program you want to transfer to the memory card along with all the files.
- Click "Move to SD".
Enlarge
If the button is inactive, it means that the application cannot be moved. If it says “Move to phone” instead of “Move to SD,” this means that the program files are already stored on the memory card.
How to Save Photos to SD Card in Android Marshmallow
First, insert the SD card into your phone, open the camera app, and then a message will appear asking if you want to change the storage location to the SD card. The same pop-up appears on most devices when you open the camera app after inserting an SD card. Agree to your phone's request and all future photos will be saved to the external memory card. Just.
If this message does not appear or you already have an SD card in your phone, you will need to set it up manually. To do this, go to Settings in the Camera app and scroll down to Storage. Here you can choose between device and memory card.
Keep in mind that Marshmallow has the option to format the SD card as internal storage, meaning your photos will be automatically saved to it without going through the above steps. But if you do this, the card will only work on the phone you formatted it on. This means that you need to connect your phone to your computer via USB if you want to manually transfer files. The card itself will not be recognized by any other devices.
Problems with the memory card
First of all, you need to make sure that the memory card is working and ready to accept files. What to do:
- Make sure there is free space on your external drive. Open the “Storage” section in your phone settings or connect your device to your computer.
- If there is free space, but you cannot write anything to it, check the file system of the memory card. The Android flash drive needs to be formatted in FAT32. You can do this on your computer/laptop, or directly on your phone. Increase
- Make sure the drive's hardware is in good working order. If another memory card with similar parameters and file system works without errors, then the reason should be sought in the media itself.
The memory card may be incompatible with the smartphone - for example, it may exceed the capacity allowed for a particular phone model. If the flash drive is larger than a certain size of gigabytes (32, 64, 128, etc.), then it simply does not recognize it, because not programmed for such volume. In this case, the only way out is to use another microSD storage device with a smaller capacity.
How to Save Photos to SD Card on Android 5.0 Lollipop
Android 5.0 Lollipop changed things up again by making it easier to customize where you save photos. Applications again have read and write access to directories on removable media. All you need to do is make sure your phone has a camera app with an API that uses the new permissions. If your camera won't allow you to save to an SD card, you can download another camera app. Check your settings in the app and select a storage option.
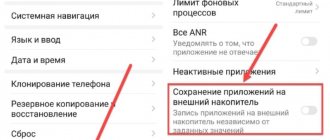
The settings for transferring files to the memory card have gone wrong
In Android settings, you can manually specify which memory is used by default - internal or external. Depending on the selected value, files will be downloaded to your phone or microSD card. After updating the system, the settings may be lost, so it’s worth checking them.
Not every model or manufacturer has such a setting. Check it out for yourself.
- Open Android settings.
- Go to the "Memory" section.
- In the "Installation location" or "Default memory" field, select "SD".
Increase
Related articles:
How to transfer an application to a memory card on Android
How to Record Android Phone Screen
How to Save Photos to SD Card on Samsung Devices
Everything is much simpler here. Just insert the SD card and open the camera app. Everything will be fine, you will be presented with a window offering you the option to use the SD card as the default storage option.
If you don't see this window, you can open the Settings menu in the camera app (gear icon) and scroll down to Storage, tap that menu item, and select your storage card. Work is done.
Restoring camera settings to default
There are rare cases when the default camera program prefers to save photos to an SD drive. In the absence of the latter, the device resigns itself and loads media files into the internal memory. In this case, the easiest way to return to external media is to reset the settings. To do this, follow these steps:
- Open the camera.
- Go to settings (we have already described two ways to do this above).
- Scroll to the very bottom of Settings.
- Click on the “Reset settings” command.
- Restart the camera app.
In practice, I have not come across this approach yet, but some forums offer just such a solution if suddenly the developers forgot to add a button for selecting where to save files. Please note that all settings will be reset, including the flash, mode settings and the presence of watermarks (text over the photo).
Which memory card should I choose for my phone?
First, it's a good idea to know what the maximum card size your device supports. nanoSD , etc. are increasingly appearing
- First, for example, use Google to find out what types of cards your device supports. In the vast majority of cases this will be microSD.
- Then figure out what the maximum storage size it can handle.
- Try to compromise between price, size and performance. Class 10 or microSDHC are a sufficient standard. Also keep in mind that small amounts, such as 32 GB, may soon not be enough for you. Much depends on the user's activity.
- Ideally, avoid suspiciously cheap high-capacity card offers from China. You will often find that the specified size does not fit.
Background to the problem of saving data to a memory card in Samsung
As you know, Google, which has been developing the Android operating system for a long time, is quite cautious about working with external memory cards.
This is due to the following factors:
| Causes: | Explanation: |
| Memory cards are produced by various manufacturers. | Not all brands guarantee stable functionality. |
| Data on memory cards is usually stored without encryption. | This allows attackers to gain access to them. |
| Removing the memory card may cause the system to malfunction. | In this case, the device will have to be rebooted. |
| Failure of a memory card leads to the loss of all data on it. | In most cases, the information cannot be recovered. |
Before Android OS version 2.2, the ability to install applications on a memory card on Samsung was not available as such. There were various craftsmen who made attempts to connect applications with a memory card (using root rights), but this did not always work out. With the release of Android version 2.2. It has become possible to transfer applications, as well as make saves to the device’s memory card.
The release of Android OS version 4.4 continued the emerging trend. In this version of the OS, Google specialists have completely blocked the ability to install applications on an external memory card on Samsung. The SD card has become a mechanical warehouse for storing photos, music, videos and other related files.
The ability to fully save information to the phone’s external memory appeared only in Android 6.0 “Marshmallow” OS. This version of the system included the “Adoptable storage” function, which allows you to link the phone’s internal memory and an external SD card.
Thus, we have the opportunity to store data on a memory card in Samsung mobile devices. Let's figure out how this can be done.
This is useful to know: how to set a photo to a contact on a Samsung smartphone.
How to save photos to SD card in Android 4.4 KitKat
Android 4.4 KitKat doesn't exactly welcome SD memory cards, and images are saved to internal memory by default, with no option to change where they're saved. An easy way out of this situation is to install the MX Camera application, in which you will find options for choosing where to save photos. Plus, this application can override KitKat preferences - just launch the application, go to settings, open the “Camera” section and select “Custom save location”.
How to transfer photos and videos to a MicroSD card on Samsung Galaxy
At their core, the methods for transferring photos for Samsung Galaxy and other Android devices are no different, but I decided to separately describe this method using only those tools that are already preinstalled on devices of this, one of the most common brands.
Shooting photos and videos on an SD card
The first step (optional if you don't need it) is to set up the camera so that photos and videos are taken to the MicroSD memory card, this is very simple:
- Open the Camera app.
- Open your camera settings (gear icon).
- In the camera settings, find the “Storage location” item and instead of “Device memory” select “SD card”.
After these steps, all (almost) new photos and videos will be saved to the DCIM folder on the memory card, the folder will be created the moment you take the first photo. Why “almost”: some videos and photos that require high recording speed (photos in continuous shooting mode and 4k 60 frames per second video) will continue to be saved to the smartphone’s internal memory, but they can always be transferred to an SD card after shooting.
Note: the first time you start the camera after connecting a memory card, you will automatically be prompted to save photos and videos to it.
Transferring captured photos and videos to a memory card
To transfer existing photos and videos to a memory card, you can use the built-in My Files application available on your Samsung or any other file manager. I'll show you the method for the built-in standard application:
- Open the My Files application and open Device Storage.
- Press and hold your finger on the DCIM folder until the folder becomes checked.
- Click on the three dots at the top right and select "Move".
- Select "Memory Card".
The folder will be moved, and the data will be combined with existing photos on the memory card (nothing will be erased, don’t worry).
How to adapt an SD card for internal memory
Traditionally, SD on Android served as portable storage. This means that you can store videos, music and photos on them for use on your smartphone. SD can be connected to a computer to transfer files two-way. When used as a portable storage device, the card can be removed without affecting functionality.
We search for the application we want to move and click on it. When it comes to looking for a new mobile phone, one of the many questions that are asked is what internal storage space they require. The same phone model may have different storage options.
The first thing to keep in mind is the usage we are going to provide to the external memory. This is a compromise solution where the only advantage is the ability to reuse the card in other devices after the end of the phone's life. Some applications can be installed on this card, but not all. And this is one of the main disadvantages of choosing a cheaper terminal in exchange for less internal storage space.
How to install applications on a memory card? The Android 6.0 Marshmallow system allows you to use SD as built-in storage, turning it into an integral part of your smartphone. If you accept a removable flash drive as your main storage, then by default new software will be installed on it. If desired, the user can move the program back to the built-in memory.
But when it comes to moving apps or games, things get more complicated. There are a number of limitations placed on your app creation guide. This leads to the fact that, although we can transfer applications to external memory, only those that are simpler will allow us to free up space in the internal memory. At the same time, if they are simpler, then, of course, they will not take up more space. From games, for example, we can almost forget.
This feature only moves a small portion of an application's files, not the entire application. Luckily, there is a solution! First start your device. The paid application has no advertising and allows you to move not only the application to the memory card, but also allows several options. Pays for the purchase of the paid version.
If an external drive is used as the main storage, then it cannot be removed without affecting the functionality of the gadget. In this case, the card cannot be used on other devices (including PCs). The SD card is formatted as a local EXT4 drive, encoded with 128-bit AES encryption and mounted as part of the system. Once the Marshmallow system accepts the drive, it will only work with that drive.
What about formatting? This means creating an extended partition for storing applications. Thus, the application will be moved to the memory card 100%. What about apps that will still be installed? So when you install a new application, it will be moved automatically. Default installation location for applications.
Issues such as app linking may occur, especially after restarting the device. Without this procedure, some devices are completely underutilized due to lack of internal memory! This way your eyes won't be busy and can do something else. But for some this may be enough. Use the "Read My Text Messages" command. After each message you read, you can repeat the message or reply before moving on to the next one. If you want to hear more than text messages, you'll need to turn on Text to Speech.
Now about how to configure the SD card. You should definitely back up your data and save it on your computer before using the flash drive as internal storage. The onboarding process will delete all data. You can return data to SD after the drive is accepted as built-in storage.
The settings here will likely depend on what your phone has. When you're done with this screen, return to the Accessibility screen, scroll down to Select for Speech, and turn the feature on. You should now see a small speech bubble icon in the corner of the screen. To use this feature, follow these steps: - Go to the app or page you want to read aloud. — Click the bubble icon. — Select the text you want to read aloud. Unfortunately, there are no voice commands that can go through this process.
To transfer data, you need to connect Android directly to your computer. It is not possible to remove the SD from the device and connect it directly to a PC to transfer files. If the drive was used as portable storage and it contains data, then you need to transfer it to the built-in memory. If you do not do this, the programs will be deleted and will have to be installed again.
With the free version of the app, you can only read one notification per app. Upgrading to the paid app version for $1.99 allows you to choose an unlimited number of apps. Once you've selected your app of choice, go to the Settings tab to enable the feature. However, now there is a better and easier way to unlock smartphones. Many of them identified the technology as the next big thing in the industry, but it seems that these accusations turned out to be a little overstated.
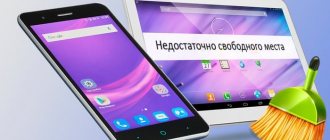
Your device's memory is limited and full of apps you no longer need, so it's time to clear your device of apps you never use. But how do you clear your device of this unnecessary load? Before you start, here's a quick tip, if you don't intend to reinstall the app you're uninstalling, it will take time to "clean up your data." You can often find a Clear Data button in the Storage section next to the Delete button. This ensures that as little data as possible from the app remains on the device after uninstalling it.
When using SD as internal storage, you need to make sure that the card is fast. When purchasing a new drive, you should look for Class 10 and UHC. If you choose a cheaper and slower SD, it will slow down the device as a whole. If you plan to configure the drive as internal storage, then it is better to spend the money on purchasing a fast card. The Android system will test the SD speed during the synchronization process and warn the user if it is too slow and could negatively affect the performance of the gadget.
Versions 2.2 – 4.2: problem solving
These versions of the operating system allow you to save data on a micro SD without having Root rights.
To do this you should:
- Go to the general settings section.
- Select “Memory”.
- Set the memory card as default.
After this procedure, all new applications and downloaded files will be saved to the card by default. But the software already installed on the phone should be manually moved to microSD.
- In the same general settings, select the “Applications” section.
- Open the one you want to move.
- Click on the “Move to map” icon.
But some applications, music and pictures built into the firmware cannot be transferred without Root access; the system blocks such actions to protect the device from accidental software breakdowns.
Third party transfer apps
The above method using the operating system is quite tedious and time-consuming, especially if you have dozens of applications installed. A utility such as AppMgr Pro III will help make the transfer easier and faster. This software has a fairly wide range of functions, and in addition to actions with applications, it clears cache memory.
The program opens three main blocks: in the phone, on the SD card and moving ones. It is in the last section that the programs that you can move are displayed. What should I do for this?
- After launching the utility, select the “movable” section.
- In the menu of this block at the top there will be “Move application”.
- Specify the memory for data transfer.
- The utility also has a “move everything” function. This way, in three clicks, you can drop all the applications available for moving onto the card.
The paid version of the program has a desktop gadget, no ad blocks, and the application cache can be cleared with one touch. Just keep in mind that the program does not save system software to microSD, since the firmware does not allow it.
How to save browser files to external memory in Samsung
You can set the browser to save the files it retrieves from the web, including music and videos, images and documents, to your Samsung memory card.
To do this you need to do the following:
- Open the Internet application on your device; Open the Internet app on your device
- Next, tap on “Options”;
- Then select "Settings"; Click on "Settings" in the menu
- Click on "Websites and Downloads"; Select the "Websites and Downloads" option
- The next item is to select the “Where to save files” option; Tap on the specified option
- Tap on “memory card”; Select memory card option
- The configuration procedure will be completed. Configuration will be completed
If you do not find the settings we described in your browser, this may mean that you are not using a built-in browser, or your phone does not support this memory card. Also, your smartphone may not have the stock (original) firmware installed, which is why the functionality of the system (in particular, working with browser files) may be impaired.
How to make sure that files are downloaded to a memory card?
How to make programs download to an SD card?
- Open the menu of your device and go to “Settings”;
- Select "Applications";
- Go to the “SD card” item, you will see a list of all programs that support transfer to an SD card;
Interesting materials:
How to install Windows from a flash drive via UEFI BIOS? How to set sleep time on Windows 7? How to install Wifi on a Windows 7 laptop? How to install Windows 10 via image? How to install Windows 10 on a second hard drive? How to install Windows 10 on Windows 7 Ultimate? How to install Windows 10 from a USB flash drive to MBR? How to install Windows 10 from a USB flash drive on an HP laptop? How to install Windows 10 from a USB flash drive on a laptop with UEFI? How to install Windows 10 from a Rufus flash drive?