Did you know that you can save photos taken with your Android phone directly to your SD memory card?
If you own a model like the Galaxy S3, Galaxy S7, or the latest LG G6, you can easily save some space on your device's internal memory by designating a storage location for your photos on an SD card. Some versions of Android do not support this option, but it can still be done.
Read our article to find out how to do this.
So, let's begin. Let's say right away that the process is very similar for most phones, so it can be applied to almost any Android smartphone with a microSD card slot. Although the steps below may vary slightly from phone to phone, or between versions of Android, you should be able to find the right method for your device.
How to save a photo?
An easy way to save photos and pictures
- Right-click on the photo and select “Save picture as...” (or some similar item) from the list.
- In the window that appears, select the location on your computer where you want to send the photo. ...
- When the location on the computer is selected, click on the “Save” button in the window.
Interesting materials:
How to block downloading games on Android? How to place a call on a contact in Android? How to properly charge a new Android? How to properly charge an Android Samsung? How to properly charge an Android smartphone? How to properly charge your Android? How to properly charge the battery on Android? How to properly charge a new Android? How to properly charge a new smartphone on Android? How to assign a ringtone to a contact in Android?
How to set up saving photos directly to SD card
In case your phone supports expandable memory, you can set your Android phone to save photos directly to the memory card (SD card) instead of storing them in the internal memory. This way, you can take a lot of photos and not worry about that you have limited memory in your 8 or 16 GB Android phone.
How to save photos to a memory card (SD card) in an Android phone
The process of setting up an Android phone to save images directly to the memory card, rather than using the already small internal memory to store photos, is a very easy process and is outlined below in steps that should work on most Android phones that have memory card slots.
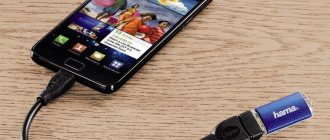
Insert memory card into android phone
In case you haven't done so yet, insert the memory card into the SD card slot on your Android phone. To do this, you may need to open the back cover of the phone (where the battery is located), this is done if the memory card slot is not accessible from the outside.
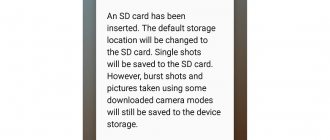
Once you have inserted the memory card, open the Camera app and check if a pop-up message appears.
On most Android phones, a pop-up message appears asking if you want to change the storage location to the memory card. In this case, making a choice is very easy, just click on the option to apply the settings.
If the message still doesn't appear, or you simply missed it, you can still make this adjustment manually in the Camera application.
How to manually set saving photos to a memory card on an Android phone
Follow the steps below to set up this storage:
Read How to enable Unknown sources or install APK files on Android Oreo
1 Open the Camera app on your Android phone by tapping the camera icon.
2 Click on the gear, this is the settings icon, it is located in the upper right corner of your screen.
3 On the Camera Settings screen, scroll down and tap the storage location.
4 Then click on the SD card or memory card.
From now on, all your photos that you took with your Android phone's camera (front or main) will be saved to the memory card inserted into your Android phone.
Note: Screenshots will be saved to the phone's internal memory in a folder called DCIM.
Save media and applications with AppMgr Pro III
It is possible to download on the Internet and install on your phone a special program AppMgr Pro III (in earlier versions of App2SD), which allows you to:
- hidden files and applications appear in the menu;
- receive messages about the completion of the download;
- clear cache memory in one tap.
The advantage of this program is the automatic ordering of information according to its location. This property fits into the tabs:
- On phone – on the internal memory of the device with support for moving to external memory;
- On SD card – the file or program is located on an external storage device;
- Phone only – movement is not available.
The method is quite convenient, but it does not work in the latest Android platform updates.
How to change the save path of files in Chrome?
How to change your downloads folder in Google Chrome
- In your browser, go to the settings menu. ...
- On the Chrome settings page, at the bottom, click "Advanced".
- In the “Downloaded Files” section, in the “Folder” item, click “Change” and specify the desired download folder.
- This will complete the process and in the future Chrome will download files to the location you specified.
Aug 19
2022 Interesting materials:
What is the strongest connection? What is the current water temperature in the Red Sea? What Wi-Fi channel width is best? Which SIM card is in Huawei p20 Lite? What is the capital of the Dominican Republic? Which country is the birthplace of football? Which Caucasian country is not part of the CIS? What country is Lebanon? Which country is below sea level? Which country was the last to declare war on Germany in World War I?
Is it possible to find pictures that were not included in the “Gallery”
You can only find them if they are actually saved on the phone (Gallery simply refused to show them). To check for them, connect your phone to your computer using USB. Open the folder where all previously taken pictures are stored. If the photos are not there, you will not be able to restore them, since, most likely, the system did not really save them.
First, restart your phone and clear the device’s memory and, most importantly, the “Galleries” cache. Try creating a new DCIM folder by renaming it. Reset your camera settings. If all else fails, you need to reset your smartphone. The last resort method is a complete flashing of the device.
- Author: Ekaterina Vasilyeva
Rate this article:
- 5
- 4
- 3
- 2
- 1
(24 votes, average: 4.2 out of 5)
Share with your friends!
Setting up the camera to save pictures to micro SD
To avoid wasting time transferring files in the future, you can configure the camera so that all pictures are saved to micro SD. For this:
- Open the camera.
- Go to settings.
- Find "Storage Location" and open it.
- Select “SD Card”.
After this, all pictures will be saved to micro SD. This setting will not affect the gallery, since the image viewer scans the external and internal memory, and then displays all the images available on the smartphone.
The first way to install and save applications to a memory card in a Samsung smartphone
The instructions below are safe and boil down to formatting the memory card correctly. You will need a computer and a USB cable. All data on the memory card will be erased, so a backup copy will help you.
Now you will need to download USB drivers for your phone (you can easily find it on the Internet) Samsung and Minimal ADB / Fastboot –
First install the driver, then ADB and don’t forget to enable USB debugging. In the command line, enter the command below and press Enter on the keyboard:
- adb shell
Next, we write a command to display the connected memory cards in the Samsung phone.
- sm list-disks
A response message will appear starting with a “disk” with numbers. For example it could be:
- disk:179:128
3
This is the identifier assigned to the memory card. Don’t forget it and enter the last command that will launch Adoptable Storage.
- sm partition disk:179:128 private
Of course, instead of "disk:179:128" you enter your ID. Now your memory card will merge with the internal one into one large place. You can disconnect the cable.
Now, when you want to download and install an application, it’s not that you can save it on a memory card, but it simply won’t work any other way.
Create a GIF animation
GIF is an animated picture in which images replace each other, like watching a video frame by frame.
Click on the ellipsis at the top right and select the “Create GIF animation” menu. Next, select the desired images and click “Create GIF” at the top.
After creation, you can edit the resulting image. The following options are available:
- Proportions (1:1, 4:3, 3:4, 16:9, 9:16). Those. We select the picture format depending on where we will view it: on another phone, on a TV, tablet or monitor screen.
- Speed (slow, normal, fast) is the speed at which the images that make up our gif animation change.
- Direction (forward, backward and looping) - in which direction the images will change.
- Decorate - add other photos, stickers, emojis to the picture, or draw it manually.
And at the end of editing, don't forget to save your work.
Files from the Internet
You can easily save data to your Samsung memory card - whatever you download from the Internet! These are documents, pictures or videos, music and screenshots. Please note that the instructions are provided for the standard Internet browser pre-installed on the device.
- Unlock your Samsung J3 or A5 smartphone and open the browser;
- Click on the button in the form of three bars in the lower right corner of the screen;
- Select the “Settings” section;
- Find the line "Websites and downloads";
- In the “Where to save files” block, enter the desired value;
- Done – your changes will be saved automatically.
Free up the internal space of your Samsung phone - temporary files can and should be stored separately!
Albums
All photos and pictures are automatically sorted into albums:
- photo from camera,
- screenshots,
- uploaded photos,
- collage,
- instagram,
- whatsapp,
- received/transmitted via bluetooth,
- and many others, depending on the applications that are installed on the phone.
Through albums, navigating through photos or searching for the desired image becomes faster and more convenient.
How can I make sure that all screenshots are saved to the memory card?
So let's get started:
- Go to the “Settings” menu;
- Next, turn on the “General” tab (on some shells there may not be a division into tabs);
- Tap on the item “Data storage and USB”;
- Click on the SD card;
- Click on the icon with three dots and select “Settings” from the drop-down menu;
5 Apr.
2022 Interesting materials:
How to save to card on Samsung? How to keep watermelon fresh for a long time? How to preserve watermelon for a long time? How to reinstall Opera and save bookmarks? How to preserve roses longer? How to keep fresh roses in a vase longer? How can I see who saved my photo on Instagram? How to rotate a video 90 degrees and save it? How to properly preserve a watermelon until new? How to properly preserve a watermelon?
Settings
The main settings for the Gallery are as follows:
- Samsung Cloud (only for Samsung devices). This option allows you to synchronize (move) all your photos to Google cloud storage. A total of 15 GB available. You can enable auto-sync - new photos will be automatically downloaded to the cloud (after that you can delete them to save space on your phone - they will remain in the cloud). I recommend setting up synchronization only via Wi-Fi to save mobile traffic. Well, you can always delete unnecessary images from the cloud.
- Cloud view. View photos and videos synchronized with the cloud.
- Cloud storage recycle bin. All files in the trash are stored for 15 days and then automatically deleted.
- Auto-creation of stories. Automatically create stories based on captured faces and time and location information in photos and videos.
- Image Recommendation - Get image recommendations for stories.
- Location display. If the photo or video file contains location information, it will be shown in the Gallery.
- About “Gallery”. Here you can see the current version of the application and update it.
So, we've looked at all the features of Gallery on Samsung devices. If you have a phone from another manufacturer, the menus and options may differ.
Applications
It's time to find out how to save applications to an Android memory card - why clutter up your smartphone's resources? But first, it is worth noting that most programs are automatically installed on a Samsung phone - this is a specific feature of the operating system.
You won't be able to transfer the system software - you just have to accept it. But you can still drag and drop some programs downloaded from the Play Store! Let's discuss how to transfer and save applications to a Samsung memory card?
- Enter the menu of the device J1 or J7 (or other model);
- Select the “Settings” section;
- Find the line “Application Manager”;
- Find the program you want to drag - messenger or game;
- Click on the “Memory” button and select the “Change” action;
- The “Change storage location” window will open;
- Check the box next to the desired value and click “Move”;
- The Export Wizard will open - you just need to follow the on-screen prompts. Ready!
If you are interested in moving programs, we recommend reading how to transfer WhatsApp from iPhone to Android. In the meantime, let's move on to the next part of our review - we'll learn how to save the phone book on Samsung.
Stories
You can compose your own stories from pictures/photos and send them to your loved ones and friends. Analogous to “stories” on Instagram. You can also receive and view other people's stories. To do this, click on the bell at the top of the screen - these are alerts. If someone sends you their story, you can view it.
To create a story, click the three dots in the top right corner and “create story.”
I don't have my own created stories, but I can view other people's.
Transfer cache to memory card
There is another option for saving photos on a phone flash drive, which is done by moving the cache to it. Here you will need the FolderMount application, which transfers the file cache and root rights to external memory.
Saving the cache is carried out in several stages:
- Launch FolderMount and click the “+” sign at the top right.
- In the “Name” menu, you must specify the name of the file whose cache should be saved on the flash drive.
- In the “Source” item, select the folder on the phone with this photo.
- In the “Destination” menu, you specify the folder on the flash drive where the cache is saved.
- After filling out all the parameters, click the checkbox located at the top right and the “pin” opposite the file name.
After saving the cache, the “pin” will turn green, which means that the photo is on the flash drive.
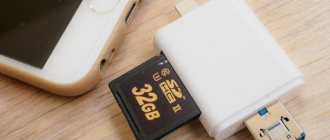
Saving via computer and card reader
To implement this method you will need:
- card reader - a device for reading flash drives onto a computer;
- connecting your phone to your computer via cable or Bluetooth.
The procedure is as follows:
- The phone is connected to the computer.
- A folder with phone files is opened on the computer, and the necessary photos are dragged into the prepared folder on the hard drive;
- Then the memory card is removed from the phone and inserted into the card reader.
- The file manager opens and uses it to save the file on the flash drive.
- The memory card is returned back to the phone and its operation is checked to see if the photo opens.
- Then the file can be deleted from the phone's memory, since it is saved on the flash drive.
Why doesn't Samsung allow you to save applications to a memory card?
Manufacturers, particularly Samsung, blocked this and Adoptable Storage was unavailable. In their opinion, this affects speed. There is logic in this. On cheap microSD cards, even with high parameters, applications are very often unstable. This choice is a lottery.
How to find out which ones are better? The performance class specification is part of the new SD 5.1 specification. The designation has two versions, short and extended.
MicroSD with the new designation differ in IOPS read speed of at least 500 write operations per second. Constant speed of 10 MB/s or higher.
Samsung did not completely remove Adoptable Storage, but only deactivated it, and it is available, but you need to enable it manually.