12/04/2018 Category: Errors and problems Author: Ekaterina Vasilyeva
The language bar, located in the bottom right corner of the display next to the clock, allows users to find out what input language is currently installed on the PC. Using this panel, you can quickly get to the language settings. Often users are faced with the sudden disappearance of this panel. The language keeps changing, but you can't see which layout is in effect: you have to start typing characters each time in the editor or any other input field to determine the language. It becomes quite uncomfortable to work on a PC. Why could this be happening and how can I get everything back to where it was?
- We fix the problem through the “Control Panel”
- Video: how to configure the display of the language bar in the “ten”
- Resetting the language
- Add the language bar file to startup
Startup folder
- Using Registry Editor
Let's create a registry file
- Video: how to use a checkpoint to restore Windows state
Activating the language bar icon in Settings
First, you need to make sure that the icon corresponding to the language is turned on in the settings. For one reason or another, it may be deactivated, for example, after using an optimizer program. Let's describe the course of action:
- Call the Windows Settings system interface - through the Start panel (the gear above the button to shut down the PC) or using the I and Win key combination.
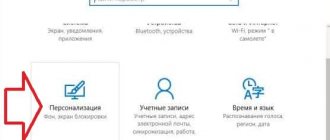
Click the gear in the left corner of the Start panel - Go to the Personalization tile.
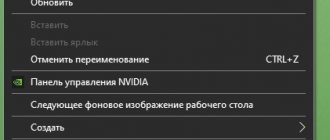
Open the Personalization section in Settings - Another way to launch the section with personal display settings is to click on an empty area of the “Desktop” and select the last option in the context menu. Right-click on an empty space on the “Desktop” and select “Personalization”
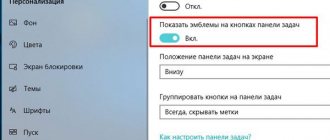
- Switch to the last block to customize the “Taskbar”. Scroll down to the Notification Area option. Follow the second link to activate and disable system icons. Follow the link "Turn system icons on or off"
- Find the line for the input indicator (this is the language bar). If the switch is in Off mode, click on it once to activate the icon - it should immediately appear in the lower right corner. If the value is “On,” move on to other methods, or try first disabling the icon and then turning it on again.
Turn on the “Input indicator” item
Why did this happen?
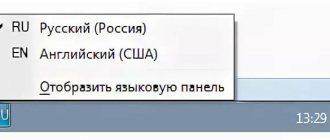
The interface for changing the keyboard layout and switching between languages is located in the system panel. It's at the bottom of the screen. The panel shows the current settings. For example, the “RUS” icon indicates that the Cyrillic layout is currently activated.
If the interface is missing, the user is faced with a problem that could arise for the following reasons:
- disabling the panel in settings;
- system failure;
- lack of language file;
- influence of malware.
The identified reasons indicate that the problems can be resolved using the system's built-in tools. The main thing is to act strictly according to the instructions.
We fix the problem through the “Control Panel”
If the system icon in the “Notification Area” constantly appears and disappears, you can enable and pin another, separate panel with languages next to the “Windows” tray. You'll have to dig a little into the settings:
- Let’s launch the “Control Panel” - immediately click on the R + Windows combination, and then enter the control panel key or simply control. Click OK or press Enter to execute the code.
Execute the control panel command in the window - On the panel, we look for and launch the block with regional standards. If you find it difficult to find, use the search bar in the top right corner. Open the "Regional Options" section in the "Control Panel"
- In the first tab with formats, click on the “Language options” link. You will immediately be taken to the “Options” window, but already in the desired section. You can also launch it using the Win and I key combination and going to the “Time and Language” section.
Follow the link "Language options" - On the right there will be a list with links - click on the fourth line “Advanced keyboard settings”.
Click the "More keyboard options" link on the right - In the item about switching input methods, check the box to the left of using the language bar on the “Desktop”.
- Now follow the link “Language panel settings” to configure the activated panel.
Follow the link "Language Bar Options" - In the dialog box, in the first tab, set the value to “Docked”. After that, be sure to apply the changes and click OK.
Pin the language bar and click “Apply”
Correcting errors using standard tools
If using the new profile is not possible, try using the following standard tools:
- Use the standard troubleshooter. Go to Windows Settings - Update and Security - Troubleshooting tab, find "Keyboard" and launch it.
- Try a basic check for system file corruption. To do this, enter sfc /scannow in the command prompt window
- Perform Inplace Upgrade - updating system files from a system image. Download Media Creation Tool from the official Microsoft website. Launch the downloaded application and select the “Update your computer now” action. The application will download the system image and automatically begin installation.
Resetting the language
The reason for the regular disappearance of the icon with the current input language may be that the languages were initially installed incorrectly. If this is your case, follow these steps to fix the situation:
- Open the “Time and Language” tile in Windows Settings and go to the block with language and region. The essence of the method is to first completely remove all languages in the block with preferred languages (except for the interface language - in this case it is Russian - it cannot be removed), and then add the necessary ones again.
Since Russian is the interface language, it cannot be deleted - We have two languages - English and Russian, so we will only remove one. Click on the language with the left mouse button and select delete.
Click on “Delete” to remove English from the list - After that, click on the line with the plus “Add”.
Click on the plus sign above the Russian language - In the window, select English or any other desired language. In the case of English, you need to be careful, since the list contains different language options - we will choose the United States version. Click on “Next”.
Select the desired language from the list and click “Next” - We remove the checkbox from the first step about assigning the selected layout as the interface language, so that the “OS” continues to work in Russian mode. If desired, leave the “Speech” item active so that the system can recognize your speech in English. Click on “Install”.
Uncheck the first item and click on “Install” - We are waiting for the system to install a new language. Wait while the system installs the language pack
- As a result, we see that the OS has successfully completed the download and installation of the language pack. We exit the window, close all programs and restart the PC - the language bar should appear.
When the procedure is completed, restart your computer
Add the language bar file to startup
The language panel in the system corresponds to an executable file called ctfmon.exe. As a rule, it starts working immediately after loading the operating system. However, for various reasons (due to a system failure, unsuccessful OS update, careless actions of the user on the PC, the presence of viruses, etc.), the process may begin to function incorrectly.
If you notice that the language bar does not appear after the OS has fully loaded, add the specified file to the startup list. This can be done in two ways: manually adding it to the “Startup” system directory or using the “Registry Editor”.
Startup folder
To ensure that the previously specified file appears in the Startup directory, follow these steps:
- Open the main page of “Explorer” through the “This PC” shortcut on the “Desktop” or in the “Start” system menu. Select the local drive on which you have the operating system installed. A hint is the Windows icon next to the image of the disk itself.
Expand your system drive in Explorer - Start the Windows directory on this disk, and in it the System 32 folder. Open the Windows folder first, and then System32
- If you do not see these folders or they are not available for launch, open access to them as follows: in the “Search” panel, enter the query “show hidden folders”. In the results, select the specified “Control Panel” section.
In the Search panel, enter the query "show hidden" - Scroll the page in the small window and set the value to “Show hidden folders and files.” Apply the changes and close the window.
Set the value to “Show hidden files” - In the System32 directory, near the beginning of the list, there is an executable file for the language panel - ctfmon with exe format. Find him.
Find the ctfmon file in the list - Right-click on it and perform the copy action.
Copy the ctfmon file using its context menu - Now, in the same “Explorer”, go to the following directory on the system drive: “Users” - the folder with the name of your account on the PC - AppData - Roaming - Microsoft - Windows - "Main Menu" - "Programs" - "Startup" "
Open the Startup folder on your system drive - In the last directory, right-click on the empty field and perform the action of pasting the previously copied file. It should be noted here that you only need to copy the document itself, and not the label to it. Otherwise the method will not work. Paste the ctfmon file into the Startup folder
- When the system document is in the directory, close all windows and reboot the operating system. Now the language panel will constantly appear after each system boot. When ctfmon is in Startup, reboot your device
Using Registry Editor
This procedure for adding a file to Startup is suitable for more experienced users, since here you need to change an important Windows database called the Registry using the interface of its editor:
- To have the system open the editor interface, run the regedit command in the Run window (Win + R). Run the regedit command in the window
- We allow the “Registry Editor” to make changes in the “OS”.
Give the editor permission to make changes on PC - Before performing the operation, save a copy of the registry in case the modification fails. In the "File" menu, click on the "Export" action. Click on "Export" in the "File" menu
- Give the copy a name and save it in a place you can remember. Save a copy of the registry in any folder - most importantly, remember which one
- Expand the second main branch HKEY_CURRENT_USER in the left area of the interface, and in it there is a directory called Software. In the second folder, open the Software directory
- Navigate to the following directory in the same tree panel: Microsoft - Windows - CurrentVersion - Run. Open the Run folder in CurrentVersion
- In the Run section, which corresponds to the “Startup” folder, right-click on the empty field, and in the menu for creating entries, click on the second line “String parameter”.
Create a string parameter in the Run folder - Give the entry any name, you can name it LanguageBar to distinguish it from other options in the list. Give the parameter the name LanguageBar
- Double-click on the entry quickly. Insert the following into the blank line for the value: ”ctfmon”=”CTFMON.EXE”.
Set the parameter value to ”ctfmon”=”CTFMON.EXE” - A simple local address of the ctfmon file on the PC - C:\Windows\system32\ctfmon.exe - may also work. You can write it too. Close the editor, immediately restart the operating system and see if the language bar appears in the lower right corner of the display. In the “Value” field, you can also specify the path to the language bar file: C:\Windows\system32\ctfmon.exe
Let's create a registry file
Changing registry settings and adding new entries is possible without launching the editor interface. If you are a beginner, try these steps:
- Let's create a text file - to do this, use any text editor on your PC (Notepad, Microsoft Word, etc.). Paste the following text: Windows Registry Editor Version 5.00 [HKEY_CURRENT_USER\Software\Microsoft\Windows\CurrentVersion\Run] "CTFMON.EXE"="C:\\WINDOWS\\system32\\ctfmon.exe".
Create a text file and paste the text into it - We save the document in a convenient place, for example, on the “Desktop”. Save the text file, for example, on the “Desktop”
- Now right-click on the file and select the “Rename” action.
Select the rename option from the text file menu - Instead of txt or docx (depending on what program was used), we write the reg format.
Instead of doc, put reg at the end of the name - Save the changes - click on “Yes”. Click “Yes” to save changes to the file name
- The document will immediately change its icon to the registry entry icon. Click on it again with the right mouse button.
The file icon will immediately become a registry icon - Select the line to run the file with administrator rights. We confirm the operation and wait for it to complete.
Open the file as administrator
Deleting an entry in the registry
Another simple manipulation in the Registry Editor can help you. Before performing the described task, also make a backup copy of the registry just in case:
- Open the Registry Editor interface again using the instructions detailed in the sections above. Also, double-click first on the second directory HKEY_CURRENT_USER, and then on the Software branch in it.
- Display the contents of the following nested sections: Classes - Local Settings - Software - Microsoft - Windows - CurrentVersion - TrayNotify.
Look for the IconStreams entry in the TrayNotify folder. - Find the IconStreams registry entry on the right side of the editor - you need to get rid of it. Right-click on the line and in the gray menu click on the delete action. Use the context menu to remove IconStreams
- In the small window that appears, click on “Yes” to confirm clearing the registry of this setting. If it turns out that there is no entry with the same name in the TrayNotify folder, then this method will not help you - move on to others. Confirm that you want to remove IconStreams
Method number 5: Install Punto Switcher
If none of the above methods worked or you simply don’t want to waste time checking their functionality, you can install a program such as Punto Switcher on your computer to solve the problem. What's good about her? Perhaps, because in addition to creating a new language panel on the computer, such a utility also automatically switches the keyboard layout when typing, thereby protecting you from any gobbledygook in documents:
Convenient, isn't it?
Removing viruses
As we have already said, the reason for the absence of the language panel may be viruses. In this case, even if you return the panel to its place in the settings, it will still disappear again after a while. Here you need to go deeper - cure the system and restore the integrity of system documents. Let's check your PC for viruses using the classic Windows Defender antivirus:
- Let's call up the Defender interface - click on the arrow next to the battery charge icon to bring up the Windows tray. Click on the white shield.
Open Defender via the Windows tray - In the antivirus utility window, open the first tile dedicated to threat protection.
Go to the first section to configure protection against viruses and threats - Let's move on to performing an advanced scan (link under the button for a quick scan).
Click on “Run new advanced scan” - We give preference to either the full or standalone option: in the first case, the scanning will take a long time, but you will then be able to do anything on the device; in the second, the computer will restart - during this time Defender will check the operating system and launch it again. The advantage of the second option is that it will only take 10 - 15 minutes. We select the test that suits us and run it.
Select the scan type and run it - We are waiting for the end of the scan. If any threats are detected in the search results, select the “Delete” option in the “Action” parameter. Wait for the scan to complete and remove any threats found
After treatment, you need to restore the functionality of those system files that were damaged as a result of the detected virus. We perform the following steps:
- Open the “Search” window by clicking on the magnifying glass on the “Taskbar”. We type only three English letters cmd in it or write the request “Command Line”.
Find "Command Prompt" in the Search bar - Right-click on the console in the list of search results and click on the first option, which will launch the standard Windows program with administrator rights.
Select "Run as administrator" from the menu - Copy the short command sfc/scannow, and then paste it into the console with a black background using the combination Ctrl + V.
Run the command sfc /scannow in the console - We are waiting for the scanning process to complete successfully. Progress in the form of percentages will be noted in the editor. The procedure will take some time (depending on the number of OS files and the degree of their damage). After treating the system, the tongue panel should return to you. You may need to restart your PC.
Wait for the system to finish running the sfc /scannow command
The ctfmon.exe file itself can be a virus, or more precisely, a copy of it disguised as a genuine system process. In this case, this process will load system resources, but you will not have a language bar:
- Hold down R and Win and in the Run window type the taskmgr command. We perform it by clicking on OK.
In the Run window, run the taskmgr command - Or right-click on the “Taskbar” (on an empty field) and select “Task Manager” in the black context menu. You can call the manager interface through the context menu of the “Taskbar”
- Find the line “CTF loader” in the first tab. We look at the amount of resources that this process “consumes” - it should be no more than 10 - 15%. If more, right-click on the process line and click on the “Open file location” line.
Click on "Open file location" - As a result, Explorer and the System32 directory should load. If another folder opens, it means the process is viral - we disinfect the system and restore the files.
If the System32 folder opens, then the file is not a virus
Causes
One of the common causes of the problem when changing the language on Windows 10 does not work is sticky keys and other problems with the keyboard. It is quite difficult to change the language with a broken keyboard. Depending on the nature of the problem, the reasons may be as follows:
- Keyboard malfunction;
- Ignorance of the required combination - some users know only one of several combinations to change the layout;
- There is a problem with the ctfmon service, which is responsible for quickly switching layouts.
- System problem or corruption of operating system files.
There are not many reasons for an error, but each of them must be approached differently. Next we will describe ways to solve problems when Windows 10 languages do not switch.
Rollback to a restore point
If none of the solutions discussed above helped you, try one of the extreme methods - rolling back the system to a restore point. This method will be effective if the panel with the current language has disappeared after the next OS update - perhaps the process did not go well. Mandatory for this solution is the presence of at least one point on the PC (saved state of the computer at a certain point in time). Let's look at how to use a dot:
- In the contextual gray menu of the “This PC” shortcut (called by right-clicking the mouse), select the last line with properties.
In the computer shortcut menu, click “Properties” - In the menu with data on the operating system and device, follow the link in the left column “System protection”.
Open the "System Protection" section - Click on the “Restore” option. If the key is inactive (you cannot press it), it means that your protection is disabled in the settings, and most likely you do not have recovery points.
Click on “Restore” in the “System Protection” section - On the main page of the rollback wizard, select either the last recommended point or notify the tool that you want to independently select a point among those available on the PC.
Select show all recovery points and click “Next” - We put a checkmark next to the item below about showing absolutely all points, select the required state (remember when the panel with the language did not disappear and focus on this period of time) and click on “Next”.
Select a restore point and click on “Next” - On the next page, click “Done”.
Start the rollback process using the "Finish" button - Confirm again that you want to restore. First save information in all open windows and close them. The system will restart several times - wait until the rollback process is completed. As a result, you should get the PC state you chose. After some time, Windows Update may install the missing update, but it will be successful - the language bar should remain in its place.
Confirm the final start of the rollback to the point