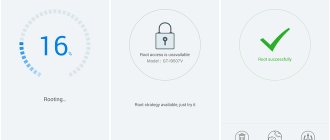
Rooting a mobile device is a unique opportunity to get almost unlimited possibilities for configuring, customizing and optimizing your gadget. Deep scanning of a smartphone for viruses, followed by identification, analysis and isolation of a malicious applet; installation and customization of a wireless network, even if the possibility of using it was not provided for by the developer in the application; detailed customization of the appearance of the device - all these goodies can be accessed through the rooting procedure (in other words, Android jailbreak). You can read in more detail about what “root access” is in the article recently published on our portal.
Returning to the topic of the article. How to install root rights? To do this, you can use one of the system applications: Framaroot, ROM Toolbox Pro, iRoot, Kingo Android Root, etc.
Once root access is obtained, we will need a universal, powerful and flexible software tool that will allow us to control processes and applications that use root in their work. Such a tool is one of the best utilities in its class, namely SuperSU .
How to use SuperSu
After installing Root on your Android smartphone or tablet, go to the application menu and find the SuperSU icon and launch it.
When you first launch you will be greeted with something like this:
Feel free to click “Expert”, since clicking on “New user” will not tell or show you anything interesting or new.
Update Su binary
Perhaps after launch, you may receive a pop-up window asking you to update the SU binary file:
You can agree and continue or cancel the action; this will not affect the operation of SuperSU in any way!
The application has three tabs:
Each tab performs its own functions and now we will consider each of them in detail.
Applications Tab
This tab will display all applications that have ever requested root rights, and you have granted them this right or denied:
A request to grant Root rights to an application at the moment it is launched or at the moment when it begins to perform its actions looks something like this:
If you accidentally did not grant Root rights to the application, then SuperSu will not give them to it.
In order to fix this, you will need to go to SuperSU, the “applications” tab and then find and click on the icon of the application to which you need to grant Root rights:
Logs tab
This tab displays a log of everything, what, when and which application required Root rights:
This tab does not provide any additional features.
Settings tab
This tab is of the greatest interest, as it regulates the operation of SuperSU.
Let's consider the main and most interesting points:
- Allow Superuser - disables or enables Root rights
- Re-authentication - ask again to grant Root rights after it has been updated.
- Default access - grant application root rights automatically, with a request, or deny
- Create a named separation of spaces - a way for root to work with root processes; if problems occur when working with applications that require rights, then disable this item
- Enable multi-user mode - if your Android tablet has two accounts and one of them requires Root, then this item will activate this feature
- Protection against interception of taps - if another window or application is layered on top of the SuperSu pop-up window, then to avoid accidental granting or denial of Root rights, the SuperSu window will not work
- Reinstallation - deleting the SuperSu application in order to install this application from Google Play (an installed application from a ZIP archive cannot be updated)
- Switching the Superuser application - if you want to change the Root rights control manager application, then this item is responsible for this option
- Complete Root Removal - Completely and permanently removes Root from your Android
That's all! Read more articles and instructions in the Articles and Android Hacks section. Stay with the Android +1 site, it will be even more interesting!
How to install the Su binary file on Android using custom Recovery
Did the method described above not solve the problem? Well, this is possible, especially for HTC models. In this case, you will have to use custom (alternative) recovery. And if you don’t have it installed yet, but you still have the desire to become an advanced user of the Android OS, then you will have to install it sooner or later. Because this tool will allow you to perform many necessary operations: create backups, install system updates or flash your Android with a different version of the operating system (ROM), etc.
We will not tell you now how to install custom Recovery, because this is a topic for a separate conversation, and if you are interested in it, write, and we will tell you in detail how to perform this operation.
Now we will assume that you are on topic and return to our question. That is, if you have a custom recovery (or you know how to install it), then look at the last screenshot, and instead of the “ Normal”
", press "
CWM/TWRP
". After completing the procedure, we reboot the smartphone, after which, along with the system update, the Su binary file will also be updated.
What programs require root access to work?
The range of applications that require root for stable and efficient operation is very wide. These include file managers, task managers, and full-featured tools for optimizing smartphone resources. Root is especially necessary when using third-party projects to manage Wi-Fi networks and multimedia recording of what is happening on the smartphone display into an external video file with settings for the codec used, resolution, shooting mode, etc. Having received root rights, the user has access to hidden resources and functions of the mobile gadget, without which all the described applications simply cannot do without.
Updating a binary element
Why can't I use my device without updating? Isn't the old "binary" able to cope with the required tasks? Unfortunately, many programs receive major updates, and the outdated version is no longer supported. This can lead to various errors. This is why it is worth updating the SU file.
And if it is busy, then the installation instructions are as follows:
- But if this option turns out to be a failure, then it is worth specifying the second update option - through TWRP/CWM (Recovery mode). This will work when the “Recovery” mode is set on your gadget. Then just restart your phone/tablet in Recovery, select “Install”, specify the path to the location of the downloaded archive with the binary inside:
- If you cannot find Team Win Recovery Project on your device, then you should move on to the next method.
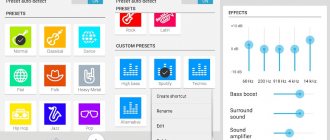
Utility settings
The last tab contains all the parameters of this program. Here we have:
- Enabling re-authentication, in which you will need to confirm access to root rights every time you update the application or reinstall it.
- Default access that applies to all applications.
- Settings for recording to a log file (what exactly will be recorded, the period for storing files in the device memory).
- Waiting time for a response to a request, after which access will be automatically denied.
- Configuring the utility interface (selecting a language, launch icon and graphical shell).
There are also some specific parameters, including:
- Enable protection against interception of screen taps.
- Turn on survival mode.
- Using the utility as a system program.
In addition to the free version, there is also a paid version - SuperSU Pro. How to use this version? Exactly the same as free. The only difference is in the wider list of settings.
What is Superuser
This is the name of special programs that allow owners of mobile devices on the Android platform to obtain superuser rights. They are assigned the role of intermediaries between gadgets and root. They provide or restrict application access to root rights. With the help of superuser for Android, the operation of utilities in root access mode is corrected.
Superuser itself does not grant the user administrator rights, being, in fact, only a shell for them. To work, get your license first.
Program description
When root rights have already been obtained, the user will need a very powerful, flexible and universal tool that allows him to control applications and processes that use root in their work. One of the best utilities of its kind, SuperSU, is just such a software tool. How to use this program? What can she do?
When to give up superuser rights
Although the possibilities for using your device are greatly expanded, sometimes you need to completely remove root:
If the device fails, no warranty workshop will repair the device with such extended access to the system. Sometimes the conditions are such that all files must remain in the same, unchanged form, and you will be required to prove that you have not changed anything in it
This is one of the main reasons to remove root; When updating system files from cloud services, updates will not be installed on such devices using this method; Please note that when you change system files on your own initiative, you may inadvertently remove the built-in protection of the device, and then the simplest virus can do great harm to you; We decided to give our device to a child, and in order for the gadget to work properly, it is necessary to remove super rights to avoid troubles.
The essence of the problem
If a program is installed on your device to grant utilities “Superuser” rights, then when you launch it you may see the following notification: “There is no binary file or it is not installed.”
This defect occurs due to the inability to update the SU file required to gain root access to the Android file system. There are many solutions available on the Internet, but not all of them are effective. Even on the authoritative resource w3bsit3-dns.com I couldn’t find a way to fix the error on the Meizu M2 smartphone that my friend brought.
Therefore, I decided to choose only working methods from all the methods so that they would help you get rid of the “Supersu SU file is busy” message.
Ways to remove root rights
You can remove unlimited access to the system using different methods:
Using Universal Unroot
There is a very convenient program called “Universal Unroot”. It works automatically and corrects unrestricted access to the system. Runs on all Android devices, even the very first releases.
Using SuperUser or SuperSU
If you set unlimited access through the SuperUser application, then the data is also deleted through it, without even turning off the device. You need to launch the application, find and activate the “Complete removal of Root” item.
Using Root Browser Lite
You can use the Root Browser Lite program from the Google store. You will have to manually delete the following files (if any):
- Su or Busybox in the /system/bin/ folder;
- Su or Busybox in the /system/xbin/ folder;
- Superuser.apk or SuperSu.apk in the system/app folder.
After all the manipulations, you will return your device to normal user rights, and you can safely transfer it to other hands or take it for warranty repair.
Reflash
This is the most radical method - when you reinstall the system, all personal files will be lost, but there will also be no super rights left. This method is suitable for those who are going to sell or give away a smartphone or tablet. If you value photos and videos saved on your smartphone, dump them onto a memory card.
For firmware updates for Android smartphones or tablets, it is recommended to use only special software. For example, for Samsung the Odin program, Lenovo - Downloader Tool, Xiaomi - Xiaomi Flashing Tool.
Conclusion
The presence of SuperSU in a rooted device is mandatory. Since with uncontrolled granting of privileges, the owner risks losing personal data or money. It is also recommended to use proven SuperSU builds up to version 2.80.
Sources
- https://appsetter.ru/superuser-kak-polzovatsya-programmoy.html
- https://FB.ru/article/270307/programma-supersu-kak-polzovatsya
- https://appsetter.ru/programma-supersu-dlya-android.html
- https://www.alpha-ag.ru/programs/get-root/7140-superuser.html
- https://softdroid.net/supersu-gramotnoe-upravlenie-root-pravami-na-smartfone
- https://androidp1.ru/kak-polzovatsya-supersu/
- https://4pda.biz/android-obshchee/3012-supersu-kak-polzovatsya.html
- https://GemApps.ru/programs/tools/skachat-superuser
- https://androfon.ru/article/supersu-kak-polzovatsya
- https://appsetter.ru/udalenie-supersu-s-telefona.html
- https://med-post.ru/tehnika/kak-udalit-programmu-supersu-sisteme-android
Utility features
If a user works with a large number of programs, often installs and uninstalls various applications, and also delves into and understands in detail the options of the Android operating system, then it is very difficult to keep track of all rights and requests.
When installing SuperSU, you can always be aware of which application needs root rights and which system processes are launched. The user will be able, based on his own preferences and priorities, to allow or deny access for a specific application, thereby controlling the activity of the software, as well as ensuring security.
Results
According to the developers of the utility, it is a tool of the future. And this cannot be called an exaggeration. After all, all analogue programs are significantly inferior to it in terms of functionality. And this situation has been observed for quite some time. The program is very popular all over the world.
Now it’s clear how to use SuperSU. At the same time, Android will bloom with new colors, and the user will receive a huge number of opportunities.
SuperSU Pro (
utility for managing ROOT access to applications
)
- This program for Android will become an indispensable assistant after you get ROOT on your mobile device. After all, the essence of this system application is to control and distribute superuser rights or administrator rights to various programs. That is, when you install some application on your device and it requires superuser rights, SuperSu will tell you about it and you will decide for yourself whether to give these treasured rights to the program or not. For ease of control, the application provides a PIN code that can be set in the program settings and which will need to be entered every time you need to grant rights to an application.
This is a very convenient function if you are more than one owner of the device, and for example, children or someone else also uses it, so so that they don’t do anything bad, it’s worth putting this pin. Another great feature in SuperSU on Android is the ability to completely remove root rights, this is necessary, for example, to update the firmware over the air, one click and you have a “clean” smartphone or tablet. From the links below you can download two versions of the program, one is installed as a regular .apk application, and the second is for flashing the firmware via custom recovery (Recovery) CWM\TWRP recovery.
Peculiarities
:
- request access to superuser rights
- log access to superuser rights
- notification about access to superuser rights
- notification configuration
- temporarily disabling root rights on the device
- deep detection process
- works in the field of restoration
- works when Android doesn't load correctly
- works with non-standard shell locations
- always works in ghost mode
- wake on request
- program conversion
- perfect understanding of root rights
- backup copy in order to still exist after the daily publication of CM
- the icon can be selected from five models or you can hide the icon
- The theme can be chosen from four models
- can download by dialing:*#*#1234#*#* or *#*#7873778#*#* (*#*#SUPERSU#*#*)
Notes: Not all smartphones can work with these two passwords. In some smartphones, you need to replace the password “*#*#” with the password “*#”.
The Pro version additionally offers
:
- OTA “survival mode” (no guarantees)
- full logging with highlighting (input/output/error)
- setting up a log log
- override setting
- allow or disable the application within a set period of time
- PIN protection
- PIN saving of each application program
- adjust automatically reject countdown
A method for those who were unable to install SuperSU PRO
- 1) Go to SuperSU and select “Reinstallation”.
- 2) Reboot the device.
- 3) Go to the Play Store and download regular SuperSU.
- 4) Download and install the PRO key (link below).
- 5) Reboot the device.
- 6) Done.
Solving the problem with the SU binary file
:
- 1. Install Superuser and launch it.
- 2. Install SuperSU, launch it and give it root rights.
- 3. Update SuperSU and remove Superuser.
- 4. We rejoice.
Working with SuperSU
As a SuperUser rights manager, SuperSU is very easy to use.
- Privileges are managed when a request from the application appears in the form of a pop-up notification. The user only needs to click one of the buttons: “Grant” to allow the use of root rights,
or “Deny” to prohibit the granting of privileges.
In the future, you can change your decision about granting root to one or another program by using the “Applications” tab in SuperSu. The tab contains a list of all applications that have ever received root rights through SuperSu or provided a request for their use. A green hash near the program name means that root rights have been granted, a red hash indicates a ban on using privileges. The icon with the image of a clock indicates that the program will prompt you to use root rights every time it needs them.
After tapping on the name of a program, a window opens in which you can change the level of access to Superuser rights.
Thus, using one of the above methods, you can quite easily obtain not only Superuser rights, but also, without exaggeration, the simplest, most effective and popular way to manage root rights - the SuperSU Android application.
Describe what didn't work for you. Our specialists will try to answer as quickly as possible.
What to do if applications are not configured
Quite often on the Internet you can see the request “SuperSU applications are not configured, what should I do?” Messages about unconfigured applications tend to cause panic among users, but are not such a terrible problem.
This notification appears after the first launch of the application, and for an inexperienced user it sounds scary. However, this means that the utility has not yet started processing applications; access to superuser rights has not yet been requested by a single application.
To set up access, you don't even need to go to the list of applications. You can run several programs that will not give up root rights. After this, the list will begin filling out.
Application, installation
Thus, to use SuperSu, root rights must already be obtained on the device using special means. At the same time, users identify the concepts of managing root rights and the process of obtaining them, firstly, because interaction with the privileges in question is carried out precisely through the program, and secondly, because many methods of obtaining root rights imply, after execution, automatic installation SuperSU. Below are three ways to get a working SuperSu on your Android device.
Method 1: Official
The easiest way to get SuperSU on your device is to download and install the application from Google Play.
Installing SuperSU from the Play Market is a completely standard procedure, implying the same steps as any other Android application when downloading and installing.
Method 2: Modified recovery
This method may imply not only the installation of SuperSU, but also prior to installing the manager, obtaining root rights in the device. The most important thing for the successful implementation of the method is to find a *.zip file suitable for a specific device, flashed through recovery, ideally containing a script that allows you to obtain root rights. In addition, to use the method you will need a modified recovery installed. The most commonly used ones are TWRP or CWM Recovery.
- Download the required *.zip file for your device on specialized forums for firmware for a specific device or from the official SuperSU website:
How to flash additional Android components using various custom recovery environments is described in the following articles:
Lesson:
Lesson:
Method 3: Programs for getting root
As was said at the beginning, many methods for obtaining Superuser rights, presented in the form of applications for Windows and Android, require the installation of SuperSU automatically after execution. For example, such an application is Framaroot.
How to root Android via CWM
1. After downloading the SuperSU archive from the official website and saving it in a convenient place on your memory card.
2. – how this is done can be found in the instructions at the link.
3. In CWM, select “install zip” (selected using the power button) or “install zip from sdcard” (for older CWM versions below 6.XX).
4. Then “choose zip from /sdcard” if the archive to be flashed is on the SD card.
5. Go to the folder where you saved the “SuperSU- version”
.zip" and confirm with the power key.
6. Agree to the installation, select “Yes – Install SuperSU- version
.zip".
7. The process of rooting the mobile device will begin.
8. At the end you will see the message “Install from sd card complete”, which in our case means obtaining root rights.
9. Return to the main CWM menu.
10. Click "reboot system now" to reboot into Android.
Solution
The Android operating system takes smartphone users to a whole new level of control, and the functionality of a root device, which allows you to install root applications, custom kernels and ROMs on it, makes its advantages even more obvious. However, after rooting the device and installing SuperSU (the most popular of the many Superuser admin apps available on the Play Store), many Android users are facing and trying to resolve the “SU file is busy” error. What to do? This error is most often caused by an incorrect installation or a damaged SuperSU binary file. Most of the users who experience difficulty in rooting their Android device try to get rid of the problem in various ways. If you also encounter the “SU Binary Occupied” error, use only the proven and working methods described below.
Updating the SuperSU binary file
To update the SuperSU binary file on Android, follow these steps:
- Go to the official SuperSU website.
- Download the previous (not the latest!) version of the APK file on your phone.
- Install the APK file.
- After installation, launch the application. A dialog box will open: “SU Binary needs to be updated.” Click Continue and then click Normal.
- The installation of updates will take a couple of minutes. Reboot your device.
- Once your device turns on, go to the Google Play Store and check for updates. Update the SuperSU app to the latest version.
Even after updating to the latest version, the application may prompt you to update SU Binary. Just follow the steps and reboot your device. And the problem will no longer arise.
Via command line
Rooting Android allows you to unlock new interesting features. After rooting your Android device, you can easily do things you couldn't do before. If after installing SuperSU the “SU file is busy” error appears, you can fix it through the command line. So, to begin with:
- Download and install Terminal Emulator for Android.
- Find and download “Replace_Kinguser_with_SuperSU-v2.4.zip”. Unzip the file.
Steps to resolve SU Binary Occupied error:
- Extract the Replace_Kinguser_with_SuperSU ZIP file and transfer the extracted version to the internal memory of your device. Install Terminal Emulator for Android and extract the Replace_Kinguser_with_SuperSU. After that, move the extracted “mrw” folder to the external drive.
- Open Terminal Emulator and enter the commands.
Open the terminal application and enter the command “su”, after entering you will be prompted with a window asking you to refuse/provide features. After granting permissions, you will need to type the following line of code:
After this, restart your smartphone and you will see that SuperSU is installed, updated and working without errors.
Installing SU file using custom recovery
It is recommended that you back up your files before proceeding with the following steps.
- Go to the official SuperSU website and download the latest SuperSU zip file on your device.
- Move the downloaded zip file to the root of your internal storage (not to your memory card).
- Turn off your device and reboot into recovery by pressing the Power and Volume Down buttons simultaneously for a few seconds.
- Click Install.
- Find the SuperSU zip file. Remember that in TWRP the internal storage is called sdcard and the external storage is called sdcard1. If you moved the SuperSU ZIP file to the root of the internal storage, you need to look for it in the sdcard directory.
- Select the zip file and confirm by swiping.
- Tap Wipe Cache & Dalvik and swipe across the screen.
- The phone will reboot.
TWRP may prompt you to install the SuperSU app. Click "Don't install." This is because TWRP cannot detect whether SuperSU is installed or not. Ready!
The best way to ensure that the installation and update of the application is successful is to run a program that requires root access, such as Greenify. The first time you launch an application that requires root access after installing SuperSU, you will see a pop-up window asking you to grant or deny root access.