Sometimes when you connect a monitor to your Windows 10 PC, everything seems a little off. If your display size and resolution aren't what they should be, here are some common causes and fixes you can try.
In this article, we'll focus mostly on issues related to external monitors, but if you're having trouble with the native display on your Windows 10 laptop or tablet, check out our article on how to adjust screen resolution in Windows 10.
Finally, if you're trying to connect Windows 10 to an HDTV, it's a different story. Luckily, we have an article that can help you fix resolution issues when using an HDTV as a monitor.
Determine your display's native resolution and switch to it
First, find out your display's native resolution. This is usually written on the screen box, but you can also check this using Windows Display Settings:
- Right-click the Windows desktop and select Display Options.
- Under Screen Resolution, select the drop-down menu.
- Find the recommended resolution, which is your display's native resolution and should be automatically selected by Windows. If it's not, you can change it to the correct resolution. The steps in the linked article should resolve most resolution issues.
However, sometimes Windows detects the wrong native resolution. If your screen's native resolution according to its manual or official website specifications is different from the recommended setting in Windows, change it to the manufacturer's recommendation.
Solving the problem with screen resolution in Windows 10
A screen resolution issue usually causes video drivers to malfunction or be missing. Another reason is the wires, adapters, adapters and connectors used to connect the monitor.
Method 1: Clean installation of drivers
If you cannot change the screen resolution using the standard method, you should try doing this through the NVIDIA control panel and the Intel graphics system or AMD Catalyst Control Center. They are used to manage multimedia content, display images on the screen and deeply configure video card parameters.
If the function is blocked everywhere, you need to check whether the video drivers are installed.
- Right-click on the Start icon and select Device Manager.
Even if you have a video driver, there is a risk that it will not work correctly. You can update it using the same “Device Manager”, and the search will be limited to Microsoft servers and the Windows system. It is much more efficient to install new software after first removing the old one. You can completely erase the drivers using Display Driver Uninstaller. Additional methods are “Toolbar” or “Device Manager”, but in this case some components may remain in the system.
For a separate graphics card, the software can be downloaded from the official websites of Nvidia and AMD or installed using their software; for a built-in one, you can find it on the website of the motherboard manufacturer. Other options are to use third-party programs or the standard Windows 10 tool.
Method 2: Restart the driver
Microsoft provides a function to restart video drivers, which can be activated by the key combination Win+Ctrl+Shift+B. It only applies to Windows 10 and helps troubleshoot display problems, as well as solve problems with updating graphics card software. After pressing the buttons, a single signal will be heard and the screen will blink. Once this happens, try changing your screen resolution. If the image suddenly remains black, force restart your computer.
Method 3: Checking the equipment connection
If updating and reinstalling drivers does not help, the cause may be damaged cables, adapters, or low-quality adapters through which the monitor is connected. To check this, you need to replace them with others that are known to work. If possible, it is also worth connecting another monitor or video card, since sometimes the problem is in the connectors themselves.
Conclusion
A similar problem is sometimes encountered by users who have just updated the system to the tenth version. Some video cards of previous generations may not be supported by Windows 10. They are installed with a standard video driver, which provides minimal color settings and basic screen resolution, i.e. does not allow the graphics accelerator to work at full capacity. In this case, you can try downloading and installing drivers that were released before the “top ten”.
Add the Lumpics.ru website to your bookmarks and we will be useful to you. Thank the author and share the article on social networks.
Did this article help you?
Share article on social networks:
More articles on this topic:
Isaac Hello, Alexander! Your article did not apply to my problem: I have a Compaq Mini with a small screen on which the windows of several programs do not fit, there is no access to the buttons Enter code, Activate, Next, Stop, etc. I tried to use the MovelnactiveWin utility, which supposedly allows you to grab the any point of the window and holding Alt to move the windows did not work, and the lower section of the windows remained inaccessible. In the list of resolutions 1024x576 is the largest reduction in the screen, so I found your article as the last salvation. But no, and here it misfires: right-click on The desktop opens a window with the lines Create, Screen Settings and Personalization, without adjusting the graphics, apparently the display does not allow it, the adapter type is Mobile Intel(R) 945 Express Chipset Family, “works fine”, driver version 8.15.10.2697 is in place. With this data, what should I do to achieve the goal of reducing windows so that I can manage? It seems to me that a solution to my problem is available to you, and also that you will not refuse to help. PS I'm not very experienced in computer matters, even though I lived to be 85, so I need step-by-step instructions. Best regards, Isaac.
Hello Isaac. This problem is possible if the font is increased in the system parameters. Try reducing it to the recommended size (100%) first. Read more: Changing the font in Windows 10
Thank you, Alexander, for your quick response. Everything is true - the size is 100% and unfortunately there is no reduction, only +. Is it really a dead end? Or will you find a solution? I’ll bow at your feet! Isaac.
Hello. Let's clarify: you have the latest version of the driver installed and the resolution is set to maximum. This is true? If the bottom of the windows does not fit on the screen under these conditions, try rotating it 90 degrees. It is possible that if the window is positioned horizontally, the controls will be visible.
Hello Alexander! There is no way to rotate the screen: on my 11-inch display, right-clicking opens a window without the Graphics characteristics option, I wrote about this in the first comment. This is strange for me, because it’s the same 10-inch, and even the latest 1909 version. Another mystery with the non-working utilities MoveInactiveWin and the second added AltDrag, both are inactive. I would be interested to know how they behave on your computer, whether they are alive. Please check.. But if all is unsuccessful, why don’t you use your main trump card - adding a resolution higher than 1024x576 to the list?. My list ends here, so tell me how to add it, if you really know the method, if the article doesn’t bluff. Everything would be decided in a couple of minutes, just give me a hint. In any case, thanks and sorry for the burden. Isaac.
Hello. You can also rotate the screen using a keyboard shortcut. Hold Ctrl+Alt and then press the left or right arrow (the up arrow will return the screen to its original position). If that doesn't work, install iRotate, a program for changing the desktop orientation. The MoveInactiveWin and AltDrag utilities work without problems on my computer. Try using them again. Now about your device. I think 1024x576 resolution is the limit. It was set by the manufacturer, which means you cannot set a higher value. Of course, I can clarify about the maximum resolution if you specify the netbook model in full, but most likely this is the case.
Isaac Alas, a complete fiasco, none of the utilities work, the new iRotate too, with keys and arrows - no effect. The Compaq Mini belongs in a landfill, I’ll save money for a new, more powerful one, it’s a pity for the wasted effort and time. Thanks and respect to you, Isaac.
I’ll add something until I collect the money: I’d like to spur the weakling on, the 10 is really slow, I’ve tried everything I could, but it just doesn’t speed up. Do you know a radical remedy? If you have it in your stash, please share it again Thank you. Isaac.
Hello Isaac. I don't know what you've already tried, so I recommend running CCleaner first. Use it to delete unnecessary files, clean the registry, remove unnecessary programs from startup.
Update all drivers on your computer, for example, using DriverPack Solution. Read more:How to update drivers on your computer
I can't change the resolution for the SAMP game. I already updated the drivers, it didn’t help, I don’t know any other ways. who can help please write
Here is a certificate about what I did almost to no avail or with temporary and weak results. 1. Cleaner-optimizer programs CCleaner, ASC13, Wise Care 365, ToolwizCare, Reg Organizer, Kerish Doctor, Auslogics Disk Defrag, Avast Cleanup - almost the entire set (there are 2-3 of this set, I rotate them) - I tried a lot with varying success, Over time, the computer “freezes” and you have to “revive” it at least temporarily, without this you end up waiting for minutes for a response. 2. I did everything recommended in this article for weak computers https://w10.jeanzzz.ru/optimizatsiya/netbook 3 I dream of getting rid of the hassle of buying a new computer, but this is not soon (permanent residence in Germany, on old age benefits, I’m 85 , you can’t go wild, enough for the very best, and the minimum price of a laptop here is 350 euros) So for now I’ll endure, at the same time gain experience. And the remaining time is still being spent successfully, there are almost no worries, the whole change house is done by my wife, 15 years younger me. - since I am disabled after an unsuccessful operation on the spine back in Kiev and I lead a recumbent lifestyle, I only go out to see doctors. In general, it’s fun. Well, enough of the lyrics with screams, thank God that he left me with a healthy mind and understanding I didn’t lose it, it seems to me. Memories of the active part of life, of course, oppress me, a slacker, an electrical engineer and metrologist by training, in the end I commanded the technical department of an instrument plant, I was creative - 11 copyright certificates, well, this is somewhat consoling, it was not in vain that I ate bread. A whole biography, now you can write my biography. I'll end with this joke, bye, all the best to you, Isaac.
Double check your equipment
Your display depends on three components to function properly: the graphics card, the display cable, and the display itself.
- If the first two components don't support your screen's native resolution, this could be your problem.
- Some older graphics cards, especially those built into older laptops, cannot output 4K or 1440p resolution. The same goes for specific cables. Single-link DVI is limited to a resolution of 1920×1200, while dual-link DVI is limited to a maximum of 2560×1600.
- HDMI cables come in different categories, and the HDMI output on your graphics card may only support certain resolutions. For example, you'll need a Category 3 HDMI cable to work with a 4K 60Hz display.
- Your graphics card must support at least HDMI 1.3 to run at 4K 60Hz resolution.
In short, make sure both your GPU and cable support the resolution you want.
In some cases this can be fixed by patch connectors. For example, if your display has HDMI and DisplayPort inputs, switching to DisplayPort will give you access to higher resolutions and refresh rates in most cases.
Embarrassed? Check DVI vs HDMI vs DisplayPort - What you need to know.
Method 2: Installing Graphics Drivers
Now we propose to touch upon the topic of installing drivers for a video card, since it is the absence of this software that most often provokes the appearance of a stretched screen and the lack of the required screen resolution values, which in most cases occurs just after reinstalling the OS. There is a separate material on our website that demonstrates universal instructions for owners of video cards from different manufacturers. Check it out to find out exactly how the correct installation is carried out.
Sometimes driver installation fails. This may be due to various reasons. In some situations, users select the wrong software versions or system conflicts arise. Another instruction on our website will help you figure this out, you can access it by clicking on the link below.
Check your settings in the app
Some full-screen applications and video games can control your system's resolution. Video games often use a different default resolution than what your monitor needs to look sharp. If your game appears blurry, stretched, and distorted, check your game's display settings and make sure you've set the correct resolution for your screen.
In some cases, when video games change your resolution, they don't change it back when you close them. Follow the instructions in the first section to fix Windows screen resolution manually.
Method 1: Manually change screen resolution
First, let's look at the most common situation, when the screen settings do not match the required ones, which causes the screen to stretch. You can independently check and change the resolution in just a few clicks through a specially designated menu in Windows.
For other available methods for changing screen resolution, read other guides on our website by clicking on the headings below.
The changes will take effect immediately and the stretched screen should be fixed. If the required resolution is not in the list, proceed to the next method, and if it does not change at all, you will need to study the recommendations from a separate article on our website by clicking on the link below.
Install, reinstall or update display drivers
You may not be able to select the correct resolution for your screen if there is something wrong with your GPU drivers. Windows can use a generic display driver, but this usually means low resolution output.
The solution is this:
- Go to your GPU manufacturer's website
- Download the correct driver for your card.
- Install it and restart your computer.
- You can use a program like GOD to clear the broken driver first before installing the new updated version.
For a complete guide, go to How to Install a New Graphics Card - From Hardware to Drivers.
What to do if the driver recovery function does not work
If the recovery option from the second step does not work, then you must first completely remove the existing drivers and then manually install the original ones using the official installer from the AMD or Nvidia website.
Instructions for Radeon cards
If your computer has a Radeon graphics card, download the AMD CleanUninstall Utility. This is the official driver removal utility for Radeon cards.
Launch it, click on OK to confirm the removal and wait until it is completed. After a while, a window with the results will appear - click “Finish” and confirm restarting the computer. Now you can install new drivers.
Uninstalling AMD Drivers
If you have Radeon HD 2000, 3000, or 4000 series graphics cards, download the AMD Catalyst 13.4 Legacy Beta Driver utility.
For newer ones, you can install drivers automatically using the AMD Driver Autodetect program.
After installing them, the resolution will be restored to the correct value compatible with the hardware-supported monitor or laptop screen.
Set the correct multi-screen mode
If you have multiple displays connected, one or more displays may not display the correct resolution. The problem may be with the display mode in Windows.
- If your computer is configured for dual displays and the two screens have different native resolutions, then one screen will not display the correct image quality. If you're giving a presentation, it's best to choose a display resolution that your audience will see and you'll have to make do with a distorted image.
- The solution may be to change the mode to "advanced". You can set each screen's resolution independently if Windows makes a mistake.
For more information about dual monitor setups, see How to set up dual monitors in Windows, What to do if the second monitor is not detected, and Fixing a blank or black monitor problem on your PC.
Video on the topic
Good advertisingStart›Windows 10›After installing Windows 10, the screen resolution changed
After completing the Windows 10 installation process, many users who installed the new OS on their computer are faced with problems changing the screen resolution. Today we will look at several methods for solving this issue.
Resolution is the number of pixels displayed on the screen (the minimum particle of the image formed on the display) horizontally and vertically. In most cases, Windows 10 automatically selects the optimal value for this setting based on the size of your monitor. But this function does not work perfectly. And the absence of a video driver in the installation distribution with the OS makes changing the resolution completely impossible.
So, let's look at how to set the required number of pixels that form the image on the display matrix in both planes, assuming that the video adapter drivers are installed.
Use your GPU's utility to set the resolution
While Windows offers you a single way to fix Windows screen resolution, major GPU manufacturers have their own utility that allows you to control the resolution of your desktop and applications:
You can access these applications by right-clicking on your desktop or searching for them in the Start menu. The resolution controls are different for each, but they're usually front and center when you open each utility.
Via Control Panel
In a similar way, the display resolution is changed through the Control Panel, and in the old interface, familiar from Windows XP:
- Call the context menu of the free part of the desktop.
- Select the “Screen” option from the drop-down list or go to the Control Panel and look for the component of the same name, which is one of the last.
- After opening the window where you can resize text and interface elements, click on the “Setting screen resolution” link located in the left menu of the dialog.
See also: Assess Windows 10 performance on your own
- We select the required screen resolution and, if you use multiple monitors, indicate the settings of which we intend to change.
After clicking on the “Apply” button, as in the first case, we will have the opportunity to evaluate the selected settings and, if you are dissatisfied with them, cancel the changes. After clicking “OK”, the parameters will take effect instantly when the window is closed.
In addition to the classical methods mentioned above, it is possible to change the screen resolution using specialized software.
Adjust DPI scaling if objects are too small
So what if your screen is set to the correct resolution, but text, icons, and other screen elements are too small? This is most common on high-resolution displays that have a small overall size, such as a 15-inch 4K laptop screen.
Modern operating systems such as Windows automatically scale screen elements to make them easier to read on such displays. However, if you are not happy with how Windows does it, you can override the setting:
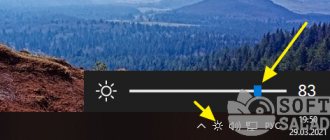
- Right-click the desktop and select Display Options.
- Select Scale and Layout.
- Under Change text size, apps, and more, select the scale you want.
The default of 100% is usually recommended, but try each incremental increase until you find what works for you. Keep in mind that some apps will no longer display correctly if you zoom in too much, so it's best to be conservative.
With all these fixes, your Windows display should now look the way you want. If not, leave a comment here and we will respond very well.
Method 3: Disable automatic device installation
By default, Windows 10 downloads missing drivers automatically immediately after installing the OS. In most cases, this process is successful, but sometimes problems arise with graphics adapters. Even if you install the appropriate driver yourself using the previous instructions, this may not help, since the files will be reset in the future. To do this, you first need to disable this built-in option, which is done like this:
After this, you need to remove the video card driver that was installed by the considered tool. This procedure is not easy for all users, so we recommend studying other material on this topic by reading the material presented below. As for installing suitable software, and this must be done immediately after deleting old files, this procedure is described in Method 2.