If you are tired of the standard icon design in Windows 10 and 7, you can change it. Who needs monotonous folders that are no different from each other? After all, they can choose individual icons. For books - a volume in a beautiful binding, for documents - a stack of papers with a paper clip, for music - sheet music, for games - a joystick. If you do the same with shortcuts and system directories, you get a unique design theme. Find out how to change icons in Windows 7 and other versions. You can decide for yourself how your desktop elements will look.
What images are suitable for icons?
There are several requirements for the image. She must be:
- Square.
- In .ICO format.
- Suitable size (16x16, 32x32, 48x48 or 256x256).
The image can be adjusted and reduced in the built-in Windows graphics editor - Paint. It is available in all versions of the system: 7, 8, and 10.
- Find it in the Start menu - Programs - Accessories.
- Click File - Open (blue button at the top left).
Paint program window
- Specify the path to the drawing.
- When it opens, click on the “Resize” button.
- If the picture is not initially square, uncheck the “Maintain proportions” checkbox. This may cause the image to become very distorted. Therefore, it is better to select icons in advance that have equal sides. Or trim the edges of the original design (if you only need the functional part of the composition).
- Set the appropriate size in pixels. 256x256 is the maximum possible. It is designed for large monitors.
- Save the resulting image as .PNG (File - Save As).
Now you need to change the file format if it was not originally in .ICO. This is the standard Windows icon resolution of all versions (XP, Vista, 7, 8, 10). For quick conversion, a simple utility “AveIconifier2” is suitable.
- Find it on the Internet and download it.
- Launch it.
AveIconifier2
- Drag and drop your original image into the box that says “PNG”. Bring it directly from File Explorer.
- A picture will appear next to it. It will already be in the .ICO. Drag it out of the converter just like you would a PNG file.
You can also use the IcoFX program to change the extension.
Installing icons from the Windows 7 collection
So, you want to change the standard folder image to something more original. Where can I get badges? The simplest and fastest solution is to find them in the system.
Change icon
- Open the folder properties.
- Go to the “Settings” tab and click the “Change Icon” button.
- Specify the location to search for the icon. By default this is the system library Shell32.dll, but you can choose another source. Click the appropriate image and click OK.
Now the folder looks like this.
The Shell32.dll library as a source of icons for folders is not always the best choice. The icons in it are not particularly beautiful and there are not too many of them. Other images can be found in the libraries Aclui.dll, Ddores.dll, Moricons.dll and many others.
To make it easier to view icons on your computer, we suggest using the free Icon Viewer utility: it shows all the icons that are stored in different files in the selected folder. So, in the C:Windowssystem32 directory alone there are several hundred of these images.
By clicking on the icon you like, at the bottom of the window you will see which file it contains.
Changing the image
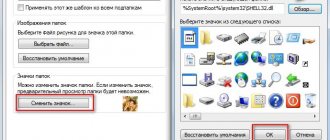
- To change the folder image, leaving the standard icon, on the same tab, in the “Folder Image” section, click “Select file”.
- Select any image of a suitable format and click “Open”.
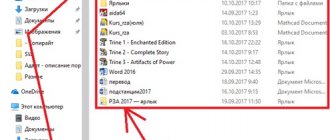
Our folder looked like this. The picture selected as an image is not moved inside the folder.
Folder icons
Here's how to change folder icons in Windows 10. The method is relevant for other versions of Win.
- Right-click on the directory. It's better not to touch system data. Select your own directory.
- “Properties” item.
Click on Properties
- "Settings" tab.
- "Change Icon" button.
Click on Change icon
- A list of images that are already available in Win will appear. You can use any of them.
- If you want to set your own icons, click on the “Browse” button.
- Specify the path to the ICO file.
Now the folder will look different.
Using specialized software
Change the icon using the IconPackager utility. Download and install the program. The installation is simple and will not cause any difficulties even for a novice user. Launch the application. Icons will appear at the bottom. To install icons downloaded online, click on “Add”. Next is “Install”. An explorer will open allowing access to the file. After selecting the desired icon, click “Apply”. To return back, at the bottom of the application click on:
Shortcut icons
If folders look boring, the shortcut icons are initially varied. But what if you don’t like the picture? Or does it stand out from the general style? In Windows 10, 8 and 7, these pictures can also be customized.
- Right-click on the object.
- “Properties” item.
- Shortcut tab.
- "Change Icon" button.
Click Change icon
- As with folders, you can select icons from the list or use your own (click Browse and specify the path).
Process of creation
So, every computer program has its own little system image that appears on the desktop if you want to create it. However, the same program on the desktops of different computers will be accompanied by the same image. It’s good if this image completely suits you. However, unfortunately, some users are faced with the fact that installed icons cause negative emotions and irritation.
Of course, you shouldn’t work with such negativity; your productivity will be low and your mood will be constantly terrible. It's better to change the picture to a suitable icon for the shortcut that will please your personal creative imagination.
System catalogs
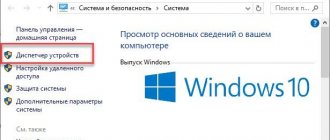
The icons for the “Computer”, “Trash”, “Users”, “Network” directories cannot be changed through “Properties”. But there is another way.
- Open Control Panel.
- Personalization menu (in the Appearance and Personalization category).
- On the left there will be a section “Changing desktop icons”.
- There you can put your own icons for system folders.
- In Win 10, this menu is located in Personalization - Themes.
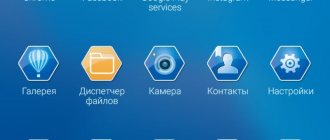
Icon options in Windows 10
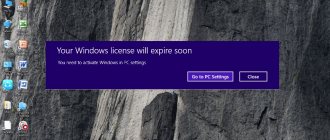
How to restore defaults?
To restore the default system icons, in the “Desktop Icon Options” window, click the “Normal Icon” button.
To return to the previous appearance of the changed folder icons, in the properties, on the “Settings” tab, click “Restore defaults”.
There is no similar option in the properties of program shortcuts, so here you will have to search and restore the original icon manually.
Changing the icons of all folders at once
Through the registry you can change the icons of all folders at once. For example, if you don't like the look of Win 10 and want to make directories like Windows 7.
Editing registry entries can be dangerous. It is better to limit yourself to design themes. But if you do decide to do this, create a backup copy.
- Go to Start - Run.
- In the window that opens, enter “regedit” without quotes and click OK. The Registry Editor will appear.
"regedit" command
- Click File - Export.
- Come up with a name for the backup and indicate where to save it. If something goes wrong, you can restore them all.
Now start changing icons.
- In the registry, open the folder “HKEY_LOCAL_MACHINE”
- Go to "SOFTWARE".
- Then in Microsoft\Windows\CurrentVersion\Explorer.
- Right-click on Explorer.
- Item “Create – Section”.
- Name it "Shell Icons". If such a directory is already in the list, open it.
- In the right part of the window, call the context menu and select “Create - Stock parameter”.
- Write type 3 (three).
- Right-click on the newly created parameter “3” (“Three”).
- “Change” item.
- In the “Values” section, enter the path to the icon along with the file name and extension.
- If you have a 64-bit system, open the HKEY_LOCAL_MACHINE\SOFTWARE folder again.
- But this time go to Wow6432Node\Microsoft\Windows\CurrentVersion\explorer
- And repeat all the steps described above.
- Restart your computer and enjoy the new look of the icons.
Edit the registry only if you are well versed in this matter. Get one parameter mixed up and errors will occur.
If you don't like the way folders and shortcuts look, you can change their icons. You only need pictures of a certain format. This way you will make a beautiful desktop.
How to change the appearance of the main icons on Windows 10
The main Windows icons on the “Desktop” are icons with the names “Trash”, “My Computer”, “Network”, “User Files”, “Control Panel” and some others. They are placed on the “Desktop” by default after installation. You can independently determine which of them should be present on it and which should not. You also have the right to change their appearance in the system “Options” window or using third-party utilities.
Through the Windows Settings window
The easiest way to change the appearance of the main icon is to go to the system parameters window:
- To make the “Settings” window appear on the display, the easiest way is to simultaneously press two keys: Win + I. But this combination may not work. In this case, there is another way: click on the “Start” button in the lower left corner of the screen, and in the menu itself, select the second icon from the bottom - the gear.
Click on the gear icon in the Start menu - We find ourselves in a large “Options” menu with many sections. We need the last tile in the first row - “Personalization”.
In the “Options” window, click on the “Personalization” section - The desired section with tabs will open. You can launch the same window in another way: click on the “Desktop” on the area free of icons, and in the context menu select the very last item - “Personalization”.
Click on the “Personalization” item in the context menu of the “Desktop” - Go to the “Topics” block.
Immediately go from the “Background” tab to “Themes” - In the right column with links to other windows and sections, click on the line “Desktop icon settings”.
Click on the “Desktop Icon Settings” link on the right side of the window - A small window will open on top of the “Settings” - select the desired icon from the menu with the left mouse button, for example, “This computer”. Next, click on the “Change Icon” button.
Click on the icon you want to change and click on the “Change Icon” button - In the third window, select an icon from the list of standard Windows icons or upload your own using the “Browse” button.
Select an icon from among the available ones or upload your own using the “Browse” button - If you chose the second option (uploading your icons), the Explorer window will appear. We are looking for the folder with the desired icon file in ico format. Click on the “Open” button and then click OK.
Find the required ico file in Explorer and click on “Open” - In the “Icon Options” window, first click “Apply” for all changes to take effect. If you want to change the icon for other main Windows icons, repeat the same procedure for each of them. Click on "Apply" again and then on OK to close the window.
Using special utilities
There are many applications from various developers that allow you to change the icons of both main shortcuts and other icons, for example, folder icons, beyond recognition. In programs, you can change individual icons or all icons at once, that is, install an entire package.
IconPackager: convenient and fine-tuning the appearance of icons
IconPackager is a product from Stardock, a company that develops utilities for customizing the Windows desktop interface. This utility comes pre-installed with several icon packs. It is also possible to upload your own and change icons in the available collections, that is, create your own unique packages.
The utility supports Windows versions higher than version seven. The downside is that it is paid, but at the beginning it offers a month of free testing. Although the interface is in English, using the application is quite convenient:
- Open the official website of the application developer. To download the installer, click on the blue Try It Free button.
Click on the blue Try It Free button to download the installer - Run the installer and install the program by following the simple instructions on the window.
- Click on the Finish button so that the application window appears on the display.
Click on Finish to close the “Setup Wizard” and open the program window - To start using the trial version, click on the Start 30 Day Trial button. Click on Start 30 Day Trial to start using the program for free for a month
- If you want to download a third-party icon that you previously downloaded from the Internet, in the Look & Feel tab, click on the Icon Package Options drop-down menu. Select the penultimate item Add Icon Package, and then Install from disk.
Click on Add Icon Package and then select Install from disk to download your collection - In Windows Explorer, find the file with the icon pack and click on “Open” - the collection will be added to the list of currently available ones.
- You can also select a topic from those presented in the list. Let's try to install, for example, Delta. Click on the Delta package below
- Click on Preview to preview all the icons in this pack. If you like them, close the second window and feel free to click on the Apply icons to my desktop button.
Click on Preview to preview the entire icon collection - If you want to get your old Windows icons back in place, just apply the first theme on the list - Windows Default Icons.
- In the Colors tab you can change the color, hue, and brightness of the icons.
In the Colors tab, configure the color scheme of the existing icons - Using the I want to adjust the color of my Icon Package item, you can adjust the icons to the theme of your “Desktop” and the color of the “Taskbar”. For example, they can completely change the color to red if there is a Windows theme with that tint. After all changes, click on Apply icons to my desktop.
Icons can take on the color of the current Windows theme - In the Live Folders section you can put separate icons for folders - live icons. To do this, check the box to the left of Always use the Live Folder icons selected below. Then simply select the folder type.
In the Live Folders block, select individual icons for folders - The Customize tab allows you to create your own icon packs. To change a specific icon, click Change this Icon.
The Customize section allows you to create your own collections and change those presented in the program - In a new small window, select from the available ones or add your own icon using the Browse button.
In the Change Icon window, select an icon from those available in the menu or upload your own using the Browse key - When all changes to the package have been made, click on Save Icon Package.
Save changes to the icon pack using the Save Icon Package option - In the small window, confirm that you want to make changes to the package. After this, all settings should be successfully saved.
Click "Yes" to confirm your intention to save the changes - There are additional settings in the Settings section. In particular, you can determine which Windows icons need to be changed and which ones should not be touched. Here you can enable changing the mouse pointer Cursors.
In the Settings tab you can configure changes for certain types of icons: folders, files, main Windows icons and others
Video: how to install new icons using the IconPackager program
Se7en Theme Source Patcher: free utility and large selection of packages
The application is designed to replace all classic Desktop icons, local hard drives, folders, and Control Panel icons. Initially, the program was created for the “seven”, but now it supports other versions of Windows, in particular, our “ten”.
The program uses the popular 7z compression format. The downside of the utility is that it does not initially have built-in icon packs. You need to download all collections on the same site from where you download the application, and then add them yourself to the utility database for further use. Nevertheless, the selection of packages on this resource is very large.
The advantage of this program is that it is free. Before replacing icons, the utility creates a restore point and a backup copy of system files so that you can return all Windows icons to the classic ones:
- Go to the official website of the application. Click on the “Download” button.
Click on the "Download" button to download the executable file of the program - Your browser will download the archive - open it, and in it, right-click on the file and in the menu click on “Extract to...”. Select a folder and unzip the archive.
Click on “Extract to specified folder” in the file’s context menu - Find the extracted file, right-click on it again and in the context menu click on the “Run as administrator” link.
In the context menu of the unpacked file, click on “Run as administrator” - Allow this application to make changes on your PC by clicking “Yes” in the system window that appears. The application does not require installation, so its window will open immediately.
Click Yes to allow the program to make changes to your device - Pre-select and download the themes you like from the same site.
Download your favorite icon pack from the developer’s website - In the application window, click Add a Custom Pack.
Click on the Add a Custom Pack button - In Windows Explorer, select the downloaded archive with the icon pack and click Open.
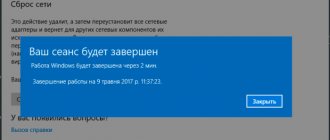
Find the file with the icon pack and click “Open” - The collection will appear in the menu. At the bottom of the window there will be a Start Patching button. Click on it. The utility will ask if you need to create a restore point. Be sure to create it - click “Yes”.
Give permission to create a backup before installing new icons - Wait for the procedure to complete. After this, you need to reboot the device twice for the changes to take effect.
- Icon packs from this developer contain not only icons, but also some other elements of the Windows interface, for example, pictures to replace the appearance of the clock, date, and even the Task Manager window. If you don’t need them, click on Extra before installing the collection. In the Option Menu, uncheck unnecessary items and click Save.
In the Option Menu, remove unnecessary items that you do not want to change and click on Save - If you want to restore classic Windows icons, click the Restore button in the lower right corner in the program window. In the new window, check the box next to the first item and click OK.
To return the default Windows icons, click Restore and then OK
You must install a new icon pack on a clean system, that is, on classic icon images in Windows, and not on third-party icons. Therefore, do a preliminary restoration using the Restore key if you have icons other than the standard ones.
Video: how to install icons using the Theme Source Patcher utility
IconTo: application with built-in instructions for use
IconTo is a free application from the developer AleXStam, which can change icons for system elements, folders, hard drive partitions, or even groups of them.
In IconTo you can change the icons of folders, system objects and hard drive partitions
It has the following advantages over other utilities:
- More than 300 built-in icons. There is also the option to upload your own icons.
- Instructions for installing icons: at the bottom of the window you will see hints.
- There is a conversion of png, jpg, ico formats, as well as the option of extracting images from files in dll, exe and some other formats.
- The program interface is entirely in Russian.
IconTo is suitable for all versions of Windows, from Windows 98 to modern Windows 10. The size of the downloaded installer does not exceed 15.1 MB, so the utility can be used on computers with a small amount of memory. The application is available for download on the developer's official website.
What applications will help you change the icons on your smartphone’s desktop?
In standard Android, unless it is modified by the smartphone manufacturer, there is no way to change the icons at will. You can only move them into folders and distribute them across desktops. But there are several types of applications that can change the appearance of standard icons and give them a new style.
- Icon packs. This is the most affordable way to change the design of your smartphone. In most cases, the user does not need root rights to use such applications. But the changes will affect only the icons, and not the entire visual design as a whole.
- Launchers are programs that change the graphic design of the entire Android system. They can style it for IOS or another shell of your choice. Moreover, such applications can also work with ready-made icon packs. With their help you can completely personalize your smartphone. Often such programs require root rights.
You will have to download any launcher first and then add an icon pack to it. Many launchers are equipped with their own packages or a means for downloading them.
From the picture
How to change folder icon? The following technique does not occur too often. It involves changing the file shortcut to a graphic document on a PC.
In this case, it is proposed to act as follows:
- Repeat the first 4 steps from the previous tutorial.
- Click on “Change picture”.
- Specify the graphic file you want to insert into the shortcut.
- Confirm the operation.
In this case, the folder icon itself will remain unchanged. But the graphic document displayed on it as a “sheet in a folder” will be adjusted.
Algorithm of actions
So, there is no need to ask your friends how to create an icon for a shortcut, but constantly run into silent silence, since they themselves only have a superficial knowledge of how to change the shortcut image. It’s better to immediately trust experienced users and study their recommendations on how to quickly change the shortcut icon.
You just need to sit back, read all the recommendations on how to create a badge, and then immediately start doing the practical steps. Initially, you should select the object whose icon you want to change. Right-click on it, in the menu that opens, look down, there you will find the “Properties” line.
Click on this option to open the dialog box we need, which contains six tabs. We don’t need all of them, we are only interested in the “Shortcut” tab, go to this tab.
ATTENTION. I would like to note that in most cases, when you open a dialog box, you are immediately taken to this tab; only in the most exceptional cases can other tabs be opened.
Now we again invite you to look lower. There will be three buttons located there, among which choose the middle button “Change shortcut”.
This is the button we need if you decide to figure out how to change the icon of any shortcut.
So, click on this button to open the next important window, which allows us to get closer to the goal of how to make an icon for a shortcut, one more step.
Do not rush to get upset when you see a window open in which the system “kindly” offers to make an icon at your discretion, but it completely limits the choice, offering only one icon that is already installed for the program.
There is nothing wrong with this, since you decide to figure out how to change or create an icon, then follow confidently to the end.
In this window you will find the “Browse” button, use it to “pave” the path to the directory we need, which will allow us not only to figure out how to make a new “drawing”, but also to practically implement it all.
You will have to specify the path to the “Shell32.dll” subfolder located in the “System32” system folder. And we are sure you know where this folder is located. If not, then just in case, we’ll tell you, it is located in the “Windows” folder located on the system drive “C”.
Now that you have followed the indicated path, multiple options for all kinds of small “drawings” will open before you. Don’t try to count them, it will just take up a lot of your time, just review this “collection” and choose the option that appeals to you most.
Next, how to make a new “drawing”, how to change it, will be very simple for you. Select the one you really like and press the traditional “Ok” consent button.
Now you can safely close all open windows and admire the fact that you managed to get the original icon for the program. By the way, you can also change the image of folders, and not just specific images for programs.
Once the creative element you create brings moral satisfaction, it will be difficult for you to resist replacing some more labels. This is your right, if you wish, proceed, especially since you have already figured out how to change such icons and do not need outside help.