Basket
- this is the basis of order on the desktop. It removes all the junk in our system. Some users who like to keep their desktop tidy and organized may try to pin the Recycle Bin icon to the taskbar, however, Windows 11 does not allow this.
Although there is no special setting to pin the Recycle Bin to the taskbar, there is a way to add it there.
In this article, we will look at step-by-step steps to add a recycle bin to the taskbar.
Restoring the "Basket"
We have already said above that the disappearance of a shortcut from the desktop can be caused by various factors. These include installing updates, software and themes. The reasons may be different, but the essence is the same - resetting or changing the system settings responsible for displaying the “Trash”. All parameters are located “under the hood” of Windows in the following sections:
- Personalization.
- Local Group Policy Editor.
- System registry.
Next, we will look at ways to solve the problem discussed today using the above tools.
Method 1: Customize Personalization Options
This menu is responsible for the appearance of Explorer windows, wallpaper, display and scale of interface elements, as well as system icons. The next steps may vary slightly depending on the version of Windows.
If the Recycle Bin has disappeared from the desktop in Windows 10, do the following:
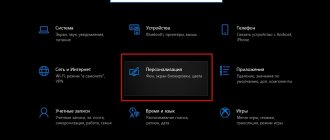
- Right-click on the desktop and select “Personalization”.
Go to the “Themes” section and find a link called “Desktop Icon Settings”.
In the settings window that opens, check that there is a checkmark next to the “Trash” item. If it is not there, then install it and click “Apply”, after which the corresponding icon will appear on the desktop.
- Right-click on the desktop and go to “Personalization”.
Next, follow the link “Change desktop icons”.
Here, just like in the “top ten”, we check for the presence of o, and if it is not there, then check the box and click “Apply”.
XP does not provide settings for displaying the “Trash” on the desktop, so if problems arise, recovery is only possible using the methods given below.
If you use themes downloaded from the Internet, you should know that not all of them are “equally useful.” Such products may contain various errors and glitches. In addition, many themes are able to change the settings for displaying icons, which is why some users are confused - the recycle bin has disappeared from the desktop: how to restore it.
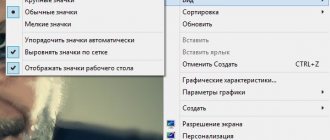
- To exclude this factor, check the box next to the item indicated in the screenshot and click “Apply”.
Next, we enable one of the standard Windows themes, that is, the one that was on the system after installing the OS.
In the “seven” and “eight”, switching the design is carried out directly in the main “Personalization” window.
Method 2: Configure Local Group Policy
Local Group Policy is a tool for managing computer settings and user accounts. The tool for setting up policies (rules) is the “Local Group Policy Editor”, available only on computers running Windows editions no lower than Pro. These are 10, 8 and 7 Professional and Corporate, 7 Maximum, XP Professional. We will turn to him to restore the Recycle Bin. All actions must be performed as an administrator, since only this “account” has the necessary rights.
- In order to launch the “Editor”, call the “Run” line using the Win + R key combination, where we enter the following:
Next, go to the “User Configuration” section and open the branch with administrative templates. Here we are interested in the desktop settings folder.
In the right block we find the item responsible for deleting the “Trash” icon and double-click on it.
In the settings block that opens, select the “Disabled” position for the radio button and click “Apply”.
Another parameter that you should pay attention to is responsible for deleting files without using the Recycle Bin. If it is enabled, then in some cases the system may remove the icon from the desktop. This happens as a result of failures or other reasons. This policy is located in the same section – “User Configuration”. Here you need to expand the “Windows Components” branch and go to the “Explorer” folder. The required item is called “Do not move deleted files to the trash”. To disconnect, you need to perform the same steps as in paragraphs. 3 and 4 (see above).
Method 3: Windows Registry
Before you start editing the Windows registry, you need to create a restore point. This will help restore system functionality in case of problems.
Read more: How to create a restore point in Windows 10, Windows 8, Windows 7
- We launch the editor using the command in the “Run” line (Win + R).
Here we are interested in a section or key with such an incomprehensible name:
To find it, go to the “Edit” menu and select the appropriate function.
Insert the name into the “Find” field, uncheck the box next to “Parameter values”, and check the box next to “Search only the entire string”. Then click the “Find Next” button. To continue the search after stopping at one of the items, you will need to press the F3 key.
We will only edit those parameters that are in the branch
The key that interests us primarily is located in the section
Double-click on the found parameter and change its value from “1” to “0”, then click OK.
If a folder is found in the section indicated below, then click on it with LMB and select the default option on the right. Its value must be changed to “Recycle Bin” without quotes.
If the specified positions are not found in the registry, then you will need to create a section with the above name and value in the folder
- Right-click on the folder and select “Create – Partition” one by one.
We assign it an appropriate name and change the default value of the parameter to “Recycle Bin” (see above).
After completing these steps, you must restart your computer for the changes to take effect.
Method 4: System Restore
One of the most effective methods of dealing with various problems is to “roll back” the system to the state it was in before they occurred. This can be done using built-in tools or programs specially written for this. Before starting the procedure, you need to remember when and after what actions your problems began.
Conclusion
Restoring the Recycle Bin on the desktop can be a rather complicated process for a novice PC user. We hope that the information provided in today's article will help you solve the problem yourself, without contacting a specialist.
We are glad that we were able to help you solve the problem.
Add the Lumpics.ru website to your bookmarks and we will be useful to you. Thank the author and share the article on social networks.
Describe what didn't work for you. Our specialists will try to answer as quickly as possible.
Recovery programs
There are often situations where the user accidentally deleted some data and emptied the trash. At first glance, it may seem that the information is lost forever. But there are applications that allow you to recover data erased even from there, for example, HandyRecovery, DataRecoveryWizard, Recuva.
Features of the Handy Recovery application:
- Supports all file systems.
- Search by file type.
- Creating a disk image.
- Preview the contents of deleted files.
- Recovering from deleted and formatted partitions.
- Recovering files, even those that have been erased, bypassing the recycle bin, including from removable media.
The program is paid, but a 30-day trial is offered.
Data Recovery Wizard is also a paid program that can recover data:
- after a virus attack;
- if the disk or part thereof is damaged;
- in case of disk reading errors;
- after cleaning and quick removal, bypassing the trash;
- if the operating system crashes;
- after formatting the disk.
Recuva is a simple utility that is sold separately or as part of the CCleaner Professional Plus package. The software is designed to improve the process of organizing files on your computer: find and delete unused application files, registry errors, and collect system data. Recuva is just part of a package that allows you to recover an empty Recycle Bin and other data that the user has mistakenly deleted.
The utility is very easy to use:
- Install and run the program.
- In the window that opens, select the type of files you want to recover. If you are not sure, click All files.
- The program will ask if you would like to create an image of your disk first. In order not to waste extra time, Fr.
- Next, specify where the program should look:
- everywhere;
- on removable media;
- in My Documents;
- in the basket;
- in a specific location (you need to set the path);
- on a virtual disk;
- on CD or DVD.
If you want to restore the empty Trash, o (In Trash).
- You will be asked to check the box for Deep Scan, which means a more advanced search, but it may take more than an hour. Therefore, first run the scan without checking this box, and if you don’t find anything, then re-enable it with the Deep Scan option.
- The scanning process will start, as a result of which the program will display a list of found files.
- Click the button at the top right “Switch to advanced mode”. Now you can see a list on the left, and a window with three tabs on the right. The first is a preview of the file, the second is detailed information about it (size, when it was created, changed, etc.), and the third is system information that is unnecessary for the average user.
- Check the boxes for the files you want to restore and click Recover checked, then select a location to save.
There are such useful programs for working with deleted data. You can, of course, only use the recycle bin, or you can even remove it from the desktop and use advanced applications.
How to restore the recycle bin icon on your desktop
- How to restore the recycle bin icon on your desktop
- How to restore the cart
- How to find the recycle bin on your computer
- How to restore the Recycle Bin on your desktop
- How to restore the Recycle Bin on your computer if you deleted it
- How to recover a deleted recycle bin
- How to find a deleted recycle bin
- How to open my cart
- How to restore the recycle bin shortcut
- How to restore the Recycle Bin shortcut on the desktop
- How to get the trash icon back
- How to return the recycle bin shortcut to the desktop
- How to restore the Windows Vista Recycle Bin
- How to return your cart
- How to return the Recycle Bin to your desktop
- How to display the Recycle Bin on the desktop
- How to restore the recycle bin on your computer
- How to return the cart label
- How to return the cart in Vista
- How to enable the cart
- How to change the trash icon
- How to change the cart icon
- How to put a recycle bin on your desktop
- How to create a recycle bin on your desktop
- How to restore desktop icons?
- How to find the Recycle Bin in Vista
How to restore the Recycle Bin in Windows - 4 ways
How to restore the Recycle Bin in Windows if it has disappeared and is not visible on the Desktop? Sometimes it happens that as a result of some incorrect user actions or incorrect settings of the Windows operating system, the “Trash” disappears from the Desktop.
Without a Recycle Bin, it is not convenient to use a computer, because any user constantly deletes something from their PC. Files placed in the Recycle Bin are not immediately deleted from the computer, therefore, in case of mistaken deletion, the files can be restored to their original location.
- Recovering the Recycle Bin using Desktop Icon Options
- Creating a Recycle Bin on the Desktop
- Restoring the Recycle Bin using the Local Group Policy Editor
- Conclusions of the article
If the Recycle Bin has disappeared from the Desktop, then you can restore the disappeared item using built-in Windows tools in various ways, which I will discuss in this article.
additional information
1. Call “Properties” of the element.
2. One by one, select each volume for which we want to disable moving files to the Recycle Bin, and move the checkbox to the “Destroy files immediately...” position.
The deletion request will only be displayed if the “Request confirmation to delete” checkbox is selected, but Windows 10 can optionally remove this dialog box.
Here you can increase the amount of disk space allocated for storing deleted objects.
If you see a full Trash icon on your desktop even though there is nothing in it, try the following steps.
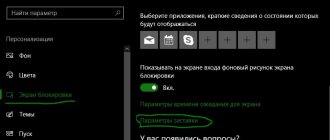
1. Open the “Personalization” settings section.
2. Go to the “Themes” tab, as we did earlier.
3. Follow the link “Icon settings...”.
4. Select an empty cart.
5. Click “Change icon”.
6. Select a suitable icon from the library or set the path to your own and click “Change icon”.
7. Save the settings.
8. To be more sure, deactivate the “Allow themes to replace icons...” option by unchecking it and close the windows by clicking on the “OK” button.
At this point, all problems with the Recycle Bin in Windows 10 should disappear.
Recovering the Recycle Bin using Desktop Icon Options
First we will use the computer personalization settings:
- Right-click on the Desktop, and then click on “Personalization” in the context menu.
- In the window that appears, click on the “Change desktop icons” link.
- In the “Desktop Icon Settings” window, check the box next to “Trash”, and then click on the “OK” button.
After these steps, the Recycle Bin should appear on the Desktop again.
Method four: using system restore
Perhaps the easiest way to restore the Recycle Bin on the desktop is to restore the system. However, this method assumes that restore points were previously created before the Recycle Bin disappeared.
- Right-click on the “My Computer” shortcut.
- Select “Properties”.
- In the new window, click on the “System Protection” link.
- In the “Protection Settings” area, select the system drive and click the “Configure” button located below.
- Check the box next to the first item and click the “Apply” button.
- Return to the previous window and click “Restore”.
Next, the “Recovery Wizard” will launch, following the instructions of which you will restore the system, thereby returning the “Recycle Bin” to the desktop.
Creating a Recycle Bin on the Desktop
The user can independently create a Recycle Bin on the desktop of his PC. To do this, you need to perform several sequential steps:
- Right-click on the desktop.
- In the context menu, select “New” => “Folder”.
- For the folder name, enter the expression: Trash.
- Next, left-click on the Desktop, or press the “Enter” keyboard key.
- After this, the Recycle Bin icon will appear on the Desktop.
- How to remove icons from the Windows Desktop - 3 methods
- How to return My Computer to the Desktop in Windows
Method 2
You can restore the Recycle Bin on the Desktop through the Windows interface. To do this, you need to open the “Desktop Icon Settings” window, check the box next to the “Trash” item and click the “Apply” button (see image).
To open this window, you must:
• in Windows 10: right-click on an empty space on the Desktop and select “Personalization” in the context menu. In the left part of the window that opens, click on the “Themes” item, and then in its right part click on the “Desktop Icon Settings” item;
• in Windows 8, 7, Vista: right-click on an empty space on the Desktop and select “Personalization” in the menu that appears. A window will open, on the left side of which click on the “Change desktop icons” item.
The desktop is an important part of the Windows operating system, occupying almost the entire space of the computer screen and being in our field of vision for a significant part of the time. Therefore, it is very important that his appearance evokes positive emotions. This is achieved largely due to the placement of beautiful background images (wallpapers) on the desktop.
This article will talk about how to set up automatic change of desktop background images at a certain frequency.
The Windows operating system provides the ability to change the desktop background image. In this case, you can use both images preinstalled in the system, and photographs created by the user himself, downloaded from the Internet or obtained from other sources.
At the same time, standard tools for changing wallpaper are not available in all versions of Windows. For example, in Windows 7 Starter, you can change the desktop background only using third-party software or by manually editing the system registry. Read more about changing the wallpaper in entry-level versions of Windows here.
Well, we will talk about ways to change the desktop background in other versions of Windows in this article.
Windows 7 Starter, as well as some other initial versions of Windows, has many limitations. One of them is the lack of standard tools for changing desktop wallpaper.
Restoring the Recycle Bin using the Local Group Policy Editor
Another way to restore the Recycle Bin is to use the Local Group Policy Editor. Please note that this editor does not work in lower editions of the Windows operating system. This method can be used on a PC with Windows Professional and Windows Enterprise versions installed.
First you need to log into the Local Group Policy Editor. follow these steps:
- Press the Windows + R keys simultaneously.
- In the Run field, enter the expression: “gpedit.msc” (without quotes).
- In the Local Group Policy Editor window, go to: User Configuration => Administrative Templates => Desktop.
- Double-click with the left mouse button on the settings item “Remove the Trash icon from the desktop.”
- In the “Remove Trash icon from desktop” window, select the “Not configured” option, and then click on the “OK” button.
- Restart your computer to apply the setting.
How to restore the Recycle Bin on your desktop
- How to restore the Recycle Bin on your desktop
- How to restore the cart
- How to open my cart
- How to create a folder shortcut on desktop in ubuntu 14
- How to recover a deleted recycle bin
- How to get a deleted recycle bin back from your desktop
- How to restore the Recycle Bin on your computer if you deleted it
- How to install the Recycle Bin on your desktop
- How to return the Recycle Bin to your desktop
- How to restore the trash icon
- How to restore the Recycle Bin shortcut on the desktop
- How to return the recycle bin shortcut to the desktop
- How to restore the Windows Vista Recycle Bin
- How to return your cart
- How to find a deleted recycle bin
- How to get the trash icon back
- How to return the cart in Vista
- How to find the Recycle Bin in Vista
- How to restore an empty Trash
- How to display the Recycle Bin on the desktop
- How to enable the cart
- How to change the trash icon
- How to put a recycle bin on your desktop
- How to restore the recycle bin shortcut
- How to create a recycle bin on your desktop
- How to find the recycle bin on your computer
- How to restore the recycle bin on your computer
- How to empty the trash
- How to remove the trash
- How to recover a deleted folder from the Recycle Bin
Alternative
No matter what, any user accesses the file dump from time to time, because deleted files and directories are stored in the Recycle Bin for an indefinite period of time until they are cleared.
In order to display the Recycle Bin on the Taskbar, drag its icon to the desired location on the panel to the right of Start, and release the left mouse button until the words “Pin to Explorer” appear.
You can open the file trash bin through the Explorer context menu.
You can also place the Recycle Bin icon on the home screen next to other tiles through the element’s context menu.
How to return the Recycle Bin to the desktop in Windows 10
Dmitry 05/06/2018 Updated: 05/06/2018
If your recycle bin has disappeared from your desktop in Windows 10, then you have come to the right place. We will not figure out why the recycle bin icon was removed from the desktop and in what way.
In this article, we will look at where the Recycle Bin is located in Windows 10 and how to return the Recycle Bin to the desktop in Windows 10. In principle, the methods we proposed, except for the first, will also work on previous versions of the Windows operating system, since previously we used the standard control panel.
other methods
What else to do if the Recycle Bin suddenly disappears from the Windows 7/10 desktop? Try this trick. Create a regular folder on your desktop and name it Trash.{645FF040-5081-101B-9F08-00AA002F954E}. As soon as you press Enter, the directory is immediately converted to the Trash.
You can also place the Recycle Bin in the “This PC” section and then pin it to the Quick Access Toolbar. To do this, use the BinComputer.reg tweak included in the archive, go to “This Computer” and drag the Recycle Bin icon to the quick access panel.
:/> Where to enter the administrator username and password in windows 10
Where is the Recycle Bin in Windows 10
The recycle bin itself is located by default in the C:$RECYCLE.BIN if you delete a file from the system drive. You can open this folder by pasting this path into the address bar of Explorer or by running the command %SYSTEMDRIVE%$RECYCLE.BIN in the Win+R window. If you delete a file on another local drive, the files will go to a folder with the same name on another local drive.
The maximum size of these folders can be viewed and set in the recycle bin properties. The more memory on the disk, the larger the default value. Therefore, if you don’t know what the Recycle.Bin folder is and thought it was a virus, then you don’t have to worry, since it’s a trash folder.
Incorrect conductor operation
Most people who still use old Windows XP are familiar with this method and some of them have probably tried it before. If before this “Explorer” constantly had to be restarted due to the invasion of viruses, today such a scenario is less likely, but still has a right to exist.
Let's solve this problem and get our missing desktop back:
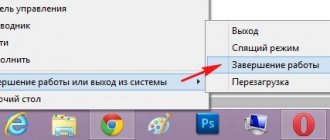
- Launch the “Task Manager” through the “Start” context menu or by pressing “Ctrl+Shift+Esc”.
- In the top window, move to the “Processes” tab and find among them “Explorer” or as it may also be called “Windows Explorer”.
- If you find it, then you need to call up the context menu by right-clicking on it and select “Restart”.
- Another option is to select the process and click on the button of the same name.
- If you are unable to find “Explorer” in the list of active processes, then you need to click “File” and click “New task/process” or “Run”.
- Next, you need to enter “explorer.exe” or “explorer” and send the command to the system.
- The command can also be launched in the “Run” tab, which can be opened simply by pressing “Win + R”.
This way, you can launch Explorer, which was turned off for some reason, and restore the familiar classic desktop on your laptop.
How to restore the Recycle Bin on your desktop
Windows 10 Settings
- Open Settings the Win+I hotkeys
- Let's go to Personalization >Themes and select the item Desktop Icon Options.
- In the window that opens, check the box Basket and press OK.
After applying the changes, a trash can icon will immediately appear on the desktop. You can remove the trash can icon in the same way.
If you are using any other operating system, you can use an alternative way to enter the desktop icon settings. In principle, even on Windows 10 it will be much faster to use this method:
Run the command Rundll32 shell32.dll,Control_RunDLL desk.cpl,,5 in the Win+R window.
Create an icon
- Create on the desktop .
- Let's name the folder: Trash...
- Apply the changes by pressing Enter.
After applying the changes, you will receive a Recycle Bin shortcut on your desktop with all its properties. But the main difference from the previous method will only be the ability to delete it again by simply clicking the delete button in the context menu. The icon from the previous method will not have such a function.
Local Group Policy Editor
The Group Policy Editor is present in all Windows 10 operating systems except Home and Starter versions. When using these versions, you need to choose a different method if you also deleted the Recycle Bin from your desktop.
- Run the gpedit command. msc
in the window that opens after pressing the Win+R keys. - Go to: User Configuration > Administrative Templates > Desktop .
- In the current location, find the policy setting Remove the “Trash” icon from the desktop , and change the value to Not configured .
After making changes to the system using the Group Policy Editor, you will need to restart the system for the changes to take effect.
As you understand, the recycle bin is located in the same location, but on different local drives. Depending on which drive you deleted the file from. We also looked at how to return the Recycle Bin to the desktop in Windows 10 in different ways. Now we know what this Recycle.Bin folder is and what it is used for in the Windows operating system.
Therefore, if you have lost the Recycle Bin from your Windows 10 desktop, use one of our solutions to the problem. The first two methods, in our opinion, are the most convenient and effective. You can also read the instructions on how to add My Computer to the Windows 10 desktop, since we used similar methods there.
Where did my cart go?
Solution 1: Check your desktop icon settings
If your Recycle Bin is missing from your desktop, there is a quick fix that should easily resolve the issue. System icons, including the good old Recycle Bin and This PC, have a hidden settings menu that allows them to share desktop space with all the other shortcuts you've painstakingly created.
Here's how to restore Restore Bin in a few simple steps:
- Right-click on your desktop and select Personalize .
- In the left pane, select Themes .
- Select Desktop Icon Settings in the far right corner.
- Check the box next to the cart .
- Optional: Uncheck "Allow themes to change desktop icons." Some of them may remove (or have already removed) the trash icon.
- Confirm the changes.
And this is how you can return your cart?
- ALSO READ: How to Recover Deleted Audio Files on Windows PC
My Recycle Bin is still missing from my desktop
However, in case you still can't find the Recycle Bin on your desktop for some strange reason, we offer a slightly more complex solution.
Solution 2: Use Run
If there was some unknown critical system error at hand and your recycle bin has disappeared, you can still access it using a small elevated Run command prompt. In those days it was stuck and hidden in the system partition.
But currently the only way to access it is with a specific command. Follow the instructions below to access your shopping cart:
- Press Windows + R to open Run .
- At the command prompt, enter the following path and press Enter:
- C: $Recycle.Bin
Solution 3: Create a Trash Shortcut
If you also create a new trash shortcut to solve this problem. Here are the steps to follow:
- Launch File Explorer > go to View > Options > Folder Options.
- Select View tab > Show hidden files, folders and drives.
- Clear the Hide protected operating system files (recommended) check box.
- Click Apply > OK.
Once you confirm your choice, return to File Explorer and navigate to the drive where Windows 10 is installed. Right-click on $Recycle.Bin and select the Desktop option to create a shortcut.
Here you are. From there, you can manipulate deleted files and restore them if necessary. Also, don't forget that desktop icons are disabled by default for tablet mode.
This should do it. Don't forget to share your thoughts with us on this issue or reveal some additional solutions. You can do so in the comments section below.
Restoring the "Basket"
We have already said above that the disappearance of a shortcut from the desktop can be caused by various factors. These include installing updates, software and themes. The reasons may be different, but the essence is the same - resetting or changing the system settings responsible for displaying the “Trash”. All parameters are located “under the hood” of Windows in the following sections:
- Personalization.
- Local Group Policy Editor.
- System registry.
Next, we will look at ways to solve the problem discussed today using the above tools.
Method 1: Customize Personalization Options
This menu is responsible for the appearance of Explorer windows, wallpaper, display and scale of interface elements, as well as system icons. The next steps may vary slightly depending on the version of Windows.
If the Recycle Bin has disappeared from the desktop in Windows 10, do the following:
- Right-click on the desktop and select “Personalization”.
Go to the “Themes” section and find a link called “Desktop Icon Settings”.
In the settings window that opens, check that there is a checkmark next to the “Trash” item. If it is not there, then install it and click “Apply”, after which the corresponding icon will appear on the desktop.
- Right-click on the desktop and go to “Personalization”.
Next, follow the link “Change desktop icons”.
Here, just like in the “top ten”, we check for the presence of o, and if it is not there, then check the box and click “Apply”.
XP does not provide settings for displaying the “Trash” on the desktop, so if problems arise, recovery is only possible using the methods given below.
If you use themes downloaded from the Internet, you should know that not all of them are “equally useful.” Such products may contain various errors and glitches. In addition, many themes are able to change the settings for displaying icons, which is why some users are confused - the recycle bin has disappeared from the desktop: how to restore it.
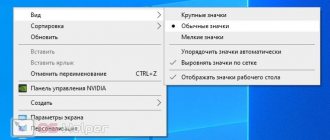
- To exclude this factor, check the box next to the item indicated in the screenshot and click “Apply”.
Next, we enable one of the standard Windows themes, that is, the one that was on the system after installing the OS.
In the “seven” and “eight”, switching the design is carried out directly in the main “Personalization” window.
Method 2: Configure Local Group Policy
Local Group Policy is a tool for managing computer settings and user accounts. The tool for setting up policies (rules) is the “Local Group Policy Editor”, available only on computers running Windows editions no lower than Pro. These are 10, 8 and 7 Professional and Corporate, 7 Maximum, XP Professional. We will turn to him to restore the Recycle Bin. All actions must be performed as an administrator, since only this “account” has the necessary rights.
- In order to launch the “Editor”, call the “Run” line using the Win + R key combination, where we enter the following:
Next, go to the “User Configuration” section and open the branch with administrative templates. Here we are interested in the desktop settings folder.
In the right block we find the item responsible for deleting the “Trash” icon and double-click on it.
In the settings block that opens, select the “Disabled” position for the radio button and click “Apply”.
Another parameter that you should pay attention to is responsible for deleting files without using the Recycle Bin. If it is enabled, then in some cases the system may remove the icon from the desktop. This happens as a result of failures or other reasons. This policy is located in the same section – “User Configuration”. Here you need to expand the “Windows Components” branch and go to the “Explorer” folder. The required item is called “Do not move deleted files to the trash”. To disconnect, you need to perform the same steps as in paragraphs. 3 and 4 (see above).
Method 3: Windows Registry
Before you start editing the Windows registry, you need to create a restore point. This will help restore system functionality in case of problems.
Read more: How to create a restore point in Windows 10, Windows 8, Windows 7
- We launch the editor using the command in the “Run” line (Win + R).
Here we are interested in a section or key with such an incomprehensible name:
To find it, go to the “Edit” menu and select the appropriate function.
Insert the name into the “Find” field, uncheck the box next to “Parameter values”, and check the box next to “Search only the entire string”. Then click the “Find Next” button. To continue the search after stopping at one of the items, you will need to press the F3 key.
We will only edit those parameters that are in the branch
The key that interests us primarily is located in the section
Double-click on the found parameter and change its value from “1” to “0”, then click OK.
If a folder is found in the section indicated below, then click on it with LMB and select the default option on the right. Its value must be changed to “Recycle Bin” without quotes.
If the specified positions are not found in the registry, then you will need to create a section with the above name and value in the folder
- Right-click on the folder and select “Create – Partition” one by one.
We assign it an appropriate name and change the default value of the parameter to “Recycle Bin” (see above).
After completing these steps, you must restart your computer for the changes to take effect.
Method 4: System Restore
One of the most effective methods of dealing with various problems is to “roll back” the system to the state it was in before they occurred. This can be done using built-in tools or programs specially written for this. Before starting the procedure, you need to remember when and after what actions your problems began.
Conclusion
Restoring the Recycle Bin on the desktop can be a rather complicated process for a novice PC user. We hope that the information provided in today's article will help you solve the problem yourself, without contacting a specialist.
We are glad that we were able to help you solve the problem.
Add the Lumpics.ru website to your bookmarks and we will be useful to you. Thank the author and share the article on social networks.
Describe what didn't work for you. Our specialists will try to answer as quickly as possible.
Method 4
You can also try to restore the Recycle Bin using the Registry Editor. The registry requires care in setting it up, as it can significantly damage the system. Therefore, do everything exactly as described below:
- Press Win R and enter regedit in the “Run” line.
- The registry editor will open, in it go to the path: HKEY_LOCAL_MACHINESOFTWAREMicrosoftWindowsCurrentVersion ExplorerDesktopNameSpace
- Select the NameSpace folder and right-click on “Create – Partition”
- The partition (folder) name is given as follows: {645FF040-5081-101B-9F08-00AA002F954E}
- Click on the created section with the left mouse button: on the right you will see the “Default” parameter. Click on it and set the RecycleBin value. Confirm by clicking “OK”.
- Reboot the computer.
Another option
The recovery methods described above work on Windows xp, 7, 8.1 and 10. I’m not sure about the dozens since there is no way to check. If none of the methods help solve the problem, you can go another way.
There are many programs that have the function of cleaning up garbage in the system, including the recycle bin. These include, for example, the programs Ccleaner, Wipe 2022, WiseDiskCleaner, Auslogics BoostSpeed and many others. Well, as an option, you can reinstall the system, but this is a last resort. I hope the article was useful to you, all the best.