Voice Recorder is a fairly useful application that can be useful to every person. You never know at what point in time you should turn on the recording of a conversation, but if it occurs, then it is better to always have such a tool at hand. Xiaomi's MIUI 12 shell already has a built-in recording application.
The application itself is called simply and concisely - Voice Recorder. You can find out the main parameters of the application, as well as where the records from it are stored, in our article.
- Main features of the voice recorder on Xiaomi
- MIUI 12 voice recorder settings
- Where are Xiaomi MIUI 12 voice recorder recordings stored?
Usage
“Voice Recorder” on Xiaomi phones is an application with a simple interface with which you can use 3 functions:
- Record/pause/stop. Starts, pauses, and stops microphone audio recording.
- Label. Leaves notes while recording.
- My notes. Allows you to view all recordings made by the application.
Settings
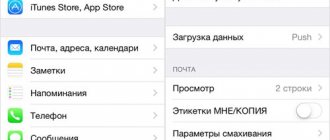
Application settings can be opened by clicking on the gear in the upper right corner.
Using this section you can:
- change the speaker for playing recordings from multimedia (on the back cover) to conversational;
- turn on the recording indication using the charging indicator;
- turn off sounds from system and other applications during recording;
- change the recording mode depending on the type of material being recorded: music, lecture, etc.;
- change recording quality: file format and bitrate;
- delete recordings already uploaded to the MiCloud cloud service.
Using different settings options, you can customize the audio recording to suit the desired situation.
MIUI 12 voice recorder settings
First of all, I recommend immediately going to settings (4) and setting some parameters.
Turn on the Indicator on the desktop if it is turned off. When the voice recorder is running, when you minimize the application, the icon will automatically be shown on the home screen.
Clicking on it takes you to the voice recorder. If, on the contrary, you would like nothing to be displayed on the desktop, you can turn it off.
Important clarification. The voice recorder will record regardless of whether your phone screen is turned on or not. If you click on record and turn off the screen, the conversation will still be recorded.
We also recommend turning on Silent Mode when recording . This means that the phone will automatically go into silent mode when recording starts.
Name entries manually . Once the recording is complete, you will be shown a window where you will need to enter the name of the recording. If you remove this item, the title of the records will be entered automatically and will contain the date of the record.
Recording format. AAC, MP3, Wav to choose from. We recommend choosing between AAC and MP3. If you don't know what it is, then leave it as it is.
That's it, after this you can start working with the program.
Record voice on Android smartphone and transfer audio file to computer
As a rule, smartphone manufacturers complete their products with a set of various programs, including a voice recording program. But sometimes such a program is not included in the package. What to do in this case?
You can download a free or paid voice recording program from Google Paly. There are a great variety of such programs available, and you can choose the one you like.
We took the free version of the popular Smart Voice Recorder application as an example. The application has all the functionality necessary for voice recording, but, like most free versions, it contains advertising blocks. This causes some inconvenience, but allows you to familiarize yourself with the program before purchasing it. In the illustrations you will see such blocks made in the form of gray rectangles.
Find the Smart Voice Recorder app in the GooglePlay app store. Below is the icon of this application in Google Play:
Download and install this application on your smartphone.
Recording a phonogram
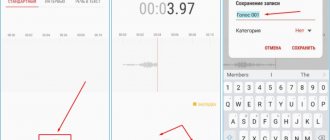
Open the application. Below is the program window after launch. To start recording, press the red button or the Start Recording 1 button. During recording, the large red button will display a countdown of the time elapsed since the start of recording. The recording level indicator will be visible above the button.
While recording, speak into the microphone area, either holding your smartphone in front of you or holding it as you would during a phone conversation (to your ear).
To stop recording, press the big red button 2 again. You can continue recording after stopping by pressing the red button.
To complete the recording, click the “Finish” button 3. A window for saving the recorded soundtrack will open. By default, an automatically generated name is suggested. Replace this name with a more understandable 4, as this will make it easier for you to work with audio files when loading them into the CMS. Click OK 5.
A list of saved soundtracks will open, which will include the newly created soundtrack. The phonogram line contains the date of its creation, duration and volume of the audio file. Also on the line is a playback control. You can listen to the recorded soundtrack.
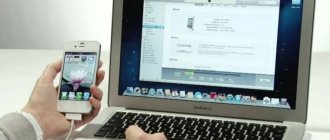
The audio file is recorded, now you need to transfer it to your computer.
Transferring an audio file to your computer
Let's consider two options for transferring an audio file to a computer:
- via cloud storage (Dropbox);
- as an attachment to an email.
To select the option to send a file, press and hold your finger on line 6 of the soundtrack until a window opens with a list of additional actions available for this audio file. Select “Send…” (Share…) 7. A window will open with possible options for sending the selected file.
Option to transfer a file using Dropbox
If you see the Dropbox application icon in the options panel, then you have it installed and can use it to transfer a file to your computer. Click on the Dropbox 8 icon.
A window will open with a list of Dropbox folders.
Create a new folder in which you will place the recorded audio files. To do this, click on the folder icon in the upper right corner 9.
In the window that opens, enter the name of the new folder 10 and click the “Create” button. The newly created folder will open. You will see her name in the title.
Click the “Add” button 11. The file will be placed in this folder.
After some time, it will appear in the same Dropbox folder on your computer.
Transfer using some other cloud storage is either completely similar to that described above, or differs in small details. All storage facilities use a common concept - data synchronization across different user devices. Thus, it is enough to install programs such as Dropbox on several devices and specify the folders in them that should be synchronized. Next, just place a file in such a folder and this file will appear on all devices that you connected to the cloud service.
Important
. In order for the file transfer to take place, both the smartphone and the computer must be connected to the network. Either to one local network or to the Internet.
Possible problems
Sometimes, when you first launch Voice Recorder, incidents occur: the application does not work correctly or does not open at all. All this happens for the reason that it is impossible to use the voice recorder without the necessary permissions. To check permissions, go to:
Settings > All Apps > Voice Recorder.
Find the “Application Permissions” section and set the sliders opposite all the items (there are four of them – “Contacts”, “Microphone”, “Memory” and “Phone”) to the active position. Now there should be no problems with the application.
Recuva
After enabling debugging, the smartphone connected to the computer will be detected as an external drive from which almost any deleted data can be recovered.
The Recuva utility allows you to recover data from any media, incl. from microSD cards and internal memory of the smartphone. The procedure is no different from the recovery algorithm via 7-Data Android Recovery:
The easiest way to recover files deleted on an Android device is from your computer. Special programs like Recuva or 7-Data Android Recovery will help you do this. But to take advantage of their capabilities, you first need to enable USB debugging on your phone or tablet - this is necessary so that the device is recognized in the system as a removable drive.
- Be sure to back up your data.
- Install an application that plays the role of the Recycle Bin on Android.
It is a computer data recovery program that can recover photos, videos, audios, emails, documents and other data from the internal hard drive and removable drive inserted in this computer, including your SD card.
An SD card is an external storage for an Android phone that helps in storing media files. If your audio files are stored on SD card, you can use another SD card data recovery software, Apeaksoft Data Recovery to recover lost audio files.
How to enable Xiaomi call recording
Saving telephone conversations in mp3 format is a system function, but is disabled by default. Therefore, you need to know how to enable this simple feature on Xiaomi Mi5 or any other Xiaomi smartphone. It doesn’t matter which gadget from the company you own – Xiaomi phones have one MIUI system shell installed. Even if this is not a flagship, but a budget Xiaomi Redmi 4 or Redmi 4X, the function is also present.
- Go to the built-in Phone application;
- Find the “Menu” button near the call key. It is indicated by three small horizontal lines (in MIUI 8 and 9) or lines with dots;
- tap on the “Settings” button;
- click on the “Call Recording” button;
- An automatic call recording system will open, which can be configured in different ways. To activate the ability to record voice files from telephone conversations, next to the corresponding inscription, move the slider to the right;
- you can configure the recording. From the selection of options, the user is asked to click on “All numbers” or enter a specific phone number.
Saving phone calls on Xiaomi Redmi 4 can be disabled in the same “Call Recording” item. The above method is also suitable for those who are looking for how to record music files on Redmi 3S. Recording of conversations is not carried out only on “pure” Android, therefore, if you flashed the device, for example, Xiaomi Redmi Note 4 on a “bare” bucket, then this method will not work!
Ardent fans of Xiaomi products know that not all the company’s smartphones have the MIUI brand shell on board. Among such devices we can highlight the brand new Xiaomi Mi A1. In the world, this function is illegal, since you cannot listen to other people’s telephone conversations.
You can record telephone conversations on Xiaomi A1 using third-party programs, which will be discussed further.
Doesn't record calls: what to do
Xiaomi phones released after 2022 do not have the option to automatically turn on the voice recorder during calls. But it happens that older models also stop recording calls. This happens if the latest version of the MIUI shell is installed on the phone.
You can find out what the firmware is by going to “Settings”. To do this, open the “About phone” tab. A window will open with information about the system, including the MIUI version.
If permanent call recording is required, and the shell does not allow you to activate the function, the user has several options:
- Cancel the update by rolling back the system.
- Switch from the Russian version of the firmware to the global one.
- Use a third-party application to record conversations.
Attention!
Before changing the firmware, you must save a backup copy of the device in the iCloud or Google Drive cloud storage.
Where are call recordings stored?
By default, the automatic call recording system saves voice files in the following path in the phone's internal storage: MIUI/sound_recorder/call_rec
You can not only open an mp3 file on your phone and listen to it in the player, but also connect your phone to your computer via a USB connection and copy the voice file to your PC's hard drive. In MIUI 8, saved mp3 files are located in the same path.
You cannot change the location where calls are saved. If this does not suit you, there are many similar applications in the Play Market that save recorded phone calls not only in the smartphone’s memory, but also on a memory card or external USB drive.
Tips for recovering deleted recordings
Step 1: Connect your device to PC
Accidentally deleted audio files such as voice recordings or call recordings from your voice recorder or Android phone? EaseUS data recovery software will help you recover deleted records.
Please note that these recommendations are suitable for restoring data before the system overwrites it. Therefore, for successful data recovery, do not record or create new recordings or files on your voice recorder or Android device. Download EaseUS Data Recovery Wizard and start scanning your device as soon as possible to increase the chance of successful recovery.
Latest articles - Also in the EaseUS program
Then. there will be a Restore button. You must click on it to restore your files.
Step 2 Now, using a USB cable, you should connect your iPhone to your computer.
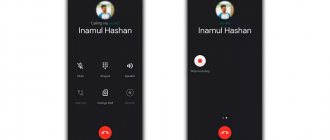
Acr – call recording
You can trust a third-party application called Acr to record phone calls. The name stands for Automatic Call Recorder.
The program is famous for its great functionality and can do much more things than the standard utility in MIUI. In particular, two stand out: “ACR - call recording” and “Call recording - Automatic Call Recorder”. They differ in design, but perform the same functions.
The second program is more complex in structure, as it has a large number of functions. The paid version allows you to record both all telephone conversations and some contacts. Here you can activate the function so that sound is captured from the microphone of the phone and smartphone of the interlocutor, and also select the location where the files will be saved. The first application only works on Android versions 6 and higher. The functionality here is a little less, it can be configured according to the user’s wishes.
The advantages of programs from the Google Play Store are that you can record conversations both on smartphones with the MIUI shell and with a “clean” version of the Android OS. This method is suitable for the Xiaomi Mi A1 smartphone.
Initial setup of the Voice Recorder application
Due to the built-in security system, when first launched, the application will ask for permission to access the microphone and device memory. All requested permissions must be provided. Otherwise, the recorder will not start or certain functions will not work. For example, if you do not allow access to memory, the program will not be able to save recordings to the internal drive or memory card.
If you accidentally pressed the “Deny” button at the stage of granting permissions, this can be done through the device settings.
The procedure is as follows:
The procedure for granting access to the application.
- Open “Settings” and go to the “All applications” subsection.
- Find “Voice Recorder” in the list and expand the application properties.
- Click “Application Permissions”.
- Move one or more switches and check the functionality of the application.