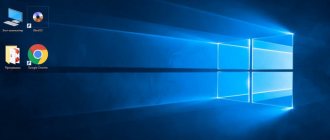
Many users very often place icons of programs and files for quick access directly on the “Desktop”, and sometimes installed applications place their own shortcuts there. We’ll talk about how to remove the icon of an unnecessary or unused applet (file, command, etc.) from the “Desktop”. When performing the steps described below, you need to clearly understand that there are only two methods to get rid of unnecessary shortcuts: either hiding them (disabling them) or deleting them.
How to move an icon from the taskbar to the desktop?
The process is very simple:
- Locate the application you want to place a shortcut on your desktop by finding it in the All Apps List or in the Start Menu area.
- Left-click on an application icon and drag it to any area on the desktop, then release the mouse button.
Aug 22
2022 Interesting materials:
What should be in the first aid kit in the car? What should be in the car for a trip to Europe? What should be in the car according to the rules of Ukraine 2019? What should be in the car 2022? What should I put where in the washing machine? What is better for a washing machine, powder or gel? What's better for getting rid of limescale in a washing machine? Which is better: Samsung or AEG washing machines? What can leak in a washing machine? What can I use instead of powder in the washing machine?
How to hide all elements without physically deleting them?
The above method is quite simple, but sometimes you don’t want to delete icons. How to remove icons from the “Desktop” by hiding them so that they are simply not visible, but at any time they can be turned on and used again?
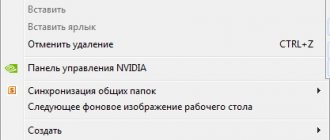
To do this, in the same RMB menu, in the free space in the view subsection, you can deactivate the icon display item, after which absolutely all icons will disappear from the “Desktop”, including the system components “Trash”, “Computer”, etc.
Removing shortcuts
There are several ways to remove shortcut icons from your desktop, it all depends on the desired result.
- Easy removal.
- Grouping using software from third-party developers.
- Creating a toolbar using system tools.
Method 1: Uninstall
This method involves the usual removal of shortcuts from the desktop.
- Files can be dragged to the Trash.
Right-click and select the appropriate item in the menu.
- Completely erase the disk using the SHIFT+DELETE key combination, after selecting it.
Method 2: Programs
There is a category of programs that allow you to group elements, including shortcuts, so you can quickly access applications, files and system settings. For example, True Launch Bar has this functionality.
- After downloading and installing the program, you need to right-click on the taskbar, open the “Panels” menu and select the desired item.
The TLB tool will then appear next to the Start button.
To place a shortcut in this area, you just need to drag it there.
Method 3: System Tools
The operating system has a function similar to TLB. It also allows you to create a custom panel with shortcuts.
- First of all, we place the shortcuts in a separate directory anywhere on the disk. They can be sorted by categories or in another convenient way and placed in different subfolders.
Right-click on the taskbar and find the item that allows you to create a new panel. Select our folder and click on the appropriate button. Done, the shortcuts are grouped, now there is no need to store them on the desktop. As you probably already guessed, this way you can access any data on the disk.
Conclusion
Now you know how to remove shortcut icons from the Windows desktop. The last two methods are very similar to each other, but TLB gives more options for customizing the menu and allows you to create custom panels. At the same time, system tools help solve the problem without unnecessary manipulations of downloading, installing and learning the functions of a third-party program.
Some users are interested in how to remove icons from the Desktop in the Windows operating system so that nothing is displayed on the computer screen except the Control Panel. For many users, this proposal sounds strange due to the fact that it is convenient to place icons and shortcuts on the desktop to quickly launch programs, or to navigate to settings and functions of the operating system.
The Windows desktop looks different: on some computers it is literally filled with shortcuts, icons, folders and files, on other computers the screen has an ascetic appearance, on the desktop there is only the most necessary for working on a PC.
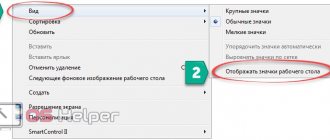
Context menu - remove all icons
The easiest way to make your desktop crystal clear is to hide icons and other content. Shortcuts and directories with files will not disappear; they will no longer be displayed.
From the desktop context menu, select "View" and uncheck the box next to "Show desktop icons." To show them, return the checkbox.
You can see the contents of the Desktop directory at % UserProfile%\Desktop or shell:desktop in Explorer.
Some icons displayed on the desktop may not be in the catalog. These are icons that are shown for all operating system accounts. They are located in the %Public%/Desktop directory.
Remove USB Shortcut Virus
In case we have a flash drive, memory card or external hard drive infected with a direct access virus, the infection spreads every time we connect it to our Windows PC.
While it is true that any security software is capable of detecting it before our computer is infected, once it is already infected, things become more complicated, and the large number of copies themselves makes it difficult to eliminate them directly. To fix this, we can use a command line tool.
From the command line
To disable this threat, it is best to remove all shortcuts that may cause the malware to replicate. This is what we need to do by connecting the infected disk or memory to the computer and using the command line tool.
To open it, we must enter CMD in the search box of the Start menu and run it with administrator rights. Once we open the window, we will use the Attribute Command, which is a native Windows function responsible for changing the attributes of a specific file or folder.
E:
The first step is to write the letter assigned to the infected memory or disk.
del *.lnk
This command is responsible for removing all shortcut files created by the virus.
attrib -s -r -h /s /d *.*
We will use this command to apply standard attributes to all source files so that they will appear again.
Once completed, it is recommended to copy all our files from the external device, completely format the external device to clean it, and then move our files back to it.
How to find a hidden application?
Removing an app from Siri search does not remove it from regular Spotlight search. How else will you find hidden software?
Activate the search by swiping down from the middle of the screen and writing the name of the application. Find it in the search results.
So anyone can find a hidden application? Yes it is. Standard methods can only remove program icons from the screen. For greater security, use a passcode, fingerprint, or FaceID on your iPhone.
On topic: In this article we tell you how to hide photos on iPhone.
Group policy settings and additional panels
To change the display settings of system icons, you can use a more labor-intensive method. For example, you can edit group policy settings (gpedit.msc).
In the custom configuration, through Administrative Templates, navigate to the Desktop subsection, and then to remove system icons, set the corresponding settings to enabled.
If you need to remove absolutely everything from your Desktop, go to the Desktop subfolder and activate the Disable All Items option.
Note: similar actions can be performed in the system registry, however, this technique is more complicated for the average user in terms of the fact that the reverse actions will have to be performed there. And it is not recommended to change the registry without special knowledge under any pretext, since any change in it is saved automatically, and it will be impossible to cancel the operation or roll back the state of the registry without a previously created copy.
Finally, you can create a new panel that will be displayed next to the system tray, giving it a custom name and placing on it the icons from the main workspace that you want to hide. When you expand the created panel, they will remain available for use. Of course, you can create multiple panels by grouping icons or their corresponding applications or files by type.
To simplify working with toolbars, you can also use simple programs like True Launch Bar, which have a little more capabilities than are provided in Windows systems themselves.
Removal
There are several ways to erase unnecessary objects:
1. Right-click on an unnecessary object and erase it with the appropriate command.
2. Drag the icon to the Trash and confirm the operation.
3. Select them and press Del to move them to the Trash or Shift + Del to permanently delete them.
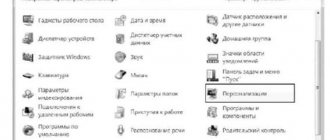
Personalization options for system icons
If you have questions about managing icons for system applets, you can use the personalization options, where you will need to go to the theme settings section, and then call up an additional menu by clicking on the icon options link.
Here you can disable or enable the display of some icons, as well as change the standard icon to any other.
How to change the shortcut icon
Often users want to change the shortcut icon to some picture to make it look more beautiful. This is quite possible to do, the main thing is to find a suitable picture and then not get confused in the labels. You don’t even need any additional programs; everything is already provided in the operating system.
To change the shortcut icon:
- Right-click on the desired folder or file, then left-click on “Properties”.
Right-click on the desired folder or program shortcut - By default, a window will open on the “General” tab, click on the “Settings” tab, and at the bottom of the window click on the “Change Icon” button.
Go to the “Settings” tab, click on the “Change icon” button at the bottom of the window - In the open window, select the icon you like from the list, click on it, then click OK.
Left-click the mouse to select the icon you like and click “OK” - To confirm, click “Apply” then “OK”.
Click “Apply”, then “OK”
Folder with new icon