Many users are facing desktop display problems. Of course, a certain part of the problems can be attributed to the system, but there are also such banal errors that inexperienced users create with their own hands.
In Windows 7, desktop icons can be removed in a couple of clicks. This simple operation is performed by children to take their parents by surprise, forcing their ancestors to puzzle over how to return the desktop to its previous state.
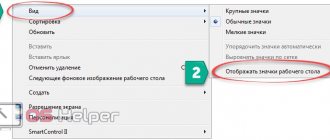
To return icons to the desktop, first, try the simplest thing: right-click on a free area of your desktop, call up the context menu, select “View”, check the box “Display desktop icons”.
As a rule, after carrying out such a simple operation, icons should appear on the desktop.
If the problem is not solved, then your problem is a little more serious than simple childish pampering. Most likely, some kind of system error occurred, as a result of which “explorer.exe” completed its work with an error or stopped launching on its own. In this case, the step-by-step instructions are as follows:
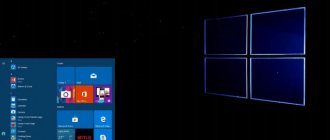
- To correct this situation, the wisest thing to do is to calm down and try pressing 3 keys that will call up the task manager.
- So, simultaneously hold down “Ctrl-ALT-DEL”.
- All that remains is to select the “Launch task manager” sub-item.
How to change icons in Windows 7 - the easiest way
Select the icon. Next, press left CTRL while rotating the mouse wheel:
- up to do more;
- down - decrease.
Another way
Do the following:
Select the desired option.
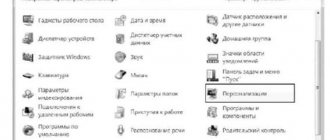
DESKTOP BACKGROUND
The Desktop background, as part of the theme, can also be changed at any time. For example, do you like the sounds of the installed theme, but don't like the background used? No problem: changing your desktop background is as easy as changing the theme itself, so don't worry, just choose a different one. To change the background, click on the Desktop background link (see Figure 7.2). In the window that opens (Fig. 7.3) you will see a list of images that change depending on which location source is selected. For example, you can use images from an image library or select the most popular photos. If you don’t have enough of what you have, you can always click the Browse button and specify any folder with images. Just like the theme, the background image changes on the fly so you can see the results right away. If you don’t like it, choose any other image, especially since there are quite enough ways to do this. Now comes the fun part. The operating system allows you to set either one permanent image or set up a slide show of the images you select. Setting a “stable” image is very simple: select a suitable background and click the Save changes button. To set up an image slideshow, you need to do the following.
Rice. 7.3. Changing the desktop background
1. Mark the images that should be included in the slide show. In this case, it is most convenient to save the necessary images in one folder, and then specify it using the Browse button. You can then click the Select All button to select all images at once. You can also tag images using the Ctrl or Shift key. 2. Specify the position of the image by selecting one of the values Fill, Fit, Stretch, Tile, Center from the list of the same name. If the image is larger than the screen resolution, this will not lead to problems, you just need to select the Fill or Stretch option from the list. If the image resolution is lower and it becomes distorted when stretched, you can modify the Desktop background by choosing a color that complements the image. To do this, use the Change background color link at the bottom of the window. 3. Select the frequency of changing images using the Change images every list. There are options from 10 seconds to 1 day. The most optimal and “calm” option is to set the frequency to around 1 hour: it’s both pleasing to the eye and not boring. 4. Specify the method for changing images. By default, the images are rotated in order as shown in the list. If you want to add some variety to your slideshow, you can check the Shuffle box. To apply the changes you have made, click the Save Changes button.
How to change folder icons in Windows 7
Find the directory you need to change. Further:
A window will open where you select:
To install an icon downloaded from the Internet, specify the path to it by clicking on “Browse”.
Now you know how to change the Windows 7 directory icon.
If you don’t like the result of the change, click “Restore” on the last tab. The icons will change to the default ones.
Recovery via BAT file
If the above method does not help you, try the next option.
- Try to close all running applications and windows.
- Create a file in Notepad with the following content:
Just copy the code and paste it into the document window
SetLocal EnableExtensions DisableDelayedExpansion
REG DELETE "HKLM\SOFTWARE\Microsoft\Windows\CurrentVersion\Explorer\Shell Icons" /f
REG ADD "HKLM\SOFTWARE\Microsoft\Windows NT\CurrentVersion\Winlogon"/vAutoRestartShell /tREG_DWORD /d0 /f
taskkill /im»explorer.exe»/f
timeout /t5
cd/d%userprofile%\AppData\Local
DEL IconCache.db /a
shutdown-l
- Save it with the extension “.bat” and run it with admin rights (via the context menu). A console window should appear, in which you should confirm readiness by pressing the English key “Y” (Yes):
I won't go into details of each command. Don't worry, it's not a virus and the system won't be harmed. You will be logged out of your Windows account, and when you log in, the standard Windows 7 icons will be restored.
How to change Windows 7 icon size
Do the following:
In the new window at the bottom, click the “Color” link. Click the "Advanced" link:
Further:
Now you know how to change icons in Windows 7 using standard OS tools.
Change shortcut icon
To change the icon for a shortcut, right-click on it and select “Properties” from the menu that opens.
In the “Shortcut” tab, click on “Change icon”.
You can select an icon from the standard ones (the default icons are located in the files C:\Windows\System32\imageres.dll and C:\Windows\System32\shell32.dll) or click “Browse” and find the desired icon in any other folder.
For example, I have one application on my computer with an icon that I want to set for this shortcut - in this window I find this application, select it and click “Open”.
8. Select an available icon and click “OK” in all open windows.
Using specialized software
Change the icon using the IconPackager utility. Download and install the program. The installation is simple and will not cause any difficulties even for a novice user. Launch the application. Icons will appear at the bottom. To install icons downloaded online, click on “Add”. Next is “Install”. An explorer will open allowing access to the file. After selecting the desired icon, click “Apply”.
To return back, at the bottom of the application click on:
What if this doesn't help?
If the task manager does not start, but instead a message appears that the task manager is blocked by the system administrator, then this clearly indicates that the system has been heavily affected by viruses, which have deprived the user of any ability to interfere with their malicious activities.
Therefore, the first thing you will need to do is restore the task manager, and only then try to launch explorer.exe. This material certainly deserves a separate article.
Well, let's consider that you are lucky, and the task manager started the first time and without problems. Next, you simply need to create a new task by clicking on the “New task” button of the same name. In the window that appears, enter “explorer.exe” and click on the “OK” button.
After carrying out such simple manipulations, in the vast majority of cases the desktop appears. If this does not happen, this means that your explorer.exe file is damaged. All that remains is to restore it using the distribution from which the operating system was originally installed on this computer or laptop.
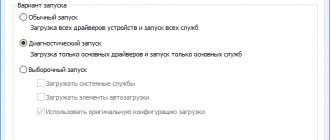
Also, if you do not have such a distribution, you can try to boot the computer in other modes, for example, in safe mode. Sometimes it happens that in safe mode the system will boot quite normally, and this will be enough to at least use the system restore system from a checkpoint.
Where to get ico files
Icons for Windows have their own extension – “.ico”. The operating system has a basic set of pictures that can be used as shortcuts. In addition, icons may change when you install a new theme for your Windows system.
If among the standard sets you could not find anything that would suit you, you can download new ico icons. There are a lot of sites on the Internet that offer their visitors to download various thematic sets or certain pictures individually.
Some resources offer shortcuts for download in png format. In this case, users will need to convert them to the desired format. To do this, you can use the special Avelcon program or any equivalent. In most cases, websites will prompt you to download all the necessary software.
How to remove arrow icons
To remove the arrow from a shortcut icon, do the following:
- Press and hold the Win + R button combination at the same time. Press and hold the Win and R buttons
- Enter regedit in the search bar and click on the “OK” button. Run the regedit command
- Thanks to the list on the left, we follow the path HKEY_CLASSES_ROOT/lnkfil. Go to the Inkfil folder
- Rename the file IsShortcut to IsNotShortcut. When you want to return the arrows back, change the file name to the initial one. Rename the file
- Reboot the computer. Reboot the computer
There is a second way to achieve your goal:
- Download the Aero Tweak program (for example, from here https://testsoft.su/?p=3769). Download the application
- The downloaded file does not need to be installed, just run it.
- Go to the Windows Explorer section. Go to the Windows Explorer section
- Activate the “Do not show arrows on labels” function. Activate the “Do not show arrows on labels” function
- Click the “Apply” button and restart the computer. Click the “Apply” button
Video: how to remove shortcuts from the desktop
How to remove shields
Unlike arrows, not every label is equipped with a shield. The system service UAC (User Account Control) designates in this way applications and commands that operate with administrative rights. In particular, this means the ability to make changes to system settings or, for example, prohibit a user from starting without the appropriate permissions. The main task of UAC is to protect the system, so disabling the service, and with it the shields, is recommended only for experienced users and on computers with an effective antivirus installed.
To disable the control service, use the system configuration editor.
- Press the Win+R keyboard shortcut to open the “Run” window and type the msconfig command in the input line.
Open the system configuration editor - After the system configuration window has opened, go to the “Service” tab.
- Find the line “User Account Control Settings” in the list and click the “Launch” on-screen button.
To change settings, you must click the “Launch” button - Now all that remains is to move the slider to the bottom position and save the parameter change by clicking OK.
The service is disabled using the lower position of the slider
The changes will take effect after you restart your computer. In order to return the shields, you need to repeat all the steps, but at the last step return the slider to its previous position.
Change application icon on taskbar
Hold down the Shift button, right-click on the shortcut in the taskbar, then select “Properties” (at this moment the application should be closed), or right-click on the taskbar application shortcut, in the list that opens, right-click on the desired application again mouse and select “Properties”.
Then everything is done as with regular shortcuts: go to the “Shortcut” tab => “Change icon” => select the desired icon.
If you need to change the icon of an Exe file, read the article “How to change the icon of an Exe file.” If you want to change the icon for a specific file type, read the article “How to change the icon for a specific file type in Windows.” If you need to change the icon for any drive, read the article “How to change the drive icon in Windows 10.”
That's all for today, if you know other ways - write in the comments! Good luck to you