All the main elements of the operating system (shortcuts, folders, application icons) of Windows 10 can be placed on the desktop. In addition, the desktop includes a taskbar with a Start button and other objects. Sometimes the user is faced with the fact that the desktop simply disappears with all its components. In this case, the incorrect operation of the Explorer utility is to blame. Next, we want to show the main ways to fix this problem.
Restoring the Start button to work
Sometimes users are faced with the situation that after debugging the functioning of the desktop, the “Start” button does not function, that is, it does not respond to clicks. Then it needs to be restored. Luckily, this can be done in just a few clicks:
- Open Task Manager and create a new PowerShell task with administrator rights.
In the window that opens, paste the code Get-AppXPackage -AllUsers | Foreach {Add-AppxPackage -DisableDevelopmentMode -Register “$($_.InstallLocation)AppXManifest.xml”} and press Enter.
Wait until the prerequisite installation process completes and restart your computer.
This leads to the installation of missing components required for Start to work. Most often they are damaged due to system failures or virus activity.
Read more: Solving the problem with the Start button not working in Windows 10
From the material presented above, you learned about five different ways to fix the error with a missing desktop in the Windows 10 operating system. We hope that at least one of the instructions given was effective and helped you get rid of the problem quickly and without any difficulties.
Reasons for the error
Let me start with the fact that most often this gap occurs due to poor performance of the installed drivers for video cards such as Radeon and Nvidia. In this case, situations arise when the new OS loads, but on the Windows 10 screen there is a black screen with a cursor, or nothing is displayed. Also quite common are complaints about the appearance of a black screen after the computer goes into sleep mode or hibernation.
The second common problem of breakdowns is the possible incorrect connection of the second monitor. There are two more interesting reasons for breakdowns - the appearance of a dark screen after removing a virus or after changing the partition structure on the HDD (the hard drive of your computer). All these and other errors will be analyzed and described in detail below. Let's start by analyzing all possible ways to solve the problem.
Probability of wallpaper restoration after update
As you probably already know, not a single deleted file, including an image, disappears without a trace unless it is overwritten. By erasing a digital image from an archive, you are telling the file system to forget about it and never use it again. The system successfully completes its task, but does not get rid of it forever. The desktop wallpaper file is still stored on the system storage shelves until it is overwritten with new data.
Thus, applications that can scan HDD sectors for file fragments allow you to recover even information that previously seemed irretrievably lost.
Desktop Actions
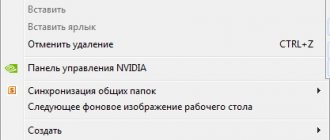
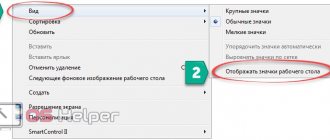
Sometimes drastic measures can be avoided. Let's say the desktop starts, but nothing is displayed on it. Try right-clicking on the screen. In the "View" menu, find the "Show desktop icons" option. There should be a check mark next to it.
Users often complain about shortcuts disappearing. The fact is that the system periodically removes unused or damaged shortcuts from the desktop. To cancel this feature, open the Control Panel. In the "System and Security" tab, find the "Troubleshooter" item. In the “Support Center” section, select the “Fix common problems” submenu and find the “Settings” item in the left panel. The Windows Maintenance Tool needs to be disabled.
These recommendations should help if your desktop won't load. If none of the actions bring the desired result, try reinstalling the operating system.
Good afternoon. Another instruction on the topic of eliminating the consequences of a virus attack on your computer. Today we are looking at another problem - the desktop does not start. On modern operating systems, only the desktop image is usually shown; on older operating systems, it may simply be black on the entire screen. I will try to describe all the steps to try to restore the computer. If they do not help, then a system reinstallation is most likely necessary. And yes, before following these instructions, you need to clean your computer of viruses, otherwise all our treatment for the virus will be nullified by constant changes in the direction it needs. For cleaning, you can use one of the LiveCDs: Dr.Web LiveDisk or Kaspersky Rescue Disk. They can be recorded on a flash drive or disk on a work computer and used to treat the computer.
We are trying to launch the desktop.
Of course, the first thing we need to do is try to launch your desktop (and in some cases, the real desktop, since a certain category of pests can launch a modified desktop). And for this there are two options:
- The first option is to use the “Run” utility, press the Win+R keys and enter explorer.exe (you can also try the full path: C:\Windows\explorer.exe) and click OK.
- The second option is to use the task manager. To launch it, you can try using the keyboard shortcut Ctrl+Shift+Esc or use the emergency screen by pressing Ctrl+Alt+Delete and selecting “Task Manager” there.
In the window that opens, click on the “File” tab and select “Run a new task.”
In the window that opens, also enter explorer.exe or C:\Windows\explorer.exe and click OK.
We look at the result, if the desktop has loaded, we breathe a sigh of relief, there is little work left, go to step 3. If not, then the problem is more complicated, the pest has replaced the desktop executable file with its own and we need to restore it, which means we read on.
We are trying to restore the original explorer.exe file
So, how do you restore the executable file? The first thing to do is try to restore using the command line and the sfc utility. To do this, we need a command line launched as an administrator, so we use the second method of the first step, but in the task launch window, check the box next to “Create a task with administrator rights,” and enter cmd in the field.
In the window that opens, enter sfc /scannow and press Enter.
We wait for the end of the check, restart the computer and look at the result. If the desktop does not start, then you will have to restore the file manually and for this we again need a working computer with the same operating system (bit size and preferably edition (Professional, base, Enterprise) and a flash card. Copy the file C:\Windows\ explorer.exe on a clean computer onto a flash card and insert it into the infected PC.Next we do a tricky manipulation.
- Launch “Run” or “Task Manager” → open “file” → “Run new task”
- Click on the “Browse” button
- Go to the flash drive and copy the file explorer.exe
- go to C:\Windows and paste it, agreeing to replace the file. (If it writes something about impossibility due to insufficient access rights, open the file properties in the C:\Windows folder, select “Security”, at the bottom click on the “Advanced” button, at the top on the “Owner” line, click “Change”, click “Advanced”, “Search” button, select “Administrator” and click OK until all property windows are closed, then copy the file from the flash drive again and paste it into the system directory)
And now, we try to repeat the first point of the instructions, if the desktop has loaded, go to the third point, if not, we reinstall the system.
We are working in the registry to restore the original values.
All that remains is to clean the registry; to do this, in the Run utility or task manager, enter the regedit command and click OK.
In the window that opens, go to the directory:
HKEY_LOCAL_MACHINE\SOFTWARE\Microsoft\Windows NT\CurrentVersion\Winlogon
And we look for the Shell parameter, it should have the value exolorer.exe as in the screenshot below, if this is not the case, we correct it. If the parameter does not exist, you can create it (this is a string parameter) through the context menu.
Next you need to find the following branches:
HKEY_LOCAL_MACHINE\SOFTWARE\Microsoft\Windows NT\CurrentVersion\Image File Execution Options\explorer.exe
And
HKEY_LOCAL_MACHINE\SOFTWARE\Microsoft\Windows NT\CurrentVersion\Image File Execution Options\iexplore.exe
They need to be removed. It is the branches, not the parameters in them. With a high degree of probability, the virus wrote data into them so that your desktop does not start, and the system itself will create new branches upon startup, only with the parameters it needs.
Restart
We restart the computer and look at the result if everything went well. The system will start and work as if nothing had happened. If not, then it’s easier to reinstall the system.
Look like that's it. I hope you found this article useful, click one of the buttons below to tell your friends about it. Also subscribe to site updates by entering your e-mail in the field on the right or subscribing to the group on VKontakte and the YouTube channel.
Thank you for your attention
Material from the site geekteam.pro
- 0shared
- 0Facebook
- 0Twitter
- 0VKontakte
- 0Google+
- 0Odnoklassniki
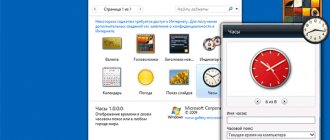
Windows can be considered completely ready for use after the desktop and applications added to startup are loaded; until this point, the system may experience slight freezes. But it may also happen that at some stage an error occurs and Windows will not be able to boot completely. A typical example of this is the appearance of the so-called black screen of death or Black Screen.
It looks like this: the computer successfully passes the POST procedure, the system boots normally, but the desktop does not appear. Instead, after loading Windows 7/10, the user sees a black screen with or without a mouse cursor. Another variation of the same problem is that a window appears on a black screen with the error “The script file C:/Windows/un.vbs cannot be found.” This happens most often because the Explorer file responsible for the operation of the system’s graphical shell cannot start normally.
There may be several reasons for this, but usually it is either some kind of conflict in the operating system, or the consequences of viruses. The likelihood that the problem is caused by hardware problems, in particular, the failure of the video card, is small, otherwise the screen would be completely black, and there would be neither a cursor nor the Windows logo on it. So, what should you do if you get a black screen when loading Windows 7/10? In any case, do not make hasty decisions and do not rush to reinstall.
How to restore wallpaper in Windows 10
Method 1: Recovering disappeared wallpaper using the Personalization option
If you happen to encounter a black screen instead of the usual background, the first thing you need to use is the desktop personalization settings.
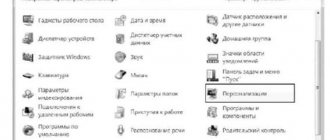
1. Right-click on the desktop and select Personalization .
2. In the Select a photo press the Browse to find a previously saved background.
3. Click on Select a picture and the operating system will set it as the desktop background.
This was the easiest way to get the background image back. But what if it is damaged or, even worse, deleted? In the next paragraph we will tell you how to solve this issue.
Method 2: Restore wallpaper using third-party software
Before proceeding with the solution, we recommend that you double-check whether the desired image is on your PC by following the path: C:\WindowsWebWallpaper . If it is not there, the only option available is to try to restore it.
Unfortunately, Microsoft has not provided suitable software for its operating system that would be able to recover lost data. Therefore, you will have to use third-party software.
Starus Partition Recovery application , or its cheap analogs with reduced functionality, Starus FAT Recovery, Starus NTFS Recovery, are designed to work with certain file systems - FAT and NTFS. The main software is able to interact with both. The applications are well suited for both home and office work, becoming a universal tool for recovering information and logical partitions of hard drives.
After downloading and installing the program on your computer, use the instructions below, which will help you quickly and with a guarantee return any lost file.
1. Launch Starus Partition Recovery. The File Recovery Wizard window will appear in front of you . Click Next and select the drive you want to scan. Next again .
2. Select the appropriate scanning mode.
Quick scan - the program performs a quick superficial scan of the disk and detects the latest files installed on the HDD. Full analysis - unlike quick scanning, this mode conducts a deep analysis of each individual sector of the device and finds even the oldest documents.
We recommend performing a Full Analysis for more accurate results.
3. A convenient preview function allows you to examine every file you find, regardless of format. You can view both text, graphic and video files.
4. Select the documents that need to be restored, right-click on any of them and click Recover .
Note: Never export files to the same drive from which you are restoring them. Due to possible overwriting, you risk permanently losing data.
evaluate all the chances of “ returning lost wallpaper ” until you register the tool. Download the program to restore photo wallpapers to your desktop and try it completely free. All features are available in the trial version, including previewing the recovered files. The preview window will allow you to make sure that a particular image is not damaged or overwritten, and can be fully restored.
Uninstalling the latest Windows updates
The computer may display a black screen due to the latest updates. If everything we have done has not solved the problem, we will use this method. To remove them, go to the “control panel”, enter this expression in the Windows search and click on the element that appears.
- Then, select “Large icons” and find “Programs and Features” in the list;
- In the new window, select “View installed updates”;
- Now all we have to do is sort the updates by the number when it was installed and delete new items (right-click on it and select “Delete”);
- It is worth noting that this sorting is within one category. Therefore, you will have to look through all the new updates from different categories.
Launch the explorer.exe process
This process may not be running on your computer. Go to the Task Manager (read more about different ways to do this here).
Click on “File” and select “Run new task”. We enter explorer.exe in the line and put an additional marker so that the process starts with administrator rights.
This method is effective only if the cause of the desktop malfunction was a process shutdown. If the system files have been damaged or changes have been made to the registry, then launching the process is unlikely to help.
Removing the antivirus
Quite often it happens that the antivirus program is configured incorrectly. In this case, one of the system files may be blocked. You can try installing this antivirus. Of course, we will do this using safe mode. Very often, the creators of an antivirus offer their program, but forget about the application that removes the antivirus. If there is no application, then I advise you to use the free Revo installation program. You can learn how to delete using it correctly from my article “Deleting using Revo.”
System Restore
There are two ways to restore (update) the system. The first is using the created recovery disk. We recently wrote about how to create a recovery disk. This will come in handy here, since we need to restore damaged system files and restore the functionality of the desktop.
Go to Windows settings (Win+I key combination), go to the “Update and Security” section, go to the “Recovery” tab and click on “Restart now”. This is the case if the drive with the recovery files is already connected to the computer.
The computer will restart and offer several boot options. We need to go to advanced options by pressing the F10 button.
Next, we will be offered the choice of restoring the system from restore points or using an image (that is, a disk we created). If you have this disk, choose the second option. It often happens that recovery points are disabled by the user immediately after installing Windows 10. In this case, the first option will not work.
The second recovery method is to return the computer to its original state. We reboot in exactly the same way - through the settings from the “Update and Security” section. When selecting boot options, select “Safe Mode” (F4).
Then go to the parameters again, in the same section and the same tab, and select “Start”. The command will restart our computer and begin the process of returning the operating system to its original state.
Follow the instructions and restore the system. Typically, such actions help return the desktop to normal.
Addition. If, as a result of the loss of the desktop, the Start menu also does not work and the settings do not open (more about this in our article), you can start the computer in safe mode as follows.
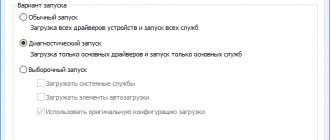
Press the Win+R key combination and type the msconfig command in the line. In the system configurations that appear, select the “Boot” tab, set the marker opposite “Safe Mode”. If we need a network connection for further work, check the appropriate box.
Remove all connected external devices
At the beginning of 2000, I worked in a company, and somehow, when I arrived at work, I could not start the computer. There was only a "Black Screen". I couldn’t understand what I was doing wrong until the programmer told me that I needed to remove the floppy disk from the system unit. After this, the computer started without problems.
Therefore, if you have a DVD in your drive, I advise you to remove it. If a simple flash drive is connected, remove another one as well. We also disconnect the external hard drive. It is better to disconnect the second monitor. After this, we restart the computer and it’s very possible that your computer will start.
Working with the registry
Any system or software changes in the Windows 10 environment are recorded in the registry. Desktop problems are often caused by damaged registry settings. We go into the editor using one of the methods suggested here.
Go to the editor along the path indicated in the screenshot. In this section we need to find two parameters - Shell and Userlnit. The values for them should be the same as they are shown in the picture.
If the values do not match the specified ones, double-click with the left mouse button and enter the correct ones.
Removing applications from startup
The black screen error sometimes appears during the automatic launch of an application that is incompatible with this version of Windows 10 or does not function properly on this system. Therefore, you need to turn off all applications from startup. To do this, go into Windows settings, then select “Applications”.
In the new window, select the “Startup” tab on the left.
If using this action you solved the problem of the black screen, then next you turn on one application at a time to understand which of them creates the black screen.
Restoring shortcuts
The problem may be simpler than we thought. Perhaps all the shortcuts have simply disappeared from the desktop, but the desktop itself is not damaged and is working normally. Usually, if the problem is with shortcuts, the Start menu is functional.
First, go to Windows settings (Win+I), go to the “System” section and to the “Tablet Mode” tab. Set all markers to off.
On the desktop itself, right-click on an empty area, select “View” from the context menu, and then set the marker to “Display desktop icons.”
Disable fast startup and hibernation mode
The “quick startup” option provides the service when the OS is turned on. This also results in faster loading times. But, this mode can cause various errors. You can try turning it off. To do this, we will use the command line: enter the combination powercfg -h off and reboot the PC.
If everything went well, then it is advisable to enable this function again using the combination: powercfg -h on
But, if this action did not have an effect, then we will also disable “quick launch”. Previously, this action could be performed in the power settings. In the latest versions of Windows 10, this can be done using the registry.
So, the command line should be launched and the combination entered: reg add “HKLM\SYSTEM\CurrentControlSet\Control\Session Manager\Power” /v HiberbootEnabled /t REG_DWORD /d 0 /f
This combination will give a zero mark to the HiberbootEnabled , which is located in the branch that is responsible for fast loading of the OS. Restart the PC.
Recovering the Start Menu
To restore the start menu, we need the command line. We run it as administrator. How to do this is described in a detailed review.
In the line we need to write the following command – Get-AppXPackage -AllUsers | Foreach {Add-AppxPackage -DisableDevelopmentMode -Register “$($_.InstallLocation)AppXManifest.xml”}. After this, restart the computer. The Start menu should appear on the taskbar again.
We check all connections in the computer nodes
The very first thing I would advise is not to use the command line or startup, but simply (for ordinary PCs) open the system unit and check all connections. Be sure to check how the operating boards are installed in the computer. They should fit tightly. If they are dusty, then you need to remove the dust with a stiff brush or cotton wool with alcohol.
Be sure to check how tightly the hard drive is connected to the motherboard. If there are several slots, then try changing them. It is quite possible that the hard drive is simply not tightly connected and needs to be reconnected.
In addition, check how the monitor is connected. It must also be tightly connected to the system unit. In other words, check all connections on your computer. Very often it may not start precisely because the RAM board or other device is disconnected.
"Trash" is missing
As you know, you cannot delete the Recycle Bin using the regular Del key (as is the case with other desktop shortcuts). But often it disappears too. You can return it through the personalization settings. Let’s go to them by right-clicking on the desktop and selecting “Personalization” from the context menu
In this settings section, select the “Theme” tab, scroll through it and click on “Desktop Icon Settings”.
To display the recycle bin on the desktop, you need to set the appropriate marker.
Fixing a bug with multiple monitors
Quite often, another monitor is connected to the laptop for your convenience. This may cause a crash. To remove it, you need to press the key combination Win + P. In the window that appears, you must select one of two monitors. Typically, a natural laptop monitor is chosen.
You only need to leave one monitor. Usually they leave the main one. Reboot the PC. When the picture appears, it will become clear to you which display you have made the main one.
Instructions
- To return to the previous desktop view, click the “Start” button and expand the “Control Panel” section. In the list of “Appearance and Themes” commands, click on the “Screen” item, and the additional “Properties: Screen” dialog will be loaded. You can go to this dialog using another method: right-click on an empty space on the desktop and select the “Properties” function.
- If you need to restore your desktop wallpaper, then open the “Desktop” page and find the previous picture in the “Background” section. If you want to use a different image, click the “Browse” command and select the desired image on your computer. To save the settings, click “Apply” and close the window by clicking OK.
Selecting a wallpaper on the Desktop page - System folders such as “My Computer” or “My Documents” may disappear on the desktop. To restore them, open the “Desktop” settings page and click “Desktop settings”. An auxiliary window will load, open the “General” page and select the desired desktop components, save the settings.
- To restore the previous size of icons and other desktop components, open the Settings page. In the “Screen Resolution” section, set the appropriate screen parameters, click “apply” to save the settings.
- In this dialog, you can change the color of the computer's working windows, as well as the font size in the folder names. To do this, open the “Design” page and examine the drop-down lists located on it; you can also change the design using these lists. Visual effects can be configured by clicking on the “Effects” command. Explore the additional settings in this section, which will become available after clicking on the “Advanced” option. To save the settings, click “Apply”.
- Sometimes the taskbar may disappear; to return it, move the mouse cursor to the very bottom of the screen and wait for it to appear. Right-click on the panel and select “Properties”. Open the “Taskbar” page and in the “Taskbar Design” section, uncheck the box next to the “Automatically hide the taskbar” line. Save the settings by clicking the “Apply” button.
Be sure to visit our online store, which has a large selection of the most famous and useful licensed programs at affordable prices!
Damage to registry entries, viruses
An even more common cause of the problem is the action of malware that overwrites the parameters in the system registry that are responsible for launching the graphical shell. Then you will see a black screen when you start the computer in both boot modes. In this case, we do this. Using Task Manager, open Registry Editor using the regedit command.
Expand the thread:
HKEY_LOCAL_MACHINE/SOFTWARE/Microsoft/Windows NT/CurrentVersion/Winlogon
Pay attention to the Shell parameter. Its value should be explorer.exe and nothing else.
If something else is specified, then you need to replace this entry with explorer.exe, otherwise the graphical shell will not start either in normal or safe mode. If the Shell parameter does not exist at all, create it and set it to the specified value. At the same time, check the value of the Userinit parameter, it should be C:/Windows/system32/userinit.exe.
Note: On 64-bit systems, you should also check the Shell and Userinit values in the HKEY_LOCAL_MACHINE/SOFTWARE/Wow6432Node/Microsoft/Windows NT/CurrentVersion/Winlogon key and correct them as shown above.
After making changes to the registry, reboot as usual. This method has proven to be effective in many cases of PC infection with viruses; it allows you to quickly eliminate the black screen and cursor when starting Windows 7/10, however, it does not solve the main task - removing malware from the system, so after loading the desktop you need to carefully check the entire contents of the disk antivirus scanner.