Author of the article
Vitaly Leonidovich Cherkasov
System administrator, computer systems engineer.
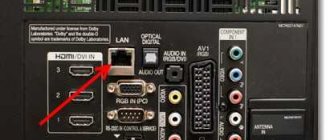
If your phone runs out of mobile Internet and you don’t have a router at hand, you can use a laptop or PC to connect your smartphone to the network. You can distribute Wi-Fi from a Windows 7 laptop through the operating system or using third-party programs. To do this, you need the computer to be connected to the Internet (for example, via a wire or via a USB modem) and have a Wi-Fi adapter installed on it.
Checking if the laptop is suitable for distribution
Before you start setting up, you need to make sure that you can distribute Wi-Fi from a Windows 7 laptop in principle. To do this, you need to perform the following sequence of actions:
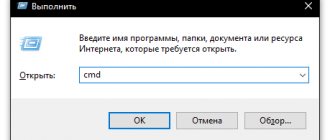
- To make the “Run” window appear, press the Win and R keys at the same time;
- in this window, enter the command “cmd” and confirm the entry by clicking the “Ok” button;
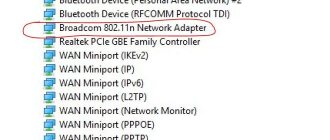
- then enter the following command on the command line: netsh wlan show drivers
Information about the Wi-Fi adapter installed in the system should appear on the screen. Here you need to find the line “Hosted Network Support” and check that it contains the word “Yes”. This means that the Virtual WiFi feature can be enabled and configured.
If the found line contains the word “No,” it means there are problems with the drivers for the Wi-Fi adapter. If they are not installed, then you need to download the drivers suitable for your model and your OS from the wireless adapter manufacturer’s website and install them. In some cases, you just need to update the drivers. Sometimes you need to roll back installed drivers to an earlier version. Algorithm of actions:
- Click on the entry button to the main “Start” menu;
- open the “Control Panel”;
- find “Hardware and Sound”;
- go to “Device Manager”;
- Click on the “+” icon next to the “Network adapters” line;
- select the Wi-Fi adapter you are using, right-click on the line with it and go to “Properties”;
- go to the “Driver” tab and click on the “Roll Back” button.
You can perform further actions only after setting up network support.
Via command line
On a PC with Windows 7, setting up network distribution via the command line is not very difficult. To do this, type the command: netsh wlan set hostednetwork mode=allow ssid=MySSID key=secretpassword
There are two parameters you can change in this command:
- MySSID – enter the name you created for the network;
- secretpassword – password.
After successfully completing the previous command, start Wi-Fi:
This will start the connection and display the “Hosted Network Started” message. Now users can connect to the created network, but they will not have the Internet. To share access:
- go to “Network and Sharing Center”;
- click on the line “Change adapter settings”;
- click on the connection that you plan to use when distributing the Internet from your laptop to your phone;
- select the line called “Properties”;
- by going to the “Access” tab, o;
It is now recommended to stop the network first.
And we launch it again, to do this we enter the network start command. You will have to type this command every time after booting the laptop. To avoid doing this manually, let's create a file with the bat extension and place it in startup.
- create a text document, its name can be anything, and the extension (three characters at the end of the file, after the dot) should be bat, for example, start.bat;
- open it, type the required command, save changes and close;
- After this, you need to drag the document with the mouse into the “Startup” folder.
As a result, when the computer boots, the required command will be executed and the Wi-Fi network will start.
Starting Wi-Fi signal distribution on Macbook
It is believed that Apple products do not support devices from other manufacturers, and to communicate with the MacBook you will need another device of this brand. However, recently this company has been taking steps towards equipping its gadgets with functions that allow them to be “friends” with mobile devices from other manufacturers. Wi-Fi distribution is included in this list.
You can use the distribution function when your Macbook is connected to the network:
- via Wi-Fi;
- via Ethernet cable;
- via USB modem.
Internet distribution from a USB modem
Important! The presence of only one Wi-Fi module in a Macbook, when a receiving device is connected through it, makes it possible to transmit a signal from it to other Apple devices only via Bluetooth.
To use a MacBook Pro as an access point, open “Sharing” in system settings on the connected computer and select “Internet Sharing.” There you select the connection used for incoming traffic and mark Wi-Fi for outgoing traffic. Wi-Fi settings include the network name, encryption, and password. Next, on the connected device you need to search for this connection and, by entering the password, join it.
Through third party programs
In order not to struggle with codes on the command line, you can use special programs that help set up Wi-Fi distribution. But before you can use them, you must first allow other gadgets to use your PC's connection. How to do this has already been written before. Consider the following apps: Connectify Hotspot, mHotspot, My Public WiFi and VirtualRouterPlus.
Connectify Hotspot
Connectify Hotspot is distributed free of charge and in two paid versions – Pro and Max. In the free version, the network SSID is set by the program and cannot be changed to another; there are also no bridge, signal repeater, or wired router modes. In addition, in paid versions it is possible to distribute the Internet via mobile networks - 3G and LTE.
To install Connectify Hotspot, you need to run the installation file. After installation, you need to reboot the laptop so that the program can start its own network services.
When you first start the application, a window will appear in which you can choose three options for further use of the program: use the application for free (“Try it”), enter the license key (“Already purchased” button) and switch to the paid version (“Buy directly Now"). You can upgrade to the paid version at any time.
In the main Connectify Hotspot window, in the top line “Internet Sharing” you need to specify the connection, enter the network name and password and click the “Start access point” button. Information about users connected to the Wi-Fi network can be seen on the “Clients” tab.
By default, when the operating system starts, Connectify Hotspot will boot in the same mode as before the reboot. Boot options can be configured by going to the Settings menu and opening Connectify Launch Options.
Paid versions of the Connectify Hotspot application can work in addition to the main one in the following modes:
- in the “Wired Router” mode, you can distribute the Internet received via a wireless network through a network cable;
- In the “Wi-Fi Signal Repeater” mode, the laptop will repeat the Wi-Fi signal, thereby expanding the network coverage area.
MHotspot
MHotspot is a small free application that you can use to share Wi-Fi from your laptop.
After starting the installation, you need to agree to the license agreement, specify the folder in which the program will be installed, and decide whether you need the utility icon on your desktop. At the last stage, you will be prompted to install additional programs. To refuse their installation, uncheck the boxes.
After installing the utility, you need to configure it. To do this, in the main mHotspot window:
- in the “HotspotName” line we write the desired name of our network;
- opposite “Password” indicate the password;
- in the “Internet Source” list, select the shared Internet connection that we want to distribute;
- in the “Max Client” field, indicate the maximum allowed number of Wi-Fi connections on the laptop (you cannot specify more than 10) and click “StartHotspot”.
At the bottom of the window you can see how many users are currently connected, the amount of downloaded and uploaded data and the connection speed.
In the application settings, you can enable: loading the utility along with the operating system, distribution at program startup, automatic checking for updates, and also resetting the application settings to factory settings.
MyPublicWiFi
MyPublicWiFi is a simple utility that makes it easy to make your laptop do the job of a router. It differs from other free applications in that it supports 3G connection. When the application is installed and launched, the main window appears on the screen.
Here you need to specify the name of the Wi-Fi network to be created, a password and indicate through which connection from the computer you will connect to the World Wide Web. To start the network, you need to click on “Set up and Start”.
Virtual Router Plus
VirtualRouterPlus is the next free program using which you can easily distribute the Internet from a laptop on Windows 7.
When you launch the utility, a window will appear in which, for configuration, you need to specify the desired network SSID name, secret password and select the connection through which the PC connects to the worldwide network. To start, press the button below.
After starting the distribution, all application fields become inactive. To stop distribution, you need to click “Stop Virtual Router”.
Specialized software
I don't want to write commands manually. Use special software. Let's look at three free programs.
Virtual Router
Download the utility from: Double-click on the installation “exe” file to install. A window will open where you enter:
- network name;
- password;
- establish a connection.
Click "Run".
MyPublicWiFi
Go to the address to download the program. After installation, restart your PC for the application to work. Launch the utility. Enter the network name and create a password.
Connectify Hotspot
Download it from this address. After installation, a reboot is required. The program is in Russian. Features: traffic tracking, automatic launch, blocking advertising messages.
Possible problems and solutions
It’s not always possible to set everything up the first time; sometimes the Wi-Fi network may not work, mobile devices may not connect, or there will be no access to the Internet. In this case, you first need to try rebooting the computer.
If there is no Wi-Fi, then check whether the laptop can distribute the network. How to do this was described above. Also check the wireless adapter driver installed in the operating system and, if necessary, reinstall it or install a new one.
If mobile gadgets connect to Wi-Fi, but do not have access to the Internet, then you need to check whether there is a network on the donor computer. After this, you need to make sure that access is allowed. If all the previous steps did not help, then the problem may be in the firewall or antivirus, disable them.
If the connection is periodically lost when distributing the Internet, it is recommended that in the “Power Management” window, remove the check mark in the line “Allow turning off the device to save energy.”