Almost every day is similar to the previous one. This also applies to the nuances of using a PC. It launches approximately the same applications, views photos from the same folder, and plays the same audio files. The SuperFetch service optimizes your computer routine so that everything runs quickly and smoothly. But this does not always work out; sometimes problems arise.
SuperFetch - what is this service?
A workflow that improves the responsiveness of the operating system (OS) and applications by analyzing historical data and then proactively managing free RAM. This service debuted in Windows Vista and has been included in every OS release since then. By default, it constantly runs in the background, analyzing launched files. Quite flexible configuration of this system component is possible.
SuperFetch can be compared to a smart father who keeps all the tools in the garage not just in order, but in the “correct” order, so that his son can quickly find the necessary keys or wire cutters. The “correct” order means the following:
- in the immediate vicinity of the working area there will be those tools that are used most often;
- the priority tool is also not located at random - if car wheels are often removed, the jack will be closer than the wheel wrench, since it is needed earlier;
- all tools are put back in their old place after use;
- if some operation is no longer repeated (for example, you bought a new tire and the wheel no longer gets punctured often), then the specific tool required to perform it is gradually located further and further from the working area.
The example is absolutely conditional, but it abstractly demonstrates the tasks of the service and this will help more accurately answer the question: “SuperFetch? What is this?".
What is it for?
To understand what SuperFetch is, we can describe 2 main goals of the service:
- Boot Windows faster. During OS startup, different files are required at different times (and the same file is needed many times, but at different times). The service “finds out” which files or a set of them are needed for downloading, and at what point in time. As a result, a conditional folder is created where the highest priority files for Windows are stored. Constant repetition of system startup cycles allows you to store the required components in such a way that reading them minimally loads the system. In this case, the service interacts with the built-in defragmenter - the files will be physically located in close proximity to each other. The result is faster loading times.
- Run applications more efficiently. To do this, two factors are analyzed: which applications are launched more often, and whether there is a certain order in which they are launched. For example, in the morning, an accountant at work can start everything off by briefly reading the news through a browser. Next, he will launch 1C and carry out current business transactions. After lunch, he can work hard on financial analysis using Excel. This sequence may not change much from day to day. The service “sees” this pattern of behavior and pre-loads into free RAM the data that is needed to launch the next application. That is, in the morning, if the browser is running, the most important 1C files are already partially loaded into the RAM. The result is that applications launch more efficiently and therefore work more stable.
Sometimes the SuperFetch node service loads the Windows 10 disk. This is caused by 2 reasons:
- The service is based on past experience. She is “used” to the fact that after application X, application Y is always launched and “prepares” for it. If the unpredictable happens and you need to load program B rather than Y, this could cause a crash and a significant load on OS resources.
- The service is sensitive to the amount of RAM. The more RAM, the more efficiently Superfetch works, because everything is based on the rational and preliminary filling of free RAM. If everything turns out to be busy, there will be no space left where you can write frequently used files. The result is that competition for every unused megabyte will increase and the system may slow down because of this.
Other Windows 10 Features You Can Disable
The system loads the windows disk heavily
Superfetch isn't the only example of a feature that might be better off disabled. Tons of other features are better left disabled due to the performance trade-off.
Windows 10 Optional Features: A Quick Guide to the Best Extras You May Want
Did you know that Windows 10 has lots of optional features that you can enable? Let's look at what they do and how to enable them.
Read Next
About The Author
Manuviraj Godara (98 Articles Published)
Manuviraj is a Features Writer at MakeUseOf and has been writing about video games and technology for over two years. He is an avid gamer who also spends his free time burning through his favorite music albums and reading.
More From Manuviraj Godara
SuperFetch Options
For a comprehensive answer to the question: “SuperFetch - what kind of service is this?”, you should know exactly what OS parameters it sets. They are available for editing through the registry. To access them, you need to do the following (using the tenth version of Windows as an example):
- press the Windows button on the keyboard, a window will appear, enter regedit in it (at the bottom), right-click on the search result (at the top) and select “Run as administrator” in the drop-down menu;
- The “Registry Editor” will open, and on the left side you need to sequentially open the following lines by clicking: HKEY_LOCAL_MACHINE => SYSTEM => CurrentControlSet => Control => SessionManager => MemoryManagement => PrefetchParameters;
- in the right part of the window you will find 3 main parameters that determine the operating mode of the service - double-clicking on any one opens a window for editing parameter values, but this will be discussed further.
EnableBootTrace
The parameter determines the status of process tracing during boot. It sets whether the OS should analyze how files are read at startup. There is little point in disabling this for the following reasons:
- the setting does not affect anything that happens to Windows after boot;
- OS loading speeds up due to internal file optimization.
EnablePrefetcher
Regarding this parameter, we need to explain the history of SuperFetch’s predecessor, Prefetcher. It appeared on Windows XP and the logic of its actions is the basis for SuperFetch. It analyzes which files are loaded when the OS or programs start, creates a priority table for these files and optimizes their placement on the media. The difference from SuperFetch is that it does not analyze user behavior patterns. This parameter is a modification of EnableBootTrace, which works not only when Windows starts, but also when applications are launched.
EnableSuperFetch
The parameter specifies the rules for the operation of the SuperFetch service. For it, as for EnablePrefetcher, 4 settings are possible:
- 0 – disable the service;
- 1 – use only when downloading applications;
- 2 – use only when loading the OS;
- 3 – use when loading applications and OS.
How to detect disk overload
Windows Search - what is this service, description
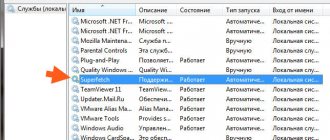
If the computer takes a long time to process information and it is almost impossible to work on it, the user is recommended to go to the task manager. To do this, you need to use the hotkey combination “Win + X” or “Ctrl + Del + Alt”.
A full window will be displayed on the screen, where there will be a list of processes; you will need to click on the “Details” tab. Next, you need to tap on the “Disk” column header. A list will be generated in descending load order. The first positions are the busiest.
How to calculate PC disk overload
If the load is caused by the work of one program, then it is necessary to close it or try to optimize its operation, and ultimately delete it. Simultaneous downloading of several files from a torrent can greatly load the disk.
Note! If the culprit of the slowdown is an antivirus program, then you should install another product or deactivate it while working.
Do you need SuperFetch on your computer?
Yes, she is still in demand. If the question is to minimize the load on computer resources by operating system processes, then it is much more effective to disable visual effects rather than SuperFetch.
How safe is it to turn it off?
Should SuperFetch be disabled or not in Windows 7? There won't be any problems if you turn everything off. The service does not affect data confidentiality in any way and in the vast majority of cases lightly loads system resources. It definitely won’t get worse, so don’t be afraid of it.
Another question is that there is no particular point in doing this on purpose. The service has been migrating from one OS version to another for almost 20 years for a reason. If it particularly interfered with something, then SuperFetch was cut out from the system core. If it caused Windows instability, then they would definitely get rid of it.
Myths
There are several common myths
about Prefetcher:
- Adding the “/prefetch:1” key to the application launch line speeds up its loading.
This myth is based on the fact that after installing the operating system, the Windows Media Player startup line initially contains the “/prefetch:1” key. In reality, adding this key by itself does not have any effect, and in some cases the application may refuse to start at all. - Deleting files from a folder speeds up your computer.
This myth is based on the assumption that too many files accumulate in a folder, so Prefetcher begins to slow down the system. In reality, clearing the above folder causes the computer to slow down until the trace data is accumulated again. - Over time, the folder begins to take up a lot of disk space.
To save disk space, the maximum number of trace files is limited to 128. Cleaning the folder is not required, since Prefetcher maintains itself automatically without user intervention.
Via command line
Disabling is carried out according to the following algorithm:
- press the Windows button on the keyboard, a window will appear, enter cmd in it (at the bottom), right-click on the search result (at the top) and select “Run as administrator” from the drop-down menu;
- a black window will open, into which you need to copy the command net.exe stop superfetch and confirm the launch by pressing Enter;
- in the same window, enter this command sc config sysmain start=disabled and press Enter again.
Using Registry Editor
You can enable, disable and configure SuperFetch Windows 10, 8, 7 and Vista in a few clicks. To do this you should:
- press the Windows button on the keyboard, a window will appear, enter regedit in it (at the bottom), right-click on the search result (at the top) and select “Run as administrator” in the drop-down menu;
- The “Registry Editor” will open, and on the left side you need to sequentially open the following lines by clicking: HKEY_LOCAL_MACHINE => SYSTEM => CurrentControlSet => Control => SessionManager => MemoryManagement => PrefetchParameters;
- In the right part of the window, find the Superfetch line, double-clicking on it will open the properties in which you need to set the value to O, and then save the changes.
Through the Services snap-in
Proceed as follows:
- Launch “Services”. You can simply enter the corresponding query in the system search and launch the found application. You can hold down the Win+R combination, enter the services.msc command and run it by pressing Enter - this method will work in any Windows, starting with Vista.
- Find the “Superfetch” service. To do this, you need to look at the first column “Name” in the window. When it is found, right-click on “Properties”. On the first tab “General” set the required service parameters.
- Setup. By clicking only on “Stop” and “Apply”, the component will be disabled, but the next time the OS is rebooted, it will start again. Why is this necessary? You need to change this scenario, for which in the “Startup type” line select “Disabled” and click on “Apply”.
In the Sysmain OS snap-in, SuperFetch is the same thing. The first name is an internal system identifier, and the second name is used for display on the computer screen.
Changing the paging file size
The computer manages to quickly perform operations and respond to external manipulations thanks to RAM. The hard drive is a data storage that the RAM is periodically forced to access. Built-in and third-party programs that run on the computer are loaded into RAM.
Note! As practice shows, its volume is not always enough for the PC to work quickly. That is why Microsoft developers created paging files, which are small sections of the hard drive that are accessed by RAM much more often.
Instructions for changing the file size on a computer with the Windows 10 operating system look like this:
- Each user, depending on the tasks assigned, can manually increase or decrease the paging file. To do this, he needs to use the hotkey combination “Win + Pause”. From the drop-down list of available tools, select the “Advanced options” line.
- In the next step, you will need to go to the “Advanced” section, and at the bottom in the “Performance” block, select the “Options” line.
- Next, you again need to click on the “Advanced” tab and in the block with the amount of memory, click on “Change”.
- Opposite the line “Automatically select the size of the paging file,” uncheck the box and below, independently register the amount of memory in the PC. Be sure to save the changes by clicking “Ok”.
Changing the paging file size
Note! After completing all of the above steps, all that remains is to check the response of the service. If it loads PC resources again, then it is better to specify “Size according to system choice” in the parameters.
Windows 10 is equipped with a large number of built-in services and tools that, when used correctly, optimize and speed up your PC. Superfetch is no exception. If you follow the instructions, you will be able to increase the speed of your PC yourself.
Common errors associated with the SuperFetch service
It happens that SuperFetch Windows 10 loads the disk at 100%. The system in this mode does not respond to user commands, and therefore it is difficult to complete current operations - for example, the browser will not want to close. This usually occurs under two circumstances:
- The computer has 4 or less gigabytes of RAM. Figuratively speaking, if you give the service free rein, it will happily cache 20 gigabytes of program and system files. However, today even an open browser with 10 tabs for 5-6 hours can easily take up 2 gigabytes of RAM. Such resource intensity of modern applications does not allow the service to “unwind”, which can cause it to fail internally.
- When running demanding games on older computers. In this scenario, the situation is aggravated by the fact that toys very often access various files - new textures are loaded all the time, which weigh a lot, colorful visual effects at peak moments can require all available resources from the system. If we add to this an old and slow hard drive, then SuperFetch will become a “bottleneck” of the OS - the service, in an effort to optimize everything, cannot keep up with such an active and chaotic circulation of files.
Troubleshooting
The most effective way to fix any error is to disable the service. This is the most effective, but you can also try these methods:
- change service parameter values;
- reinstall recently installed applications;
- check your hard drive for errors.
Controlling SATA drivers
If you haven't installed a dedicated IDE driver, your SATA drives may not work properly. Go to “Device Manager” through the Win+X submenu and find the “IDE Controllers” subsection. If the list says “Standard SATA...” and there are problems with the drives, it is better to install a special driver from the manufacturer of the laptop or computer motherboard.
To do this, go to the manufacturer's website and look for SATA or AHCI drivers for your model. Download the provided file and run it. If you download an archive from the site, unpack the files into a folder, in the manager, click on “IDE Controller” and select “Update Drivers”. Point to the folder in the “Search on this computer” dialog and wait for the process to complete.
If reinstalling specialized drivers fails, try disabling the use of MSI. This technology is used in the standard controller, but may not be supported by your equipment. To turn off MSI: