I suspect that this is due to connecting the old disk to port 0, when the new one is in port 1. »
| disappearance of a working disk from all available BIOS boot menu items" |
——- Of two evils, choose neither!
| Most likely, after the transfer there was not a single bootable/active partition on your SSD. » |
| It’s probably better to start with the boot files (be sure to run all the commands, replace drive C with the letter of the SSD system partition), if that doesn’t help, then use bootrec (you’ll need an installation disk or a system recovery disk/flash drive, it’s better to disconnect the HDD with the old system before doing this) )" |
| you need to start by resetting the CMOS BIOS or, in the case of a laptop, at least setting the BIOS settings to default. » |
Tried it, didn't help. The BIOS was also updated to the latest version, the result was zero.
Source
Why doesn’t the BIOS see the SSD drive and what should I do?
Modern SSDs are still more expensive than traditional HDDs, but this price difference is fully justified. While not inferior in terms of reliability and durability, solid-state drives are significantly superior to conventional hard drives in terms of performance and power consumption. The internal structure of an SSD drive is significantly different from the design of a classic hard drive with mechanical moving parts, but there is no difference in the connection interfaces.
If, instead of a failed old HDD, you want to install a new fast SSD, you will not need any adapters, and the connected disk itself should immediately appear in Explorer. However, sometimes you may encounter a situation where the connected disk is not only not detected in Explorer, but the BIOS itself does not see the SSD. It may also happen that before this the disk was detected perfectly and suddenly suddenly disappeared from the list of connected devices.
Particularly a lot of trouble arises when an unsuccessful attempt to start the system SSD occurs, because in such cases it becomes impossible to boot the computer. For what reason is the SSD disk not detected in the BIOS? As sad as it may be, most often the problems are hardware in nature. However, you should not rush to make such a disappointing diagnosis, since often the solid-state drive is not recognized due to damage to the cables or due to incorrect settings of the BIOS itself. Both of these problems can be resolved very easily.
The computer/laptop does not see the hard drive. What to do?
In this article we will talk about the reasons why a computer/laptop does not see the HDD/SSD hard drive and how to solve a similar problem.
Sometimes, after turning on the computer, the Post self-test procedure completes successfully, but Windows does not boot. In this case, the system may generate an error, informing the user that it is impossible to detect the hard drive. Often, the problems associated with this error are problems with the OS itself or incorrect BIOS settings. Let's look further at how to get rid of boot errors and restore system functionality.
Fixing erroneous BIOS settings
Most often, the appearance on the screen of a message indicating that the hard drive cannot be detected by the system is due to the incorrect ordering of boot devices in the BIOS. For example, to boot from a Live CD, the BIOS settings are often changed so that the first boot device is a DVD drive, followed by the HDD. Users sometimes forget to return the original settings.
In this case, if the drive when you turn on the laptop or PC does not contain a bootable DVD, but a simple optical drive, the system will not be able to boot, displaying messages stating that the hard drive cannot be detected. Usually it is enough to simply remove the drive from the DVD drive and reboot. If HDD is set to boot next in the BIOS, then the error should disappear.
However, in some cases, performing the described actions is not enough, as a result of which you have to independently change the boot priority in the BIOS, for which:
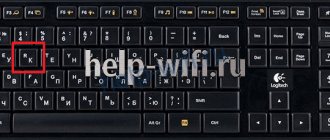
- Enter the BIOS by pressing the Delete or ESC button several times in a row immediately after the power is turned on or the corresponding message appears on the screen. Sometimes you can enter the BIOS by pressing F11, F13 or F1 when turning on your laptop or computer.
- In Award BIOS you need to go to Advanced BIOS Features, in the BIOS AMI version - to the Boot Device Priority section.
- In the above section, select the line that should be called First Boot Device or something similar, where change the priority so that the HDD boots first.
After saving the updated settings and rebooting, the PC or laptop usually turns on without errors.
If changing BIOS settings did not help
The IDE interface hard drive may not be detected if this controller is not active in the BIOS. This is an outdated interface, so it is often simply disabled. But if after this there is a need to connect some old hard drive, problems begin with finding the reasons why the HDD is not detected by the system. You can get rid of the problem using the method described below:
- In the main BIOS menu, go to the Advanced section.
- Here you need to find the Onboard Devices Configuration line, which is responsible for the operation of the controllers integrated into the motherboard.
- Having opened the section, go to the line whose title contains the word IDE and make sure that Enabled is next to it. Otherwise, enable this option.
Next, you just have to save and exit the BIOS. After this, the HDD with the old IDE interface should be detected by the system.
Checking the correct installation of jumpers
If the jumpers on the hard drive are set incorrectly, the hard drive may also not be detected in the BIOS.
The contacts on which the jumper is installed are located at the end of the HDD, and information about setting up the device using a jumper is always on the sticker on the cover of the hard drive:
- The first position “Master” is the main one and means that the drive, if there are two drives, is the master.
- The “Drive” position changes the settings so that the drive will be a slave if a second device is connected.
All other options are unlikely to ever be useful to the average user. Our task is to check that the jumper is in the “Master” position, and if the setting is incorrect, set it to this position.
If you get tired of your laptop and it is not economically feasible to repair it, you can buy a new one at the Continent store. You configure your characteristics and the site will select you at the best price.
Solving hardware problems
Sometimes the hard drive is not detected due to problems with the computer itself. For example, a working hard drive may become invisible to the system due to a faulty power supply. The latter may simply not be able to handle two HDDs at once. On a faulty device, sometimes problems arise with the only hard drive.
A dead CMOS battery can also cause problems. For example, if you make the necessary changes in the BIOS settings and reboot, then if the battery is dead, the changes simply will not be saved. There is only one way out - replace the CMOS battery.
And one last thing. Before making changes to the system settings, check that the connectors are connected correctly and the quality of the connections. This is often the reason why Windows may not detect a connected hard drive.
Source: https://akmartis.ru/noutbuki/polomki/noutbuk-ne-vidit-zhestkij-disk.html
Disabling SATA devices
So, the BIOS does not see the SSD drive. What to do? In some cases, after an unexpected power failure, the settings in the BIOS are reset, in particular, SATA controllers are disabled (this connection interface is used in most computers). Go to the BIOS, go to the Advanced section, find the SATA Controller parameter and make sure it is set to Enabled.
It is worth considering that the names of sections and parameters may differ in different PC models and BIOS versions. For example, in AMI BIOS settings should be looked for in the Main section, in Phoenix Award BIOS the section will be called Integrated, etc. BIOS settings are a separate topic, so don’t be lazy to look for information on the Internet, especially since it may be useful to you in the future. The easiest way to understand the interfaces of modern versions of BIOS UEFI, many of which not only have a graphical interface, but also support the Russian language.
Reason 3: No partitions on SSD
The SSD may not be partitioned. You can create a new partition to experimentally check whether this is the reason why the laptop/PC does not see the SSD. For this:
- Log in as administrator;
- Make sure your disk has free space in the secondary partition or unallocated space.
- Go to Disk Management (Win + R > diskmgmt.msc > Enter).
- Find the SSD in the list of drives and click on the corresponding line.
- On the unallocated area, right-click, click "Create simple volume...".
- The Partition Creation Wizard will launch. Follow the prompts.
- Specify the volume size
- Select a letter for the new drive from the list,
- format the volume.
- Complete the procedure by clicking "Finish".
- Check if the SSD is detected through Explorer.
Other BIOS settings
It is unlikely, but still possible, that the BIOS does not see the SSD because the automatic recognition of new devices feature is disabled. Check this point too. When replacing a drive on an old computer, look at what connection interface was used. If it's an IDE, look for the Compatible setting in your BIOS. If it was working in PATA only mode, switch to SATA only mode, otherwise the new SATA drive will not be visible.
Why doesn't the computer see the SSD?
A solid-state drive, compared to a hard drive, has such advantages as a high level of performance and reliability, low power consumption, lack of noise, and much more. Therefore, more and more users are choosing SSD as their system one. When connecting such a drive, you may find that it is not detected by the system or is not even displayed in the BIOS. This may look like a missing disk in Explorer, Windows settings, or in the BIOS boot selection list.
Solid State Drive Technology - Advantages and Disadvantages
SSD (Solid State Drive, solid state drive or solid state drive) is a device that implements new technology in the field of long-term storage of information for computers. Unlike a hard drive, a solid-state drive does not use magnetic plates to store information, but non-volatile memory cells, for example, NAND memory, which is also used in well-known flash drives. Thus, an SSD disk is, in fact, an advanced “flash drive”. Due to its operating principle, a solid-state drive does not have the main disadvantage of a hard drive - low reliability. This is due to the absence of fragile and shock-sensitive mechanical parts in the SSD. In addition, modern solid-state drives have high speeds for reading and writing data, significantly exceeding those of hard drives.
However, since the cost per unit of information volume on a solid-state drive is still several times higher than that of hard drives, SSDs are rarely used as the main device for storing information. In most cases, solid-state drives are installed in computers as system drives, that is, drives on which the operating system and its service files are located. In this case, the speed advantages of SSDs are especially useful because they allow the operating system to load and run faster.
Causes of SSD connection problems
Problems with displaying the SSD in the system can occur for reasons such as a missing drive letter or initialization, the presence of hidden partitions, and a file system incompatible with Windows. At the same time, this may occur due to incorrect BIOS settings and physical damage to the disk itself or one of the connection elements between the motherboard and the SSD.
Reason 1: The disk is not initialized
It often happens that a new disk is not initialized when connected to a computer and, as a result, it is not visible in the system. The solution is to perform the procedure manually according to the following algorithm.
As a result, the disk should appear in the system.
Reason 2: Missing drive letter
Sometimes an SSD does not have a letter and therefore does not appear in Explorer. In this case, you need to assign a letter to it.
After this, the specified information storage device is recognized by the OS, and standard operations can be performed with it.
Reason 3: Missing partitions
If the purchased drive is not new and has already been used for a long time, it may also not appear in My Computer. The reason for this may be damage to the system file or MBR table due to a crash, infection by a virus file, improper operation, etc. In this case, the SSD is displayed in “Disk Management”, but its status is “Not initialized”. In this case, it is usually recommended to perform initialization, but due to the risk of data loss, it is still not worth doing this.
In addition, a situation is also possible in which the drive is displayed as one unallocated area. Creating a new volume as usual may also result in data loss. The solution here may be to restore the partition. To do this, you need certain knowledge and software, for example, MiniTool Partition Wizard, which has the appropriate option.
This should help solve the problem, but in a situation where there is no necessary knowledge and the necessary data is on the disk, it is better to turn to professionals.
Reason 4: Hidden section
Sometimes an SSD is not visible in Windows due to the presence of a hidden partition. This is possible if the user has hidden the volume using third-party software to prevent access to the data. The solution is to restore the partition using disk software. The same MiniTool Partition Wizard copes well with this task.
After this, the hidden sections will appear in Explorer.
Reason 5: Unsupported file system
If, after following the steps above, the SSD still does not appear in Explorer, the drive's file system may be different from the FAT32 or NTFS that Windows works with. Typically, such a drive appears in the disk manager as a “RAW” area. To fix the problem, you need to follow the following algorithm.
Next, create a new volume according to the instructions above.
Reason 6: Problems with BIOS and hardware
There are four main reasons why the BIOS does not detect the presence of an internal SSD.
SATA is disabled or has the wrong mode
Incorrect BIOS settings
The BIOS will also not recognize the drive if the settings are incorrect. This can be easily checked by the system date - if it does not correspond to the true one, this indicates a failure. To resolve it, you need to reset and return to standard settings according to the sequence of actions below.
Alternatively, you can remove the battery, which in our case is located next to the PCIe connectors.
Data cable is faulty
The BIOS will also not detect the SSD if the CATA cable is damaged. In this case, you need to check all connections between the motherboard and the SSD. It is advisable not to allow any bends or pinching of the cable when laying. All this can lead to damage to the wires inside the insulation, although externally the material may look normal. If there is any doubt about the condition of the cable, it is better to replace it. When connecting SATA devices, Seagate recommends using cables less than 1 meter in length. Longer ones can sometimes fall out of the connectors, so be sure to check that they are firmly connected to the SATA ports.
Failed SSD
If after carrying out the above procedures the disk is still not shown in the BIOS, most likely there is a manufacturing defect or physical damage to the device. Here you need to contact a computer repair shop or SSD supplier, first making sure that there is a warranty.
Reason #2. The drive does not have an assigned drive letter
Each drive and removable device is assigned a unique letter after initialization (B, D, C, etc.). Its absence is one of the reasons why the computer cannot correctly display the SSD along with other drives.
To fix the error, follow these steps:
- Go to Disk Management again.
- Click on the SSD using the right mouse button.
- Select from the drop-down menu: “Change drive letter or drive path...”.
- Enter the desired symbol, then click OK to accept the changes.
This step must be done after initialization; its absence can cause the “Change drive letter or drive path” command to be disabled. If everything is in order, but the letter still does not change, contact the computer manufacturer or write to Microsoft technical support.
Attention ! If Windows OS or software is installed on the SSD drive and then a similar problem follows (in which the computer does not see the SSD drive), do not rush to change the letter, this will complicate the problem. Windows may not boot or may malfunction.
What to do if the BIOS does not see the SSD
Why doesn't the BIOS see the SSD?
Most often, this problem occurs due to incorrect user BIOS settings - the motherboard software will need to be reconfigured. Also, mechanical faults with the board, cable or the drive itself cannot be ruled out. Finally, the board may not be compatible with SSDs. Let's consider solutions to each of the reasons.
Method 1: Adjusting BIOS settings
The most common reason why a solid-state drive is not recognized in the BIOS is incorrect settings: the SATA port is disabled or operating in the wrong mode, the date parameters are lost due to the CMOS battery being disconnected, or the board does not work correctly due to overclocking. The method for resolving these problems is obvious - you need to enter the correct settings in the BIOS. Since there are quite a lot of options for the board’s microprogram, it will not be possible to consider them all, and therefore we will use the UEFI of motherboards from the manufacturer Gigabyte as an example.
Correct SATA configuration Modern motherboards support several operating modes of the serial ATA port. For SSD, you need to select the AHCI option.
Setting the time and date Sometimes problems with drive recognition occur due to a time and date failure. You should set the current values of these parameters, for which do the following:
Method 2: Reset BIOS Settings
In rare cases, the board’s firmware may not respond to the entered settings, or the SSD was connected “hot”, which is not recommended. To solve the problem, you should reset the firmware settings.
Reason #7. SSD driver problems (OS conflict)
For SSDs, driver problems are not a common problem since Windows 10 supports most modern devices and hardware conflicts are rare.
However, a driver error cannot be completely ruled out. If this is the case, we will try to fix it using the operating system.
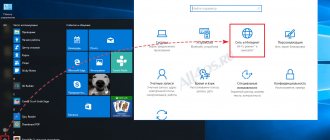
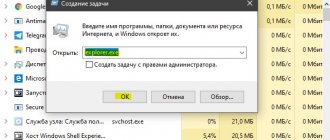
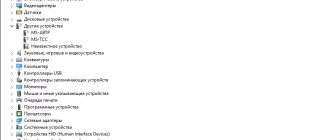
- Open Manager through the context menu of the Start button. An alternative method is the keyboard shortcut Win + R > Run > devmgmt.msc > Enter.
- Double-click on the Disk drives . All storage devices connected to the PC are collected here. The problematic SSD will appear with a yellow icon.
- Uninstall the SSD driver via the context menu by selecting the option Remove device (Uninstall).
- Restart Windows OS. Alternatively, you can use the Update driver option in the SSD Disk context menu.
- Check the driver status in the Disk drives section.
BIOS does not see SSD: how to force the disk to be detected
Installing a solid state drive is an excellent choice for a user who wants to ensure maximum system reliability and performance.
Although the technology is still more expensive than traditional magnetic storage, the technical benefits will fully justify your purchase. Once connected, you won’t have to wait for minutes for your favorite game or work program to load—the launch will take literally a fraction of a second. There should be no problems with the installation - the disk should be recognized automatically. However, sometimes it happens that the SSD is not detected in the BIOS. We'll tell you how to restore your computer's functionality in this article. It should be noted that the issue in this case is not the device of the carrier. Replacing rotating disks with microcircuits does not affect connectivity in any way; quite the opposite: such a disk is easier to handle and takes up significantly less space. You will be able to connect a new drive instead of the old one into exactly the same connectors - unless you use a new, faster type of ports.
The reason why you cannot see a solid-state drive in the list of devices when you turn it on lies precisely in the hardware-software combination. The problem may appear either immediately after connection or after a certain time. Below we will provide detailed instructions on how to correct the situation. Take advantage of it and continue working with truly fast media!
What to do if the HDD BIOS sees it, but Windows doesn’t
The wonderful times when no hard drives simply existed have long since sunk into oblivion. The development of high technologies differs from others in that it does not obey general laws, but rushes forward like a stratospheric rocket.
Tape drive mechanisms may have failed more often than modern magnetic disks, but the reasons for their failures were much more understandable. Although... what are we saying? No, we are not asking everyone to go back to the Stone Age. God forbid! We simply present some comparisons, which, according to certain parameters, do not always turn out to be in favor of modern technology.
So, your hard drive has broken down or you suspect that the failure lies precisely in it - in the inadequate operation of this complex and obscure device. You are saved if there is another PC nearby that sees its own hard drive. Just swap these two drives and make sure that the other machine recognizes it as working.
If this is the case, then the problem lies in the incorrect settings of your system. If the second computer doesn’t see your unfortunate screw, it means it’s really faulty, and at the very least you need to take it in for repairs. As a maximum, simply throw it away and replace it with a new one if its surface did not contain some critical data.
Why doesn't the BIOS see the SSD drive?
Before we begin to solve the problem, let's say a few words about its possible causes. Most often, the problem occurs when the computer tries to access the system drive during startup. It's simple: it contains not only files critical for the operation of the OS, but also boot sectors. Accordingly, if a PC or laptop does not see the SSD drive in the BIOS, you simply will not be able to start working with the system.
Since new generation equipment is extremely reliable, the reason should be sought in the software-hardware combination or at the hardware level. Don’t rush to worry: it’s too early to talk about completely replacing or repairing the media. The issue may be an incorrect or weakened connection - then to restore functionality, it will be enough to fix it.
Other, less favorable options are failure of the board itself, parts of the microcircuit or conductors. In such a situation, all that remains for you is to contact the service center, and at the same time think about purchasing a new disk. Another option is possible - incompatibility of the “receiving” and connected devices. Everything is obvious here: you will have to purchase a different disk model suitable for your PC or laptop.
Reason 5: File system (RAW) not supported by Windows
An SSD drive may have an incompatible file system, so all attempts by Windows to read it end in failure. The error is accompanied by messages like: “Format the disk for use”, “The file system is not recognized”, etc.
The problem occurs both with new disks and those that have been actively used. In the latter case, the reason is system failures, which appear incl. due to errors in working with the PC.
There are two ways to solve the incompatibility problem.
Formatting an SSD
- If you just bought an SSD, format it. Here are the instructions for formatting the HDD.
- Do the same with the disk (or partition) you are using, provided that there is no valuable information there.
How to format an SSD:
- Go to Disk Management.
- Right-click on the partition or disk that RAW listed the File system .
- Select Format .
- Set the label and the new system - NTFS .
- Confirm formatting by clicking OK .
Checking SSD for errors
- Press the WIN + X .
- Select the line Windows PowerShell (Administrator) . If it is not there, select “Command Line”.
- Enter the command: chkdsk a: /f, Where A – this is the drive letter, look which one you have, substitute yours.
- Press Enter and wait for the process to complete.
Instructions : How to check a disk for errors
Tip #2: Check if SATA controllers are enabled in BIOS
As you can see, the first of the possible problems is quite easy to solve. The second, most often caused by external factors, will also not confuse you. Very often, controllers responsible for connecting drives automatically turn off after power failures - to avoid such troubles, use an uninterruptible power supply.
And if a failure has already occurred and the BIOS does not see the SSD drive, you will need to go to the hardware-software menu again. Here you will find a section called Advanced/Integrated/Main or similar. SATA entries in the list of available options - and check that Enabled . If it is not, manually change the value to the correct one; Enter key will help you again .
After the next reboot (be sure to save the changes you made), you can make sure that the SSD is initiated and working as it should. Take your time and spend a few seconds setting the date and time. These parameters, although not directly related to the disk, affect the efficiency of its identification - and in addition, after adjustments, you will be able to use reliable system reports.
Reason 2: Surface damage
Poor assembly, manufacturing defects, lack of correct transportation conditions and much more, not to mention user actions, can cause damage or incorrect operation of the solid-state drive. The consequences of the factors described may not be immediately noticeable, but sooner or later they will manifest themselves. The most prominent items that can suddenly fail are capacitors and controllers, but they are relatively easy to replace if you have the proper soldering skills and equipment and know where to purchase the necessary parts. Let's look at solving the problem with capacitors using the example of SSD OCZ Vertex 4: this model is prone to design flaws that lead to the failure of the entire drive, although often literally one faulty component is to blame. To diagnose SSD, perform the following steps:
- Unscrew the bolts holding the disk cover.
Tip #3: Reset BIOS Settings
It happens that all the previously described manipulations do not bring the desired effect. The point here is not your mistakes made when setting up the ports, but a system failure. It can happen for completely arbitrary reasons - in this case, as in the previous one, a power surge will be enough. Very often, an error occurs when you try to connect the drive “live”, without first turning off the PC. Under no circumstances should you do this - and if trouble has already happened, immediately take measures to correct it.
To reset incorrectly set parameters, you will need:
If you do not find a corresponding entry, look in the instructions supplied by the manufacturer or on the latter’s website for key combinations that can be used to perform a reset at boot time. For each model, one combination will be specified - this is what you should use.
And if you can’t find this information, use the “mechanical” option: you just need to remove the battery from the motherboard and then install it in place. This battery is present in every device. Most often, it is removable: you can remove it at any time and replace it with a similar one. The socket can be located either in the center of the board or at any of its edges.
In some cases, the battery is hidden so well that it is impossible to get it out without completely disassembling the PC. Then try closing the contacts using the slot of a regular screwdriver or any other thin conductive object.
To remove the battery and finally fix the problem where the BIOS does not see the SSD, follow the instructions:
If there is a special disconnect lever on the motherboard, instead of removing the battery, you can use it - or, as we wrote earlier, short-circuit the battery contacts for a few seconds. Next, you just need to put everything back together and start the computer with the SSD; the BIOS parameters will be set to standard.
Tip #4: Update your motherboard BIOS
Another way to get rid of the problem due to which the BIOS does not see the SSD is to perform a firmware update. As you already know, models from different manufacturers differ in functionality - you will have to look for instructions for your software and hardware combination. We will recommend just a few areas for updating:
In most cases, the user has several options available at once. Apply whichever one you think is most suitable on your PC, and when finished, make sure that after the update the disk is recognized and ready for use.