Not everyone knows, but it is possible to make sure that, in addition to the ringtone and vibration, the flash goes off and blinks: and it can do this not only with an incoming call, but also with other notifications, for example, about receiving SMS or messages in instant messengers.
This instruction details how to use the flash when making a call on Android. The first part is for Samsung Galaxy phones, where this is a built-in function, the second is common to all smartphones, describing free applications that allow you to set the flash to a call. May also be useful: Flash for iPhone ringtone.
How to set the flash when making a call on your phone
How to set up flash when calling in the application:
- Download the one you like, for example an application with a Russian interface
- Launch it and in the “Flash notification” section, activate the “Incoming calls” items
- To set up a flashing flash for calls and SMS, activate the item described above and additionally activate the “Incoming text” item
As with many applications, this one allows you to specify the modes in which the flickering will be triggered.
Turning off the flash
If you can easily activate the flash, you can easily turn off the flashlight if necessary. The operation is performed by moving the slider in the application or in the phone settings to the “Off” position. You must act in accordance with the instructions given earlier in the material. The only difference will be to move the slider to the opposite position.
In the case of third-party software, an alternative deactivation method is also used - complete removal of the program. However, if you install it again, the feature will not be activated automatically. You will have to manually enable it again through the application settings.
Free apps to enable flash flashing when calling on Android
There are several applications available on the Play Store that allow you to set your phone's flash to ring a call. I will note 3 of them with good reviews, in Russian (except for one in English, which I liked more than others) and which successfully performed their function in my test. I note that theoretically it may turn out that one or many applications do not work on your phone model, which may be due to its hardware features.
Flash On Call
The first of these applications is Flash On Call or “Flash on Call”, available in the Play Store - https://play.google.com/store/apps/details?id=ru.evg.and.app.flashoncall. Note: on my test phone the application does not launch the first time after installation, from the second onwards everything is fine.
After installing the app, granting it the necessary permissions (which will be explained in the process) and verifying that the flash is working properly, you will get flash already turned on when calling your Android phone, as well as the ability to use additional features, including:
- Configure the use of the flash for incoming calls, SMS, and also enable reminders of missed events by flashing it. Change the blinking speed and duration.
- Turn on flash for notifications from third-party applications, such as instant messengers. But there is a limitation: installation is available for free for only one selected application.
- Configure the behavior of the flash when the charge is low, the ability to turn on the flash remotely by sending an SMS to your phone, and also select modes in which it will not fire (for example, it can be disabled for quiet mode).
- Enable the application to run in the background (so that even after swiping it, the flash function on a call continues to work).
How to restore performance on your own
First of all, remove the film, as it may interfere with the normal operation of the lighting. Test how the flash works using the Camera and Flashlight apps. If the flashlight is on, but the flash cannot be turned on, the problem is in the standard Camera program. It needs to be updated or use an analogue.
Next, explore your iPhone settings. Go to “Do not disturb”, activate the “Manual” option and disable it again. Check if the application that controls the flash and enables photo and video shooting is allowed.
Software failures can be easily resolved by rebooting - press the Power button, wait for the slider to appear and move the pointer to the right. Also install updates:
- connect iPhone to charger
- enable internet access
- run the software update in the main settings
If the flash fires but unpredictably, try adjusting it. Click on the lightning icon in the upper left corner of the screen and change the settings.
It was not possible to turn on the flash again - you will have to contact a specialist. If you haven't flooded or dropped your phone, visit an Apple representative and request a free repair. Otherwise, the best way to fix your iPhone flash is to call YouDo artists to your home.
How experts can solve the problem
Use the functionality of the YouDo service if you do not want to waste time traveling. Professionals registered with Yuda come to your home and office with all spare parts and tools. They set minimum prices and accept orders around the clock.
The LED responsible for the bright flash cannot be replaced separately. Experts completely change camera modules in several stages:
- unscrew the bottom screws and lift the screen 90 degrees using a suction cup and spatula
- remove the cover of the FPC connector and the protective plate, disconnect the cables and the display module
- remove the battery cable together with the holder, remove the battery, disconnect the antenna cable
- remove the flash bracket, disconnect the motherboard from the top cable and button wires
- remove the bottom cable connector and SIM tray; remove the motherboard, having first disconnected the Wi-Fi cable
- disconnect the bracket and cable of the main camera
- remove the old part, connect a new camera, assemble the phone in reverse order
Yudu performers provide guarantees of up to 1 year, work efficiently and quickly. Order
Unlike other smartphones, the iPhone does not have a dedicated notification light. But the iPhone has a special feature for the deaf and hard of hearing that uses the LED flash to show incoming notifications and calls. If you want the flash to blink for calls and notifications, turn on this feature, and read how to do this below.
You can activate the flash on your iPhone to notify you of incoming calls and messages. However, it will blink only if your smartphone is locked. And when the screen is active, there will be no blinking.
How to make a flash when there is a call so that it blinks
Most often, the required indicator is missing on budget Chinese smartphones. But they have a built-in camera flash, which can also be perceived as a solution to a similar goal. If your gadget does not have a special built-in setting, then download one of the applications from Google Play: Call Flash, Flash Alerts 2 or any other (they will help activate the flash). Applications are convenient because you can specify a period of time during which the flash will not fire.
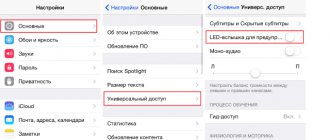
How to make the flash blink when there is a call on devices that have this built-in function:
- In settings, open “Accessibility”
- In the “Hearing” subsection, check the box next to “Flash alerts” / “Flashing alerts”
Does your phone have the option to turn on flashing or have you downloaded an app?
Why is this function needed on a smartphone?
Most smartphone users often find that they have a lot of missed calls and notifications on their phone.
Some people turn off the sound on their phone so as not to interfere with their work or while in public places. Some even forget to turn on the sound, which risks missing a work call or message. Flash for calls and SMS helps solve this problem. Even in silent mode, the owner of the phone will always be able to see the call or read the SMS in a timely manner.
It can be seen in a dark room, it is noticeable in a bag or lying on a table. This function is indispensable for those who need to turn off the sound on their smartphone or for those who spend most of their time in noisy places.
The LED indicator helps to see the smartphone when making a call if the owner cannot find it indoors. Since it flashes brightly, the owner will detect the gadget even where the device is not visible at first glance.
Setting up the camera in the Android engineering menu
Access to the engineering menu is provided only on smartphones with a MediaTek processor and Android version no older than version 2. To get into the camera's engineering settings, you need to enter a special combination on the numeric keypad. As a rule, this code is *#*#3646633#*#*. Camera parameters are located in the Hardware Testing section. Here you can find a fairly extensive list of fine settings:
- Camera sensor selection;
- Shade chart;
- Flash calibration;
- Focus settings;
- HDR mode options and others.
Capture and shutter speed;
Applications to expand the functionality of the camera
Some programs that are downloaded from the Google Play store significantly expand the smartphone camera settings. Having mastered such applications, the user can improve the quality of the photo. We recommend paying attention to several paid utilities. They are inexpensive, but your shooting will not be disturbed by constantly pop-up advertisements.
An application that adds a huge number of settings to the photo module on a smartphone, turning it into a real professional camera. Using the utility, you can fine-tune camera stabilization, level exposure, focus, flash brightness, set the shooting interval, colors and scene illumination. A special scale shows the angle of the camera, so you can use it to maintain an even horizon.
A convenient application designed for high-quality camera settings before shooting. It is worth noting the very well-thought-out interface of the program, thanks to which most of the tools are available with one click on the screen.
Main functions of the application:
- two states of the shutter button - press to focus, release to take a photo; movable viewfinder to set the focus area;
- visual histogram; exposure compensation; exposure metering mode - matrix, center-weighted, spot;
- autofocus mode - single-frame, continuous, face detection, etc.;
- white balance;
- ISO;
- shutter mode;
- Scene setting;
- color effects;
- grids: rule of thirds, Golden ratio, etc.;
- Volume keys act like shutter buttons.
Causes of failure
The flash may fail after:
- installing custom firmware;
- camera driver bugs;
- changing module settings;
- falling of the device;
- diode burnout;
- moisture getting inside the smartphone.
All this can affect the functionality of the device in different ways:
- In some cases, the camera's flash will activate, but there will be a long delay after the photo is taken.
- It happens that when taking a photo it does not turn on, but in flashlight mode it shines properly.
- To save battery power, after 5%-10% charging, the flash simply does not turn on. The module, however, is fully functional; the operating system does not allow its operation.
- Poor contact of the cables leads to periodic malfunctions of the flash.
- A software error related to the camera's operation can also cause some problems when shooting.
Android's own camera settings
In order to achieve a good picture, the user needs to set the right combination of camera settings that match the shooting conditions.
Let's look at the main camera menu items in order:
Exposition. This function determines the amount of light that hits the camera sensor. Typically, exposure ranges from -3 to +3. If you are shooting in the evening, set the exposure to positive. On a bright sunny day, it is better to reduce the exposure. The picture below shows examples of how a picture turns out if the frame is overexposed or underexposed in uniform lighting:
Color effect. As a rule, there are 6 main effects available in color settings:
- Monochrome;
- Sepia;
- Negative;
- Under the water;
- Chalk on a black board;
- White board.
These effects are useful if you need to add stylization to your photo. For example, for a more atmospheric and dramatic photo, you can turn on monochrome, and sepia will help if you want to take a photo in a retro style:
Shooting mode. Here the setting depends on the time and place of shooting. Use the appropriate modes if you are shooting on the beach, in the snow, in the city during fireworks, photographing a car race or taking night portraits.
White balance. This feature adds warm or cool tones to your photo. The white balance setting depends on the lighting. The photo below shows an example of two shots. The left one is made in the “Shadow” mode, the right one is in the “Incandescent” mode:
If you are not sure exactly which mode to set, it is better to switch to auto balance.
In the image settings, you can adjust the sharpness, hue, saturation, brightness and contrast of the photo. By default, all parameters are set to “Normal”.
Frequency. This parameter determines the flickering frequency of the light source in hertz. To avoid racking your brains over this value, leave the parameter in Auto mode.
The size of pictures is set in megapixels. If your smartphone has a sufficient amount of internal or external memory, it is better not to skimp on the size and set this parameter to the maximum setting as far as the camera allows.
The ISO parameter determines the light sensitivity of the camera sensor. The higher this indicator, the more light will reach the sensor. Therefore, lighting conditions should be taken into account when setting this parameter. In a dark room, the ISO should be set higher, and in bright sunlight, it is better to lower the sensitivity to 100 or 200.
The photo below shows two shots that demonstrate extreme ISO values. The left image has a value of 100, the right one has a value of 1600.
Advantages and disadvantages
Among the positive aspects are:
- Free provision of all options.
- The ability to create a voice ringtone and then download it to the internal memory of the phone.
- The interface is made entirely in Russian.
Negative aspects are:
- Making changes to the system configuration.
- Presence of advertisements.
Using the program will eliminate situations where an incoming call or notification goes unnoticed. This does not use sound effects, which, combined with the silent mode enabled, will ensure silence if necessary.