Overclocking a processor is an increase in the speed of the chip compared to the performance declared by the manufacturer. The most popular way is to increase the clock frequency. In this case, the processor cycle is slightly reduced in time, but it does the same amount during this clock cycle. This means that the speed of calculations is increasing. The advent of multi-core processors has given rise to another overclocking option - unlocking cores disabled by the manufacturer . But this is the lot of professional overclockers, and we will leave witchcraft with cores outside the scope of this article. Let's look at just a few of the safest options for overclocking a laptop processor.
What is CPU overclocking?
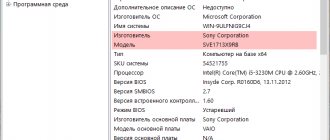
Overclocking a processor on a laptop is an increase in performance by increasing the processor clock frequency, or increasing its multiplier . You should immediately understand that not every laptop, or rather, processor, can be overclocked. The motherboard and the chipset itself must support this feature. Naturally, there is no list, so you can find out the possibilities for increasing productivity using the AIDA64 program.
The AIDA64 application has a paid and free version, and even the latter option is enough to get the information you need. After installing the program, first of all you should select the “Sensors” item and look at the temperature of the chipset. For a laptop, the normal value is no more than 60 degrees. If the utility shows a higher value, then overclocking is guaranteed to kill the processor. If the indicators are in order, then in the “Overclocking” tab we look at the optimal clock frequency, and it is immediately indicated how much it can be increased without a significant danger of ruining something. Typically, the growth value varies from 15 to 25%.
In 2022, chipsets appeared in which manufacturers provided “legal” overclocking options, that is, this will not affect the performance of the node in any way. They are installed in gaming laptops and are expensive, but the device will have all the necessary software for overlocking on board. Additionally, there may be a button on the laptop itself that, when pressed, speeds up the chipset. In other cases, overclocking is carried out using special software or through the Bios settings.
Important! It should be understood that overclocking the processor is done at your own peril and risk, since the likelihood of irreversible damage is real and high.
The only advantage of overclocking is increased performance. But the disadvantages are presented in a broader list:
- heating will increase;
- The service life of the chipset is reduced;
- energy consumption increases;
- The battery drains faster.
To overclock or not is the choice of each user, so for those who decide to try, below is how to do it.
The dangers of overclocking a laptop
The overclocking procedure on a laptop has only one advantage - increasing the performance of the device. There are many more disadvantages:
- increased energy consumption;
- acceleration of battery consumption;
- device overheating;
- reducing the service life of overclocked equipment.
On laptops you can achieve minor performance gains.
If a serious increase in operating speed is required, then it is only possible through modernization with an update to the cooling and power system.
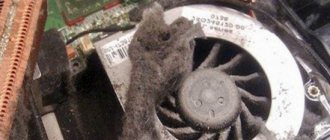
The problem of overheating when overclocking a laptop is much more acute than on a PC. On laptops, it is not possible to install additional equipment to cool components that are very close to each other. This negatively affects the operation of the device - if it overheats, the system begins to freeze, and the laptop may turn off spontaneously.
Overclocking with built-in tools
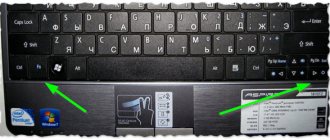
The most popular and relatively safe way to overclock the processor on a laptop is to change the multiplier in the BIOS.
- We enter Bios (depending on the version, the Del button or one of the F buttons during system startup).
- Open the item – “MB Intelligent Tweaker” (options are possible depending on the version).
- Moving using the arrows on the keyboard, we find the item “CPU Host Clock Control”, by clicking on Enter we change the value from automatic to manual “auto” - “manual”. Now the user can change the parameters of the chipset himself.
- In the “CPU Frequency” item you can change the frequency value. For this, there is a special field where you can enter a new value, while the minimum and maximum values are indicated above. In order to overclock the processor on a laptop through BIOS, it is recommended to increase the frequency by 50 Hz, that is, if the parameters are limited to 200 and 500 Hz, you should start with 250 and increase to 450 in steps of 50. You should never set the possible maximum, this will force the device is worn out. In some BIOS versions, the multiplier changes, and the user must choose how much to multiply the frequency from the proposed list.
- After each increase, the action is saved with the Enter button, and when exiting the BIOS, you can remember the changes with the “Save&Exit” button.
- After each change, you must log in and check the temperature as well as the behavior of the device.
Depending on the processor manufacturer, proprietary overclocking software may be installed in the operating system, or it can be downloaded from the manufacturer’s website. Intel is biased towards the overclocking procedure, so only processors designed for this have their own programs for this purpose. But AMD has offered the AMD OverDrive utility, which allows you to experiment with different brand chipsets.
Before installing the program in Bios, you must disable the following settings:
- Cool'n'Quiet;
- C1E (Enhanced Halt State);
- Smart CPU Fan Control;
- Spread Spectrum.
After installing the application, you must enter Clock/Voltage – Voltage. If the chipset does not support the Turbo Core function, then overclocking is carried out by dragging the CPU Core 0 slider. If the function works, then you should click the “Turbo Core Control” button in the window that opens, and only after that you can overclock.
Important! The rules here are similar - you need to move the slider slowly and check how the system behaves after each change. Do not move the slider to the maximum position.
How to overclock via Bios
Perform the following sequence of actions:
- Go to Bios;
- We find the section related to overclocking. On different models it is called: “POWER BIOS Features”, “Advanced Chipset Features” or “Advanced”;
- We are looking for FSB (CPU Bus) clock frequency parameters;
- Next is the bus performance multiplier (Clock Ratio or CPU Ratio);
- Add 10 percent to the nominal frequency. Next, divide it by the FSB value and set the resulting result as a bus performance multiplier.
Do not overclock the CPU by more than 10% of its rated frequency.
The attentive reader will think about how to find out whether it is possible to overclock the processor. This is done in Bios. Look carefully, if you do not have sections related to overclocking (described in point 2), then it is impossible to overclock the laptop.
If, after the steps described above, a blue screen appears or the system becomes unstable, this indicates that the overclocking threshold has been exceeded. Go to Bios and reduce the values.
After completing the work, use special utilities to check the temperature. No more than 90 degrees is recommended. Otherwise, reduce the multiplier.
Overclocking through third-party utilities
It was said above that overclocking an Intel processor can be done through Bios or using third-party applications. The latter are also suitable for AMD chipsets. All programs are supported by the Windows 10 operating system and earlier versions, including Windows 7.
- SetFSB is a useful utility that is perfect for AMD and Intel. The program is in English, but it is free. However, the interface is simple enough to understand without deep knowledge of the language. In fact, the software is a window with several tabs. On the main page (open by default), you need to click on “Get FSB” and start moving the central slider. Changes are saved using the “Set FSB” button.
- CPUFSB is another universal utility in Russian. Its inconvenience may lie in the fact that the user must select the manufacturer and type of motherboard from the proposed list. You can find them on the official website of the laptop manufacturer. The second option is to look through the Everest program, which scans the entire system and displays useful information about the hardware, including the manufacturer and model of a particular node. Further actions - click on “take frequency”, after which the current data will begin to be displayed in the “current frequency” and “multiplier” fields. The performance increase is achieved by adding one in the “Multiplier” field, each change is confirmed by clicking on the “Set frequency” button.
- Clock Gen is a program with one of the most uncomplicated interfaces. In the application window, select “PPL Control”. The upper slider changes the chipset frequency, the lower slider changes the RAM frequency. Increasing values must be done slowly. All actions are saved by clicking on the “Apply” button. In some cases, you may encounter that settings are reset after saving. In this case, you should go to the program options and check the “Apply current...” checkbox.
Do you need to overclock your laptop?
Laptops are not designed to overclock the processor. On the contrary, mobile chip manufacturers have done everything to ensure that the user does not need such overclocking. The frequency automatically decreases when the processor is idle and increases when the system needs the chip. The most reliable way not to break anything is to use switching the laptop power supply circuit . The processor will stop reducing its frequency, which will give you a small performance increase compared to economical operating modes. To be fair, let us remind you that the high-performance mode is automatically turned on if you simply plug the power supply plug into the laptop. For not the newest laptop models, there is an additional alternative to overclocking the processor - the SetFSB utility. And you can check the stability of operation in the new overclocked state with the Prime 95 program.
Turn off visual effects
Another way to speed up a Lenovo laptop on Windows 10 is to remove unnecessary sound and video effects. If on powerful PCs they almost imperceptibly load the system, but on weak “machines” they will significantly slow down the work.
To disable visual animation, do the following:
- Click on Start, Settings and Accessibility.
- Click on "Other options".
- Turn off animation playback in Windows.
At the same stage, go to the “System”, “About the system” and “System information” sections. On the left, select “Advanced options...” and enter “Properties...”. Here go to “Advanced”, click on “Options” and “Performance”. To increase the speed of your Lenovo laptop, select the option for better performance and save the data.
Enable background services
When considering options for how to speed up a laptop running Windows 10 on a Lenovo IdeaPad 330 or other models, you cannot ignore the removal of unnecessary services. The latter can load the device, which leads to slower operation. Turning off background services can improve OS performance. To speed up your laptop, follow these steps:
- Go to “Control Panel” and “Administration”.
- Select the Services section and uncheck the ones you want to disable.
- Restart your Lenovo laptop.
In most cases, you need to turn off Work Folders, Fax, Application Identity, Client License Service, Browser..., Communication Service, Heart Rate Service, and others. Here, be careful not to turn off anything unnecessary.
To quickly enter “Services”, enter Win + R, and then the command services.msc and enter.
Use third party programs
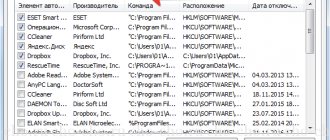
If the question is how to improve the performance of a Lenovo laptop and speed it up, use third-party applications. One of the most popular solutions is CCleaner. You can install it for free at ccleaner.com/ru-ru. With its help it is possible to solve the following issues:
- clean the registry;
- remove unnecessary software or cache;
- get rid of cache, etc.
To speed up a Lenovo laptop, you can use other programs, for example, Glary Utilities, Wise Disk Cleaner, etc. In all cases, the functionality is almost identical, and only the design differs. During the cleaning process, be careful, because you can accidentally delete the history of the web explorer and reset passwords, which is why you will then have to log in to all sites.
Shut down unnecessary processes
If the question is how to increase the performance of a Lenovo laptop and its speed, disable unnecessary processes. To do this, take the following steps:
- Press the combination Ctrl+Alt+Shift.
- Log in to Task Manager.
- Go to the "Processes" section.
- Close the most “heavy” ones that slow down the system.
If the OS warns you that you cannot close the process, refuse to do so. Otherwise, difficulties may arise with the performance of Windows.