With the release of the stable version of Android 12, major smartphone giants have started showcasing their latest software skins. While companies like OnePlus and Oppo have already released beta versions of OxygenOS 12 and ColorOS 12 for their flagship phones, Samsung is not far behind. Samsung's One UI 4.0 based on Android 12 is also available and launching for the Galaxy S21 series. One UI 4 received its latest beta last week and things are looking pretty exciting. If you are a Samsung user and want to know all the latest features of One UI 4, then we have you covered. We've listed 25 of the most exciting features and improvements you can expect in One UI 4.0.
Key features of the One UI advantage
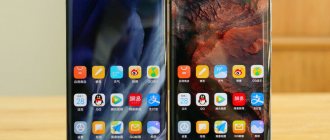
The new interface is designed to make it easier to use the smartphone with one hand. Thus, it was decided to place information about the current open window at the top of the screen (so as not to stretch your thumb across the entire display), and below make a selection of the settings and options themselves, which is convenient to reach. Below is an example of how the interface works. Comfortable? Quite.
One UI in action
According to the developers, the shell should provide the following capabilities for users:
- Intuitive interface for one-handed operation.
- New simplified icons for system programs.
- Dark (night) theme. This is the trend of this year, which Samsung decided to initially build into the shell. On Amoled screens, the dark theme looks gorgeous, plus it saves battery power.
- Updated multitasking submenu in the form of large tiles.
By clicking on the icon you can quickly go to the application settings. Multitasking interface - Gesture navigation is not a new feature. Samsung decided to leave the usual navigation buttons, but if you hide them in the theme, there is the usual gesture control.
- The appearance of the Camera has been updated. The developers have redrawn the entire design and icons of the Camera. And you can switch between shooting formats by simply swiping left or right.
Updated appearance of the Camera
- Redesigned appearance of floating applications.
- The appearance when taking screenshots has been redesigned. When you take a screenshot, a menu appears at the bottom where you can choose further actions: capture the entire screen, crop the finished photo, or share it.
- The new keyboard interface has also been redrawn.
It is now possible to move the keys around the screen, compress them, or, conversely, stretch them to the desired size. New keyboard interface
Convenience
Multi-shot mode appeared in One UI 2 with the release of the Galaxy S20 and allows you to shoot with an ultra-wide-angle lens using Live Focus, and short videos, creating several shots in one frame in different styles.
We started by asking ourselves two questions. First, what can we do to make users enjoy the moment? And secondly, how can we provide them with multiple options to choose from without requiring anything more than taking one photo?
We decided that a description of the mode should be shown when the user goes to Multishot. In addition, in order to be able to view multiple results simultaneously on one screen, we have created a new preview mode.
Taehee Hwan
Designer Samsung
The video calling feature has also been updated with Google Duo integration.
Our goal is to make group calls even more convenient. We will continue to work to create an integrated solution for the Phone, Messages and Contacts apps.
Sueyon Lee
Designer Samsung
Automatic shutdown of programs
Another innovation from Samsung is the automatic shutdown of running applications and programs. If you have not launched the utility within the last 30 days, the program will be blocked and its icon will be hidden from the menu. This is done so that unused utilities do not use system resources and prolong battery life.
The program is not deleted, but simply hidden. This way, your data (or progress in the game) will be saved, and you can return the icon in the smartphone settings.
Creating and setting up a project
Let's start by creating a new project, specifying the minimum requirements of Android 8.0, since starting from this version you can assign the AutoSize parameter to the TextView. If you need to work with earlier versions of Android, no problem. There is a support library for such cases.
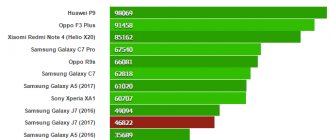
Android distribution
Information taken from Android Studio
https://www.appbrain.com/stats/top-android-sdk-versions
Customize the Bixby button
The physical Bixby button is not the most successful innovation in the new generation of Samsung smartphones. Its main drawback is accidental clicks, which negatively affect the autonomy of the device. It constantly wakes up and discharges faster than usual. To solve this problem, South Korean engineers have added an option to disable this feature.
Unfortunately, Seoulians do not allow you to completely disable the Bixby button, but you can make the voice assistant activate not with a single press, but with a double press. This way the smartphone will stop waking up again.
You can do this in the following way: launch the Bixby assistant, tap on the menu in the form of three vertical dots and select “Settings”. There, find the “Bixby Button” section and then select the “By double-click” option.
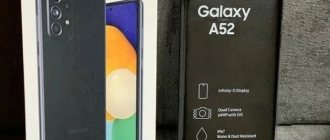
Hiding the screen notch
Currently, this customization is only available on the new Galaxy S10 series and Samsung devices equipped with an Infinity-U display with a dewdrop notch. As with other devices, this option allows you to hide the notch by setting the status bar to a black background.
Here's what the Galaxy S10+ looks like after hiding the two front cameras.
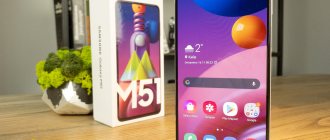
No notifications for the apps you use the least
Sometimes we install applications that we only use occasionally, but despite this, they always do some background work that shows up in the notification bar. If you too are experiencing this frustration, you are in luck!
The Sleeping Apps feature allows you to select a group of apps that you don't want to delete, but for which you want to avoid constant notifications. Plus, adding them to this list will stop them running unnecessarily in the background, saving battery life. So follow these simple steps:
- go to “Settings> Device support ”;
- select the “Battery” section;
- now click on the “Options” in the upper right corner (three vertical dots), then click on the “Settings” icon;
- select the “Sleeping applications” option;
- By clicking on the “Add” icon, you can choose which application to send to “sleep” for a long time.
Put apps from which you don't want to receive constant notifications into sleep mode.
Reviving the “control panel”
Well, the application works, and so do the animations. Fine. But our “control panel” stands its ground and doesn’t move anywhere - it’s logical, we haven’t specified in what cases it should move. But first, I would change the colors of our status bar. To do this, you need to go to value->colors and change the colors. You can use my “elegant” set.
#000000 #4E4E4E #505050 #717171 #515151 #FF000000 #FFFFFFFF
Now let's move on to the “control panel”.
Our goal is to find out when the scroll was made. Hang a kind of listener on the ScrollView. This is done thanks to these lines.
scrollView.viewTreeObserver.addOnScrollChangedListener(ViewTreeObserver.OnScrollChangedListener { //Enabled when scrolling scrollEngine() })
scrollEngine() is a function that moves our “toolbar”, let’s write it.
private fun scrollEngine() { val upDown: Boolean = scrollView.scrollY < scrollY // true if scroll up val params = panel.layoutParams as ViewGroup.MarginLayoutParams // LinearLayout MiniMain parameters val temp: Int = if (upDown) { // Calculate how much should we move our panel if (scrollView.scrollY <= maxScroll) { params.topMargin + (scrollY - scrollView.scrollY) } else 0 } else params.topMargin - scrollView.scrollY + scrollY if ((temp < 0) && ! (upDown)) {//Move the panel depending on the scrolling params.topMargin = 0 } else if ((temp > maxScroll) && (upDown)) { params.topMargin = maxScroll } else { params.topMargin = temp } panel.layoutParams = params // Assign changes to scrollY = scrollView.scrollY }
It looks scary, but if you sit for 5 minutes and figure out how it works, everything will immediately become clear. Comprehensive comments are located directly in the code.
Let's run it and check the result.
As we can see, everything works great, apart from a couple of bugs*. The slider showing where we are in the ScrollView intersects with our “toolbar”. And the simplest solution would be to turn it off completely. This is done in the xml file with this parameter in ScrollView.
android:scrollbars="none"
The second problem is that our panel periodically merges with the content area. This problem can be solved by dynamically adding a shadow.
private fun alphaElevation() { val params = panel.layoutParams as ViewGroup.MarginLayoutParams panelText.alpha = (1 - (scrollY.toFloat() * 100.0 / maxScroll.toFloat() / 100.0) / 0.5).toFloat()//Smooth disappearance/appearance panelText theBigText.alpha = (scrollY.toFloat() * 100.0 / maxScroll.toFloat() / 100.0).toFloat()//Smooth disappearance/appearance of large text //If you suddenly want the icon to also appear smoothly, uncomment this area // var settingsAlpha = // ((scrollY.toFloat() * 100.0 / maxScroll.toFloat() / 100.0)).toFloat() // if (settingsAlpha < 0.7f) // CompasIcon.alpha = settingsAlpha // else // CompasIcon.alpha = 0.7f //If the panel has reached the top edge of the screen -> add a shadow if (params.topMargin == 0) panel.elevation = 10f else panel.elevation = 0.1f }
Our ScrollView listener should now look like this.
scrollView.viewTreeObserver.addOnScrollChangedListener(ViewTreeObserver.OnScrollChangedListener { //Enabled when scrolling scrollEngine() alphaElevation() })
And let's check the result again
↑ Digital well-being
Digital Wellbeing is an additional feature that has been added to the latest Samsung models.
They have also undergone changes as part of the shell modernization. There is now an additional trend feature: the device tracks device usage compared to previous reporting periods. If necessary, you can access information about using the gadget while driving a car. To simplify device control, an additional widget is added to the panel. Separately, you can view device statistics in operating and normal modes - they are displayed separately.
↑ Possibility of DeX
Samsung DeX
- this function allows you to transform your phone into a full-fledged computer. In previous versions of the system, it was necessary to use peripheral devices to connect this function, but now this is no longer necessary.
Now smart TVs can act as a monitor, and the connection itself occurs through a working Wi-Fi network. In addition, this function has expanded the capabilities of gesture control in this device: now, with the help of simple movements, you can change the font size of the screen, as well as scale images.
More beautiful emojis than stock Android
Nowadays, few people do not use emoticons when corresponding with their acquaintances and friends. Cute emojis add useful context and intent to written statements that don't inherently provide this type of detail. But there is a problem and that is Google. It seems that the company doesn't like emoticons and added a few just to have them in the operating system. Available stock emojis on Android look disgusting. This is one of the reasons why some companies like Samsung have added their own emojis, which at least look good.
Backend
Before setContentView I suggest implementing a few parameters. All comments are transferred to the code.
class MainActivity : AppCompatActivity() { override fun onCreate(savedInstanceState: Bundle?) { super.onCreate(savedInstanceState) supportActionBar?.hide() // Removes the top bar with the application name AppCompatDelegate.setDefaultNightMode(AppCompatDelegate.MODE_NIGHT_NO) // Sets the light theme by default window.navigationBarColor = resources.getColor(R.color.black)//Sets the color of the navigation bar to black setContentView(R.layout.activity_main) } }
Now, we need to create a couple of global variables
private lateinit var scrollView: ScrollView private lateinit var panel: RelativeLayout private lateinit var panelText: TextView private lateinit var theBigText: TextView private lateinit var compassIcon: ImageView private lateinit var scrollLinearLayout: LinearLayout
After setContentView we initialize our variables
scrollView = findViewById(R.id.scrollView) panel = findViewById(R.id.panel) panelText = findViewById(R.id.theBigText) theBigText = findViewById(R.id.panelText) compassIcon = findViewById(R.id.compassIcon) scrollLinearLayout = findViewById(R.id.scrollLinearLayout)
Now, we need to get the MarginTop of our “control panel” in pixels, because Now we will only track them. To do this, add maxScroll to the global variables.
private var maxScroll = 0 private var scrollY = 0
And we find the indentation itself
val params = panel.layoutParams as ViewGroup.MarginLayoutParams // Calculates the maximum possible scroll for huge text maxScroll = params.topMargin
Let's fill zone 3 with content.
To do this, let's create the addCardToScroll function. All comments have been moved to the code; if something is unclear, I will answer in the comments.
private fun addCardToScroll(_input: String) { val blockView = View.inflate(this, R.layout.block, NULL)//Create 1 block val blockText = blockView.findViewById(R.id.text)//Initialize the Text field val blockImage = blockView.findViewById(R.id.image)//Initialize the Image field var isCheck = false blockText.text = _input blockImage.setImageResource(R.color.white) scrollLinearLayout.addView(blockView)//Add block to scrollView val params = blockView.layoutParams as? ViewGroup.MarginLayoutParams params?.setMargins(20, 12, 20, 12) // Set Margin blockView.layoutParams = params // Assign new parameters blockView.elevation = 20f // Raise the card up to make a shadow appear around blockText.setAutoSizeTextTypeUniformWithConfiguration( 1, 22, 1, TypedValue.COMPLEX_UNIT_DIP)//Using the code, set the AutoSize attribute //Assign a listener to blockView.setOnClickListener { isCheck = !isCheck if (isCheck) blockImage.setImageResource(R.drawable.checkyes)//Replace the icon else blockImage.setImageResource (R.drawable.checkno) animateView(blockImage)//Animate the icon } } //Animate the icons private fun animateView(view: ImageView) { when (val drawable = view.drawable) { is AnimatedVectorDrawable -> { drawable.start() } } }
My pictures are xml animations. This allows us to add life to our application. You can replace them with any static picture. All my code, including animations, can be found on GitHub.
I already want to check how our application works, don’t I?
To do this, we’ll add the following lines at the end of our onCreate() to fill zone 3 with content and launch our application.
for(index in 0..10){ addCardToScroll(index.toString()) }
There is Dual Messenger
If you manage several accounts in several social networks and instant messengers, then it is quite difficult to do without additional functionality. On Samsung smartphones, you can run two accounts of most applications at the same time: two separate Instagram accounts, Skype, Whatsapp, Facebook, and so on. This makes the Galaxy truly multitasking.