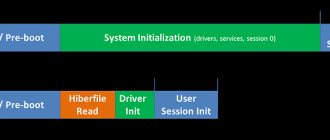
restore Windows 10 boot speed with ease .
Almost three years have passed since the release of the newest version of the Windows operating system - Windows 10. It was advertised primarily as the best for its time, but for certain reasons it could not meet the expectations of most users. To be honest, Windows 10 was far from the characteristics that the developers originally assigned it. Forced installation of updates, startup problems, errors during reboots and a number of other problems - all this accompanied the operating system in the first months of its existence.
Despite the not-so-prosperous start, Windows 10 continues its active development and promises to continue to delight us with interesting additions. However, problems such as slow system loading are still present and continue to complicate the work of many users.
Method 1: Editing startup
The simplest advice, but still relevant for a huge number of users, is to work on startup. Often people install various programs, not paying attention to the fact that they are listed in startup. By launching along with the system, they significantly slow down this process, because launching them simultaneously and checking for updates at startup requires more resources and time. Utilities such as CCleaner, various torrent clients, or even Yandex.Browser go there.
Most often, programs that want to run on a computer are not required by the user on an ongoing basis, which means there is no reason to allow them to open with a new session. We recommend removing from startup everything that you don’t need every time you start Windows. Keep only what you always use and for which you are willing to sacrifice a slightly longer PC turn-on time. Various drivers, for example, software for a sound card, gaming keyboard, mouse, should not be disabled.
Should I enable fast boot?
Since POST is generally important for the computer, it is reasonable to answer the question of whether it is worth disabling it in order to speed up the computer boot.
In most cases, there is no point in constantly diagnosing the condition, since people have been working on the same PC configuration for years. For this reason, if the components have not been changed recently and everything works without failures, “Quick Boot”/“Fast Boot” can be enabled. Owners of new computers or individual components (especially the power supply), as well as in case of periodic failures and errors, are not recommended to do this.
Enabling Fast Boot in BIOS
Users who are confident in their actions can enable PC fast start very quickly, just by changing the value of the corresponding parameter. Let's look at how this can be done.
- When you turn on/reboot your PC, go to the BIOS.
In Award it will be located in another BIOS tab - “Advanced BIOS Features”.
In some cases, the parameter may be located in other tabs and have an alternative name:
With UEFI things are a little different:
MSI: “Settings” > “Advanced” > “Windows OS Configuration” > “Enabled”;
Gigabyte: “BIOS Features” > “Fast Boot” > “Enabled”.
For other UEFIs, for example, ASRock, the location of the parameter will be similar to the examples above.
- Press F10 to save settings and exit BIOS. Confirm exit by selecting “Y” (“Yes”).
Now you know what the “Quick Boot”/“Fast Boot” parameter is. Be careful when turning it off and take into account the fact that it can be turned on at any time in exactly the same way by changing the value back to “Disabled”. This must be done when updating the PC hardware or when unexplained errors occur in the operation of even a time-tested configuration.
Software developers tried to do everything for the OS to make it work quickly. After using it for a while, it becomes noticeable that it starts to slow down each time. In order for Windows 10 to load faster , you need to optimize the process of turning on the operating system.
Method 2: Enable/Disable Fast Startup
The “ten” has a quick start function, which programmatically (using hibernation technology) speeds up the startup of Windows. In most cases, turning it on turns out to be effective and demonstrates a reduction in the time spent on starting the PC. To enable it, do the following:
- Expand Start and start typing Control Panel. Immediately from here you can go to the “Power Options” section. If you are used to launching the panel in a different way, go to the section through the list of its categories.
- Through the left panel, switch to “Power button actions”.
- Click on the link “Change settings that are currently unavailable.”
- The option to enable Fast Launch will become active. Check the box next to it and apply the changes. Pay attention to its description: it will only work if you use “Shutdown”. During Reboot, quick startup does not work.
However, if you already have Fast Startup enabled, it may well not work properly due to some bugs in the OS. As an experiment, disable it for one session, shut down and turn on the PC, thus checking whether the startup time has changed.
Some tips
If your Windows 10 PC has old or corrupt drivers, your PC may also boot slowly. To correct the situation, you can update device drivers.
Driver Easy driver update program
Reference! In this case, you can save a significant amount of time if you use special driver update programs such as Driver Easy.
Step 1. Download and install Driver Easy. Launch the program and click the “Scan Now” button. Driver Easy will scan your computer and detect “faulty” drivers.
Launch the program and click the “Scan” button
Step 2. After finding the drivers needed to update, click the “Update” button next to the required driver, or the “Update all” button for all found drivers.
Click "Update"
Step 3: Restart Windows 10 and check if it boots faster.
If the computer on which Windows 10 is installed is quite weak, you should also pay attention to the antivirus used in the system. If you use several such programs, it is recommended to select the most productive one and leave only that one.
You can also use only the Windows Defender built into the OS, which in Windows 10, unlike Windows 7 and 8, has become a valuable assistant for everyday use, generally reliably protecting the PC.
You can also perform a clean install of the OS to permanently resolve the issue.
Method 3: Hard Drive Maintenance
HDD owners who have never defragmented manually and whose computers have optimization disabled may experience severe fragmentation over time. It interferes with the normal operation of the drive and, accordingly, can slow down the loading of the PC. Defragmentation is performed using standard operating system tools and third-party software. It is worth understanding that fragmentation will only have a negative impact if its percentage is high. If, after the analysis carried out before defragmentation, a small level of broken files is detected, you should be sure that you should not expect any effect from the procedure in terms of starting the OS.
Read more: What is hard drive defragmentation and how to do it
File system errors and bad sectors can also negatively impact the time it takes for the system to start up. Check if there are HDD problems using the instructions below.
Read more: How to check your hard drive for errors and bad sectors
Disk Defragmenter
The process of writing data to a hard drive is not ideal. Often, files seem to be split into parts, which is why processing information takes more time than is required for comfortable use of a PC. Therefore, anyone who is faced with the problem of a long startup on a laptop or desktop computer is recommended to defragment the drive:
- Open the Start menu.
- Go to "Disk Optimization" through the "Windows Administrative Tools" tab.
- LMB on the drive name.
- Click the "Optimize" button.
- Wait for the operation to complete.
During the process, defragmentation will be performed, which will speed up the computer startup. At the same time, this method should not be considered in isolation from the previously discussed acceleration methods. They all work only in combination.
Method 4: Free up space on your SSD
Solid-state drives, which are increasingly installed in laptops and desktop PCs instead of classic hard drives (or next to them), can also begin to slow down if they are filled to capacity with files. The peculiarity of the operation of this type of storage medium is such that the presence of a reserve allows the SSD to use it to level out the wear of memory blocks and replace failed ones with “healthy” ones. In the absence of at least 10-20% of free space, the quality of the SSD can drop significantly. Free up space on your C drive using system tools. For information on how to do this, read the article at the link below.
Read more: Free up space on the C drive in Windows 10
Using an SSD
If the previously discussed methods did not help speed up the reboot, you will have to resort to radical measures. PC owners using a hard drive should consider replacing the drive with a more modern SSD. Solid state drives provide high write speeds, which, among other things, have a positive effect on the speed at which the computer turns on.
Method 5: Disabling Superfetch
Superfetch technology, although aimed at speeding up performance, on not very productive assemblies only worsens the performance of the computer. And although many articles advise leaving this service turned on, based on user comments it is easy to conclude that it does not always work for good. Sometimes it is turning it off that allows you to resume the normal turn-on speed. Learn more about this service to understand what we generally suggest deactivating.
Read more: What is the Superfetch service responsible for in Windows 10
Try disabling it for 1-2 sessions by turning off and on the PC to check. If there is no increase in download speed, you can turn it back on, of course, if you consider it necessary.
Read more: Disabling Superfetch in Windows 10
Video card drivers
On a Dell Inspiron 17 laptop, it turned out to be impossible to speed up the startup of Windows 10 using the methods listed above. Even though the below methods worked, it still did not completely fix the problem with the laptop.
Presumably, the black screen that appears during the boot phase of Windows 10 is a graphics driver issue that is especially serious on laptops switching between an integrated Intel HD graphics processor and a dedicated card from Nvidia or AMD.
An easy way to check this is to disable the AMD or Nvidia graphics driver and restart your computer.
Step 1: Click on the magnifying glass icon to the right of the Start button. Enter in the line that appears: “Device Manager” and click on the icon that appears at the top with the inscription “Device Manager”.
Click on “Device Manager”
Step 2. Select "Display Adapters" with the mouse and identify the dedicated graphics card. It will be designated as Nvidia, AMD Radeon or ATI Radeon. Right-click on the graphics card and click Disable (this may cause the screen to go blank for a while).
Click “Disable device”
Turn off (not reboot, just turn off) the computer and turn it on again to make sure the problem is resolved.
Important! If you are using only the Intel HD Display Adapter, you do not need to complete the above steps.
If your graphics adapter is causing the problem, you will need to re-enable the disabled graphics card using the steps above, and then download the latest graphics card driver from the graphics card manufacturer's website: amd.com/drivers or nvidia.com/drivers, installing it in the OS.
After downloading and installing the driver, turn your computer off and on to see if the problem is resolved.
Reference! If loading is still slow, it's worth checking if disabling fast startup in conjunction with new graphics card drivers would be an effective solution.
Method 6: Update Motherboard Driver
Without up-to-date and genuine drivers, your computer cannot function properly. In particular, the problem with a long PC startup may be affected by a missing driver for the chipset present on the motherboard. In this case, we strongly recommend downloading it exclusively from the manufacturer’s website, and not through third-party programs such as DriverPack Solution.
- First of all, find out the model of your motherboard.
If you have a laptop, you instead need to know its exact model. This can be done from the articles linked below; instructions for determining the model are discussed using the example of a device from DNS, but it is fully applicable to other brands. Read more: Determining the motherboard model Determining the laptop model - Go to the official website of the motherboard or laptop manufacturer. There, depending on the site itself, find the section “Support”, “Support”, “Drivers”, “Drivers” or something similar. For example, for an HP laptop it is “Support” > “Programs and Drivers”.
- Enter the exact model or serial number.
- Find the "Chipset" or "Chipset" tab and download the latest version of the software (some files may not be the main drivers, as you can see in the screenshot below, where the penultimate file from the list is selected, not the last one).
- If this option is not available, look for proprietary software through which all driver updates are installed. For HP, this is the HP Support Assistant program.
- Install the driver using any available method, restart your computer and check if the problem in question has disappeared.
Correcting the registry
The Windows Registry stores settings, instructions, and user account information on your computer. It also contains all the records about all programs, drivers and other software ever installed. Even after deleting a program, information about it does not disappear anywhere, but accumulates as “dead weight” in the database.
The Windows registry greatly affects the performance of your computer, and just as much as anything else needs to be kept in order. We will do this using the same CCleaner:
- We return to CCleaner and select the “Registry” section.
Leave all the checkboxes in place and click “Search for problems.”
- We do not go into the details of the search results, but immediately click on “Correct selected”.
- CCleaner will offer to create a backup copy of the registry - we agree and wait for the repair process to complete.
Now it is advisable to restart your computer and move on to the next method.
Method 7: Disable ULPS on AMD
This method applies to devices with two installed video cards, one of which is from AMD. One of the discrete graphics features is ULPS, which is responsible for the transition to ultra-low power consumption. The result sometimes is not only lags and slowdowns, for example, in games, but also a longer recovery from sleep mode, when rebooting or after completely shutting down the PC. Its operation is disabled through the registry editor.
- Press the Win + R key combination and write the command regedit in the window, then click on the “OK” button.
- If you have moved to a section on the left side, switch the selection to “Computer”.
- Press the Ctrl + F keys simultaneously and type “EnableUlps” in the search window, confirm with the “Find Next” button.
- Wait for the search to complete and, if the parameter is found, double-click on it.
- Change the value from “1” to “0”, apply the changes.
- To check the effectiveness, a new session should accordingly be started. If this does not help, return the value to “1” using the same steps.
Cleaning Windows of temporary and unnecessary files and programs
During work, a lot of temporary files accumulate in the computer’s memory, which are no longer relevant, but have not been deleted. Over time, there are so many of them that they begin to take up a significant amount of memory on the local disk. At the same time, the hard drive head performs unnecessary movements, and this is precisely what prevents Windows from loading quickly.
Disk cleanup can be done using built-in Windows tools or external programs. First, let's use the standard method, for which:
- Open “Computer” (“This Computer”) and select the system drive “C:”, then right-click to call up the context menu, where we select “Properties”.
- In the “General” tab, you can visually estimate the amount of free space on your local disk. Click on the “Disk Cleanup” button.
- The program will begin to estimate the amount of space we can free up.
- After some time, we will be able to choose what kind of files should be deleted.
In the “Advanced” section, we can remove installed programs and Windows restore checkpoints.
After we have dealt with the programs and checkpoints, we return to “Disk Cleanup” and click “OK”. In the pop-up window, select “Delete files”.
You will probably be surprised at how much free space appears on the system partition of your hard drive. If necessary, you can separately remove unnecessary programs through “Start/Control Panel/Programs/Programs and Features”.
The “non-standard” method consists of downloading, installing and using a service utility from the Internet:
- Download the free CCleaner utility from the official source at https://www.ccleaner.com/ru-ru.
- After launching it, the cleaning window automatically opens. We check the boxes on the left side (or leave them as they are) and turn on “Analysis”.
- All found “garbage” will be displayed in the working area of the window. It's time to start cleaning using the corresponding button below.
This is how you can easily and quickly put things in order and, at the same time, speed up the loading of Windows 7, 8, 10 when you turn it on.
Method 8: Reset BIOS Settings
The system boot could slow down after some changes made to the BIOS or other errors in it. If you are sure that after the reset you will be able to enter the BIOS again and set the necessary settings, follow this method. For example, after resetting many old BIOSes, the mode for connecting the hard drive to the motherboard returns to IDE, although the user set (or was set to) AHCI. Due to the change in the disk connection mode, the already installed Windows will not start. Beginners who do not understand what we are talking about, or who do not know how to change these modes, as well as some other parameters on which the performance of the PC and Windows depends, are not recommended to resort to a reset. After it, the computer may stop turning on at all, giving an error. If you are confident in your abilities, read about the options for resetting BIOS settings by clicking on one of the links below.
Read more: Resetting BIOS settings What are Load Optimized Defaults in BIOS
Purpose of "Quick Boot"/"Fast Boot" in BIOS
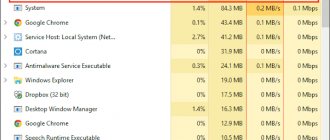
From the name of this parameter it already becomes clear that it is associated with speeding up the computer boot. But how is the PC startup time reduced?
The "Quick Boot" or "Fast Boot" option makes booting faster by skipping the POST screen. POST (Power-On Self-Test) is a self-test of the PC hardware that runs when turned on.
More than one and a half dozen tests are carried out at a time, and in case of any problems, a corresponding notification is displayed on the screen. When POST is disabled, some BIOS reduce the number of tests performed, and some even disable self-testing.
Method 9: Restore Windows 10
Sometimes a drop in download speed is directly related to installed system updates. It's no secret that every major (and not so major) Windows update is often accompanied by errors and stability problems, and one of the manifestations of problems is slow startup. Try rolling back to the previous update and wait until Microsoft fixes the bug so you can reinstall the update in the future.
Sometimes, even after a thorough search of solution options, it is not possible to identify the reason why turning on the operating system is very slow. Unfortunately, there are many non-obvious reasons that cause this problem, and if it is not possible to contact a competent person who would professionally identify the source of the problem, the last software method remains - resetting the settings. In this case, Windows will be returned to its original state, with some personal files retained or deleted. The reset method is chosen by the user himself, and the article at the link below will help him decide.
Read more: Uninstalling KB updates in Windows 10 Restoring Windows 10 to factory settings
Additional solution to speed up Windows boot time
If none of the described methods helped you, use the function of resetting the system to a “clean” view. You will lose all installed data, however, Windows 10 will be fresh again and the loading speed will be restored to its original speed.
We hope the article was useful to you and helped you find answers to your questions.
Method 10: Virus check
Viral or simply unwanted software can load the computer already at the stage of turning on the operating system, without manifesting itself in any other way. As a rule, miners work using this method, taking away part of the hardware resources, which is why not only the launch of the OS suffers, but also its performance as a whole. Therefore, no matter how primitive this recommendation may seem, we advise you not to neglect it and scan the system. This is done both by the antivirus built into the Top Ten and by special scanners that do not require installation. This is discussed in detail in the material at the following link.
Read more: Fighting computer viruses
Application of special software
Software developers are well aware of the problem of slow computer startup. Therefore, they created special programs to speed up the process through simple manipulations.
"Computer Accelerator"
The name of this application gives confidence that after a few clicks the user will be able to reduce the amount of time the computer spends turning on. The program interface is completely translated into Russian, so even a beginner can understand how to use it. By launching the “Computer Accelerator”, the PC owner will open up a wide range of possibilities:
- hardware acceleration;
- eliminating lags and freezes;
- task planning;
- garbage cleaning;
- startup management and others.
Thus, the functionality of the “Computer Accelerator” collects the vast majority of settings, which have to be edited manually through the built-in tools of Windows 10.
CCleaner
Perhaps the best option for those who have never even tried to speed up their computer startup before. CCleaner has an intuitive interface that provides garbage cleaning, registry management, and manual settings. And, although CCleaner’s capabilities are not as wide as those of the “Computer Accelerator,” it will still not be difficult for the user to optimize the operation of their device.
Method 11: Replacing the drive
Even if you install a clean Windows or follow all the previous recommendations, the loading speed will still be limited by the hardware capabilities. A slow hard drive or solid-state drive will in any case significantly slow down startup, which is why no optimization of the operating system will help.
Hard disk drive (HDD)
Quite often, quiet but slow hard drives with a speed of 5400 rpm are installed in budget laptops or ready-made PC builds. They are well suited for storing files, but reading and writing to them will be slow - this is also noticeable when performing other everyday tasks: everything opens slower than we would like, the system “thinks” for a long time and does not respond very quickly to user requests. Finding out the disk speed is easy - just use, for example, the CrystalDiskInfo program.
The necessary information is in the “Rotation speed” field.
Why is my laptop slow and slow?
In 90% of cases, the laptop starts to become dull due to the obsolescence of its hardware. The remaining 20% are problems with the software (accumulation of junk files in the system, full C drive, errors in the OS, viruses, etc.). This also includes overheating of laptop devices due to a breakdown of the cooling system or its contamination.
How does this manifest itself?
A newly purchased laptop usually does not have any problems. The iron in it is at least a year old. The operating system is clean. All games and applications fly. But over time, the hard or solid-state drive of your device becomes clogged with all sorts of files from deleted applications, the cooling system gradually becomes covered with dust, and new versions of programs and games appear that are more demanding on hardware.
And now, on your once cool and fast laptop, suddenly there are freezes in programs, slowdowns and lags when watching videos, performance in games has dropped, the OS has taken a long time to load, etc. And the further it goes, the worse it gets.
When most ordinary users encounter this, they try to understand the problem that has arisen to the best of their knowledge and capabilities, but without the necessary information it will not be possible to do this correctly and without spending extra money.
Below I explain in detail and step by step how to improve the performance of your laptop.
Method 12: Disabling HDD
In computers with an SSD and HDD installed, the latter occasionally causes a boot problem. It may occur due to poor SMART status or other problems, and to check if this is the case, we suggest disconnecting the cables from the hard drive that go to the motherboard and power supply. Naturally, this must be done in a previously de-energized PC. Once the shutdown has been completed successfully, press the power button on the system unit.
For a hard drive that turns out to be problematic, the first thing you should do is inspect the SATA cable for external damage and test it by switching, for example, from an SSD or using any other (ask a friend for a while or buy a replacement). Be sure to scan the disk for errors and bad sectors, following the instructions from Method 3 of this article. If, even after eliminating bad sectors, they continue to appear, you must urgently buy a replacement HDD, since this behavior means that the current device is failing.
Additional Information
Don't forget that sometimes Windows 10 takes a long time to load due to updates being installed. They can be installed even several times the computer is turned on in a row, especially if the user has not downloaded updates for a long time. Check through “Settings” > “Update and Security” to see if any updates are currently being downloaded, and if so, there is no need to worry about the increased startup time of the PC - as soon as the updates are installed, the PC startup speed will return to normal.
In addition, automatic system maintenance is enabled by default in the OS, and sometimes it is this that leads to one-time slowdowns in Windows loading. Therefore, if this happens occasionally, there is no reason to worry and look for the cause.
On the Internet, you may also come across the following tips that supposedly speed up system startup: disabling services and editing msconfig. This does not work!
- Disabling services will not reduce the load on the OS and will not help it boot faster, of course, unless there are many unwanted programs such as optimizers. Similar advice may have taken place in older versions of Windows and on very weak computers, but now even if you disable all services except the most important ones, you will not be able to get a noticeable increase in seconds when starting your PC. And their thoughtless disabling even leads to errors in the operation of the system.
- Editing msconfig, the miracles of which are already legendary, actually does not change anything at all. Uninformed users believe that the settings noted in the screenshots below are turned off by default, which means Windows intentionally limits the speed of the PC when turned on. In fact, the system always uses as many cores and RAM as needed to solve a specific problem. And the restrictions set are only needed for testing, for example, by developers.
Therefore, rest assured that using these two “tips” will not solve the problem of reducing PC startup time.
We are glad that we were able to help you solve the problem. In addition to this article, there are 12,719 more instructions on the site. Add the Lumpics.ru website to your bookmarks (CTRL+D) and we will definitely be useful to you. Thank the author and share the article on social networks.
Describe what didn't work for you. Our specialists will try to answer as quickly as possible.
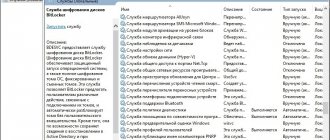
Disabling unnecessary services
In addition to third-party programs that work on the autorun principle, individual services are included with the computer. Some of them (for example, “Pulse Service”, “Telephony”, “Remote Registry” and others) do not play an important role. Therefore, they can be disabled to save time when starting the computer:
- Click LMB on the “Start” icon.
- Expand the "Windows Administrative Tools" tab.
- Double-click on the name of the unnecessary service.
- In the “Startup type” column, set the value to “Disabled”.
- Save the new settings.
After this, you will notice that the speed of turning on the computer has increased noticeably. However, be careful when disabling unnecessary services. Deactivating individual elements may lead to system malfunctions.