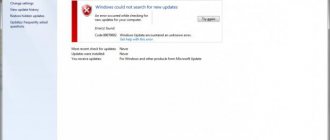
System updates are needed to eliminate OS vulnerabilities, improve performance, make the Windows version more stable, and also bring some useful features. As a rule, the update occurs independently, and the user does not participate in the process. However, sometimes there is some glitch that causes the problem 8007000e – error when searching for updates. Since we already know the importance of timely updates, we will not postpone the problem, but will consider its solution.
How to fix the problem?
Sometimes the cause of failures does not come from the user, but from Windows 7 itself. The fact is that many builds of Windows 7 were released with an already faulty update service. Usually in such cases, the error occurs immediately after installing the seven on the PC. Although this may also be the fault of the user who accidentally damaged or deleted system files. One way or another, in this case there is only an alternative method of updating.
Let's look at it step by step:
- Follow the link https://support.microsoft.com/ru-ru/kb/3102810.
- Scroll the page to the 2nd method.
- There will be a sign with update packages for versions of Windows 7.
- Select your OS and click “Download package”.
- Open the downloaded file and agree to the update.
- After everything is installed, reboot the PC.
That's all, now you know how to fix 8007000e.
Code 8007000e. Windows 7 update error: causes
Based on the material about Update Center failures that is posted on the official website, the occurrence of this situation is associated with temporary communication disruptions, although the description of the error indicates memory problems. (E_OUTOFMEMORY).
It is not for us to judge to what extent the interpretation is consistent with the reasons, but the way out of this situation is quite simple.
Start the BITS service
The Windows operating system has a service called BITS (this English acronym stands for Background Intelligent Transfer Service), which is part of the Windows Update service and is responsible for scanning for new updates and downloading them to your computer. If you see error 0x80070020 while updating Windows 10, you should check the BITS service in the Service Manager.
- Click on the “Start” button with the right mouse button and select the “Run” command.
Select the “Run” command
- In the input field in the window that opens, type the command services. msc and click OK.
Launch "Service Manager"
- The “Services” window will appear on the screen, where we need to scroll the list of services to the end and find the “Background Intelligent Transfer Service (BITS)” service and double-click on its name to get into the properties window for this service.
Open the properties of the “BITS” service
- In the “Properties: Background Intelligent Transfer Service (BITS)” window, on the “General” tab, in the “Startup type” drop-down list, select “Automatic”. If the service is not currently running, click the “Start” button and then “OK” to confirm the settings made and close the window.
Select the startup type “Automatic”
Error 80072ee2
This code fails for one of the following reasons:
- disconnection from the update server;
- action of viruses;
- corruption of registry branches;
- cache full;
- Damage to Update Center files.
If you see code 80072ee2 on the screen, the Windows 7 update error can be resolved in the following way:
- Completely scan the system with an antivirus program. Dr.Web helps the best. This utility has a Portable version that does not need to be installed on your PC.
- Update or install missing drivers for your PC hardware. The easiest way to do this is to use the utilities that we mentioned in the previous section.
- Use CCleaner to clear the cache and fix registry errors.
- Open Command Prompt as Administrator. Enter sfc /scannow in it so that the system independently scans its components for errors.
Some experts recommend removing unnecessary files or keys from the registry yourself. If an error occurs with this number, such actions will be unnecessary. It is best to contact a specialist or reinstall the system.
Error 80073712
Do not miss:
- Windows 7 error code - all the most common ones, causes and solutions
- How to fix Windows 10 update error - all reasons and methods
- Windows 10 error codes - what they mean and how to fix them
The symbols 80073712 Windows 7 that appear on the screen indicate a system update error. A failure with this number occurs when CBS components become damaged during the download and installation of updates. It means that even if you manually search for the required files, you will not be able to download them from the developer’s servers. There are several ways to restore functionality. Let's look at the most effective one:
- In the Accessories folder of the Start menu, look for the PowerShell utility. It needs to be run as administrator. To do this, right-click on the program name and select run as administrator from the context menu.
- In the window that opens, enter the command Repair-windowsImage -Online –RestoreHealth.
- Go to Command Prompt, it is located in the same folder as the PowerShell utility. It must also be run as administrator.
- Enter the command sfc /scannow, confirm your action with the Enter button.
Now you can try installing the updates again. If everything goes well, then you don’t need to do anything else. If the error appears again, you need to restore the system using the disk with it. To do this, you will need to have a ready-made installation disk or its virtual image.
Run PowerShell again as an administrator and enter the command: Repair-windowsImage -Online -RestoreHealth -Source:WIM:E:\sources\install.wim:1. In it, the letter E corresponds to the location of the disk in the system (first look at how your installation disk is displayed in the “Computer” window), and the number “1” is the edition number of the operating system. Then enter the Healthy command to check the storage status.
Error 8024200d
On your computer screen you can see code 8024200d - a Windows 7 update error, after which installing new versions becomes impossible. First, try to fix the problem using the official WindowsUpdateDiagnostic utility. It is distributed through the developer's website. The interface of this utility is as simple and clear as possible, even an inexperienced user can handle troubleshooting.
If after running the utility no faults are found, then you need to install the updates manually. Choose the version yourself, for example, KB2919355 or newer. Download the update file from the official website of the operating system, and then run it like any other distribution. After installation is complete, restart your computer. You can now use the updated operating system. Her error will disappear with the upgrade.
Check whether the new version is installed correctly through the “Update Center” (it can be found through the “Control Panel” located in the “Start” menu). If you did everything correctly, you will see a green “Shield” icon in the Update Center, next to which it will indicate that all the necessary components have been installed. To ensure that you no longer have problems with updates, you need to go to the C:\Windows\SoftwareDistribution\Download folder and delete all files from it.
Troubleshooting
Before solving the problem manually, you should refer to a special built-in program called “Troubleshooting”. As a rule, this tool temporarily turns off the Wuauserv program and, in a short period of time, changes the name of the partition with the cache stored there. To enable troubleshooting you need to do the following:
1. In the Windows search bar, enter two words: Troubleshooting, and select the result provided.
2. On the Computer Troubleshooting page that opens, click on the “System and Security” section.
3. Next, click on the “Advanced” button and check the box next to the “Automatically apply fixes” line. To confirm the action, the system will ask you to indicate that you are enabling this mode as an administrator - confirm.
4. After this, you can begin the automatic error correction process; this procedure may take several minutes. After fixing the errors, start installing all the necessary updates, and that’s it, the problem will be fixed.
If there is not enough space for Windows virtual memory: we solve the problem
Microsoft's operating system contains small flaws.
Some users have experienced that their computer has little virtual memory. What they are notified about by error. Before this, 95% of users are faced with the problem of the computer slowing down or programs not starting. This is the first sign that the machine does not have enough RAM. Problems are solved by performing simple manipulations.
Even a beginner can perform the steps. But first, let's determine the cause of the problem.
A sufficient amount of virtual memory is required for normal operation of the system.
When a user works with a computer, the latter has to perform a number of operations and respond to requests and commands from the administrator.
If the RAM is loaded, then processes are difficult to complete and the computer gradually freezes. Initially, the user sees that the program is not responding, and then the operating system prompts it to terminate the process.
This is necessary to prevent data loss. Here it is important to learn to recognize the problem at the first manifestations.
An indicator that the RAM is heavily loaded is a decrease in system performance. In this case, the computer does not yet signal a failure. There are problems opening applications.
This can be seen when the user launches a program, but it does not open.
If there is no response from the program for a long time, this indicates that the computer’s physical memory is full and will need to be freed
What memory does Windows mean?
When the user saw a message about lack of free space, it initially meant RAM and virtual memory. The latter is controlled by the paging file. It is used as an addition to the operational one when there is not enough RAM.
Windows message about low RAM memory
Users who have no computer experience or are not technically savvy consider the error as insufficient hard drive space. This gives them justifiable bewilderment, because the hard drive holds a lot of GB, but there is not enough memory in the system. It turns out to be a dead end situation from which they cannot find a way out.
Reasons for the error
Before we begin to fix the problem, we will identify the common causes that could cause it to occur. Provoking factors include:
- Opening 3-10 applications or programs at the same time (depending on the resources consumed) will result in the computer not having enough memory to process the command and an error will pop up. This is the most common case, and can be solved by shutting down unused applications;
- limited amount of installed space, and it is not necessary that the computer is old, because some programs require 4 or more GB of RAM for correct operation, and the average 2GB is not enough;
- the hard drive is overcrowded, respectively, the user does not have enough free storage space for the correct automatic configuration and operation of the paging file, that is, the virtual one does not fit;
- changing the size of the paging file, perhaps the user previously played with optimization or used a third-party application for these purposes, that is, the size was forcibly changed to insufficient for correct operation, and the user simply forgot about it;
- the action of malicious or potentially dangerous programs, when their algorithm is based on the gradual consumption of free space, a constant leak occurs;
- incorrect operation of the program, when launched, a message appears stating that there is not enough RAM.
In principle, these are, if not the only, then the main reasons against which the problem occurs. Now let's start exploring ways to solve the problem.
4 Ways to Fix Low Space Problem in Windows 7, 8 and 8.1
So, as we decided earlier, if there is not enough RAM on the computer, then we try to fix the problem by opening a small number of applications.
This will protect the user from losing personal information and increase the performance of the machine. The user must pay attention and remember those programs that consume a lot of resources.
If you don't run them at the same time, the problem will disappear.
It is not always possible to solve a problem this way.
After all, people often use heavy programs at the same time for work, that is, the above measure is permissible only at home, it is not implemented in a work environment.
Often users are faced with the fact that the message “There is not enough memory to complete the operation” pops up on the desktop. By following the instructions below, you will learn how to solve the problem in a matter of minutes.
Error message due to insufficient RAM
So, freeing up RAM in Windows 7 and subsequent developments is done in several ways; you may have to combine them, but this is only in the most severe cases.
Method number 1 - increasing the size of the paging file
If the problem does not appear systematically, then to fix it you need to clear the computer’s virtual memory. This is done through the Task Manager (close unused processes). Otherwise, the user will have to make adjustments to the size of the paging file. Sometimes the operating system itself does this.
Here I will immediately note that if you adjust the size of this file, the problem will disappear, but there is a high probability that the computer will slow down. The system processes information contained in RAM faster.
If you increase the size of the swap file, the computer will read information from the hard drive, because that’s where it is located, hence the brakes.
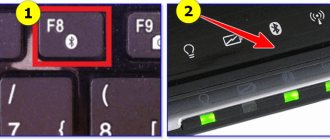
To make adjustments to the file size, hold down the keys marked in the picture:
Press the desired key combination
Or open the start menu, then go to the control panel, from there go to the system menu and select additional options:
Go to advanced options
After clicking, a dialog box will open in which we will go to the “Advanced” tab and open the performance parameters:
To adjust performance, click Settings
Here let's go to the additional settings tab, where we have virtual memory, and click on the change button:
At the very top, uncheck the automatic size detection box and set the desired number yourself:
Advice! If you have two physical hard drives installed, then move this file to where the system is not installed.
If you do not know what parameters you need to specify regarding the size of the paging file in order to free up RAM on your computer, then I recommend proceeding from the following proportions: for standard work, set to 1.5 of the total amount of RAM, for games, at least 2.
Method No. 2 - installing an additional RAM module
The first method is recommended for those users who very rarely encounter a problem; if your RAM is constantly loaded, then it is best to install another stick in the system unit. Look at what is installed now: brand, type, volume and buy an identical one.
If the user does not have the means or there is a problem at the workplace, then you can try to clear the RAM on the computer through the Manager and do not run many programs at the same time. There is no other way.
Method No. 3 – checking the memory consumed by the program
When an error occurs while running a certain program, you need to check how much resources it is consuming from RAM. If there are too many of them, then a memory leak occurs. The problem can be fixed by a RAM cleaning program or by the user himself. In the second case, we do the following:
- We define the consuming application in the task manager: right-click on the bottom panel of the desktop and select the appropriate item;
- In the application, go to the processes tab;
- For ease of identification, arrange applications by consumption. To do this, click on the word “Memory”.
When you have found the required process, check it for errors; you may have to remove and reinstall the program.
If cleaning ram in this way causes difficulties, then we will resort to the Ccleaner program. If it is not installed, then download it from the offsite, go through a simple installation process and start working. Next, you need to select the “Cleaning” option, select the Windows tab. When the program finds errors or unnecessary files, click on “Clean” and you’re done.
Method number 4 - check memory using built-in tools
In rare cases, the system itself determines that the computer's memory is loaded and then the troubleshooting wizard opens. If the user sees such an agreement, then open the application and start troubleshooting
Important! Before you begin, save all data and close applications.
Click on the first option and wait for the wizard to complete. Everything happens automatically. Upon completion of the application, if it is discovered that the system memory is excessively consumed or incorrectly allocated, you will be prompted to contact the hardware supplier; there may be a technical malfunction of the memory board chip.
Here are the main ways to help fix the problem. Everything is quite simple and even beginners in computer science can cope with them.
Source: https://pcyk.ru/windows/esli-ne-xvataet-mesta-dlya-virtualnoj-pamyati-windows-reshaem-problemu/