Hello, dear readers! In today's post I will tell you how to install a network card on a computer, how to connect this adapter and into which connector, where it is located in the computer and whether it is possible to carry out the procedure yourself. You can read about how to change a fan in a computer power supply here.
Types of network cards
External - this type of network card is necessary for owners of laptop computers, if for some reason you do not have a built-in one or you need a more powerful network card, then purchase an external network card.
Internal - this type of card is installed on desktop computers or server stations to increase the speed of data exchange or simply for an upgrade.
Built-in - this type of network card is already built into the motherboard by manufacturers; it is not always of high quality and fast, but it is quite suitable for a home computer.
Integrated or built-in
Probably the most common type. They are chips mounted on the motherboard. Accordingly, all the necessary connectors are located on the rear panel. Most modern motherboards come with this type of network adapter. It is worth noting that Wi-Fi modules are also network cards for a computer, however, they are usually called “Wi-Fi module”, of course, if it is not integrated.
Internal PCI and PCI-E network cards
These devices are separate boards that are mounted in specific connectors or buses. The most common ones are PCI and PCI-E. The first form factor is gradually becoming obsolete and giving way to PCI-E. But such cards can still be found on the market. PCI-E can have different lengths. But when specifying characteristics, this parameter is usually discarded, since it is standardized.
PCI and PCI-E are easy to distinguish
It is worth mentioning separately the PCMCIA standard. This specification was developed as an expansion module and was very widely used in laptops of the past. With its help it was possible to connect not only network cards, but also many types of other equipment. Today this standard is practically not supported.
External USB network cards
A relatively new trend in the adapter market. It is an external device connected to a USB port. Externally it looks like a flash drive. All microcircuits are hidden in a neat case. In the simplest case, it may have one RJ-45 connector. A very convenient and compact type of network card.
Manufacturers of popular cards and their products
When you mention network cards, several manufacturers come to mind, whose names are always well-known: Intel, Tp-Link, D-Link, HP, gembird and others. Since network cards do not have any special advanced functionality, let’s take a quick look at the manufacturers and look at their devices.
Intel EXPI9301CT
Intel can produce not only processors, but also network adapters and many other devices.
Gigabit low-profile network adapter from a well-known company. It has 1 RJ-45 connector and works with all known operating systems. Connection type: PCI-E. You can buy such a network card for a computer for 2,000 rubles.
TP-Link TG-3468
Budget option from TP-Link
Gigabit option from the budget segment costing 500 rubles. Connection bus – PCI-E. There is 1 RJ-45 connector. Additional features include support for Wake-on-Lan.
D-Link DUB-E100
Compact and convenient device
Simple USB adapter. The maximum data transfer speed is 100 Mbit/s. USB version - 2.0. Supported by all known operating systems. There is one connector for connection. The adapter costs 800 rubles.
3COM 3C905C-TX-M
Classic network adapters
A regular 100 Mbit/s adapter with a PCI bus. 1 RJ-45 connector. Not all operating systems are supported. The cost of the device is 3,000 rubles.
ASUS NX1101
The low profile will help save space for other internal modules
Card from Asus at 1000 Mbps. The PCI bus is used for connection. RJ-45 connector − 1. The device costs 930 rubles.
Apple MD463ZM/A
Apple has its own connection standards
A device designed for Apple products. Accordingly, instead of a USB port, it uses its own Thunderbolt interface. The data transfer speed is stated to be up to 1 Gigabit. There is 1 type of RJ-45 connector. The adapter costs 2,100 rubles.
Acorp L-1000S
Simple externally and internally model
At one time, Acorp was one of the leaders in the production of network equipment, in particular, Dial-up modems. This card is a network adapter with a PCI 2.3 interface. The data transfer speed is 1 Gigabit. To connect the cable, 1 RJ-45 port is used. Wake-on-LAN option available. The adapter costs only 370 rubles.
ST Lab U-790
This model can be put in your pocket and taken with you on the road.
A simple 1000 Mbit/s network adapter. Connects via USB version 3.0. There is 1 RJ-45 connector for the cable. All modern systems are supported. You can buy a card for 1,500 rubles.
Zyxel GN680-T
Zyxel, or in common parlance “Zukhel”, is a reliable and easy-to-use
Gigabit card based on PCI 2.3. One RJ-45 connector and Wake-on-LAN. A large list of operating systems is supported. The cost is 1,300 rubles.
5Bites UA2-45-02
The model can be presented in two colors: black and white.
Quite a simple and budget device. Its cost is only 400 rubles. For that kind of money, the user will receive 100 Mbit/s, a USB 2.0 interface and 1 RJ-45 port. Almost all systems are supported.
Setting up a local network in Windows 10
A local network allows you to connect computers with each other using a router via a wireless connection or a switch. Setting up a local network in Windows 10 is also suitable for a cable connection, but it is used less often. The user will be able to connect to it not only through a desktop computer or laptop, but also through a mobile device. Correctly setting up your home network will allow you to log into it from other operating systems. All you need to do is enable network discovery on both machines.
How to set up a local network in Windows 10
First you need to do some preparation. First you need to select the type of network profile; it can be private or public. Public is used in public places like cafes or hotels. Private - at home, and you need to choose a personal one. Setting up a Windows 10 network will help protect folders and files that will be accessible. Therefore, we select only the “private” profile.
Open the Start menu - Settings - Network. Next, it depends on your connection, if the computers are connected by cable, then select Ethernet. If you are using a router, then go to wi-fi. Left-click on the network name and select a private profile.
Setting up a local network in Windows 10
This happens in two ways. You can access additional settings via the tray icon.
The example shows a wi-fi connection icon. If you have a cable connected via a network card, then a small monitor will be displayed. Next, setting up the network between Windows 10 is the same. Select the Sharing options section.
Setting up a network consists of the following steps: 1. Turn on network discovery so that our computer is visible to other network participants. 2. Enable sharing of those files, folders and devices (printer, scanner) that we want to open for the local network. Users will be able to not only download files, but also edit them and add their own (how to select specific files is described below).
3. Save the changes. Setting up a Windows 10 workgroup allows you to give free access and set a password for protection in the All networks section. Password protection is not required for a home network. If you install it, then to access the file from a remote computer you will need a name and password for each user.
At this point, setting up your home network is complete and you can move on to selecting folders that will be available to other users.
Setting up sharing
If the settings are made the same for everyone, then in the “Network” item all computers from the created network environment should be visible.
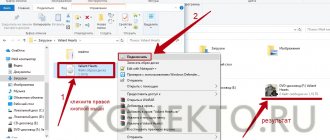
Setting up a Windows 10 homegroup in the latest versions is not necessary, because... It was removed when the system was updated. If the settings are different, then enabling network discovery will be done through Explorer. It's easy to check whether network discovery is enabled. Open Explorer and look at the “Network” item. If there is a message stating that no network devices are visible, click on OK.
A bar should appear at the top with the option to enable sharing of the documents and folders we need.
If private network is enabled in the settings, nothing else needs to be done. If it is not yet selected, a window will open with a recommendation to change the profile to private. We agree and close. Now all users should be displayed in the Network item and the Internet setup in Windows 10 is complete.
Setting up shared access to folders and files
We just need to right-click on the desired file and call up the context menu. In it we go to the section for providing access and selecting specific people. Next, we determine the person who will be able to view and work with them. You can leave it All, then any member of the local network can use it.
With password protection enabled, you will need to create users and assign them names and passwords.
Access rights can also be customized. By default, only reading files is possible, i.e. users will only be able to view them. To be able to edit, delete and add new ones, you need to select Read and Write.
To receive a link to the desired document, just click Share. In the window that appears, you need to select the link and forward it to any member of the local network. We paste it into the address bar in Explorer and the desired document will open. Another option: from Explorer you need to open the machine that has the document we need.
How to remove access:
We find the folder we need and also call the context menu. Select the access section in it and click Make inaccessible.
smb in windows 10 and setting available files
It is possible to check all shared folders through Explorer. In the address bar, enter \localhost and see a list of all publicly accessible files.
setting up a network card in Windows 10 and firewall
If, after all the steps you have taken, you cannot access the folder from another computer, you need to check your antivirus. This must be done on the computer where the required file is physically located. To get started, just temporarily disable the firewall. If after this access is working, then we go to the settings. You need to find the section where permission to share is given in this version of the system. After confirmation, it should work fully. Network card settings in Windows 10 are registered automatically. Resetting network settings on 10 may only be necessary as a last resort. Usually, if there are network problems, updating the driver is enough.
Internet connection optimization
There are several reasons for a slow connection, some of which you can solve on your own. Here are the main ones: 1. Damaged cable - only replacement will help here and you need to contact a specialist. 2. Outdated drivers for the router - you can update them automatically. 3. Enabled speed limits - this applies more to file hosting services, in the settings of which you can remove the limit on the file transfer speed. 4. Incorrect settings - carefully check all steps for setting up the local network. If at least one is not made according to the instructions, we correct it.
If everything is done correctly, file sharing and joint editing will be available on all computers connected to the network.
How network cards work
The adapter is located at the second, data link layer of the OSI model. In order for the operating system to know how to interact with the network card, driver installation is required. They are usually supplied with the device or are available on the manufacturer's official website. Many versions of Windows can pick up adapters installed in the system without installing additional drivers. As for Linux distributions, almost all of them are able to work with the adapter out of the box.
Why do you need a network card in a computer, and how does it work? When receiving data, the card receives a set of signals, as a result of which it converts it to a certain sequence of bits. Then the checksum of this piece of data is checked. If it matches, then they are placed in RAM. If not, they are discarded and an error is reported. When transferring data to the cable, all steps are performed in reverse order. It is worth noting that network adapter manufacturers, in order to make them less expensive, shift many tasks onto the shoulders of drivers. In server solutions, network cards may have their own processor, which is itself responsible for processing, encrypting and converting signals.
A little educational background: OSI is a generally accepted model and international standard by which protocols and devices are developed. It has 7 levels, each of which implements its own task. A short list of them looks like this: physical (cables, radio channels), channel (network cards, DSL), network (routers), transport (TCP, UDP protocols), session (exchange and maintenance of information flows), presentation (data conversion), application (HTTP, FTP, bitTorrent protocols).
Setting up a local network in Windows 10
A local network allows you to establish a connection between several computers in the same room, establishing shared access to files. As a result of setting up a home network, users have the opportunity to work on the same document or play games together on different computers.
Local network capabilities
Setting up a Windows 10 network allows you to get a number of convenient features that will be useful for users who have several computers at their disposal.
- Sharing files from different computers. Fast data transfer regardless of volume.
- Share a printer, scanner, or other network device.
- Setting up online games and entertainment.
These are the main directions, each of which contains a number of possibilities. For example, fast data transfer allows you to back up important information so that if one machine stops working properly, the information you need can still be accessed from another computer.
To start using all these functions, you first need to properly configure the local network in Windows 10. You can connect machines that have the same versions installed, a PC and a laptop with different versions of Windows - between “seven” and “ten” there are no compatibility restrictions.
Networking
The first step is to set the same workgroup name on all computers that you are going to connect to the network. On Windows 10 and other versions this is done the same way:
- Press Win+R to open the Run .
- Type " sysdm.cpl " to open system properties.
- Computer Name tab will immediately appear . Look at the name of the working group. To put the same name on other computers, click " Change ". Use only Latin letters!
The setup then continues in the “ Network and Sharing Center ”, which is launched through the Control Panel or the connection icon in the notification area. Next you should move on to changing additional parameters.
On Windows 10, you can still get here through the “ VPN ” section on the “ Network and Internet ” tab in the system settings.
Here you need to enable network discovery with automatic configuration, file and device sharing, and allow the system to manage homegroup connections.
Attention: Enable network discovery and passwordless sharing is required for all profiles! You'll set up your home or work profile first, then your general profile and all networks.
Next, proceed to setting up additional settings. Disable password protection when sharing so that the connection between computers can be established without additional barriers.
This operation must be repeated on all computers. As a result, local network participants should have:
- One workgroup name is assigned.
- Network discovery enabled.
If the home network into which the computers are connected is built on the basis of a single router, then the above steps are sufficient for the normal operation of the local network. If the computers are connected directly using a crossover cable or the DHCP service, which independently distributes IP addresses to machines, is disabled on the router, then additional configuration must be done.
- Open Network and Sharing Center , then go to the Change adapter settings .
- Select the network card in which the crossover cable is installed and open its properties.
- O and " Use the following DNS ". Fill in the lines with the values shown in the screenshot.
On the second computer you need to add the following data:
The IP address will be different on different computers. If on the first machine you wrote 192.168.0.2, then the second address will be 192.168.0.3 and so on, depending on the number of network participants. The rest of the data remains unchanged.
Enable sharing
The local network has been created, but in order to use programs and files from one computer that are stored on another machine, you must also set up shared access for them. Setting up the Windows 10 network is essentially complete here. Let's create a shared folder with documents:
- Right-click on the folder and open properties.
- Go to the “ Access ” tab, click on the “ Advanced settings ” button.
- Put o. Click on the “ Permissions ” button.
- Set permissions. If you want to only be able to open a directory from another computer and view its contents, then in the “ Allow ” column. To provide full access, check the appropriate box. Save the configuration by clicking " OK ".
Then you need to return to the folder properties and go to the “ Security ” tab. Here you should click the “ Change ” button.
Group Permissions window appears . Below the Groups or Users , click Add .
Enter the name " Everyone " (no quotes needed), click " OK ".
Set the same permissions that you did earlier when setting up access.
After allowing sharing, it is recommended to restart your computer so that Windows 10 network setup completes correctly. The next time you turn it on, the “ Network ” section will appear in Explorer, which will display the computers between which the connection has been established.
Inside the directory under the name of the other computer, you will find folders that are configured for sharing.
Inside the folder will be the same documents that are stored on another computer. If you have given full access to the settings, you can easily edit them from another machine.
Sharing Internet access
If a local network is built without a router, using a direct wired connection of computers, and one machine has Internet access, but the other does not, then this can be quickly corrected. The described actions are performed on the computer that has a connection to the global network.
- Click the connection icon in the notification area. Open Control Center and proceed to change adapter settings.
- In the list of available connections, find the WAN connection. Open its properties, right-click.
- On the Access , allow other members of your home network to use this Internet connection.
Now from one computer the Internet will be distributed to other participants in the network. This will affect the speed, but when accessed from different devices through the router, the speed is also divided in proportion to the load, so this is a common practice for sharing the Internet.
Main characteristics of network cards
The adapters have quite a lot of characteristics. But most of them are useless for home use. Therefore, let’s consider those points that, one way or another, significantly affect the price and scope of use:
- data transfer rate . Almost all modern devices, even those that cost 500 rubles, can support a transfer speed of 1 Gigabit. Therefore, there is no significant difference here. However, it is worth paying attention to this parameter;
- interface or connection type. This is how the network card will connect to your computer. There are currently three dominant connection types on the market: USB, PCI and PCI-E;
- number of RJ-45 connectors . If you plan to use a computer to transmit the Internet over the next link in the network, or you simply need a local network, then you should take a closer look at models that have 2 or more connectors on board;
- card profile. There is a misconception that a low profile card, or Low Profile, means it only takes up one slot. This is wrong. Low profile in networking as well as video cards means the width of the board. In simple terms, this is the height of the card above the motherboard. Although almost all network cards are low-profile, if there is not enough space inside the system unit, you need to choose a device with the Low Profile mark.
All other characteristics are not so important, and in most cases they can be neglected.
Changing network adapter settings for dynamic addresses
But when connecting via a local network or creating a connection based on routers (routers or ADSL modems operating in wireless broadcast mode), you do not need to specify the above options.
All items should be set to receive addresses automatically (this is a prerequisite for a wireless network).
Installing a network card into the system unit.
To install a network card on the motherboard, you first need to remove the side cover to access the inside of the case. Then, after you have removed the side cover, you will see a motherboard with peripherals installed in it, but to install a network card, pay attention to the photo, you will need a PCI connection interface, this slot is present on every motherboard, unless of course you have equipment is already installed there, for example an old network card that you want to replace.
First, we need to prepare a place if the network card is installed first, first we will make sure that the slot for the card is free, then we need to remove the plugs from the back of the case; in sophisticated cases they are unscrewed, and in simpler cases they are broken out. Next, we install our network card in the free slot. Please note that in this photo we have 4 places where you can install a network card; we specifically took a couple of pictures of different motherboards to understand that there can be more than two slots for installation.
Next, after the process is completed, you need to install the driver from the disk when you start Windows for the first time; they usually come with the network card. If you do not find this disk in the kit, install it manually through the task manager by automatically searching and installing the driver for the network card.
Checking the adapter
If you configured the Netgear WNR612V2 router or any other router, you must have seen a network card port (RJ-45) on the back of the system unit. It looks like this:
If the connector is located near other ports (usually USB), you are dealing with an integrated network card. If the RJ-45 port is located separately from other connectors, then your system unit has a separate board installed that is responsible for connecting to the network.
After detecting the port, you need to check whether the hardware is installed correctly in the system.
To do this, go to Device Manager and make sure that the network card is detected and its drivers are installed correctly.
Reinstall them if necessary.
The network adapter can also be disabled in the BIOS. Restart your computer and go to Basic I/O.
Find the “PCI Confuguration” parameter (usually it is located in the “Advanced” section). Make sure that the “LAN Controller” item is set to “Enabled”.
Where is the discrete network card connected?
Almost any motherboard is equipped with an integrated Ethernet adapter, which is used to connect a computer or laptop to the network. Like any electronics, this chip can fail. Changing an expensive motherboard because of such a small thing, if it still works well, is a little expensive.
And you don’t want to be left without the Internet - you won’t be able to see funny pictures. Don't play tanks. In such cases, it is worth installing a discrete Ethernet card, which is connected as an additional module.
You can use a network card that connects via a USB port. The disadvantage is that one such slot will always be occupied, and there may not always be enough of them to connect all peripheral devices.
There are also advantages: connecting everything is very simple. It is enough to install such a module in a free port and wait until the drivers are installed automatically.
More popular are LAN controllers that need to be installed in the PCI slot on the motherboard. This part looks like a small scarf with a port for connecting a cable at one end. It is quite inexpensive, even if it supports gigabit data transfer speeds.
The PCI slot can operate at frequencies of 33 and 66 MHz, depending on what device is connected to it. The slot speed is quite enough for comfortable Internet use with data transfer speeds of up to 150 Mbit/s.
As a rule, providers rarely provide higher speeds, since such tariffs are not popular.
How to install an Ethernet controller
To change the board or insert a new one, you need to open the left cover of the system unit by unscrewing a couple of screws from the back. Having selected the PCI port where you are going to add a new part, break off the blocking plug on the back cover opposite so that there is somewhere to remove the part panel for connecting the wire.
First try on the network card to the slot to determine which plug is unnecessary. After removing the plug, carefully insert the LAN controller into the port and secure the bracket that rests on the back cover of the system unit with a screw.
You can put the cover of the system unit back, connect the cable to the LAN port and install the drivers. It is possible that Windows will find suitable software in its own database and install it independently.
If this does not happen, the driver needs to be installed from the disk that comes with the kit or by first downloading it from the manufacturer’s official website, which is more common; now there are few users who install CDs or DVD-roms on their PCs.
If you replace one LAN card with another, you don’t even need to break out the plug in the case: you dismantle the old part and install the new one.
The articles “Procedure for assembling a computer” and “Parts and components necessary for assembling a computer” will also be useful for you. I would be grateful to everyone who shares this post on social networks.
Connecting the card in BIOS
What signs can be used to determine that the card was recognized by computer hardware?
If the network card is not working, then first of all you need to determine whether it is recognized by the computer hardware. Currently, all boards support Plug-n-Play technology, which means that when they are inserted into a computer, they are automatically assigned the necessary hardware parameters (interrupts, I/O ports, memory addressing). After this, these parameters are picked up by the network card driver, which is either in the kernel (in UNIX-like OSs) or installed as a separate module (in Windows). Sometimes, if a card is not functional or is completely incompatible with a given version of the operating system, you will not see it at all in the operating system output. If the card is somehow detected by the operating system, then information about it will appear in the boot logs (in UNIX this is the dmesg command). But before understanding the boot logs, you need to check whether the card is recognized in the computer’s BIOS.
to enable network card support in BIOS
To enable a card disabled in the BIOS or at least check whether the network card is recognized by the computer, you must:
- Reboot your computer.
- After the first successful squeak, quickly and alternately press and release the F2 and DEL keys on the keyboard. The fact is that one of these keys is responsible for launching the BIOS/UEFI setup screen on the computer, but which one is described in the documentation for the motherboard, but not for the computer.
- Therefore, by quickly and alternately pressing these keys, you are guaranteed to enter the BIOS on a running computer before loading the operating system.
- After the BIOS screen appears, you need to enter the item, which may be called “Integrated Phieriferals”, “PCI Devices”, “I/O Devices”, etc. It is usually second in order from the main screen.
- If you are interested in the built-in card, find the item “Onboard Devices”, “Network Devices”, “Onboard Lan”, and look there for items containing the word “Ethernet”. For example, but not necessarily, “PCI Gigabit Ethernet” - for a built-in wired network card, “Wireless Ethernet Adapter” - for a wireless Wi-Fi card, if the word Bluetooth appears, then this indicates a built-in Bluetooth adapter.
- If you are interested in a network card that you installed in one of the free sockets (slots) of the PCI bus, look for the words “Ethernet” and “Bluetooth” in the Slot# items, where # is the number of the slot in which you installed the card;
- Next to the built-in map item, and sometimes for an external map, there may be Enabled, Disabled, Auto icons. The Enabled item means that the device is turned on, Disabled means it’s turned off, Auto means the behavior is determined by the BIOS/UEFI firmware.
- To make sure that the device is enabled in the BIOS, items 4 and/or 5 must be present, and in item 6, the devices should be Enabled or nothing. Correct these values.
- If you do not see the indicated items, then most likely you have hardware problems with the equipment or BIOS. Try replacing the hardware. If, under no circumstances, does the board come out of the Disabled position, then, apparently, it is incompatible with your computer. Try replacing the hardware as well. (Or stop using it).
- After making changes, press F10, select Yes as confirmation and restart your computer. Next, check whether the card is recognized by the operating system.
Connecting a card in Windows
How to check the card status in the Microsoft Windows operating system?
Any device recognized by a Microsoft Windows operating system version higher than Windows XP will appear in its Device Manager. You can get to the Device Manager from the “System” item in the Control Panel (called by pressing the Win+Pause key combination), but it’s easier to get to the Device Manager from the command line. To do this you need:
- Open the command line or Windows terminal with administrator rights (if you want to make changes);
- In the command line that opens, type devmgmnt.msc and press Enter.
Solving adapter related errors
During setup or use of the adapter, the errors described below may occur, which will prevent you from using the Internet or local network. Most of them can be fixed without replacing the card.
The card does not have valid IP settings
You may encounter a similar error when setting IP parameters or scanning a network module using standard Windows tools designed to automatically resolve errors.
Manually obtaining settings
If you have not changed the settings of the adapter, that is, it obtains an IP address automatically, then manually requesting an IP address may fix the problem:
- Type “cmd” in the Start search bar. Expand Command Prompt using administrator rights.
Open Command Prompt as administrator - Run the commands “ipconfig /release” and “ipconfig /renew” sequentially. Done, all that remains is to check if the error has disappeared.
Execute the commands “ipconfig /release” and “ipconfig /renew”
Reset
Resetting settings to default values is the most reliable way. How to do this in several ways is described in the section “Resetting the adapter settings”.
Manual adapter configuration
If the previous methods did not help, you should try setting the settings yourself:
- While in the map status window (how to open it is described in the “Viewing map parameters” section), click on the “Properties” button. Find the IPv4 item, highlight it and click on the “Properties” button again.
Open “Properties” IPv4 - Disable automatic search and set the following parameters: for the main and backup DNS servers, the values are “8.8.8.8” and “8.8.4.4”, respectively, the IP address and the default gateway are the same parameter, which can be viewed on the router itself or in instructions for it usually looks like “192.168.1.1”. The remaining parameters will be entered automatically.
Setting parameters for IPv4 manually
Error "This device cannot start"
This error appears in the “Device Manager” not only with the adapter, but also with other connected devices, and has code 10. To fix it, you need to update the card drivers. How to do this is described in the “Updating and installing drivers” section.
The adapter does not work, does not install, or does not appear
If the adapter does not work, does not install or is not displayed, then the reasons may be the following:
- It is disabled in the BIOS, you need to start it manually. Or it is disabled in the system itself, since there is another physical or virtual adapter. You can check where it is enabled and where it is disabled using the “Card Activation” item.
- If the card is not displayed in the “Device Manager”, then click on an empty space in any area of the window and select the “Update configuration” function. Then look for the card in all the items on the list. It may not be recognized by the system and will be located under a different name or in the wrong section. Sometimes it is transferred to the “Other devices” block under the name “Network controller”.
While in the “Device Manager”, click the “Update system configuration” button - Update or reinstall the adapter drivers, first remove the already installed ones. It is important to install only official drivers that exactly match your card model. How to properly update and install drivers is described in the “Updating and installing drivers” section.
Changed map settings disappear
If, after you close the window with the changed settings or restart the computer, all the changes you made disappear as if you never made them, then there are two ways to solve this problem: set the settings by running commands and change the incorrect values in the registry.
Making changes via the Command Line
Launch “Command Prompt” with administrator rights and sequentially execute the following two commands: “route delete 10.0.0.0” and “route -p add 0.0.0.0 mask 0.0.0.0 X”, in the second command “X” is the IP of your router, which usually looks like "192.168.0.1", but in your case it may have a different meaning.
How to turn on the adapter?
Sometimes a network card is connected, but the system does not see it because it has been deactivated. To run it through the BIOS, follow these steps:
- Select the reboot mode and go to the BIOS - to do this, click on the F12, F1 or Esc key. The key you choose depends on your individual PC configuration, so you may have to try several options. In addition, upon startup, an inscription always appears indicating which combination you need to press to go to the settings - focus on it.
- In the settings that open, select the section containing the word “Integrated”, where there will be the line “On Board” or something close and similar to it - this is the network card.
- If you see that the value “Disabled” is applied opposite the specified line, the adapter is truly disabled. Change the status to “Enable”.
- Before you exit Settings, use the Save and Exit keyboard shortcut to make the settings take effect.
Activation directly through Windows is performed as follows:
- Go to “Settings”, stop at the “System” section.
- Select the “Hardware” menu and find the network adapter in the drop-down lines - if it is disabled, a red cross will appear next to the name.
- To run a part, double-click on its name, check the “Hardware in use” checkbox, and click “OK” for the settings to take effect in Windows.
If there is a yellow exclamation mark next to the name, this means that the card is activated, but you need to change the drivers for it to work correctly.
Resetting the adapter
You can reset the adapter settings, namely TCP/IP and DNS, using standard Windows tools or using a third-party program from Microsoft. Conditions under which a reset must be performed:
- Internet connection speed is low or unstable;
- files are downloaded broken, this happens due to the same instability of the Internet;
- When connected, the Internet works fully, but after a few minutes problems begin;
- Manually changing the adapter settings led to other problems with the Internet.
Standard method
Launch “Command Prompt” by going to “Start” - “Accessories” - “Command Prompt”, and enter the commands “netsh int ip reset c:\resetlog.txt”, “netsh int tcp reset” and “netsh winsock reset”, which will perform a factory reset. Done, the registry branches and system files will see changes, and you may need to restart the computer.
Execute the commands “netsh int ip reset c:\resetlog.txt”, “netsh int tcp reset” and “netsh winsock reset” in the “Command Line”
Through a third party program
You can download the NetShell program from Microsoft, which does not require installation, from their official website. Once you launch it, follow the instructions that appear on the screen to reset all changed settings.
Download the program to automatically reset the card settings
Disabling a network card
If the device stops working, you need to install a new adapter or you want to disable it, this is done through the BIOS, not Windows.
To stop the equipment, follow these instructions:
- Start the PC or reboot if the computer is turned on and press the F12 or Del key when starting the BIOS. To enter the settings, use the F1, F10 and other keys. If you don’t know which one to choose, read the text “Press... to enter Setup”, where the desired combination will be indicated.
- In the parameters, open the section with the word “Integrated”, where you will need the line “On Board LAN” or something similar.
- Change the status of the line to “Disabled” to deactivate it.
- Don't forget to use the Save and Exit button to save your changes.
As you can see, you can disable the network card through the BIOS, and it can be turned on in the same menu or in the Windows settings. All this is not difficult to do and, if necessary, you can easily complete the task yourself.
Changing DNS server addresses
If after this there is still no connection or the Internet connection is unstable, you can try changing the addresses of the DNS servers by disabling their automatic assignment and entering addresses, say, from Google, in the appropriate fields, as shown in the image below.
It is not necessary to enter these exact parameters. You can use any other sets of free addresses that are freely available on the Internet (for example, from Yandex).
Briefly, what is a driver?
A driver is a program (software) that is needed to connect the operating system (OS) with devices connected to the computer and “explain” to the OS how to use them correctly. Almost every device that accesses the OS has its own driver: external devices (peripherals) - mice, printers, monitors, keyboards, etc. , internal (components) - video card, network adapter, motherboard, processor.
Drivers for most devices are already integrated into the OS, but it may turn out that for complex and specific devices, which include a network adapter, you will need to install the latest driver.
I can't install the driver
Typically, a driver archive is downloaded from these sites. Sometimes it may just be an “exe” file (we launch it with a regular double-click). If this is an archive, then first you need to unpack it. Next, we find the same “exe” file in it and launch it. But sometimes it happens that there is no “exe” file. Then the installation may be a little different.
- In Device Manager, select our adapter and click “Update Drivers”.
- Next, select the second item.
- Now click “Browse” and select our driver folder. Exactly the unpacked folder, and then click “Next”.
NOTE! If the drivers somehow do not install or do not work correctly, then make sure that you downloaded the software correctly - specifically for your OS and the required bit rate.
Installing the network driver
The driver installation procedure can be divided into 2 stages: hardware identification and driver installation.
In order to identify manufacturers and specific models of equipment, a coding system for models and brands of computer components was developed.
Typically, the code for a network adapter has the following form: PCI/VEN_xxxx&DEV_xxxx&SUBSYS_xxxxxx, where VEN_xxxx is the equipment manufacturer identifier (Vendor ID), DEV_xxxx is the equipment model code (Device ID).
Step 1. Equipment identification
In order to find out the code, click Start, enter “Device Manager” in the search field and go to the corresponding menu.
Next, you need to find the “Network adapters” or “Other devices” submenu and right-click on one of the submenu items, for example, in our case it will be “Realtek PCIe GBE Family Controller”.
Next, you should go to the “Details” tab, and in the “Property” field, select the “Equipment ID” item from the drop-down list. The first line will be the full name of the ID equipment.
Step 2. Driver installation/update
Using the identification code, you can find and download the required driver on the Internet.
To do this you need to do the following:
- Press Win+R, enter the line “devmgmt.msc”. Device Manager will launch.
- You need to go to the line related to the adapter.
- By right-clicking, go to properties and select the “Information” tab.
- Select “Equipment ID” from the drop-down list. In this case, you can see the code of the equipment used.
- You need to launch your browser and go to the manufacturer’s website. Enter the found code in the search window. After going to the desired page, download the driver to your computer.
- Launch its installation program.
Important! After this, the operating system is restarted.
View map options
If you want to find out the physical address, IPv4 parameters, gateway address and other possible information about the adapter, then follow these steps:
- While in the Network and Sharing Center, open the adapter settings.
Click the button “Change adapter settings” - This section provides a list of all physical and virtual wired and wireless adapters. Right-click on the desired one and select the “Status” value.
Open the “Status” section - In the window that opens, click on the “Details” button. Click on the “Information” button in the adapter status window
- A list will open in which you can view all the card data.
List of all network card data
Additional method
You can also find out the card parameters through the “Command Line” using the “ipconfig /all” command. “Command Prompt” can be found by going to “Start” - “Accessories” - “Command Prompt”. Running this command brings up information about all physical and virtual adapters recognized by the computer.
Run the command “ipconfig /all” to obtain information
Driver Updater from Carambis
If you have a need to search for universal programs that can function on different operating systems: I mean utilities for creating group policies, programs for cleaning the system from viruses and, of course, software for working with OS drivers - the best solution would be to use the Carambis program Driver Updater.
Thanks to Driver Updater, you can not only get the software you need, but also save big. After all, one subscription purchase allows you to connect two computers at once.
As for the work process, the utility copes well with the assigned tasks. Now you no longer need to fix errors in connected hardware components on each computer.
Setting up automatic search and installation of updates now automatically updates all devices.
But, if you need to speed up your computer, we recommend using another utility from the same manufacturer - Carambis Cleaner.
Its capabilities:
- Comprehensive optimization of the operating system;
- The ability to delete components and temporary files that are no longer used and are not needed for the operation of the OS;
- Delete all OS error reports;
- Quick registry cleaning;
- Ability to delete files that the user selects;
- Uninstall installed programs in the main program window with a few clicks.
Remember, files that have been deleted by the program cannot be restored (unlike the usual deletion procedure using built-in OS functions). Run diagnostics on your computer several times a month to keep your system in good working order.
Sources
- https://www.Terabit.Spb.ru/company/with-his-own-hands/386-installingthenetworkcard.html
- https://tehno.guru/ru/setevaya-karta-dlya-kompyutera/
- https://vpautine.ru/oshibki/adapter-podklyuchenie-po-lokalnoy-seti-otklyuchen-kak-vklyuchit
- https://mysettings.ru/ustrojstva/raznoe/kak-podklyuchit-setevuyu-kartu.html
- https://infotechnica.ru/pro-sborku-i-podklyucheniya/ustanavlivaem-setevuyu-platu/
- https://oracle-patches.com/net-cloud/3884-%D1%81%D0%BF%D0%BE%D1%81%D0%BE%D0%B1%D1%8B-%D0%BF% D0%BE%D0%B4%D0%BA%D0%BB%D1%8E%D1%87%D0%B5%D0%BD%D0%B8%D1%8F-%D1%81%D0%B5%D1 %82%D0%B5%D0%B2%D1%8B%D1%85-%D0%BA%D0%B0%D1%80%D1%82-%D0%BA-%D0%BF%D0%BA- %D0%B8-%D0%BD%D0%BE%D1%83%D1%82%D0%B1%D1%83%D0%BA%D1%83
- https://nastroyvse.ru/devices/comp/vklyuchenie-setevoj-karty.html
- https://wifiget.ru/wi-fi/ustanovka-drajvera-dlya-setevogo-adaptera
- https://pomogaemkompu.temaretik.com/1141053634652146647/drajver-dlya-setevogo-adaptera—detalnaya-instruktsiya-po-ustanovke/
METHOD 5: DriverPack
I’ll warn you right away that this method should be used only as a last resort, if you had any problems with previous options. The fact is that this is a commercial package, which in addition installs a lot of garbage and unnecessary programs on your computer. They can slow down and interfere with the operation of the system. Let's go to the site.
Scroll down and download DriverPack Offline Network. After installing the drivers, you will need to go to “Programs and Features” on your computer and uninstall everything that was installed additionally. As you can see, this method is simple, but requires additional steps.