It often happens that some sensors on a device running Android stop working altogether or do so incorrectly. For example, at the moment of a call and the device approaches the ear, the screen does not go off; when auto-brightness adjustment is turned on in the sun or indoors, the display will remain the same brightness, and there are a lot of such examples. Each such action is responsible for its own sensor (sensor), which is located in a certain part of the device. Today we will try to tell you how to calibrate touch sensors in order to avoid various problems associated with their operation.
How to calibrate (reset) the light/proximity sensor
To do this, you should use the useful program “Proximity Sensor Reset”. You can download it from our website.
- Download, install and launch the application.
- We follow the instructions. First, press several times together where the sensor is located. When pressed, the red dot will change to green. This means the sensor is working.
- Cover the location of the proximity/light sensor using your hand and click on the “forward” arrow.
- After which you should remove your hand from the sensor and press the next button.
- At this point, the calibration procedure can be considered complete. To save the settings, just tap on the checkmark in the lower right corner of the screen. The device will then reboot and all settings will be saved.
For information on how to calibrate the touchscreen, read the article - “How to calibrate the touchscreen.”
What types of sensors are there in a smartphone and why are they needed?
Modern mobile devices have a large range of sensors, and occasionally among them there are unusual options such as measuring ambient temperature and humidity, ultraviolet radiation and pulse, as happened with the Blackview BV9900 smartphone.
But the standard set includes completely different, more familiar sensors.
The most popular of them can be safely called accelerometer . Designed to measure acceleration along three coordinate axes (X - transverse, Y - longitudinal and Z - vertical) taking into account gravity. Thanks to the data received, the smartphone seems to begin to understand its position in space, and functions such as auto-rotating the screen or launching applications by shaking the smartphone appear. The accelerometer has also found use in some games and applications - thanks to it, when you tilt the smartphone, you can control anything on the screen. This control method will be a good addition to the touch screen.
The second most popular is the proximity (or proximity) sensor, which turns off the screen during phone calls if the smartphone is near the ear (or any other part of the body). And it can, on the contrary, prevent the display from turning on when the device is in your pocket. Almost all modern smartphones are equipped with a separate proximity sensor, but some devices implement a software method for turning off the screen during a conversation, which will be discussed in the article a little later.
An ambient light (light) sensor is also almost always used, with the exception of rare budget models. It measures the level of ambient light in lux, and is responsible for automatically adjusting the brightness depending on external conditions. Moreover, in some smartphones, auto-brightness cannot be turned off, and along with the backlight, the saturation of color shades can also change.
Through a magnetometer (compass), the external magnetic field is measured, or rather its strength along three axes. As you might guess, a compass is needed to determine the cardinal directions, and it also simplifies the work with navigator applications - on maps it is much faster to determine the direction of movement. Unfortunately, not all smartphones have a magnetometer anymore, but it may well be found in a budget device.
Gyroscope , which is sometimes confused with an accelerometer, actually works in tandem with it and is useful for measuring speed around the X, Y and Z axes. Without a gyroscope, it is impossible to watch 360-degree videos and use VR technology, since the smartphone will not be able to track and capture movement in three-dimensional space. Without a gyroscope you cannot play some games comfortably. The most popular example is Pokemon Go, in which users with devices that do not have a gyroscope cannot enable augmented reality mode and catch Pokemon through the camera.
A note on calibrating position sensors at home
Some acceleration sensors require additional zero calibration after mounting on the board. When I saw several sources with calibration of acceleration sensors, where the G component was taken into account simply by subtracting the value = 9.8 m/s2 from the Z axis, the idea came up to write this note.
Publication structure
- Problem
- Statement of the problem and method of solution
- How to get the points correctly?
- How to calculate the center of a ball?
- How to speed up the search for the center of the ball?
- How else to speed up the search for the center of the ball?
- About errors in measurements
- Bottom line
Problem
What is the problem - MEMS sensors, after being mounted on a board, undergo minor deformations, which affect:
- zero position;
- scaling of measured values;
- perpendicularity of the axes to each other.
And if the scaling and perpendicularity are not violated so noticeably, then the zero position is noticeably lost.
For example, if we convert the typical zero offset value for the accelerometer of the MPU9250 sensor to m/s2, then it turns out to be around 0.2 m/s2. That is, the sensor is stationary, but at the same time it shows acceleration, and after 5 seconds we get a speed of 1 m/s. On the one hand, all sensor data is always passed through some kind of filter (for example, this one). But on the other hand, why does the filter constantly compensate for this offset? After all, the sensor will show movement where there is none. This reduces the accuracy of the result. All you need to do is find the displacement value once and then, while the sensor is operating, subtract this value from its readings. The simplest solution for finding the value of the zero offset, which immediately comes to mind, is to create conditions under which the sensor must accurately indicate zero. The value recorded on the sensor is the zero offset value! So? But no - the accelerometer is constantly affected by gravity. To avoid it, you will need weightlessness (tossing will not work). The compass is affected by the Earth's magnetic field, and the gyroscope is affected by its rotation. So, if you don’t have a personal spaceship, you’ll have to come up with something.
The second solution that immediately comes to mind is to place the sensor (or rather its axes) in a position in which we know exactly what the sensor should show. The difference between what the sensor shows and what it should show - and there will be a zero offset! So? For example, we know that if the accelerometer is placed level with the horizon, then, in theory, the free fall acceleration vector will be directed exactly along the Z axis of the sensor. We know the magnitude of the acceleration vector.
However, there is a problem. It lies in the fact that we cannot accurately set the sensor axes to the level with the horizon. The fact is that the surface on which we will rest is not parallel to the printed circuit board. That, in turn, is not parallel to the site on which the sensor is located. The sensor itself is not level on its site and the axes inside the sensor are not parallel to the sensor body. An error in setting the axis relative to the horizon by 1 degree gives a projection comparable in size to the value of the zero offset itself that we want to find. In the case of a magnetometer, we additionally do not know where the magnetic field vector is directed. In theory - to the north. But in practice, the Earth’s magnetic field itself is non-uniform in strength and direction. Plus, nearby metal objects make their own adjustments.
Statement of the problem and method of solution
The task sounds like this: we need to determine the zero displacement vector using the readings of the sensor, which will always register the displacement vector + a constant vector of external influence (gravitational acceleration, rotation of the Earth, magnetic field of the Earth), the magnitude and direction of which we do not know (in the case of an accelerometer we know the value, but again the sensor scale may not be equal to 1).
Method of solution. This article proposes to determine the displacement vector as follows. We take and rotate the sensor in any way and record the sensor readings. After N measurements, the values taken from the sensor and located on the graph will represent a ball, the radius of which is the magnitude of the external influence, and the center is exactly the desired value of the zero offset.
How to get the points correctly?
To facilitate the measurement procedure itself, you can write a simple program. It should record sensor readings when the device is stationary. All we have to do is turn the device to the desired position. In order to determine a stationary state, a non-calibrated accelerometer is also suitable - we simply take the difference between the current value and the previous one. And if the noise level is higher, then we are detecting movement. My threshold is around 0.07G. If you hold with your hands, you will get more than this value. I used masking tape to secure the position. If it still doesn’t work, check if there is a refrigerator, fan or something similar nearby. How can this be in the code
// here you have variables that are global in modulus static TSumSensorsData g_sens_data[2]; static int32_t g_sens_data_sum_cnt[2]; static uint8_t g_sens_data_num; // there is some kind of interruption here when receiving data from sensors IS_INTERRUPT void on_dma_raw_ready_calibrate_step1() { SensorRawBuffer *raw = sensor_get_raw_buffer(); g_sens_data
Bottom line
The method has fairly good accuracy.
The method allows you to make do with simple improvised means (ball, can, etc.). It works fast enough. Simple code. Many sensors have special registers where you can write the found value, and the sensor itself will subtract it on the fly. Such registers are usually prefixed with "TRIM", as in the MPU9260, or "OFFSET", as in the LSM303. But the well-known LIS302DL does not have such registers. Don't forget to upvote it if you liked it. Write in the comments your methods for calibrating sensors.
What is the error in his work?
There may be several reasons for incorrect operation:
- in the Meizu Global or Mini settings the sensor is disabled;
- after the fall, the device has changed position and is not level;
- there is no seal, a small part is lost after removing the screen;
- the device is damaged or burnt out;
- the device may temporarily stop working correctly due to a failure in the firmware or bootloader;
- incorrect installation during repair.
Meizu proximity sensor calibration error may appear due to dirt on the display. It is also recommended to remove the protective accessory and try to make a call without it. In the Android settings you should check whether the element is enabled. If the situation has not changed, you can proceed to calibration.
How to calibrate the accelerometer
This sensor is one of the most useful, because it helps determine the orientation of the device in space, and many games use this sensor for control, for example, to control a car on the highway. If for some reason it does not work correctly, you should follow these steps. To perform this action, you will need GPS Status & Toolbox.
- Download, install and launch the application.
- Now you need to place the smartphone/tablet on a flat surface in order to further calibrate the sensor as correctly as possible. The slope values should be set to zero, as shown in the screenshot.
- Click on the upper left corner and get to the main menu, where you need to select a section "Accelerometer calibration"
. - Make sure that the device is lying on a perfectly flat surface and select the item "Calibrate"
. - Almost instantly, the program will perform the necessary actions, and the message “Accelerometer calibrated”
.
Possible problems
When using your smartphone, you may encounter various types of problems related to the G-Sensor. For example, many complain that their G-Sensror simply does not work on Android, that is, the device does not perform auto-rotation, and also does not determine the number of steps and speed of movement. In such a situation, you need to act like this:
- Make sure your device actually has this sensor. To do this, use the “Sensor” application.
- Check to see if the auto-rotate screen feature has been forcibly disabled.
- If you use a smartphone with custom firmware, then install the official version of the shell.
If we are talking about a partial malfunction of the sensor, when the position of the smartphone is determined incorrectly, then the problem can be solved by calibrating the sensor. If none of the recommendations helped you, then it is possible that the G-Sensor has failed and will have to be replaced by contacting a service center.
Sensor location and functional features
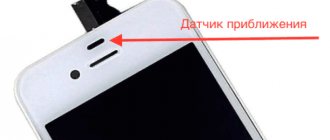
The proximity sensor is located on the top plate of the front side of the device. Usually there is a speaker, camera, proximity and lighting sensors. In the latest models, these sensors are combined into one.
How to find out where the sensor is located? Call a friend and place your finger close to the sensor (example of location in the screenshot below). When the screen goes dark, congratulations, it’s a proximity sensor.
Proximity sensor location
The main function of this sensor is to react to an object approaching the phone screen. This technology was invented to automatically lock the display during phone calls, Viber or WhatsApp. The next time you make a call, notice how the screen goes dark when you bring the device to your ear and then lights up when the call ends.
The sensor itself sends an infrared light signal to determine how far away an object is and blocks it when it approaches.
Proximity sensor device
With this approach we get two big advantages:
- The screen is blocked from accidental ear presses, which prevents accidental termination of a conversation, turning on the speakerphone, you can also accidentally put the call on hold, etc.;
- The second point is saving smartphone battery power. The phone's display is the main source of power consumption; when the screen is on, consumption increases and the battery drains quickly. When making calls with the screen off, the battery lasts longer;