“I already have an older version of iTunes downloaded, but my iPhone 4 won't connect to it because it's not newer. Is there a way to get music files from my computer to my iPhone without iTunes? "What's the best alternative to iTunes to transfer music from my computer to iPhone seamlessly?"
Can't transfer music from computer to iPhone with old version of iTunes? If you don't want to add music to iPhone using iTunes, you can find other solutions in this article. We will introduce you 3 easy ways to help you transfer music to your iPhone without iTunes successfully. You can find the answers here.
- Part 1. Best Solution to Transfer Music to iPhone X/8/7/6/5/4 without iTunes
- Part 2. Available cloud services to install MP3 on iPhone without iTunes
- Part 3. Streaming Services to Sync Music on iPhone without iTunes
What formats does iPhone and iTunes understand?
iTunes and Apple mobile devices can accept the following types of music files:
- MP3 (from 16 to 320 Kbps);
- MP3 VBR;
- AIFF;
- AAC Protected (from iTunes Store);
- Audible (2,3,4 format);
- ALAC (Apple Lossless);
- WAV.
As you may have noticed, the presented list of supported formats does not include the common WMA type - Windows Media Audio. The system in iPhone smartphones and the iTunes utility automatically converts this format to AAC with a bitrate of 128 kbps. It is also worth noting that these settings are set by default.
Qualified specialists do not recommend changing these settings if the user has little understanding of the iPhone. Also, if such parameters do not suit the owner of the mobile device, he can seek help from a technician at any service center or mobile salon.
If a downloaded music file cannot be played in iTunes, this may indicate that the type of this file does not match the utility parameters. You can solve the problem by converting the file extension to one of the above types.
How to use iPhone or iPad as a flash drive
Step 1: Download and install the latest version of iFunBox .
Step 2. Open the program and connect your iPhone or iPad to your computer. In order for iFunBox to see your device, iTunes must be installed on your computer.
Step 3. The device will be detected in the program and you can transfer absolutely any files to it using your iPhone or iPad as a flash drive.
Step 4. Drop the files that need to be “transferred” to the “ Shared Storage ” folder.
A very convenient solution that can help out at the most crucial moment. For example, you don’t have a flash drive at hand, but you need to upload an important file weighing several gigabytes. You can't send something like this by mail. An iPhone or iPad coupled with iFunBox copes with this task perfectly - the files are not damaged and are transferred safe and sound.
Users who have jailbroken their devices are luckier. Thanks to a huge selection of tweaks from Cydia for working with the file system, they can unpack files using special managers, download files directly from Safari and much more. A striking example of such a tweak is the iFile file manager. You can find other useful tweaks for iPhone, iPad and iPod touch with jailbreak installed by following this link.
Please rate this article 5 stars if you like this topic. Follow us on VKontakte, Instagram, Facebook, Twitter, Viber.
Sometimes you urgently need to transfer files from your computer to your phone: programs, books, movies, music, photos, presentations, TV shows, etc. Even if this is personal data - office Word and Excel documents, home photos and videos, contact lists, history of correspondence by mail and instant messengers - the task is still the same: transfer files from your computer to your phone in order to have them at hand. There are several ways to do this, all you have to do is choose the simplest and most accessible one for your situation.
Transferring music via iTunes
The presented option is considered the fastest way to transfer music to an iPhone from a personal computer. If iTunes is not yet installed on your computer, you will need to install it from the official Apple website
After the presented utility is installed, you must complete the following steps:
- Connect your mobile device to the computer, after which the following message will appear on the screen: “Trust this computer”, answer in the affirmative;
- Then open the utility. If the system requires updating, click on the appropriate button, and then restart your personal computer;
- Now you need to click on your iPhone icon and select its model. Then the system will automatically redirect you to the iPhone page;
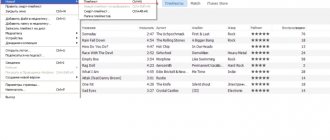
- Click on the "File" button, which is located in the upper left corner of the page. A new menu should open in which you will need to click on the “Add to Library” button;
- Select the folder with the added music and click on the “Select folder” button. After this, the process of importing new music files into the mobile device library will begin;
- At the end, you need to open the “Music” section and check the box next to the “Synchronize music” item, as well as next to the “Entire music library” item. Then click on the “Apply” button.
It is worth noting that the presented method has both disadvantages and advantages.
Advantages and disadvantages
When transferring music, the quality of the files is not lost.
All files are saved.
The user can import an unlimited number of files.
The utility's interface is not the most convenient.
The user can group files only by albums.
The utility does not track changes in music files.
Follow the link to watch a video that shows how to do this:
Part 1: Transfer Files from PC to iPad Using iPad Transfer Tool
A good way to transfer files to your iPad is using iTunes, but we'll provide an easier solution here, and perhaps even better than what you used in the previous steps! Follow these few steps on how to transfer files from computer to iPad with dr.fone – Transfer (iOS) instead of iTunes.
First of all, download dr.fone – Transfer (iOS) in your computer to transfer files from computer to iPad. Then, follow us to check the simple steps below. Here, just take the Windows version as an example.
dr.fone – transfer (IOS)
Transfer Music, Photos, Videos to iPod/iPhone/iPad without iTunes
- Transfer, manage, export/import music, photos, videos, contacts, SMS, apps, etc.
- Backup music, photos, videos, contacts, SMS, apps, etc. to your computer and restore them easily.
- Transfer music, photos, videos, contacts, messages, etc. from one smartphone to another.
- Transfer media files between iOS and iTunes devices.
- Fully compatible with iOS 7, iOS 8, iOS 9, iOS 10, iOS 11 and IPOD.
Step 1. Launch iPad Transfer Program
Download and install dr.fone on your computer. Launch it and select Transfer. Now connect your iPad to your computer using a USB cable, and the software will automatically recognize your iPad.
Step 2. Transfer files from PC to iPad
Here I would like to share you how to transfer music, videos, playlist, photos and contacts to iPad one by one.
Select Music category at the top of the main interface, and you will see different sections of audio files in the left sidebar along with content on the right side. Now click the "Add button", and select "Add file or Add folder" to add music files from your computer to iPad. If the music files are not compatible with iPad, the program will help you convert them.
Note: This PC to iPad transfer platform is fully compatible with iPad mini, iPad with Retina display, New iPad, iPad 2 and iPad Pro.
It's the same to import videos to iPad. Click Videos > Movies or TV Shows or Music Videos or Home Videos > Add.
You can also create a new playlist on your iPad directly using dr.fone – Transfer (IOS). You only need to right-click on one playlist, and select "New List" to create a new playlist on your computer.
If you are going to copy your favorite photos from your computer to your iPad, you should click the "Photos" tab. Your Camera Roll and Photo Library will appear in the left sidebar. Click the Add button and select Add File or Add Folder to add music files from your computer.
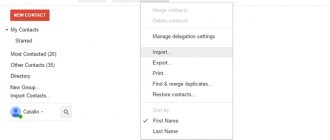
If you prefer to use your iPad to do your work, you can transfer your contacts to it. To import contacts, you just need to click the "Information" button and then the "Contacts" tab. Click the Import button in the window and you will see several options: from vCard file, from CSV file, from Windows and Outlook Address Book, from 2010/2013/2016.
Note: Currently, the Mac version does not support transferring contacts from PC to iPad.
This is a tutorial on how to transfer files from computer to iPad. Now, just download this Computer to iPad Transfer to try it out!
Key Features of dr.fone – Transfer (IOS)
- Directly transfer music, videos, contacts and photos between iOS and Android devices.
- Transfer audio and video from CD reader to iTunes and PC.
- Import and convert music and video to CD reading formats.
- Take any photos or videos from Apple devices or PC in GIF image format
- Remove photos/videos with one-click package.
- De-duplicate duplicate contacts
- Selectively transfer exclusive files
- Fix and optimize ID3 tags, covers, song information
- Export and backup text messages, MMS and IM messages
- Import and export contacts from primary address books
- Transfer music, photos without iTunes restrictions
- Perfectly backup/restore iTunes library.
- Compatible with all iOS devices, including iPhone 7 (Plus), iPad Pro, iPad Air, iPad mini, etc.
- Fully compatible with iOS 11
Using Google Drive
In this case, you will need to follow the instructions below:
- First, open Google Drive on your personal computer and click on the “Create” button;
- A menu should open in which you will need to click on the “Upload files” line, after which you must select the files required to transfer;
- Click on the “Open” button, which is located in the lower right corner of the page. The music download process will then begin;
- After the data is transferred to Google Drive on your personal computer, you will need to launch the same application on your mobile device;
- Now select the necessary music files and click on the “Make available online” button.
After the user completes the steps described above, he will be able to listen to downloaded music through the Google Drive application, even without an Internet connection.
Advantages and disadvantages
In case certain files have been deleted, the user can restore them.
Built-in history of file changes.
If desired, the user can share the music with friends.
You cannot synchronize folders with music outside the program.
The program is inconvenient to use on a mobile device.
It is possible that a failure may occur during the file download process.
Part 6: Transfer Files from PC to iPad via Email
Using email to transfer files is not as demanding as you send email to yourself. In the following steps we will show you how to email files from one account to another. Additionally, if you do not have two accounts, you must create one additional one.
Step 1. Depending on the program you are using, the interface may be different, but they will all have an "Attach" button. Find and select it in order to select the files you want to transfer. A slight disadvantage of this procedure is that they are limited to max. 30MB.
Step 2. Send a message to yourself
Step 3. Open the message and simply download the attached files.
Once you have read all the methods that we have presented to you to transfer files to your iPad from your PC or laptop, it is up to you to choose the best solution to your need. If you have to transfer large files or a large number of them, Google Drive is probably the best solution, as it offers 15GB of space. If you have one small file that needs to be transferred, email is the best option. However, by connecting iPad to PC using iPad Transfer program to transfer files, we recommend dr.fone – Transfer (iOS) as it is proven to be the best in this field. It offers various features and can surely meet all the needs you have.
Via iTools
The presented utility is an alternative to the iTunes application and also allows you to send music from a personal computer to an iPhone. Moreover, iTools allows you to import absolutely any content to a mobile device both through personal computers with the Windows operating system and through Mac OS X.
Music transferred from a personal computer to an iPhone will be immediately available on the mobile device in the Music application.
Music is transferred as follows:
- To begin, connect your mobile device to your personal computer using a wire;
- Then run the presented utility on your personal computer and go to the tab called “Music”. Also, click on the “Import” button;
- Then select the required music files and click on the “Open” button.
Advantages and disadvantages
You can use this utility completely free of charge.
Music loads quite quickly due to the lack of synchronization.
The music will be immediately available on your smartphone in the Music program.
There is no Russian language in the program.
The user cannot edit ID3 signatures.
Part 3. Streaming Services to Sync Music on iPhone without iTunes
You can also sync music from your computer to iPhone using streaming programs such as Spotify, SoundCloud, YouTube Red, Deezer, Microsoft Groove, Pandora, etc. Since music streaming services work the same way, we will take Spotify as an example. to show you how to sync music to iPhone.
As the best music streaming service, Spotify contains a variety of tracks. You can listen to any songs at any time.
VLC
Using this service you can also transfer music. This is done as follows:
- Download the VLC for Mobile utility on your iPhone. Then launch it and activate the option to transfer files via WI-FI network in the “Access via WI-FI” section, which is located in the upper left corner;
- Notice the network address that appears. You must open the same link on your personal computer through any browser;
- Then add music to the control window of this utility via your computer by clicking on the plus button. After this, the system will automatically start synchronization, and you will be able to listen to music through VLC on your iPhone.
It is worth noting that the files will be displayed in the utility. Moreover, the user will be able to listen to music even without an Internet connection.
Advantages and disadvantages
You can fix damaged files.
Clear interface.
The utility may freeze or even crash when transferring music.
Hotkeys don't always work.
How to transfer files via plug-in drives
Through the standard Files program, users can access data on external drives. To do this, just connect the desired device and select “Places” on the display.
To connect to the file server you will need:
- Go to the “Review” section and click on the three dots.
- Make a connection to the server and enter the SMB address.
- Click the connection button, and you can find out the server name in the “Overview” section on the “General” tab.
AcePlayer
In this case, you will first need to connect your iPhone, on which the AcePlayer utility was previously installed, to your personal computer and open the player. You also need to allow your computer to access files on your smartphone.
Then launch iTunes. In the utility window that opens, open the “Programs” section and go to the “Shared Files” tab. Next, you need to click on the “Add files” button and specify the path to the music. After completing these steps, the player will download the selected music files to the memory of the mobile device.
It is worth noting that in this case the user will not need to convert files on the IOS system, since the program does this automatically.
Advantages and disadvantages
Has hardware data acceleration
Clear interface
Built-in sound normalizer.
The utility may not work on weak devices.
Lots of annoying advertising.
Dropbox app
This program is the most common cloud storage. And to transfer music, the user must install it on a mobile device. Then you will need to follow the instructions below:
- Connect your iPhone to your personal computer and allow access to files, and then open the folder called “Dropbox”;
- Transfer all the necessary music files, after which the data will automatically synchronize;
- Launch the utility on your smartphone and see if all the music has been added to it. It is worth noting that the user will not be able to listen to music without an Internet connection.
If you want to listen to music without the Internet, you will need to import files from the utility using third-party programs. Any music players can help with this.
Advantages and disadvantages
You can recover deleted data.
Free version available.
You can search for files.
There is no translation into Russian.
Small amount of available space when using a free subscription.
Part 4: Transfer Files from PC to iPad with Dropbox
For those who use Dropbox to transfer files, the following contents should be taken care of. We'll assume you already have an account, and if you don't, you should create one. Here you are limited to 2GB of space.
Step 1: Install Dropbox on your computer or laptop
Step 2: If you want to transfer files, simply drag and drop them into your Dropbox folder
Step 3. The next thing you should do is install the Dropbox app on your iPad. When you have finished downloading, log into your account.
Step 4: Open the file you want to use.
Via eMusic
Sending music is carried out as follows:
- Register or log in to the eMusic website;
- Then click on the “Upload Music” item, after which a window will open in which you should add your favorite tracks;
- Then install the same utility on your mobile device and log in to it.
The user will be able to listen to music both through the provided service and by exporting files to a third-party application from eMusic.
Advantages and disadvantages
You can listen to audio files without an Internet connection.
Convenient program interface.
There is a recommendations section.
The utility only supports MP3 format.
Via Evermusic
This utility can work with many well-known cloud storage services. In this case, the user simply gets access to the files stored in the storage.
To transfer audio files from a personal computer to a mobile device, you must follow the steps below:
- Open any cloud storage that supports the Evermusic program on your personal computer and save the music folder to it;
- Install this application on your mobile device;
- Open the player menu and connect to it the disk to which you previously transferred the files;
- At the end, indicate in the application the music that you want to save in the memory of your mobile device.
It is worth noting that the free version displays a small amount of advertising.
Advantages and disadvantages
You can save files from cloud storage to your mobile device.
The utility supports many different formats.
User-friendly interface.
Ads are displayed, which you can get rid of only after purchasing the extended version.
In offline mode, the system may crash.
There may be glitches during the file download process.
Documents program
Like the previous utility, this service is capable of downloading information to the phone from a cloud platform. Documents supports such storages as Google Drive, Dropbox, OneDrive, Box and Yandex.Disk.
The procedure for downloading music files from a personal computer to an iPhone is as follows:
- From your computer browser you need to go to any of the above drives;
- Audio files are copied to the selected storage;
- Documents is downloaded to the mobile device;
- You will need to go into the program and connect a supported drive.
After access has been gained, you need to select the necessary tracks and save them to the phone’s memory.
Advantages and disadvantages of the Documents program.
| Advantages | Flaws |
| Allows you to save data from disk to phone | No sorting by albums or artists |
| Many supported formats - MP3, FLAC, AIFF, WAV, AMR, M4A and many others | Failures may occur when loading data from some drives |
| The interface is simple and easy to understand | |
| The program is completely free and does not show ads |
This program can work not only with music files, but also with various documents or videos.
Rate this article